Showing posts with label polar. Show all posts

Thursday, December 22, 2011

Gifts From the "Art" Class

Last week I finished a mini course with students in 2nd through 4th grade where they create eight art-inspired gifts for giving. The course was fun to prepare for--I had to choose projects the children would love to make that resulted in gifts they would be proud to give! I think the class was very successful. 

The projects we created were:

Stained Glass Plate: based on rose windows of Gothic cathedrals, this project is pretty much a black snowflake-like shape decoupaged onto a clear glass plate with tissue paper squares added for color. These are striking displayed on a plate rack where light can shine from behind. We used Mod Podge to attach both the "snowflakes" and the tissue paper squares to the back of clear glass plates.
Faux stained glass plate

Watercolor coasters: The children used crayons and watercolors to create four pieces of art (Christmas images and the four seasons were popular). These paintings were then cropped and inserted into a glass coaster set.
One student's set of coasters with a holiday theme.

Mexican Folk Art-Inspired Ornaments: The original post for this can be found here.

Pillow Pals: The children drew an animal, doll or critter onto white cotton using permanent marker and crayon. The image was heat set and stuffed with fiberfil. The result was a unique stuffed animal for a younger sibling.
Coloring in a turtle Pillow Pal. We used black Sharpies to outline and regular Crayola crayons to color in the images. When done, heat set using a warm, dry iron and a pressing cloth.


Framed Silhouette: I took the children's profile pictures in the first class, printed them out, cut them out with scissors and then painted the shapes. The children mounted these on white paper for contrast and then on a larger piece of colored card stock and framed the piece. Mom is sure to love those! I'll have a more detailed post about this in the future.

Mosaic candles: We used the technique from the snowglobe mosaics post to create little mosaics (7x7 squares). The children could do a holiday image such as a tree or snowflake, or the initial of the gift recipient. The resulting mosaic was decoupaged onto a ready-made glass candle using Mod Podge.

Peg game: We used the process from an earlier post for a Valentine's Day peg game, but I changed the image to a tree. Dad will love that game!

Hand woven fleece scarf: We used a technique similar to one that I saw in Family Fun magazine, but substituted different types of yarn for a more artistic look and feel. The resulting scarf is sophisticated, and a great intro to weaving. Plus it used up some of the yarn I had in my stash!

Lots of great projects! I have had wonderful feedback from the parents and students! I think this course increased the students' confidence in being able to create a quality finished art piece as well as showing them that the best gifts really do come from the heart. Have a wonderful New Year!

Thursday, December 8, 2011

Inuit Soap Carvings

I have been wanting to try this project for a long time! In my "Art Around the World" class we have a little extra time, so I thought it would be the perfect class to try an introduction to carving using soap and simple tools. I originally saw this project in the book "A Survival Kit for the Elementary/Middle School Art Teacher, " by Helen Hume. This is a wonderful book that has a number of great projects. I like how her projects have a "Teacher Page" with background info and alternative lesson plans as well as a "Student Page" that you could photocopy and hand to students to refer to as they work their way through the project.
Polar Bear, looking up.

I started class by flipping through the book "The Inuit: Ivory Carvers of the Far North," by Rachel A. Koestler-Grack. This book is full of great information and images that aided in my giving a brief background on the Inuit people and their beautiful carvings.

I then gave each student a copy of the Inuit Bear Carving Lesson plan from Dick Blick Art Supplies. That lesson is intended to be done by carving a foam block, but the diagrams easily translate to a bar of soap. The handout shows, step-by-step, how the child should carve the block to create a lovely 3D representation of a bear.

I really do encourage you to try this project with your child. It's wonderful to see them working and planning as they carve the soap away! Enjoy!

Supplies Needed:

  • Bar of soap (I used plain Ivory)
  • Newspaper (for working on and collecting soap chips)
  • Skewer or toothpick
  • Potato peeler, plastic knife and spoon
  • Plastic kitchen scrubber
  • Handout from www.dickblick.com (optional, but helpful)
Directions:

If you are creating a polar bear, you can follow the handout from Dick Blick. Some of my students decided to create turtles since I had brought in a carving of a turtle. I had them work from the figure and I walked them through carving the piece. 

I think older students could design their own carvings, but younger students or first-timers may have more success if they work from a plan. Or, if your student is comfortable "winging it," let them go for it and see what animal emerges from their carving!

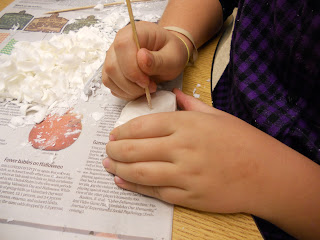
Carving the rough shape of the turtle with a vegetable peeler.

Adding the final details with the point of a skewer.


Another Polar Bear!

And a cute little turtle!

Related Posts Plugin for WordPress, Blogger...