Showing posts with label hand. Show all posts

Tuesday, April 19, 2016

Kindergarten Projects From My Long-Term Sub Gig

Hello!

So, it's been a busy Spring for me since I finished student teacherin' in December--I subbed a bit in preschool, kindergarten, elementary and high school and then landed a wonderful 6 1/2 weeks long-term sub gig at an elementary school nearby teaching art to grades K-5. What a blast I had--the students and staff at Fairgrounds rock and I was sad to go (it's hard to stop doing something you love when your next big thing isn't settled upon yet). Since then, I haven't blogged much because I've been daily subbing and working on my dang art teacher portfolio (more on that in a future post or ten). ANYHOW....I thought I'd break out some of the projects that appear in the collage here so that you had a bit more info on them...ENJOY!!

For more info on this awesome project--READ ON!
Kindergarten Art Projects From Fairgrounds Elementary School:

Week 1: Lots of Hearts (1 day)
A getting-to-know-you project.
Inspired by Valentine’s Day, students used chalk pastels to trace the outline of a heart shape (line) and then smudge the edges with cotton balls. Once the heart tracer is removed a glowing heart (shape) remains. Students were asked to repeat the procedure 5-6 times using whatever colors they wished.
 
Sorry, all I have of this project is my teacher example.
The finished pieces were WAY better!
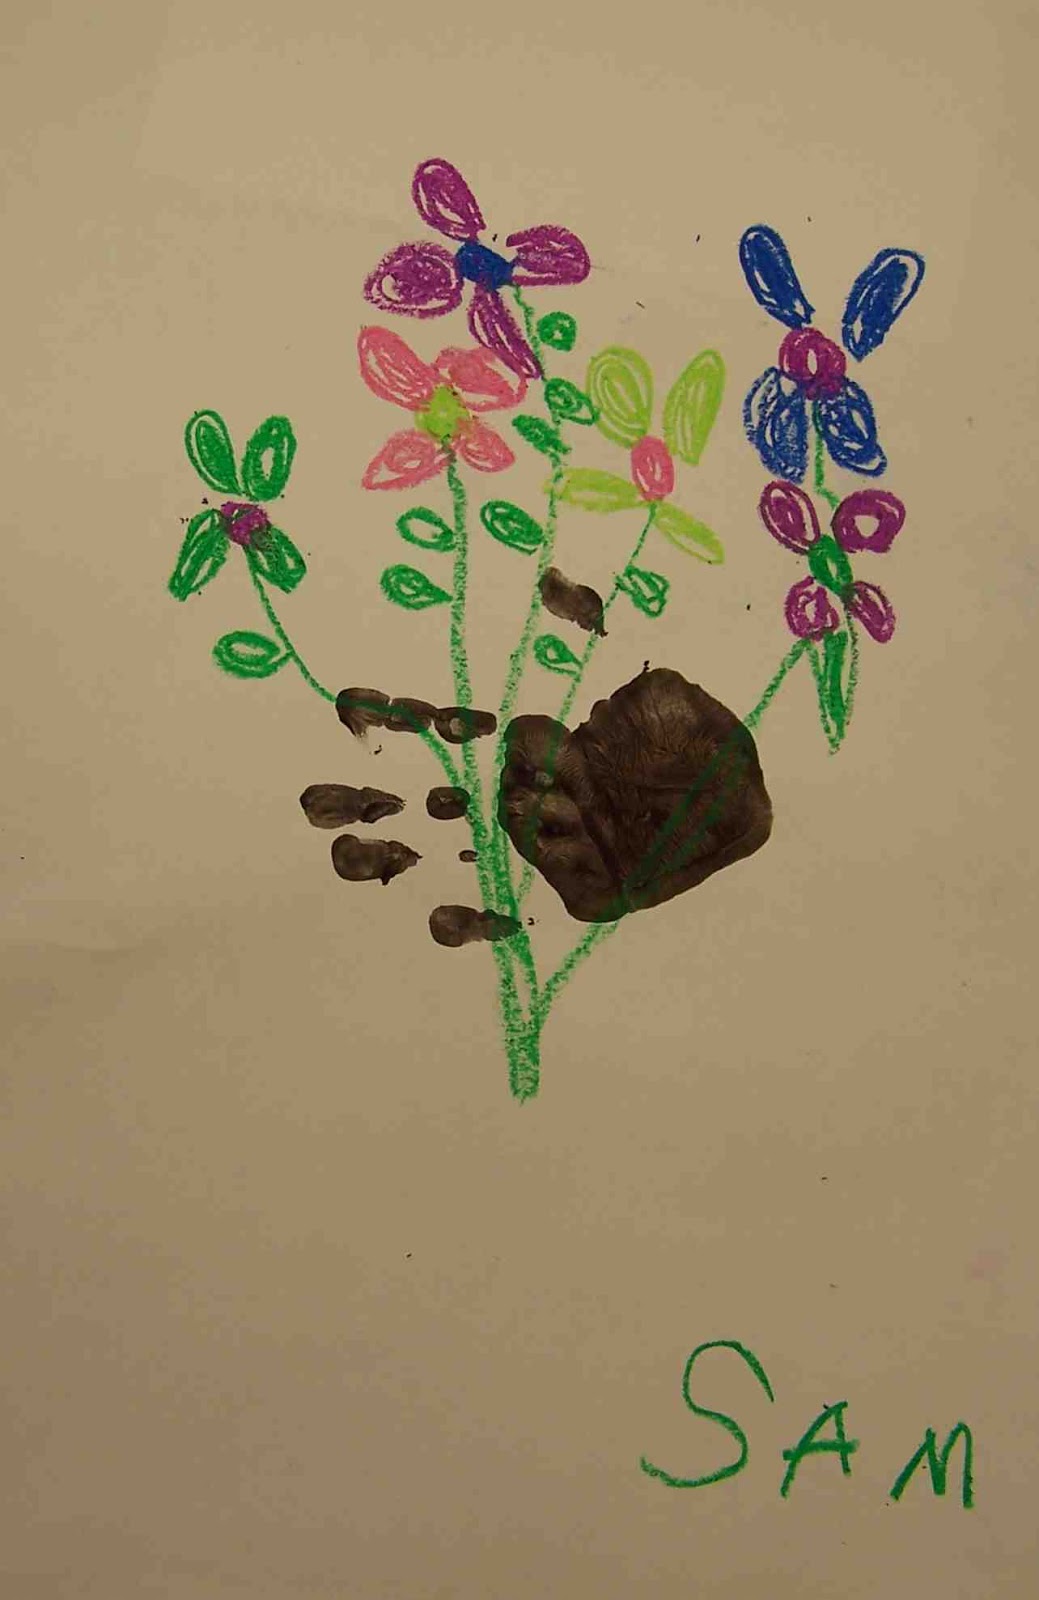
Week 2: Picasso Bouquets (1 day) See post here
Inspired by Pablo Picasso’s drawing: Hands With Bouquet
Students looked at and talked about the drawing “Hands With Bouquet” by  Pablo Picasso. Students then used oil pastels to create a similar bouquet of flowers using circles and ovals and vertical lines. When they were done, I painted the palm of their hand with black paint and they stamped their handprint onto the work to look as though they were holding the bouquet.


Week 3 and 4: Mondrian Mixed Media Collages (2 days) From Art Room 104
Inspired by the work of Piet Mondrian
Students looked at the work of Mondrian and discussed how his work was similar to (and different from) the work of Picasso. Students then used scissors to cut squares and rectangles from paper to create a collage. On day two of the project, students added horizontal and vertical lines to the work using scraps of mat board and black tempera paint.
 
This is the info I put with my displays.
Many people comment about how helpful the info is.

A student example.

The finished display--there's one class in here, I think.


Inspired by the 19th and 20th Century Quilts from the Picturing America Series (Particularly the “Crazy Quilt” Image)
We reviewed the shapes we had been using the past few weeks and the art method they had used recently (collage). Students then used scissors, glue and a variety of papers to create individual quilt squares that had whatever colors and shapes they wanted. On day 2, the teacher used a hole punch to add holes to each quilt square (about 8 per square) and students used yarn to sew their quilt square. Individual student work was mounted together to create a whole-class composition displayed in the individual Kindergarten classrooms.

Each Kindergarten class made their own quilt for their classroom.

An example of a quilt square (they are 6" square).

I needed one more square and decided to create this piece--
the teachers LOVED the quote.
Week 7: Kandinsky group mural See post here
Inspired by Kandinsky’s color studies

Students used paint to create a composition of concentric rings based on the color studies by Kandinsky. Individual student work was displayed with other grade levels to create a multi-age group mural for the hallway.

A close-up of the individual 6" squares all glued together
onto the larger roll of paper using Elmer's glue (a dot in each corner).

The finished mural. Beautiful!!

Thursday, November 13, 2014

Love printmaking? Try these lessons!

I've rediscovered printmaking over the last month or so. I love printmaking because it is easy and can be done on the cheap. Well, sort of. The process is always so fun for the students and the results are magical--I love to watch them "ooh" and "aah" over their prints!

Well, here's a round-up of some past printmaking lessons from my site that may have you rocking and rolling with your students!

Matching Mittens with Found Object "Snow" Prints

USING FOAM TRAYS:
Reduction Prints (Using Styrofoam trays and found objects)
Andy Warhol Self Portraits (Using Styrofoam trays and a pencil to "carve" an image)
Reduction Print Selfie (Using Styrofoam tray and gradually removing portions of it between inkings)

USING CRAFT FOAM:
Haunted Houses (Using sticky-backed foam shapes)
Fall Banner (Using foam shapes to make stamps--can be changed for any theme or season)

FOUND OBJECTS AS STAMPS:
Create Your Own Stamps (Using found objects and wine corks to make your own stamps)
Matching Mittens and Snowflakes (Cut paper mittens with found object "snow")
Focal Point Fruit Prints (Using an apple or pear to print--exploring focal point too).
Leaf Prints (This is mine, it's from Deep Space Sparkle, but it is my go-to early finisher activity in the fall).
Modern Day Adinkra Cloth (Using stamped symbols on sections of card stock that are joined together into one "cloth")
Spring Forsythia Still Life (Using pieces of sponge to make a lovely arrangement of forsythia blossoms)
Not-So-Scary Dancing Skeletons (Uses doggy bone treats for unique stamps)

USING YOUR HANDS:
Andy Warhol Hand Prints (Seriously one of my most popular posts, but not mine--from Artolazzi--so easy!).

And one of my all-time popular posts--
Quick Andy Warhol Hand Prints

Friday, May 10, 2013

Graffiti Names...ooh, Edgy!

Here in southern NH we aren't exactly urban or edgy. Our town is more "quaint" and "quiet" and is best known for its Colonial feel. Graffiti can be seen here and there, but it is looked upon as vandalism. Probably for a couple of reasons: 1. It appears in inappropriate places such as on street signs and, 2. For the most part, it isn't very good...Sorry!

I am not crazy about the swear words or anatomy lessons that sometimes appear on the underpasses. It's always lovely to have your emerging reader sounding out four letter words he has seen as you make the trip to Grandma's house! That's not the kind of graffiti I'm talking about. I'm talking about the artform in which artists use spray paint to create images and lettering in a colorful, concise way in a public setting. This is a type of artwork I cannot do (at least in spray paint), but I highly admire. The colors are out-of-this world! The way the artists combine text and image is amazing and creative. So, I needed to do this with my kiddos and see what they could come up with.

This student is in 3rd grade.
I did this project with students in 2nd-4th grade and then again with 5th-8th graders and both groups of students took to the project easily. I love the creative results and would highly recommend this project! A site that I found VERY helpful when planning the project was www.graffitidiplomacy.com--lots of visuals and handouts and how-to's. Another great take on this project can be seen at Art Room With a View. Danielle's 7th graders created graffiti tags but then went above and beyond with the backgrounds--you have to go check those out!

Graffiti Names

Supplies Needed:
  • Lettering Sheets (examples of the alphabet in different styles of graffiti--bubble, tag, etc.)
  • White copy paper
  • Pencils with erasers
  • Sharpies (I had fine point and ultra fine on hand)
  • Colored pencils
  • Scissors
  • Glue sticks
  • Print-out of a photo of a brick wall
Directions:

1. Choose a word, nickname, or your name to use for your tag and sketch out a few ideas for your tag. 

2. Choose a font for your tag. Are you going to use bubble letters or a more edgy, linear font? Draw or trace the letters for your tag on the white copy paper.

3. Thicken the letters in your tag, if desired, and then retrace your letters so that they touch one another.

4. Make your letters 3D, if desired.

5. Add "bits" such as shiny highlights on the letters, a crown, hearts, bubbles, or arrows.

6. Add a "forcefield," or two to hold it all together. The forcefield is the cloud around the letters.

7. Ink pencil lines with Sharpie. Erase any extra pencil lines.

8. Add color with colored pencils. Colors can be bright, you can use complementary color combinations for "pop," the letters should be different than the forcefield for readability, use effects such as gradients, textures, patterns, etc. 

9. Cut out the finished tag. Glue to the printout of the brick wall with a glue stick. Re-outline the tag with Sharpie, if necessary.

Have fun with this artform and make it yours! Don't worry if your first try isn't exactly perfect--just try again! Try using your tag as your homescreen on your phone or iPod or putting it in a tee-shirt. So cool!

This student is in 5th grade. 
This student is in 5th grade.
This student is in 2nd grade.

This student is in 7th grade.
This student is in 5th grade.
This student is in 3rd grade.

This student is in 2nd grade.

This student is in 2nd grade.
This student is in 5th grade.

Friday, April 19, 2013

Drawing American Sign Language Hands

My private art lessons are very organic-what we study ebbs and flows with what I think the student would be interested in or in an area they may need to develop further. One day, my student and her mom were discussing a piece my student had done (at home) and there was some, ahem, disagreement as to how readable the hand was in the drawing. After a little more discussion, my student admitted that, although she felt she drew hands perfectly fine, they were "hard" and she "hated drawing them." Hmmmm...well, never one to shy away from a challenge, I tried to think of a way we could practice drawing hands in a way that seemed fun. 


This spells "ART."

So, here's what we did:

The first week, we spent practicing drawing hands in different positions. I found this great tutorial online at Neon Dragon Art that I thought would work well to illustrate the anatomy of the hand as well as seeing a hand as a 3D form from the beginning. We worked our way through the different variations Jessica "Neon Dragon" Peffer presented, using our own hands as "models." It is quite difficult to draw something as complex as the human hand--especially when you don't want to! But we kept trying and trying. We had a couple shaky starts and we needed to keep remembering to look at our 3D models--our own hand, and draw what we saw, not what we thought was there.

Once my student was confident drawing hands in a variety of positions, I brought out the American Sign Language chart that shows the letters of the alphabet using photos of hands. We practiced the letters and she chose a word she wanted illustrate. At first she chose "CREATE" but the thought of drawing 5 more hands (one for each letter of the word) proved too much so she settled on "ART" instead.

She did a great job drawing the hands in pencil and then outlining them in Sharpie. For the background, she chose to do a Jackson Pollock-inspired drippy painting using watercolors and temperas that she drizzles and splattered all over. The colors were custom-mixed--she had a plan--they are her favorite colors.

Once everything was done, she brought the pieces together (making sure the hands were in the correct order). She was very happy with her piece (as am I!) and *hopefully* she'd say it isn't too bad drawing hands after all.

Wednesday, April 10, 2013

Kinder Picasso "Hand With Bouquet"

I've been visiting the Kinders at a local school (Clark Elementary in Amherst, NH) once a month doing an art enrichment program. I usually tie in a book or music or fine art (and sometimes all three) to make the experience a rich and multi-layered one. I have absolutely LOVED working with the children--Kinders are so cool. They are up for anything and so smart!


We've done some fall- and winter-themed art, but Spring is here! So I thought we'd create a piece that celebrates warm weather, flowers and color! I'm not a huge Picasso fan, but when I saw the piece "Hand With Bouquet" I immediately thought the children would love it. I experimented a bit with using cut paper and paper muffin liners to make a daffodil bouquet (which came out fine), but then I saw this version on the blog "Splish, Splash, Splatter." Rebecca uses the child's hand print as the hand holding the bouquet--WOW! Now, I'm a mom and anything that has a handprint in it instantly gets a place in my heart (and on the wall). It was a no-brainer--this was gonna happen!

But, I have to say, I was a bit worried about handprints and Kinders and only having a half hour per session...but it went great! We have a small sink in the art room, so I brought in two plastic bins, filled them with water, and had the children wash their hands in those. This allowed all 18 kids (or so) to wash their hands in about 5-7 minutes. I had a grown-up helper at the bins keeping an eye on things-I'm sure that helped!

I am so thrilled with the results and so were the kiddos! This lesson was fun and inexpensive and has a great "WOW" factor. It would be lovely for Mother's Day, too. I particularly enjoyed painting my own hand and then giving each student a high five before they printed their hand on the paper (that allowed me to check that they had covered their entire hand in paint and make sure they placed their hand properly on the page). I think the children thought I was silly-but it was so fun!

Here's how we did these colorful pieces:

Kinder Picasso "Hand With Bouquet"

Supplies Needed:

  • One 12" x 18" piece of white construction paper
  • Paintbrush
  • Paper plate for palette
  • Black tempera
  • Oil pastels/cray pas (assorted colors, but you'll definitely need green)
Directions:

1. Paint your palm, thumb and fingers with the paintbrush and black tempera paint. Make sure you get a nice coat on your hand and go all the way to the tips of your fingers. Press your hand onto the white paper, leaving a handprint. The handprint should be perpendicular to the page. Now you can wash your hand.

2. Look at the picture of Picasso's "Hand With Bouquet." How does he make the flowers? What shapes does he use? Turn your paper so the thumb is up. Check out the examples to see what I mean. This gives a more realistic idea of the hand "holding" the flowers.
Our inspiration:
"Hand With Bouquet" by Pablo Picasso
I instructed the children to use the craypas to draw a large circle for the center of their flower and then color it in. Then add petals going around the center. Use whatever colors you want, but make 4-5 flowers on the area of the paper above the hand.

3. Then add the stems. They should go from each flower, to the hand, and out the other side. Add a couple of leaves to make your bouquet look realistic.

4. Don't forget to sign your work like Picasso, using a craypas.

Welcome spring!


Wednesday, October 10, 2012

More Illuminated Names

My after school art class is focusing on Medieval Art and this week we learned about illuminated manuscripts and hand lettering. The original post on my blog appears here. This was a nice way for the children to get to know one another and create a personalized keepsake. This project really is easy and requires very few supplies.

Here are some of the results:

Katie enjoyed using the gold pen.

Paige said that the critter the makes up the letter "e" in her name
is meant to show that she likes weird, scary, animals.

Love the cactus!

Alex likes money, math, candy, and super heros. Oh, and that
is a Ninja peeking out from behind the "A."

Tuesday, October 9, 2012

Fall Trees With Cork-Stamped Leaves

I had the best time today with about 60 kindergardeners! I was asked to do an art project with them as part of a Fall-themed day their teachers had created for them. It was wonderful--the children were so happy and they were able to explore outside, do some fun movement activities (I joined in too!) and they also did leaf rubbings and this stamping project with me. Thank you so much to the Kindergarten teachers at Clark Elementary School for allowing me to come in for the afternoon.


This picture has a flurry of fall leaves
flying wildly all over--and note the piles on the ground.
I'm so glad I'm not raking all of those leaves up!

I shared a nice little book called "Leaf Jumpers," by Carole Gerber with the children. This book was different than I expected--it's a fiction book. It described the sound, shapes and colors of leaves and identifies eight different kinds of leaf shapes within its pages. This would be a great book to read before going on a leaf hunt! It got us thinking about the colors and shapes of leaves. It also had some very poetic ways of describing the colors of the leaves: "...flame bright and vivid like a match." The back of the book has a little page on the science of leaves and why they change color.

I had the children listen carefully since this project had tracing, cutting, gluing and stamping. We need to listen when doing so much stuff with our art.  I then gave them a quick demo on how to stamp using the corks: dip in paint then stamp gently on paper--no smooshing the cork around! We aren't painting with a brush. It's up and down only.

Next we went over to our tables and began to work. What a great time and a lovely lesson on color and printmaking. Enjoy!

Fall Cork-stamped Trees

Supplies Needed:
  • One 12" x 18" piece of construction paper for background (light blue or whatever color you'd like)
  • One 9" x 12" piece of brown construction paper for tree trunk and branches
  • Pencil
  • Scissors
  • Glue stick
  • Wine Corks
  • Paper plates for paint palettes
  • Red, Orange, Yellow, and Brown Tempera Paint
  • Newspapers to cover work surface
Directions:

1. Trace the child's hand and part of his/her forearm onto the brown paper. This will be the trunk and branches of the tree. Cut the tracing out (most of the children were fine with this--we only lost a couple paper fingers, er, I mean, branches. Glue the trunk and branches to the background paper, making sure the base of your tree trunk is at the bottom of the page.

2. Dip the cork into the paint and stamp leaves all over the paper, filling your tree with beautiful colored leaves!  It's important to have the children fill the ENTIRE top of the tree with leaves--not just a couple along the edges of the branches! No naked trees--this isn't winter. Make sure you get all four colors of paint on your tree.

That's it! A beautiful fall keepsake!

Fall Leaf Rubbings:

When the children were done, they could move over to a couple tables where I had long sheets of newsprint from a roll, taped down. Under the paper, I had placed different types of leaves. They then could use flat-sided crayons to do rubbings and discover the different leaves I had "hidden" under the paper. This was a nice project to keep little hands busy for the last five minutes of class.

Friday, September 28, 2012

Mini Hand Drawing With Pattern & Ribbon

Well, here's another project I saw on Pinterest only to follow the link to nowhere. If you know where this came from, let me know so I can give credit where credit is due! When I originally saw this project I thought it would be great for my 13-year-old private art student. It was, but I also modified it and had my 9-year-old student do it as well. Here are my notes and method:


This is a lovely project that encompasses a variety of art concepts: inking patterns, drawing hands, shading with colored pencils, depth, positive and negative space, and value (in the ribbon and in the patterns). But, in order to make it manageable, I suggest only drawing one hand on an oversize index card. This keeps the size relatively small and you should be able to actually get the piece done at some point. My 13-year-old student used a large piece of paper (maybe 11" x 14"?) and had two hands in the composition and divided up the space with lots of ribbons and she worked on it for over three weeks (each an hour long session) and it was only about 1/3 of the way done. It got to be pretty tedious for her, I think.

With this smaller format, you get all of the fun and it is just enough to keep it interesting. Here's how we did it:

Mini Hand Drawing With Pattern & Ribbon

Supplies Needed:
  • Oversize (6" x 9") white index card, blank (or card stock)
  • Pencil with eraser
  • Sharpies (fine and ultra fine tips)
  • Colored pencils, assorted colors
Directions:

1. Place the hand you don't draw with onto the index card. You can make the hand go off the page a bit, but extend your fingers so that the space around your hand is broken up a bit by your fingers. Trace your hand with pencil.

2. Move your hand off of the paper and use it as a model to fill in some of the details of the hand you traced on your paper. Add wrinkles, rings, bracelets and fingernails. Don't add too many wrinkles though!

3. Draw a ribbon curling around your hand or through fingers and take care to have the ribbon divide up the negative space in your piece. Make it interesting!

4. Erase the lines of your fingers where the ribbon overlaps them. You'll want to take a minute and really make sure that your lines make sense--you don't want to ink something that shouldn't be there!

5. Trace the hand and the details on your hand with the ultra fine point Sharpie. Also trace the ribbon with the Sharpie.

6. Use your pencil to draw different patterns in the different sections of the background. Patterns can be made of lines, dots, squares, triangles, zig zags, and more!

7. Once you have your patterns down, ink them in with the Sharpies.

8. Erase all pencil lines.

9. Use the colored pencils to add color to the ribbons. Once you've built up nice layers of color, use darker colors in areas to create shadows.

My 9-year-old art student created her piece in two one-hour sessions. I'd think that this would take 3-4 regular class sessions if you were doing this project in a classroom setting. 


Wednesday, May 9, 2012

A Quick Modern Art Project: Warhol

This past week's after school art class was great! We were able to get two art projects done in the allotted time and some children had a few minutes to sketch. Both of these projects are fun and colorful and easy to do. I've done them with preschoolers up through fourth graders and everyone seems to enjoy it! This time, I was able to show the children artwork from each artist and link the lessons to children's books about the artists. If you haven't checked out these books, please do! The first project is: Handy Andy's inspired by the blog Artolazzi.


For this project, I shared the book: "Uncle Andy's," by James Warhola. What a lovely book! This is written by a nephew of Andy Warhol and is told from the child's perspective. James Warhola talks about visiting his Uncle Andy at his studio and all of the interesting projects and people he sees there. I really like this book. It is interesting to look at the illustrations and see all of the fun details. The book also reminds me that children are like little sponges, soaking up info and inspiration from their environments. Warhola speaks about how inspiring it was to be surrounded by all of the art objects and artwork in his Uncle Andy's studio and being able to see the process his Uncle went through to create his art (note: I brought in one of the Marilyn Monroe series of paintings for the children to view--it had repetition and color that I wanted to highlight with the project below).

Handy Andys

I saw this project on the blog: Artolazzi and loved it. I changed it a bit to use bright papers instead of paint for the backgrounds to speed things up a bit. I used a bright pad of paper I bought at the local copy store (Staples) which was 50 sheets of 11" x 14" paper (5 bright colors) for about $5.

Supplies Needed:

  • 1 sheet of bright paper 11" x 14" for the background
  • 2 5.5"x 7" rectangles of bright paper (different colors than your background)
  • 4 5.5"x 7" rectangles of bright paper (assorted brights so that the hands cut from these papers are different than the backgrounds)
  • Pencil
  • Scissors
  • Glue stick
  • Black tempera paint
  • Paper plate for palette

Directions:

1. I had the students select one 11" x 14" piece of bright paper for their background. In the above image, my background piece is yellow.

2. I then had them select two rectangles (5.5" x 7" each) these needed to be different than their background paper. These were glued down to the background so that it appeared the background is divided into four sections. Use the photo as a guide. In my example, I used a blue and a green rectangle.

3. I then handed out stacks of four rectangles (each 5.5" x 7") of assorted colors that had been stapled together. I had the students trace their hands onto the stack and cut through all four at once with their scissors to create four identical hand shapes. Remove the staples, arrange onto the background and glue down using the glue stick. Glue the fingers down well so they don't curl off of the page.

4. Once everything was glued down well, I had the students come over to the printing station where they could dip their hands into the black tempera I had placed in foam plates and then print onto their backgrounds over each of the hand prints.

They came out great! The children had lots of fun with these and the bright colors really created an eye-popping display! These would be so nice for Mother's Day or Father's Day and they didn't take any time at all (maybe 30 minutes from start to finish).

Coming soon: Part two of this post...15 minute Jackson Pollock paintings!
Related Posts Plugin for WordPress, Blogger...