Showing posts with label medieval. Show all posts

Wednesday, October 24, 2012

Big Mouth Gargoyles

This past week, in Medieval Art, we explored the 3D art of gargoyles and chimeras. We learned some neat facts such as the name gargoyle means "water spitter" or "water vomiter" which is quite accurate since gargoyles have a gutter where rain is funneled through and then exits their mouths (sometimes the water exits the nose or, ahem, other places). Sculptures that do not have holes for water to travel through are actually called chimera (ki-mare-ah). Gargoyles and chimeras do not have to be scary--we saw some that looked like elephants, sea turtles and even Darth Vader! This art form is a great way for children to explore clay modeling techniques while experimenting with telling a story and expressing emotion in their work.

Love the fangs and curly tail!

We used a technique where the children created a pinch pot with clay first and then flipped it on its side to create the mouth of their gargoyle. This created a large caricature mouth and immediately made their sculpture more expressive. The children then utilized the "scratch and attach" method of using slip (watered down clay) to attach their features to the gargoyles. Since these are made from air dry clay, I took them home to dry and my husband sprayed them with a metallic faux-stone paint to make them look as though they truly are gargoyles carved from stone.


Thus technique of using a pinch pot to make a gargoyle is different than my previous approach. I thought the pinch pot gargoyles were very expressive, and great for a younger group. 

And a big "Thank you" to one of my students who brought in a few gargoyles from his personal collection for us to see firsthand. Seeing gargoyles and chimeras in 3D really helped facilitate the discussion.

Big Mouth Gargoyles

Supplies Needed:
  • Air dry clay (we used Crayola), about the size of a baseball
  • Newspapers and a paper plate for work surface
  • Little cup (for slip)
  • Plastic knife
  • Crayola Marker (one of the thick ones), color not important
  • Toothpick
  • Paint (acrylics, or faux stone spray paint), optional
Directions:

1. Knead the dough to get it more pliable. If it is too dry, dip your fingers in a bit of water. The dough shouldn't be goopy, but it shouldn't crack when you mold it either. Divide the dough in half and put one half aside for now. The ball of dough you are working with should be about the size of a golf ball or an egg. 

2. Using your thumb and pointer finger, gently squeeze the dough to create a pinch pot. The walls of the pinch pot should be thick enough to support its weight, but thin enough so that the piece dries properly (about 1/4" thick is good).

3. Place the pinch pot on its side on the paper plate. This is the mouth of your gargoyle. Feel free to gently manipulate the pinch pot so that the mouth is expressive: a smile, a grimace, a frown. 

4. From your excess clay, pinch off a bit, about the size of a large blueberry. Place it in your little cup with a couple Tablespoons of water. Stir the clay around in the water until it dissolves and makes mud. This is slip and it will help the clay pieces stick together better.

5. Use the rest of your excess clay to form the features and appendages of your gargoyle. Gargoyle parts you may need are: eye(s), ears, a nose (with crazy nostrils), horns, scales down the back, arms, legs, claws, fangs, teeth, tail, and/or wings. The list is endless! Some things to keep in mind when creating your gargoyle parts:
  • Don't make any piece too thin--it will crack as it dries.
  • Legs, arms, wings and tails should touch the pinch pot and/or rest up against each other for support. Parts that stick off the pinch pot too much will get damaged. Have the legs and arms fold up like your gargoyle is crouching and make the tail wrap around the body. Look at pictures of real gargoyles to see how the sculptors handled this challenge.
  • All "parts" need to be attached with slip. To do this, scratch the area you'd like to attach the "part" to the pinch pot, add a dab of slip, and then press the part onto the pinch pot. This will form a nice bond between the pieces of clay. I'm not sure if there is a formal name for this technique, but I use "scratch and attach."
I have my students use the tools they have to create all of the pieces for their gargoyles. The plastic knives are helpful to some students, the toothpick is great for scoring and poking little holes such as the pupils and drawing scales or adding a furry texture to the piece. The Crayola markers are good for rollers (the outside of the marker shaft) or to create circles for eyeballs (the end of the cap). I remind my students to add all of the parts they want to during this session, and when they think they are done I remind them to take a look again and make sure they've added details in the mouth (teeth & tongue), the top of the head (horns and hair) and the back (scales and texture). They can choose what they want to add/disregard, but I want to encourage them to add detail.

6. Once the piece has all of its "parts" on it, put it aside to dry for a few days. 

7. You can leave the sculptures as they are, or paint them. Before painting, I do a once over and hot glue any bits that seem to be falling off. Acrylic paint works well on the dry clay and you could always use a limited palette such as grey, black and white and have the students create their own faux stone look. I had a 50% off coupon for Michael's craft store and wanted to try the faux stone spray paint, so I picked that up. My husband is the spray paint guy, so I had him spray the gargoyles for me.

Note: One can of stone spray paint covered eight sculptures. I think the color we chose (a metallic stone) looked more silver than anything else. I would have liked a more "plain stone" look. Also, this paint is expensive. $5.00 for 8 sculptures is probably a bit much if you were doing this with a large group, but worked with my smaller group.


Great expression--love the two teeth in front!

Cyclops with big claws on the toes. The wings are resting against
the gargoyle's haunches so they are supported.

This student was inspired by some of the animal gargoyles we looked at.
This elephant has lovely ears. It has a trunk and tusks, too
(sorry the picture is kind of blurry).

Wednesday, October 10, 2012

More Illuminated Names

My after school art class is focusing on Medieval Art and this week we learned about illuminated manuscripts and hand lettering. The original post on my blog appears here. This was a nice way for the children to get to know one another and create a personalized keepsake. This project really is easy and requires very few supplies.

Here are some of the results:

Katie enjoyed using the gold pen.

Paige said that the critter the makes up the letter "e" in her name
is meant to show that she likes weird, scary, animals.

Love the cactus!

Alex likes money, math, candy, and super heros. Oh, and that
is a Ninja peeking out from behind the "A."

Wednesday, October 3, 2012

Dragon (Faux) Stained Glass

Yesterday was the first session in my after school Medieval Art Class! What a blast! I have a great group of kids and a nice mix of boys and girls!


Aren't these fabulous?!
We did a variation on a project I saw in the book, "Medieval Projects You Can Do" by Marsha Groves. The image is pretty much the one Groves uses, but I used the Contact paper technique that I've developed with my students over the last couple years.

I showed the children pictures of stained glass from medieval times, making sure that I had examples of traditional stained glass (tall and rectangular), some details showing the brushed-on enamel details, and an example of a rose window with its circular design.

I then provided them with a guide that had the dragon image on it with all of the sections labeled so the children would know what was fire, what was dragon and what was background (sometimes that gets confusing). Using a template like this is actually very traditional. In medieval times artisans would sketch the designs for windows onto wooden panels and the artisans would fabricate the windows on top of the wooden templates.

The end results of this project were gorgeous! It is funny how different the pieces can be even thought they are all the same subject.

One bit of warning, using tissue paper squares with children can be, um...tricky. This group wasn't bad at all: I had the tissue paper squares in a tray in the center of each table and I warned that crazy movements can cause the squares can fly up and get on other people's work (not cool!). Once the tissue paper is on the Contact paper, it cannot be removed, so the children need to be mindful of their neighbors' pieces and move slowly and carefully.

I do hope you try this project, it really is a cool one!

Here's the method:

Dragon (Faux) Stained Glass

Supplies Needed:
  • Template (I copied mine on 8 1/2" x 11" paper)
  • Pencils, Ruler & Sharpie to create your template
  • Piece of clear Contact paper slightly larger than your paper guide
  • Clear tape
  • Four 3/4" x 12" strips black construction paper "(for frame)
  • About four 1/4" x 12" strips black construction paper "(for leading)
  • Many 1" squares of tissue paper, assorted colors
  • Scissors
  • 1 clear sheet protector, optional
Directions:

1. Make your template: Draw a border around the copy paper that is about 1/2" wide. Use the pencil & ruler to create a simple, bold image made up of straight lines. Don't make anything too detailed! You can use the dragon image for inspiration. Once you have your design down, use the Sharpie to go over the lines. These will be the guide lines you will use when placing your construction paper leading. You may want younger children to work from a template image you've created, but older children could create their own over a period of classes.

2. Tape the template to the table using clear tape.

3. Remove the paper backing from the Contact paper and place it on top of the template sticky side up. You will be doing all of the work on the sticky side of the Contact paper. Tape the Contact paper to the table using a couple pieces of clear tape to hold it in place while you work.

4. Place the 3/4" pieces of black construction paper over the areas of the template designated as your border. Place the paper strips directly onto the sticky side of the Contact paper and press lightly. It is OK if the strips extend beyond your template--you'll be trimming the piece later.

5. Using your template as a guide, place the 1/4" strips of construction paper over the leading lines on the image you drew. Simply rip (or cut) the construction paper strips to the proper length to cover your leading lines. Cover all of the lines in your drawing.

6. Once you have the border and all of the leading lines covered in construction paper, start filling in the remaining sections with colorful pieces of tissue paper. The squares can overlap each other and can overlap the black construction paper lines a bit (you are actually working on the piece from behind). But take care to make sure the tissue paper goes where you want it to. It is almost impossible to remove the tissue paper from the Contact paper once it gets on there. 

7. Once all of the sections are filled in with color, trim the piece down to 8 1/2" x 11" and slip it into a clear sheet protector to protect it. Other options would be to use another sheet of Contact paper on the other side of the piece to seal the tissue paper and construction paper safely inside. Or you could run the piece through a laminator (maybe), I don't have one at my disposal, so I'm not sure of that, but it may work. 

Place in a sunny window and enjoy!

Working on our dragon (faux) stained glass windows.
Everything is taped down with clear tape and the tissue paper
squares are in the center of the table in cardboard trays.

Wednesday, September 14, 2011

Illuminated Names

This is a wonderful project for students to get to know each other. I saw this in the book, "Medieval Projects Your Can Do," by Martha Graves. This is a great resource for parents and educators and it is full of lovely, simple little projects.
This shows the various stages on the project all at once.


I have the children introduce themselves and give a couple of brief bits of information about themselves (favorite sports, colors, animals, etc). Then we talk about how they can incorporate those ideas into a fancy letter of their names. Simple and fun and everyone leaves with a piece they are proud of and is uniquely theirs!

Supplies Needed:

  • Large index card (5x7" or so) without lines on it
  • Pencil and eraser
  • Ruler with inches
  • Reference books with illuminated letters or calligraphy (optional, but nice)
  • Fine tip markers (we used sharpie brand in black and other colors)
  • Colored pencils, optional (when we wanted to add a hint of color)
  • Gold paint pen or gold acrylic paint with a fine brush
Directions:

1. With the pencil and ruler, lightly make horizontal guidelines every 1" on the index card.

2. Check out the reference books for inspiration and lightly draw the initial, or first letter of your name onto the index card. It should be large about 3" tall (mine touched both the top guideline and the bottom guideline on my index card). See below for the reference books I had on hand.

3. You can letter the rest of your name now, if you'd like. I made my letters about 1" tall and used a plain text I found in a book.

4. Add details to your initial. This is where all of the things that make you YOU come in! The girl I am making this for loves art and is seven. She also has a grandmother who does a lot with protecting sea turtles (and this little girl is interested in that), so I put a sea turtle and a seascape in there as well.

5. Use a marker to fill in the piece. I used black first and then colored in parts with other colored markers. I wasn't crazy about how dark the marker colors were getting, so I used colored pencils for the elements that I wanted to be secondary. When I was done the marker work I used an eraser to remove my guidelines and THEN I did the colored pencil work.

6. When it is done, use a gold paint pen to add some pizazz to the piece. This is part of what makes this art so "illuminating" because the gold makes it appear to be shining with light and color.

Here are some of my students' pieces, below. ENJOY!

The students could choose their first or last name.

This student traced over the pencil guidelines with gold with beautiful results!

Lovely lettering!

References for this class:

Saturday, July 30, 2011

Forever Sandcastles

So, the past week has been spent at the lake while my oldest three children take swimming lessons. I enjoy the sun and relative peace while my littlest child scoots all over the beach (she doesn't crawl), getting sand in her diaper. I have been thinking a lot about sand these days, after taking great pains to clean the sand out of everyone's shorts, diapers, food, sunscreen, car seats, etc. This week's project is all about sand: creating sandcastles from a dough that allows your project to be enjoyed long after the summer fun is done.


This project is originally from Family Fun magazine. I originally did this project at the beginning of the school year with my art students. I thought it was a good way to ease the students from summer into a year's worth of medieval art. While this project can be done with children as young as preschool age, results will vary, so don't be too concerned if the masterpieces of the younger set don't look quite like castles! Have fun and enjoy the sand!

Supplies Needed:
  • Sand dough, recipe to follow
  • Small shells
  • Small twigs or toothpicks
  • Pieces of scrap paper and glue stick for flags
  • Tacky glue
  • Paper plates covered in wax paper (to use as a work surface)
  • Plastic table cover
  • Colored pencils & scissors to decorate flags
  • Castle books for inspiration
Directions:

1. Start by making the sand dough. Use an old metal pot that is not non-stick (the sand will scrape the finish). You can make the dough 1 day in advance, just keep it tightly covered until ready to use.

Sand Dough Recipe:


1 cup sand
1/2 cup cornstarch
1 tsp. alum (found in the spice section of the grocery store)
3/4 cup water

Combine the dry ingredients in the saucepan using a wooden spoon. Add the water and stir until the mixture is smooth & combined. Cook the clay over medium-high heat, stirring once in awhile. The clay will start to thicken. As it begins to thicken, stir more frequently. After about 3 minutes of cooking, the dough will be the consistency of play dough. Remove the clay from the pan and let cool a bit. Once the clay is cool enough to touch, you can begin sculpting.

2. Give each child a portion of the dough (1 batch will make enough for two children). Have the child work on a paper plate covered with a piece of waxed paper (that will make the sculpture easy to remove once it's dry).

Some of the elements you may want to include in your castle are:

The Keep: the last defensible part of a castle. This is the "building' portion of the castle.
Crenels: Openings cut from the top of a tower or wall for guns or arrows to fire through.
Moat: A water-filled ditch surrounding a fortress.
Drawbridge: A huge, heavy door that was raised and lowered over a moat to stop or allow entry into a fortress.
Bailey: A courtyard inside a castle compound.
Loop hole: A thin opening in a tower wall to let light in or to see out and to shoot arrows or fire guns through.
Battlement: A fortified top of a castle wall or tower.

Once you are done sculpting your castle, you can use shells to embellish it. The children in my art class used shells to make patterns on the sides of their castles, or as doors or windows. You can use the point of a toothpick to make brick texture or windows on the side of the castle. Now is also the time to create little flags for your castle out of bits of paper glued to toothpicks and stuck into the dough. Do this while the dough is still wet though--once it is dry it is rock hard!

Now you can let your castle air dry. It will take about 2-3 days or so. Any shells that fall off during the drying process, can be reattached with some tacky glue.

Enjoy your little bit of summer!

The castle from above


Resources:
When I presented this lesson to my art class, I had the following books on hand for them to look at:

“Castle,” by David Macauley (ISBN 0-395-25784-0)
“Castles,” A First Discovery Book, Scholastic, Inc. (0-590-46377-2)
“Knights and Castles,” by Philip Dixon (ISBN 1-4169-3864-8)
“Knights and Castles,” by Fiona Macdonald (ISBN 0-8368-4997-3)
“Knights and Castles: Exploring History Through Art” by Alex Martin (ISBN 1-58728-441-3)
“Medieval Castles,” by Lynne Ferguson Chapman (ISBN 0-88682-687-x)
“See Inside a Castle,” by R.J. Unstead (ISBN 0-531-09119-8)
“The Story of a Castle,” by John S. Goodall (ISBN 0-689-50405-5)
“The World of Castles & Forts,” by Malcolm Day (ISBN 0-87226-278-2)

Friday, May 20, 2011

Clothespin Theater

I love this project! This clothespin theater is one of those projects which kids can totally make their own! I originally taught this project as part of a medieval art course. I tied in medieval puppetry and theaters and it was a wonderful way to link history with art. 


While I had envisioned creating backgrounds and characters to act out a play about St. George and the Dragon, the children created a wide variety of characters and backgrounds such as a rainforest explorer, a soccer team, a horse and rider, and more. This project would also be a wonderful way for children to make an interactive diorama for a project at school or a book they've read (imagine Little House on the Prairie!).


Enjoy this wonderful project and the creative options it inspires!


Background:

Medieval life was hard! But during festivals, children and adults alike were able to enjoy puppet shows. There are woodcuts, paintings and illuminations that show people enjoying puppet shows. These shows were also a great way to illustrate stories for people who could not read.

One popular type of puppet during medieval times was the marionette. We created marionette during my first semester art class. Marionettes have jointed body pieces that are controlled from above with strings. Although there were also puppets that were glove puppets (that fit over a person's hand) and "jiggling" puppets that were controlled from below with a stick.

I brought in a few different types of puppets for the children to see: a finger puppet, a marionette from our first semester class, and a glove puppet. We talked about the elements of a stage: the floor, or stage itself, the background, the actors, etc.

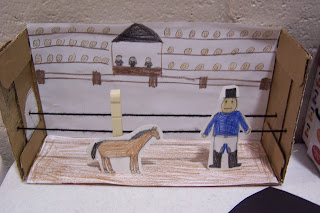
In this project, we use a cardboard box with the top and front removed, for our theater. We then created backgrounds and floors by drawing on pieces of paper and inserting them into the box. The actors (or puppets) are drawn on index cards or cardstock and glued to clothespins. The puppets are then placed onto a piece of yarn that has been strung across the width of the box. The child can then move the puppets along the yarn as s/he acts out the story.


Supplies Needed:
  • A cardboard box (we used a box that juice pouches came in)
  • Yarn to go across the width of the box 1 or 2 times 
  • A nail to make the holes for the yarn (a grown-up's job)
  • A plastic needle
  • Plain white paper for the background (ours were 10 1/2" wide x 5 3/4" tall)
  • Plain white paper for the floor (ours were 10 1/2" wide x 3 1/4" deep)
  • Pencils
  • Crayons or colored pencils
  • Sharpie marker (optional)
  • Clothespins (the non-spring type)
  • Index cards or card stock, white
  • Hot glue or tacky glue
  • Scissors
  • Glue dots or masking tape (optional)
Directions:

1. Remove the top and front of the cardboard box you will be using for your theater.


2. Measure the back and floor of the inside of your box and cut plain white pieces of paper to fit. These will be the background and floor of your theater.

3. With pencil, draw the details of the background and floor. In my case, I created two backgrounds: one that shows the outside of the castle with a seascape and misty hills shrouded in thunder storms (that is where the mean dragon lives) and an inside view of the castle. This was a great opportunity for me to draw all of the things we've learned about this year in our medieval-themed art class: shields, tapestries, swords, etc. When drawing your background think about drawing things near and far (the foreground, mid-ground and background)--that will add depth to your drawing.
The two backgrounds I created. I only colored one in.

When I drew the pieces to line the bottom of my clothespin theater, I drew a dirt path for the outside view and a castle floor with rug for the inside view of the castle.

The two "floors" of my theater.

4. If you'd like, go over your pencil lines with black Sharpie marker and then color the images in with crayons or colored pencils.

5. Create the puppets or actors: You will need one clothespin and one index card per puppet. Draw the puppet onto the index card (put the puppet's feet at the bottom of the index card), trace over your pencil lines in Sharpie, if desired, and color in as you did the background. I made my puppet about 5" tall. When done, you can cut around the figure with scissors to remove the excess paper. Using hot glue or tacky glue to attach the puppet to the clothespin as shown in the photo below. This will allow your puppet to move along the yarn.
Puppet front

Puppet back. Note how the clothespin is glued to the puppet.

6. Assembling the theater: Have a grownup poke holes in the side of the box. They should be the same height as the clothespin slot. Now, using the plastic needle, thread the yarn through the holes and knot each piece outside the box. Slip the background into the box and place it into position (if you want to change the background, you can just prop the background in there, or you can use glue dots or masking tape to permanently attach the background paper to the back of the box). Slip the floor into place (you can attach that with tape or glue dots if desired). Place the puppets onto the string and enjoy the show!

You can string one, two or more lengths of yarn across the theater.

Here are a couple of the clothespin theaters the children in my art class created:


Friday, April 15, 2011

Medieval Metalwork

This week, in my art class, I showed the children how to do a simple technique that looks like aged metal. The children created frames and crosses and then added faux gemstones for a little sparkle!

Jewel-encrusted antique metalwork frame.

This year's art classes are all about Medieval times. We've done shields with coat-of-arms, marionettes of kings and princesses, stained glass dragons, and many other projects you'll soon be seeing in this blog (one day at a time!!). This week, I decided to have the children do a project that simulates metalwork. I was thinking of those large, heavy covers of illuminated manuscripts that were pieces of wood covered with tooled sheets of gold and inlaid with real gemstones (see below). Since my budget is a bit more limited than that--I thought we could use tin foil and plastic gems from a craft store.

Background Information:

Since medieval manuscripts would take many years to create and often were the life's work of many of the artists, the covers of these books were often just as elaborate. The covers were often a plank of wood covered with gold, jewels, enamelwork, precious metals, and ivory. One such example of this type of ornate work is the cover of the Lindau Gospels entitled, "Crucifixion with Angels and Mourning Figures." This piece is from The Pierpont Morgan Library in New York.

The cover from the Lindau Gospels uses a technique called repoussé "a technique by which metal reliefs are created. Thin sheets of metal are gently hammered from the back to create a protruding image. More elaborate reliefs are created with wooden forms against which the metal sheets are pressed (Art History: Volume 1, by Marilyn Stokstad, 1995)."

The project below is very similar to this technique. Enjoy!

Supplies Needed:
  • Corrugated cardboard cut into a frame shape (6 1/2" x 8') or a cross (a 3" x 7" piece of cardboard glued to a 3" x 11" piece of cardboard)
  • Self adhesive foam letters and shapes (optional)
  • Yarn
  • PVA glue (I use Elmer's glue)
  • Paintbrush
  • Water bowl and water
  • Scissors
  • Aluminum foil (standard household foil is fine)
  • Clear tape
  • Black tempura paint
  • Paper plate for a palette
  • Facial tissue
  • Glue gun and hot glue sticks (optional)
  • Plastic jewels (I bought mine at Michael's--they had a value pack of 1pound of "bling")
Directions:

1. If you are creating a frame, think about which way you'd like to have the picture displayed. This is important if you are doing lettering on your frame.
Here you can see the cardboard piece I'll be using for my frame as well as an easel-backed piece of cardboard from an old frame that I later glued onto the finished frame. That part is optional,

2. Create a design on the cardboard frame (or cross) using self adhesive letters and shapes. Words and phrases such as, "family," "best friends," "love," or your last name work well. You can also use yarn for the letters and shapes (and also for lines). Put a line of glue onto the cardboard and then gently press the yarn into it. Keep your design simple.


3. Once you have your design done, brush a thin coat of white glue all over frame. You can brush right over the foam shapes because the adhesive on the back of the shapes is nice and strong, but go gently over the yarn. You will want to go along the edges of the yarn you have glued down so that you don't mess up your design.
My design is done. Now I can brush white glue over the entire design.


4. Take a piece of foil that is slightly larger than your piece and gently crumple it--not too much or it will tear when you open it back up. Open the foil back up and smooth it a bit. Now lay it onto the frame over the glue on your design. Press gently all over your design, around the letter and shapes.
Gently smooth the foil over the design. Press gently around the yarn and foam shapes (if using). Be careful not to use your nails, since the foil will tear easily.


5. Flip the piece over and tape the extra foil to the back of the cardboard. If you are doing a frame, you'll need to gently cut an "x" in the foil in the center portion of the frame and fold back the foil there (and tape it to the back of the frame) so that you'll be able to see the picture in the center of your frame.


6. Now comes the messy part! Squeeze a bit of black tempera paint onto the paper plate. Dip your paintbrush into water and mix it in the paint to thin the paint a bit. Brush the thinned tempera paint over the entire front of your frame.


7. Now....wait! Leave your frame to dry for 10-15 minutes. While it is drying you can draw a picture to go in your frame. Will the picture be of your family? A pet? A medieval scene with a knight and a dragon?

8. Once the time is up and your paint is not quite dry, gently buff off the paint with a piece of facial tissue (it may take your piece a bit longer to be ready to buff--the paint should be "almost dry"). The more black you leave, the more "antique" the frame will look.


9. Use a hot glue gun, white glue, or tacky glue to attach jewels to the frame.
I live this tacky glue in a squeeze tube!

10. Attach your picture to the back--and you are ready to display your medieval work of art!

Variation: Easter is a wonderful time to do this project and create a cross! This technique makes a beautiful cross that looks unique. It is a nice project to do as a family--certainly a conversation-starter on many levels! Enjoy!
The same technique can be used to create a cross. I left a good amount of the paint on the edges to give this cross a very old feel. This picture doesn't do it justice--the jewels really shine and add sparkle. This would also be a nice gift idea.

Wednesday, April 13, 2011

Gargoyles in Clay

Last week, with my art class, I thought it would be fun for the children to create gargoyles from clay (carving seems too messy and frustrating). I brought in a variety of pictures of gargoyles for them to look at. We were all surprised to see that gargoyles didn't have to be scary. Modern gargoyles can even be kind of cute, or look like a real animal or person (not a "horrible, unreal creature of the imagination"), and some even tell a story.
Sea turtle gargoyle. This has a gutter on its back. Note the baby turtle hitching a ride!


Background: 

What makes a gargoyle? Well, gargoyles are carved grotesques with a spout used to divert water away from the side of a building. The water usually exits through the mouth, but sometimes there is a gutter on top of the gargoyle instead. If the figure doesn't divert the water, it is not technically a gargoyle, but more of a "chimera."

Gargoyles have been used for thousands of years and in a variety of cultures. The word gargoyle means different things in different languages. The most common being: "throat" or "gargle" and the Dutch call them waterspuwer which means "water spitter" or "water vomiter." Pretty cool visual, eh?

I brought some pictures of gargoyles for the children to see. I also brought in the book, "American Gargoyles: Spirits in Stone," by Darlene Trew Crist. This book has many wonderful, clear images of a variety of old and new gargoyles along with the stories behind them. With this book, I was able to show the children a bird's eye view of a gargoyles and show them the mortar between the building stones (water erodes this mortar--hence the need for the drainage spouts). There were examples of scary gargoyles and friendly-looking gargoyles as well as an image of the gargoyles at work--one with water spewing from its mouth. Since the children in my art class are very interested in turtles, I showed them a picture of the "Weeping Sea Turtle (p.71)" and we discussed how gargoyles can tell a story.

I also borrowed a couple of other books from the library about gargoyles, but left them at home since they weren't completely appropriate for the children to be viewing.

"Holy Terrors: Gargoyles on Medieval Buildings," by Janetta Rebold Benton is also a stellar resource on gargoyles. This book also contains many clear pictures of a variety of gargoyles along with interesting text and an extensive bibliography, but some of the images contained nudity. Since I couldn't leave this book out for the children to peruse, I just left it at home.

"The Gargoyle Book: 572 Examples From Gothic Architecture," by Lester Burbank Bridaham was also left at home due to some nudity, but is an interesting resource of black and white images of gargoyles, Chimeres, Heads, and Woodwork that may be inspiring to the older student. The text is brief, so this is primarily a visual resource.

When doing the research for this project I read about a modern-day gargoyle that I had to check out: Darth Vader on the Washington National Cathedral. I went to the site, searched, and lo and behold. there he was! The piece was designed by Christopher Rader as part of a contest. The piece (not actually a gargoyle since it doesn't direct water) was sculpted by Jay Hall Carpenter, carved by Patrick J. Plunkett, and placed high upon the northwest tower of the Cathedral. I had to show the kids that one!

Before I handed out the materials for the project, I suggested that the children think not only about what creature they were going to create, but think about what type of building it would be on and if it their gargoyle or grotesque would visually be telling a story.

Supplies Needed:
  • Paper mat to work on
  • Hunk of clay (I used Crayola air dry clay in gray-I used two 5lb. buckets for my 12 art students and my demo)
  • Tools such as a plastic knife, toothpicks, a plastic drinking straw and a roller
  • Meat trays for transporting the finished pieces home
  • Paper towels and water for cleanup
  • Books on gargoyles and reference books on animals, dinosaurs, etc.
Directions:

After discussing gargoyles (their function, the different designs, etc.), give each child a hunk of clay about the size of a softball. The clay should be kneaded a bit before starting to work. Have the child create a sculpture of an animal or person (real or imaginary). If it is to be a true gargoyle it should have a hole through its mouth (some of the children in my art class just made the mouth open and some made more of a tunnel going through the clay. I think it depends on the the child's wishes and their ability in working with the clay).

Thin pieces will break off when dry, so the child should be encouraged to make pieces that are at least 1/8" thick (but 1/4" thick is even better). Don't forget to add texture and detail to the piece such as scales, hair, etc.

Is your gargoyle telling a story? What elements can the artist include to help us to "see" the story? In my example, I included the turtle's eggs, a baby turtle, some seaweed and the water, so that viewers could see the life cycle of a turtle and its habitat.

Have fun with this! Gargoyles don't have to be scary! Although....scary gargoyles are cool too!
The sea turtle gargoyle from above. One side has the eggs and seaweed, the other has a baby turtle. The wavy things on either side of the shell are ocean waves (looks nice and makes the sculpture less breakable).

Wednesday, March 9, 2011

Op Art: Magic Pictures

This project is a fun one for children! It can be used for a variety of themes and once the child understands how to do the project, s/he can create countless combinations! This idea is based on a project that I first did in middle school or high school. It explores optical illusions and has a nice "wow" factor for the children.
Magic Picture: A great lesson in Optical Illusion!


Class talk:

I began by defining the term "optical illusion." Optical meaning "eyes" or "sight" and illusions are "something that appears to exist, but does not." Magic tricks are a great example of optical illusions. I had a couple of magic books on hand to illustrate this point. I explained that one could read a book on magic and learn how to make something disappear. A child isn't learning "magic," but how to fool the viewer's eye. Optical illusions are like magic for your eyes.

I then showed a few examples of optical illusions from the Childcraft: The How and Why Library, Volume 12, "Look and Learn," by Worldbook (c. 1988). I found it helpful to have a ruler on hand since some of the children had never seen these particular illusions and wanted to measure the lines to verify they were the same length, etc.

Some other examples of everyday optical illusions that also appear in the Childcraft Book were camouflage and movie pictures (animation). I was able to "show" the children examples of those from the same book.

I also brought in a book from my own library entitled, "Masterpieces in 3-D: MC Escher and the Art of Illusion," by Catherine Gleason. This book has 40 images by Escher with built in spectacles so that viewers can see the works in 3-D. It also has brief descriptions of each of the pieces. While the 3-D element of the book is great, many standard examples of Escher's images will work for illustrating the concept of optical illusion.

So, in this class, we decided to create two pictures and put them together in a special way to create an optical illusion. While not technically a medieval-themed project, I explained that we could use medieval-inspired imagery such as a knights, castles, princesses, or shields. We thought that if we created optical illusions like this back in medieval times, people would have thought our art was truly magical!

(NOTE: Once a child learns this technique, s/he can use it to explore many different ideas such as opposites, seasons, transformations, etc. The pictures should be very different for the illusion to be dramatic and should fill the space).

Supplies Needed:

• Templates (while not necessary, I found it easier to have these templates on hand), One copy of all three for each child:
  • Template One: Image Page (this has two 4"x8 1/2" rectangles printed on an 8 1/2"x11" piece of white paper. Each rectangle should have guides to help the child divide the drawing into four 1" segments. On one rectangle, label the sections 1, 2, 3 & 4, on the other rectangle, label the sections A, B, C & D. See image below.)
  • Templete Two: Accordian Page (this is a 8 1/2"x9" rectangle with fold lines spaced every 1" across vertically and 1/2" tabs at either end. See image below.)
  • Template Three: Backing Page (this has a 7"x8 1/2" rectangle printed in the center of an 8 1/2"x11" piece of white paper. See image below.)
Template 1: Image Page
Template 2: Accordian Fold Page
Template 3: Backing Page

(Supplies, cont'd.)

• Construction paper for frame
• Stapler
• Pencils/erasers
• Black marker
• Crayons
• Ruler
• Scissors
• Glue stick

Directions:

1. Using pencil, draw two very different pictures on the Image Page, one in each rectangle. The rectangles should be held vertically. Make to fill up the space in each box and use images that are nice and big--little details will get lost in this kind of project.

Step 1: Draw two pictures

2. Once the the images are planned out, outline the pencil drawings with marker and color in with crayon.
Step 2: Color pictures in
3. When the two images are done, use a ruler and pencil to divide each drawing into four 1" strips from top to bottom. Leave the "1,2,3,4" and "A, B, C, D" marks on each strip for now to help with placement. Take your time and do a nice, neat job--it will help the optical illusion work better if you do a neat job.
Step 3: Cut pictures into 1" strips
4. Cut away the excess portion of the Accordian Page and fold the rectangle on the fold lines like you are folding a paper fan. Fold the 1/2" tabs at the edges so that they lay flat on the table (you'll be stapling them to another piece of paper later).
Step 4: Prepare Accordian Fold Page

5. Following the letter and numbers written on the Accordian Page, glue the strips of the two pictures you created onto the Accordian Page with a glue stick. Take your time and do a nice, neat job. Once you are done gluing all of the strips to the Accordian Page and you are sure the illusion is works, you can cut off the excess portions of the image strips (the parts labeled with the letters and numbers).
Step 5: Glue strips onto Accordian Page in alternating order
When done, it looks kind of confusing!


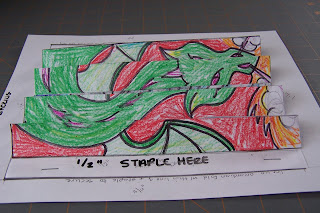
6. Staple the Accordian Page onto the Backing Page. Staple through the 1/2" tabs on the left and right side of your project. This will hold your project in the way that you need for the illusion to work.
Step 6: Staple project to Backing Page


7. Test your illusion out! Tilt your drawing one way and then the other--does your illusion work?
From the left: Fire-breathing Dragon!
From the right: A brave knight!


Is it not working? Try these tips:
• Refold the accordian page so that it looks like the one in the photos, if the folds are going the wrong way, the illusion won't work.
• Did you glue the pieces on in the wrong order? Or upside down? That happened to some of the kids in my class. You could try to peel off the strip that is positioned incorrectly, but glue sticks hold pretty strongly--you may need to cut the strips and reposition them onto another Accordian Page.

8. Once your optical illusion is done, you can create a frame for you Magic Picture. Fold a piece of construction paper in half lengthwise. Draw a 3"x8 1/2" square on the fold. Cut away the rectangle with scissors. Open up your frame. It should be the proper size for your Magic Picture. Glue it to the backing page with a glue stick. You can decorate it with crayons and markers if you'd like.
Step 8: Create a frame

Amaze your friends and family with your Magic Picture!
Related Posts Plugin for WordPress, Blogger...