Showing posts with label tree. Show all posts

Friday, January 15, 2016

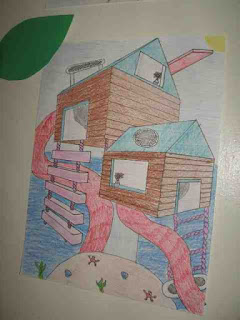
8th Grade 2-Point Perspective Dream Tree Houses

While I was subbing last spring, I was asked to teach two point perspective to the 8th graders. Instead of having them draw a standard house, I decided it would be fun to have them draw dream tree houses. This project is from Mini Matisse and she does it with 7th grade students, but the 8th graders enjoyed it. She also has a video that walks you step-by-step through the project (that was great for students who were absent and needed to catch up).

I had grand plans of also doing a shared project with my son's second grade classroom, but it didn't pan out due to time restrictions (but NEXT time I would have the littles brainstorm dream treehouse elements and have the 8th graders incorporate those into their work and then bring the treehouse images back to the second graders and have them write about the tree houses and create their own images).

This house has a car coming out of it!

I had the book, "Treehouses: The Art and Craft of Living Out on a Limb" by Peter Nelson on hand for some creative inspiration. WOW! Some of those tree houses are just fantastic!!


Vocab for the project: 2 point perspective, horizon line, vanishing points, parallel, horizontal, vertical, construction lines, recede, diverge, cube, depth

Anyway, the project was a great learning experience and I created two worksheets/handouts to go with the project. The first, a treehouse brainstorming sheet allowed the students to come up with ideas for their tree houses and tell me a story about their houses (those were fun to read!). I also came up with a an assessment checklist for the student and I to make sure that all of the expectations for the project were met.

Treehouse brainstorming sheet to be passed in with final drawing.
The checklist I used to assess the drawing.
Enjoy these creative dream tree houses! Sorry some of the pictures are wonky!


The bulletin board display. I added a title and the book by Nelson to the case as well.

Thursday, September 26, 2013

Welcome Fall! Birch Tree Project

The leaves are starting to change up here in New England and I love it! I was looking in our local paper this past weekend and they ran a great article about vacationing in Minnesota written by Laurie Hertzel and I just LOVED the beautiful images! Check it out here at the Star Tribune.

This beautiful photo, below, caught my eye especially, since the Birch Tree is the state tree of New Hampshire. 
This photo of birch trees in the Fall taken by Laurie Hertzel at the Star Tribune
inspired this birch tree craft.
This project uses a couple of fun techniques. First, the black lines of the birch bark are made using a hair comb (I saw that on the blog ARTASTIC: Miss Oetkin's Artists), and second, the colorful leaves are sponge painted on the background paper. It's quick, easy, fun, and just a bit messy. I hope you enjoy this craft and this crisp fall weather!


NOTE: I had my son create the birch trees on paper that was being held vertically and then place them on a background that was horizontal--this allows you to have the tree trunks touch the edges of the paper if your child puts them on tilted--some other lessons don't allow for this and there's a gap at the bottom edge of the trees. Sorry, no floating trees here!)

Fall Birch Tree Paint Project

Supplies Needed:
  • 1 8 1/2" x 11" sheet of white card stock
  • 1 8 1/2" x 11" sheet of yellow card stock
  • Tempera paints in black, yellow, orange and red
  • A plastic hair comb
  • A 1" piece of clean sponge
  • An old magazine to use as a palette
  • Newspapers for your work surface
  • Scissors
  • Elmer's glue
Directions:

1. Make the trees: begin by placing the white card stock vertically on your work surface. Put a little of the black tempera paint onto the magazine palette. Dip the teeth of the comb into black paint and scrape it across the surface of the white card stock back and forth horizontally. Make sure you don't use too much paint or you'll get large areas of black on your trees. Also, make sure you go right off the page--you'll be using all of the white paper, so you'll want those little black scratch marks to be all over. Once you are satisfied, set the paper aside to dry.

2. Make the leafy-background: place the yellow piece of card stock on your work surface horizontally. Remove the page of the magazine that had your black paint on it so you have a fresh page. Put a bit of red, orange, and yellow on the palette. Dip your sponge into the paint and dab it all over the yellow piece of card stock. Don't blend the colors too much, or goop on the paint too thick. Check out the photo above to see how the colors blend. When the background is covered to your liking, set it aside to dry.

3. Cut the trees: Take your scissors and cut the white card stock into long, vertical strips (they should be 11" long by about 1/2"-1" wide). These don't need to be perfect, they are your trees, so don't get out a ruler and measure them! Cut strips out of all the white card stock (you may not use all of these trees).

4. Put a line of glue down the back of the birch tree strip and place it onto the horizontal background. The birch trees will extend past the edges of your background, but that is OK, it allows for you to tilt the tree a bit, as in the picture (and real life). Glue as many trees as you would like to your background.

5. Trim the excess bits of the trees that extend beyond the background and discard.

Enjoy this lovely bit of fall!

Wednesday, January 9, 2013

Peek-a-boo! Who's In The Shelter? Science and Drawing


This is a fun project for kids of many ages, especially if they are learning about shelters and habitats and hibernation. This sample was done by my Kindergartener and he had a fun time drawing from photographs (it's too difficult to get a chipmunk to sit still!) and he was able to use the pictures I had on hand to create his own version of the chipmunk, complete with bushy tail (most of the tail is inside the tree).
Peek-a-boo! It's a chipmunk!

Critter In The Hole of a Tree

Supplies Needed:

• One 9" x 6" piece of brown construction paper• Scraps of brown paper• One 9" x 6" piece of black construction paper• One 9" x 6" piece of white card stock• Pictures of the critter you choose• A piece of wood to use for rubbing (make sure it has a nice, raised grain), optional, you could draw the wood grain• Dark brown and/or black crayon• Colored Pencils• Scissors• Stapler with staples

Directions:

1. Choose the critter you'd like to draw. I talked to my son about the types of animals that would live in holes in trees and under the trees among the roots. He chose to draw a chipmunk. I gathered a couple of photos of chipmunks for him to reference.

2. Draw the critter on the piece of white paper. I drew a line on the bottom edge of the white paper about an inch and a half up from the bottom, so that my son wouldn't draw the animal too low (you want to be able to see the critter when the piece is all together). I told him to draw the chipmunk about 4-5" tall (about THIS big, I showed him with my fingers). You don't want to make the critter too small--we need to be able to see it!

3. Color the critter with colored pencils. Use the pictures as a guide to make the colors just like in nature. Cut around the critter, but leave the 1 1/2" border along the bottom edge of the critter. This bottom border is how you'll secure the critter in your project and it boosts him up so he's peeking out of the hole you'll make later. Set aside your critter drawing for now.

4. Place the brown paper on top of the wood surface and secure with tape. Use the edge of the crayon to rub and create the wood grain on the paper. We used our old wooden steps--the texture was just right. My son drew in one of the knots he saw since that didn't transfer well.

5. Cut a U-shaped section out of the wood-grained brown paper from the top edge. This is the flap for your shelter. Set aside for now.

6. Cut some 1/4" wide strips of the brown paper and crumple a few of them in your hands to use for nesting material inside the tree.

7. Assemble the project: Lay the U-shaped piece of construction paper (not the flap piece, the rest of the tree piece) on top of the black rectangle of construction paper. Staple along one side. Place the critter between these two pieces of paper, with the bottom edges of all the pieces of paper lined up an your critter looking out the hole. Staple along the bottom edge of your piece and up the remaining side. This will secure the critter in the hole. Stuff some of the nesting material inside around the opening of the tree. Replace the flap of the brown construction paper back in place and staple across the top edge to secure it to the piece.

Check out who's living in that old tree! What critter do YOU see?


The project with the flap closed--see the woodgrain?

Peek-a-boo!
This is a close-up in case you need it for assembly
or want to check out that cute critter even closer!

Tuesday, December 18, 2012

Artsonia Ornament Picture How-To

I saw this project on Artsonia and thought my students would love to make this, and guess what? I did too! I made this along side one of my private art students and it was fun and easy and I love the contrast and graphic look of the piece.


Ornaments and Evergreen Picture

Supplies Needed:

  • Scraps of watercolor paper 
  • A circular object to trace--I used a glass (our circles are about 2 1/2" in diameter)
  • Pencil
  • Watercolor paints and brushes
  • White watercolor pencil or crayon
  • Water bucket and paper towels
  • Black mat board
  • Oil Pastels
  • Tacky glue
  • Gold and silver Prismacolor colored pencils
Directions:

1. Use the pencil to trace the circular object onto your watercolor paper about four to five times. Trace lightly. It is better to have a couple more circles than you'll use, just in case.

2. Use the watercolor crayon to add the highlights to each of the ornaments.

3. Wet the entire circle of an ornament. Use the watercolors to create juicy, saturated colors on the ornaments, letting the water blend the colors (wet on wet technique). Use your brush to blend the colors into the highlight a bit to soften the edges. Try to use three colors per ornament--choosing colors that are next to each other on the color wheel (analogous) so that they blend nicely. Repeat with all of the ornaments. Let dry.

4. Use the oil pastels to create the branches of the evergreens. I had my student start with the brown part of the branches. Use a chocolate brown first and rough in the branch. Then go over the branch with a lighter brown (like a yellow ochre) for the highlights. 

5. Use the oil pastels to create the needles of the evergreen. Start with a dark emerald green and rough in some of the needles. Then layer on the medium kelly green color for the bulk of the needles. Finally, use a light moss green for the highlights. Remember to make the needles start at the branch and curve toward the tip of the branch, the way real evergreen needles do.

6. Glue the ornaments onto the background. you may need to place a book on top of them to keep them from curling.

7. Use the gold colored pencil to add the top of the ornament (the finial?) and the hook. Use the silver to create a bit of highlight on the gold.

Merry Christmas!

Thursday, October 18, 2012

Preschool Leaf Exploration

The other day I had a lovely class with a bunch of preschoolers at Peabody Mill Environmental Center. They stop by once a month to learn about science and nature and this month I was asked to teach them about leaves. This is what we did:

Outdoor Activity
We discussed how trees change throughout the seasons. Right now the leaves are very colorful and are falling to the ground since it is Autumn. We went on a leaf hunt and collected interesting leaves. We noticed how leaves can come in different shapes, colors, and sizes. A nice book that tied in with our walk was "Leaf Jumpers," by Carole Gerber. I quickly skimmed the book showing them the different leaf shapes and pointing out the ones that matched the leaves we had collected. We were able to collect red maple, birch, burr oak and regular oak leaves (as well as a couple I could not identify).

Indoor Time:
We discussed the seasons and talked about how trees look different in each season. I read the book "Leaves!" by David Ezra Stein and pointed out the trees depicted in each season. This is a cute book about a little bear who doesn't understand why the leaves are falling off of the tree, but is VERY happy (and reassured) when he sees new leaves in the spring. We were able to tell what season it was in the pictures by looking at the details in the illustrations.

Leaf Critters:
Once we came back inside with our leaves, we glued them to paper. We then added eyeball stickers to them and used a marker to add details such as arms, legs, wings, and/or antennae to make Leaf Critters. A good book that ties in with this craft would be "Leaf Man," by Lois Elhert.


Making Trees of Our Own:
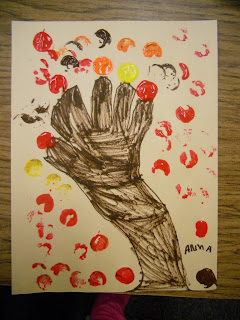
The children also created autumn trees using simple art supplies. This was similar to the project I did the other day with the Kinders at Clark, but I used smaller paper (9" x 12") and traced their hands and had them color the "trunk" and "branches" with crayons. Then they were able to use wine corks to stamp paint "leaves"onto their pictures. They came out very cute and this gave us an opportunity to try some new stuff (stamping/printmaking, tracing, coloring) while learning the parts of the tree and noticing all of those beautiful fall colors.


Additional Activities:
Leaf collecting is fun for little ones--it is nice to see how many different kinds they can find! You can keep the leaves as they are or glue them to pieces of paper to make a leaf book.

Leaf rubbing may be overdone in some people's eyes, but it is fun! One thing I've done (that I saw on Pinterest) is to take a big long piece of paper (from a roll--maybe the piece is about 6' long) and tape it down to the floor or on a long table with various leaves scattered underneath. Show the children how to use the side of a crayon to make a leaf rubbing and the leaves magically appear on the paper. I used newsprint on a roll with great results.

Additional Fall Books: "Why Do Leaves Change Color," by Betsy Maestro is a great book for older children (and for parents to read so that we can answer all of those questions about Autumn!). It is one of the Let's Read And Find Out series of science books. "Red Leaf, Yellow Leaf," by Lois Ehlert is also a good one, as is "When The Leaf Blew In," by Steve Metzger (this one is great for cause and effect and a bit of silliness!).

Sing a Song of Autumn: many sites have great songs to get children up and moving. One site I like is  Perpetual Preschool. What a wonderful way to end the day with a song!


Tuesday, October 9, 2012

Fall Trees With Cork-Stamped Leaves

I had the best time today with about 60 kindergardeners! I was asked to do an art project with them as part of a Fall-themed day their teachers had created for them. It was wonderful--the children were so happy and they were able to explore outside, do some fun movement activities (I joined in too!) and they also did leaf rubbings and this stamping project with me. Thank you so much to the Kindergarten teachers at Clark Elementary School for allowing me to come in for the afternoon.


This picture has a flurry of fall leaves
flying wildly all over--and note the piles on the ground.
I'm so glad I'm not raking all of those leaves up!

I shared a nice little book called "Leaf Jumpers," by Carole Gerber with the children. This book was different than I expected--it's a fiction book. It described the sound, shapes and colors of leaves and identifies eight different kinds of leaf shapes within its pages. This would be a great book to read before going on a leaf hunt! It got us thinking about the colors and shapes of leaves. It also had some very poetic ways of describing the colors of the leaves: "...flame bright and vivid like a match." The back of the book has a little page on the science of leaves and why they change color.

I had the children listen carefully since this project had tracing, cutting, gluing and stamping. We need to listen when doing so much stuff with our art.  I then gave them a quick demo on how to stamp using the corks: dip in paint then stamp gently on paper--no smooshing the cork around! We aren't painting with a brush. It's up and down only.

Next we went over to our tables and began to work. What a great time and a lovely lesson on color and printmaking. Enjoy!

Fall Cork-stamped Trees

Supplies Needed:
  • One 12" x 18" piece of construction paper for background (light blue or whatever color you'd like)
  • One 9" x 12" piece of brown construction paper for tree trunk and branches
  • Pencil
  • Scissors
  • Glue stick
  • Wine Corks
  • Paper plates for paint palettes
  • Red, Orange, Yellow, and Brown Tempera Paint
  • Newspapers to cover work surface
Directions:

1. Trace the child's hand and part of his/her forearm onto the brown paper. This will be the trunk and branches of the tree. Cut the tracing out (most of the children were fine with this--we only lost a couple paper fingers, er, I mean, branches. Glue the trunk and branches to the background paper, making sure the base of your tree trunk is at the bottom of the page.

2. Dip the cork into the paint and stamp leaves all over the paper, filling your tree with beautiful colored leaves!  It's important to have the children fill the ENTIRE top of the tree with leaves--not just a couple along the edges of the branches! No naked trees--this isn't winter. Make sure you get all four colors of paint on your tree.

That's it! A beautiful fall keepsake!

Fall Leaf Rubbings:

When the children were done, they could move over to a couple tables where I had long sheets of newsprint from a roll, taped down. Under the paper, I had placed different types of leaves. They then could use flat-sided crayons to do rubbings and discover the different leaves I had "hidden" under the paper. This was a nice project to keep little hands busy for the last five minutes of class.

Thursday, December 15, 2011

Mexican Folk Art Ornaments

Ooooh, I have a special treat for you today! Tooled metal ornaments inspired by Mexican folk art! They are so bright and shiny, the children just loved making them!
Mexican Folk Art Ornament

When I am looking for inspiration for art projects, I look pretty much everywhere: my Art History books, gift catalogs, and magazines to name a few of my sources. My grandmother loves to bring me magazines that she's done with. No matter how old the magazine is, I love to look through them for techniques and inspiration. This craft was originally published in "Crafts" magazine in 1984. I loved the look of these ornaments and thought my art kids would love to make them. I was right! They LOVED making these. I had them make little cards to put them in so they could give them to a loved one as a gift.

The tooling aluminum needed to be ordered online from www.dickblick.com, but it was so worth it! I ordered a roll for just under $6 and combined with a couple of other things, shipping was only $7. I know that seems like a bit much, but I did have a few things in my order and the tooling aluminum is a roll of 15' or so, enough for plenty of ornaments! Plus, it is a medium that is unusual for the children to work in. I highly recommend it! So, let's get started!

Supplies Needed:

  • Tooling aluminum, available from www.dickblick.com
  • Newspaper
  • Dull pencil or blunt stick for tooling the design
  • Sharpie markers or other permanent felt tipped markers in a variety of colors (I had an eight color assortment available, but so many beautiful colors are available!)
  • Hole punch
  • 8" piece of ribbon for hanging
If you would like to make this as part of a card, see the end of this post.

Directions:

1. Choose a design for your ornament, we used the full size ornament patterns that were published in "Crafts" magazine, but I also had a few blank ornament shapes available for children to design their own. I encouraged the children to design bold designs with clear, large shapes. I also told them to fill up the entire ornament shape and add some details to their design (tons of little details may get lost, but I didn't want them to just draw one little shape in the middle of the ornament and say they were done). Just to be sure they created designs that would work, I had them show me their drawings "for approval" before they started tooling.

2. Using scissors, cut a piece of the aluminum roughly the size of your ornament. We used 4 1/2" x 6" rectangles. Tape the paper with your ornament design to the aluminum to hold it in place while you work.

3. Place the aluminum onto a pad of newspaper. This will create a soft surface for the metal. Using a dull pencil and firm pressure, trace over all of the lines of your design.

4. Once your design is done, use scissors to cut out the shape of the ornament. I found that younger children had trouble with this part and sometimes the ornament would get all bent up or the outer shape would become distorted. So if you are working with younger children, you may want to cut the ornaments out yourself.

5. Flip the ornament over and gently color the raised surfaces with permanent markers. The children can create large areas of color and then add details with a darker color on top. Encourage doing one's best work, taking one's time and adding details and pattern.

6. Once done, have the child add his/her name and date to the back.

7. Use a hole punch to create a hole for hanging and add ribbon to hang the ornament.

8. Attach to a card if desired. See my card directions, below. Feliz Navidad (Merry Christmas)!

Some of the ornaments done my my students

----------------------------


To make this project into a card:

Additional Supplies Needed: you'll need construction paper for the card, an envelope, tape to adhere the ornament to the card and the optional information for inside the card (see the info later on in the post).

Cut a piece of construction paper so that it fits inside the envelope you have. Inside the card, glue the greeting and the information about the project. Have the child sign the card.

The greeting I used was:

Feliz Navidad, próspero año y felicidad!

(Merry Christmas, a prosperous year and happiness)

 May the Spirit of the season bring you joy and peace.


I also included this information on the card: 

Tooled Metal Ornaments


Congratulations! You are the proud recipient of a hand-tooled and hand-colored metal ornament. These ornaments are done in the style of Mexican folk art with markers standing in for the traditional paint. The children used tooling aluminum from www.dickblick.com, pressing their designs into the metal with a dull pencil, then added color with permanent Sharpie markers.

Care of your ornament: the tin is bendable, so care should be taken to keep it from being crushed. It should also be hung up away from little ones since the marker could come off if the ornament is chewed on and the edges are a bit sharp for delicate fingers.


Use tape to attach the ornament to the front of the card and draw a "frame" around the ornament with a felt tip marker to fancy up the front of the card. Done!

Note: if you are going to write a name on the front of the envelope, do so before you put the ornament in the envelope or you will ruin the ornament. Also, take care not to fold or bend the ornament--the metal is pretty thin and will crush and/or bend easily. If you want to mail this card, you'll have to put it in a crush- and bend- proof package.
Related Posts Plugin for WordPress, Blogger...