Showing posts with label shape. Show all posts

Monday, April 25, 2016

Second Grade Projects From My Long-Term Sub Gig

 Here are some of the projects from my long-term sub gig that appear in the collage here so that you had a bit more info on them...ENJOY!! For the background about where I've been/what I've been doing lately, scroll to the end of the post...


OK, I just think this is the cleverest solution to the "Beautiful OOPS" project
described below--this tiger is just TOO cute!!
Check out the post below to see how it was made...
Second Grade Projects From My Long-Term Sub Gig:

Week 1: Winter Landscapes (1 day) Original Post here.
A getting-to-know-you project.
Students used crayons to draw a winter landscape focusing on foreground, background and atmospheric perspective. They then added watercolor to their work (watercolor resist) to add a colorful sky (sunset, nighttime, etc.).


Inspired by Vincent van Gogh’s Sunflowers
Students used Sharpies to create radial designed “sunflowers” and used oil pastels to add color to their work. Students then cut out their flowers and individual student work was mounted together to create a whole-class composition displayed in the hallway.
Oops, a little glare on the reproduction in the middle...
This display used two bulletin boards. This is display #1.
Display #2. Each second grade class had a vase of flowers.
My mentor teacher did this project with grade 1, this was done with grade 2,
but I think it could be done with a variety of grade levels.

A close up of one of the compositions.
The "table" is dollar store contact paper--easy!!

Week 3 and 4: Beautiful Oops! (2 day) 
This one was from my mentor teacher, Meagan Read, at Riddle Brook Elementary School
Inspired by the book, “Beautiful Oops!” by Barney Saltzberg
Students looked at the book, “Beautiful Oops!” by Barney Saltzberg and then moved through a series of stations where they made six “Oops!” on their papers.

  • Table 1: tear or cut a scrap of warm colored paper and glue to your background paper (up to 2 times).
  • Table 2: tear or cut a scrap of newspaper and glue to your background paper (up to 2 times).
  • Table 3: tear or cut a scrap of cool colored paper and glue to your background paper (up to 2 times).
  • Table 4: Dip the side of a cardboard scrap into paint and stamp onto paper to make a line (up to 6 times)
  • Table 5: Dip a mug into paint and stamp onto paper to make a ring (up to 3 times)
  • Table 6: Write your name on your background paper and then trace a circle tracer onto your background paper and cut it out (make a hole in your paper--1 time).

The next week, we looked at the book again and discussed how we could turn mistakes into masterpieces. Students then used markers and crayons (and imagination and innovation) to transform their mistakes into wonderful art.


The write-up that was part of the display.
A cute little guy!

"The Big Monster:"
This is me, the big monster.
I like to roar--it's fun.
I am roaring now.

"The Rainforest:"
The rain is in the trees and (dropping?) from the tree. 
"The Snowman Winter Clean-up"
The finished display got a TON of attention by staff and students alike.
It was colorful and creative and I often saw people stopping and reading
the captions written by the students about their work.
Note: If you are looking for cookie-cutter, pretty projects, this many not be
the project for you--but it is fun and creative!
Week 5 and 6: Juan Miro’s Fantastical Creatures! Check out my original post here.
Inspired by the work of Juan Miro that Mrs. Pettus saw on her trip to Chicago
Students looked at the work of Juan Miro and noticed the shapes and lines he used to create his images. Students then used dice to randomly select pieces and parts for their own creatures and fantasy compositions. Once the creatures, shapes and lines were drawn with oil pastel, students added a wash of watercolor (water resist) to the background to add mood. This was a wonderful project to follow the Beautiful Oops since students needed to adapt and use their imagination.


Week 7: Week 7: Kandinsky group mural Check out the original post here.
Inspired by Kandinsky’s color studies
Students used paint to create a composition of concentric rings based on the color studies by Kandinsky. Individual student work was displayed with other grade levels to create a multi-age group mural for the hallway.

A close-up of the individual 6" squares all glued together
onto the larger roll of paper using Elmer's glue (a dot in each corner).

The finished mural. Beautiful!!


----------------
Backstory for this post:

So, it's been a busy Spring for me since I finished student teacherin' in December--I subbed a bit in preschool, kindergarten, elementary and high school and then landed a wonderful 6 1/2 weeks long-term sub gig at an elementary school nearby teaching art to grades K-5. What a blast I had--the students and staff at Fairgrounds rock and I was sad to go (it's hard to stop doing something you love when your next big thing isn't settled upon yet). Since then, I haven't blogged much because I've been daily subbing and working on my dang art teacher portfolio (more on that in a future post or ten). Check the sidebar (over on the right side of the blog) for other posts in this series (k-5 at Fairgrounds Elementary School). ENJOY!!

Friday, April 22, 2016

First Grade Projects From My Long-Term Sub Gig

 Here are some of the projects from my long-term sub gig that appear in the collage here so that you had a bit more info on them...ENJOY!! For the background about where I've been/what I've been doing lately, scroll to the end of the post...
Here's lookin' at YOU! Check out the projects below for some
first grade ARTSY inspiration!
Grade 1 Art Projects From Fairgrounds Elementary School:

Week 1: Winter Windows (1 day)
A getting-to-know-you project.
We looked at the book, “Snowflake Bentley” by Jacqueline Briggs Martin. Students folded their paper to make four “window panes” and used crayons to draw four six-sided snowflakes (just like real snowflakes). They then added watercolor to their work (watercolor resist) to add a colorful sky (sunset, nighttime, etc.) and enhance the snowflake designs. The wet work was sprinkled with salt to add texture and interest to the work.

A close-up of one of the "Winter Windows"--
this light yellow crayon was easier to see than a white crayon on white paper.

Week 2: Aboriginal Bark Paintings (1 day)
A continuation of a project started prior to my arrival
Students used crayons to create mini circles within a photocopied Aboriginal design. They then added a black tempera paint wash to their work (watercolor resist) to enhance the designs. Finished pieces were mounted onto construction paper backgrounds.

No image of these--sorry!

Week 3, 4 and 5: Feathers For Lunch Collage (2-3 day) From Fine Lines
Inspired by the work of Mrs. Pettus--that's ME! (I've been doing collage work lately) and the collage artist Lois Elhert and her book, “Feathers For Lunch”
Students looked at the book, “Feathers For Lunch” by Lois Elhert and used different shapes and papers to create a collage composition of a cat and a bird. Details could be added using crayon and a real feather was attached to represent the one that got away—just like in the book!

Our inspiration!!
We talked about using shapes to make our cats and birds.
We used real feathers and oil pastels for fun details.

If a student wasn't in class the first week, they could make just the bird on week two.
This student was fascinated by the hole punches he found on the supply cart.

I love this cat's expression!


The finished display I copied from Fine Lines Blog--
it was perfect, so I just had to do it!

Here's the write-up that I displayed near the bulletin board-
it really helps everyone to see all of the details of this project
(as well as the National Common Core Standards in Art)

Week 6: Line Study With Pastels (1 day)
The attributes of line were discussed (length and direction) and then students took turns drawing different types of lines. Students then cut out a shape of their choice (emphasis on something that moves such as an animal or vehicle, etc.) and attached it to a piece of white paper. They used Sharpies to drew eight different types of lines coming from their shape and going off the edge(s) of their paper. Lastly, they used chalk pastels to trace their lines and smudged them to add the illusion of movement to their work.

Beautiful shooting star!

Some students chose to have a limited color palette, but they still turned out beautifully.

A flying airplane.


And this is a football flying back and forth between players--LOVE it!
We also had flying pigs, a giraffe or two, cars, superheros, a UFO, a couple of rockets,
LOTS of footballs, a unicorn, some cats and much more!
Week 7: Kandinsky group mural See post here
Inspired by Kandinsky’s color studies

Students used paint to create a composition of concentric rings based on the color studies by Kandinsky. Individual student work was displayed with other grade levels to create a multi-age group mural for the hallway.

A close-up of the individual 6" squares all glued together
onto the larger roll of paper using Elmer's glue (a dot in each corner).

The finished mural. Beautiful!!

----------------
Backstory for this post:

So, it's been a busy Spring for me since I finished student teacherin' in December--I subbed a bit in preschool, kindergarten, elementary and high school and then landed a wonderful 6 1/2 weeks long-term sub gig at an elementary school nearby teaching art to grades K-5. What a blast I had--the students and staff at Fairgrounds rock and I was sad to go (it's hard to stop doing something you love when your next big thing isn't settled upon yet). Since then, I haven't blogged much because I've been daily subbing and working on my dang art teacher portfolio (more on that in a future post or ten). Check the sidebar (over on the right side of the blog) for other posts in this series (k-5 at Fairgrounds Elementary School). ENJOY!!

Monday, March 7, 2016

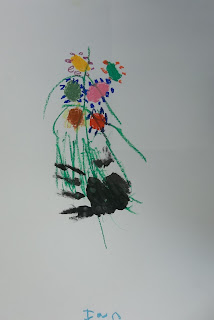
Picasso's Hands With Bouquet With KINDERS


 I've been having a blast with the elementary students at the school I am working at temporarily. I've been having the Kinders explore art materials a bit and this week I thought they'd enjoy doing a project I originally posted back in 2013 as we continued our discussion about line and shape. This is not my idea, as you can read in the original post, but it's a great one that I'm sure I'll be doing again and again in the coming years!


The only thing I changed this time was to have the students draw all of their flowers first, then add the stems, and when they were done they could line up and they could make their hand print at the back of the room at a table by the sink (and near the drying rack). Other times I'd have them print their hand first and then add the flowers.

Again, it helps if you have a bucket or two of water ready for them to rinse their hands in and paper towels ready to go right near the sink (already ripped to single-serve sizes). This was a wonderful project that helped them explore some of the elements of art (shape, line, color) and explore a new material and technique or two. They have some really good observations and insight about Pablo Picasso's work and, it's a FUN project--I mean, who doesn't love to have their hand painted by the art teacher!!??

VOCAB: Pablo Picasso, bouquet, shape (circle, oval), line, color, drawing

CROSS-CURRICULAR CONNECTION: Science (flowers (petals, stems), spring), kindness/giving

MATERIALS: 12" x 18" white paper, oil pastels, black tempera paint, paint brush

Our inspiration!

ENJOY!


Sunday, November 23, 2014

Make a quilt in an evening--A PAPER ORIGAMI quilt that is!

Once upon a time, I used to quilt. I wasn't super-great at it, but I loved it and had fun. I think it's the graphic designer in me seeing all of those neat little shapes in neat little rows just makes me happy! But now I have four kiddos and I'm going to grad school. As for quilting..."Ain't nobody got time for that!" But, my sister is a wonderful quilter and churns out quilts left and right. And her work is better than mine ever was or will be--she's into detail and hand-stitching and all other sorts of craziness :-) And she has a stash of fabric that is *to die for!!*


I thought my quilting days were done (or on hold for a good long time), but, stay with me on this...

My family and I also *LOVE* origami--I don't know what it is about folding a tiny piece of paper a few times and magically getting a little shirt, a ballon, a lantern, or a samurai hat, but we can't get enough! So, awhile back, I saw this neat origami piece that had a bunch of what I figured out were origami samurai hats/helmets arranged on a colored background that looked like--a QUILT! OK, now quilts are still one of my favorite things--so I pinned it and would look at it fondly whenever I saw it in amongst my 5000+ pins...


The last time I stumbled on my origami quilt pin, I thought, "Hey that would be great for my sister!" So, I bought a pack of origami paper from the craft store (about $12.00 for 200 sheets) and coerced my kiddos to help me make a bunch of samurai hats.

Samurai hats are easy to make and even my four-year-old could do them. She ended up making about 15 or so! They were a little "unique" but usable, nonetheless! Here's link to see how to make a samurai hat.


You'll need 32 hats for this arrangement. We made so many, we had enough to make two "quilts"--one for me and one for my sister! The hats are mounted on 18" x 24" piece of Canson pastel paper. You could use mat board, but this is what I had on hand and it is wonderful quality paper and comes in a bunch of colors (and it is easy to measure and cut at home).

This project would make a great class project either for a teacher or for a group auction piece. It's also great for anyone who loves quilts and quilting. It's unusual and a conversation starter! The project took us a night to make two completed "quilts." You could make smaller versions that would fit in a 12" x 12" frame (so three rows of 6 samurai hats) or you could work with the mini origami paper (it's about 3" square) to make cards for your friends.

I hope you try this project and have fun with it and origami! ENJOY!

Friday, January 24, 2014

Positive-ly ME Collage

I'm currently taking a course at Plymouth State University on teaching art to high school students. It's been so awesome! One thing we've need to do was create a curriculum for an Intro to Art course (also called Visual Studies or Art 1). 

Here's an art idea that could be used for a variety of age levels to teach about Positive and Negative Space. It's my spin on a positive/negative space lesson I saw online. With my lesson, students think of a pose, an object, or a symbol that best represent them, sketches it as a silhouette, and fills in the negative space around the silhouette with images and text from magazines or personal photos that are unique to them (i.e. that tell the viewer who they are). It was fun to do and pretty quick. Here's my example:


I originally saw this project on TeacherPayTeachers, designed by Melissa Woodland. She designed it as a negative space social issue collage. What a great idea! I purchased her lesson and it is nicely thought out with great resources and skill-building activities included. Her lesson focuses on the art or Kara Walker, a contemporary silhouette artist who uses silhouettes to address social issues of race, slavery, and sexuality. Melissa Woodland's lesson has students watch a PBS video on Woodland and has a wonderful handout for students about the film. Woodland also includes a rubric for the lesson and three clear images of finished products to get you and your students started. This would be a wonderful project to link with history class and get students checking out the resources that the library offers (to collect newspaper and magazine articles as well as images related to their social issue).

On a personal note, I felt that Walker's art was a bit too edgy for me to be introducing to students, so I substituted local (to me) contemporary silhouette artist Randal Thurston. He is using silhouettes in his work and his work is thought-provoking and technically exquisite. He doesn't have images on his website, but you can google his images and contact him for more info about his work (I did and he sent me TONS of images of his work as well as info about the collections--wonderful!).

Another fabulous resource for silhouettes to get your students thinking can be found online at Art Inspired with a lesson written by Tricia Fuglestad, an art teacher at Dryden Elementary School is Illinois. She has her students create silhouettes of their bodies in front of a green screen and create posters reminiscent of iPad ads from awhile back. She links her lesson to the viral iRaq posters that appeared online and in Los Angeles. Seriously cool (and it links art with technology!).

So many possibilities! I hope you try this with your students--and if you do, email me some picts and I'll post them here. ENJOY!

Wednesday, June 12, 2013

Check out these projects...

"Busy, busy," is the lament of the art teacher and mom at this time of the year! I've been running all over doing some super-awesome art projects with kiddos in Kindergarten all the way to 8th grade. I had been shying away from a couple of art projects because they were beyond my comfort level, but I made myself push on and try some projects I really thought would be worthwhile. Here are the projects I tried with my students with my notes on each project. I didn't get photos of any of these since I was very, ahem, engaged due to messes, etc. But check them out...


Kimmy Cantrell slab masks: So awesome and very engaging! I saw this project on Shine Brite Zamorano. I had never heard of this contemporary artist, but once I saw his work I knew my kiddos would love them. 

Pros of this project:
  • Students get to work with clay--yippee! Who doesn't love that!? Learn slab techniques and "scratch and attach" method using slip to adhere clay pieces together
  • Students draw out their masks before creating in clay. Great for them to work from a plan!
  • Students learn about symmetry/asymmetry 
Cons of this project (for my situation):
  • I don't have access to a kiln, so I used Crayola air dry clay. It works well, but it isn't as sturdy as fired clay. I've hot glued finished air dry clay projects to mat board for stability, that helps most times.
  • I needed to transport these between home and school for the drying stage (I don't have a classroom) and I am super-paranoid that something will happen to these in transit or at my home. If you have a classroom, this is a non-issue, I guess.
VERDICT: This is a keeper!

----------

Marbled Paper Journals: I love Mr. E's site so when I saw his super-simple technique for doing Marbled paper using shaving cream and tempera paints, I thought, "I can do this!" I thought the marbled paper would be great as covers for art journals. What a unique keepsake for my "All About ME!" after school art class.

Pros of this project:
  • Students get to learn about marbling and making a book. Wow!
  • Students get to have a wonderful tactile experience with the shaving cream and get to do all sorts of experimenting with drizzling paint and choosing their own color combinations.
  • The shaving cream smells good (teachers from other classrooms kept coming in to see what smelled so good!).
Cons of this project:
  • I had an energetic group that had some, ahem, listening problems. This was a bad idea for them. Many of them would have been happy just playing in the shaving cream. The. Entire. Time. That's fine, but they were playing in the shaving cream that had paint mixed into it and it was dripping on the floors, the tables, their clothes, etc. And then when they "helped" to clean up, the water from the sink somehow poured onto the floor and we had GIANT puddles everywhere. It was a bit of a challenge. So that brings me to my next "con:"
  • This project can be messy if not managed well. I take responsibility for the mess, certainly, but it's pretty bad when I go through an entire roll of paper towels and I have to ask the custodian for a mop and bucket and spray and spend 45 minutes cleaning with said items--and that was one class!
  • This technique is very teacher-focused. I worked with three kids at a time and they made two prints each. This focus made it so some of my rowdy students had some time to wind-up and get into trouble. I felt like I was constantly juggling naughtiness and shaving cream. It was a great stress test! :-) I think I passed, but then I had lots of time to think about it as I cleaned up after class...Mr. E--you are a saint!
VERDICT: Not again.

--------------

Kinder Rainbow Windsocks: I had my final volunteer art session with the Kindergarteners at Clark School in Amherst in May. I had done all sorts of wonderful projects with them using collage, printmaking, and paint (a bit), but I wanted to make the final project special. I knew I had my project when I saw these beautiful rainbow windsocks online at Kinder Craze. The windsocks have paint and streamers to create the most awesome and beautiful windsocks perfect for Spring! But 60+ kids with 6 different colors of paint and 30 minutes? Was this beyond my skillset? I worried, I planned, but it was awesome in the end...

Pros of this project:
  • Paint! Rainbows! Streamers! Need I say more!?!?
  • The children needed to use each of the colors to made large arcs on their papers moving from left to right. Great for hand/eye control, especially since subsequent arcs needed to touch the previous arc. Also, colors needed to be painted in rainbow order.
  • Children saw that a 2D piece of art, could transform into a 3D form: a cylinder
  • Children needed to share the foam brushes and practice patience. I placed a muffin tray in the center of each table with one of the six colors each well. One brush in each color. I had the first person start with red, paint their arc, and then pass the red brush to their neighbor who would paint and then pass the brush to his/her neighbor. This was repeated through the colors. I was worried this would take too long, but it was awesome.
Cons of this project:
  • It uses 6 colors of paint and six colors of streamers, so it would be pricey if you were buying everything for this one project, but we had everything we needed already.
  • Cleanup can be difficult. I had a helper who rinsed my brushes and trays, but I'd allow for 1/2 hour cleanup. It really wasn't all that bad at all. Those Kinders are awesome.
  • It doesn't get done in 1 day. We glued the streamers on first, then painted and then put them on the drying rack to dry. The teachers then formed the pieces into cylinders and stapled them closed the following day. They said it was super-easy (I try not to leave the classroom teachers with anything to do once my visit is done).
VERDICT: This is a keeper!

-------------------

Jean Dubuffet Paper Sculptures: What could be easier-a sheet of white paper, some markers (limited color palette--2-3 colors, plus black), scissors, glue stick and a piece of black mat board--TA DA! Instant art just like Jean Dubuffet. I've had this one pinned for a while now, but never quite had the chance to get to it. Then, in Sculpture class, we had a little free time after painting our Kimmy Cantrell masks (see above) and I thought I'd try this project. I'm glad I did--it was perfect! See a similar project here at Art Smudge.


Pros of this project:
  • Limited supplies (and the supplies needed are inexpensive).
  • Limited teacher involvement--YEAH! This is great for a sub or if you are helping students finish up/clean-up.
  • Children saw that a 2D piece of art, could transform into a 3D form.
  • Allowed for creativity in the lines, pattern, color, and 2D and 3D shapes and forms.
Cons of this project:
  • It is over quickly--I'd say, 1/2 hour from start to finish. That could be a pro, but if you are planning for it to take an entire class session, it's a con.
  • They are relatively delicate. May not make it home on the bus and cannot be stored, really.
VERDICT: This is a keeper!


-------------------

I'm very happy I tried these projects! What projects have you been hesitant to do but, in the end, were glad you did? I'd love to hear about them!

Friday, April 5, 2013

Kindergarten 2D Shape Robots

I saw this fantastic art project on Teach Preschool and knew I just  HAD to do it with my son's Kindergarten class! So this past Tuesday I was able to go in and spend a robot-themed afternoon with them. We had so much fun! Here are the robots they made using 2D shapes:


Deborah at Teach Preschool is totally great! I wish she lived near me so I could send my little ones off to her! Every day she sends out posts that are full of great learning ideas for the Preschool set. I've found that my Kinder guy also enjoys some of the activities from her site.

So check out her original post for the Shape Robots here.

Here are some of my notes on the lesson:

  • This project is great for Preschool and Kinder-aged kiddos. Both boys and girls enjoyed creating their robots.
  • This project tied in nicely with what my son was learning at this time: 2D versus 3D shapes and had a bunch of different shapes for them to use, identify and talk about while they were working.
  • This project has some very interesting kinetic-learning opportunities. The shapes are secured by poking bits of pipe cleaner through the shapes and into the foam. The kids loved doing that and really enjoyed that the legs and arms could move once they were secured with the pipe cleaner "bolts."
  • The featured book, "The Robot Book," by Heather Brown was a bit hard to find locally since it currently out of print but it is being rereleased in June. I ordered it from Amazon and it has become a favorite in our house. It talks about the parts of a robot, but it is ultimately what's inside the robot (it's heart) that counts. You could get along without the book, I guess. But I was glad to have it. It is a board book with moving parts which tied in perfectly to our robots. 
  • I was able to buy the craft foam sheets for the shapes at Michael's and just spent a few minutes cutting random shapes out of the foam: big rectangles, little rectangles, squares, half circles, and triangles. I also had peel and stick hearts and stars available, too. Maybe having circles would be nice, but I didn't have any and I wasn't going to cut them!
  • I bought the 1/2" thick styrofoam sheets at the dollar store in the floral section. They were 12" square and I was able to get three 5" x 7" rectangles from them and then I used the scraps to piece together another one (so I got four 5" x 7" styrofoam pieces from one 12" x 12" styrofoam piece). I hot glued the styrofoam rectangles to an 8 x 10" piece of mat board.
  • The only thing we used glue for were the googly eyes.
  • I encouraged the children to add details (button, switches, patterns, lines) with a Sharpie. They were more than happy to do so!
  • I worked with about 6 children at a time and at the other "stations" or centers they could play with gears (like Deborah suggested) or play Robot Bingo which I picked up at the dollar store (score!!).
It was a great day and I had a lovely afternoon with the children! They were all so proud of their robots and had a great time exploring shape and line and form. Thank you to Mrs. Greany for having me visit and to Deborah at Teach Preschool for the super-awesome lesson!

Thursday, April 4, 2013

Easy-Peasy Pizza Sculptures!

I'm always looking for a better way to do projects. I had done pizza sculptures a la Claes Oldenburg before (see here) and I thought that my Modern Art kiddos would like them too. I had originally had students create the pizza form from two pieces of newsprint stapled and stuffed with crumpled up newspapers ad then paint the sauce and toppings. While that worked out OK, the pizzas got a bit muddy with all of those toppings being painted over one another before they were dry. So, I got to thinkin'...
YUM! Bacon, sausage and pepperoni pizza!

I bought some red and kraft-colored wrapping paper at IKEA this past Christmas and thought the weight and color of them would be nice for the sculptures. I thought the children could cut a brown triangle for the bottom crust part and a top triangle from red for the sauce part...however, I used all of the red wrapping paper at Christmastime. Oops! But I had a plan...

I had the children cut both triangles for the pizza from the kraft paper, staple & stuff and then paint the sauce on with red tempera. While they were drying, the children created their toppings from construction paper scraps. This worked out great for timing and they came out great--love the bright red sauce!

The toppings are a study in size, shape and color! I had some take-out menus from pizza places and we made a huge list of toppings the children could use on their pizzas. I also made my "at least three" rule with the toppings: the children had to create at least three different toppings for their pizza (not including the cheese). Most of them were happy to oblige!

So have a no-calorie pizza party for your class or family and have fun using up all of those paper scraps you've been hanging onto!

Easy-Peasy Pizza Sculptures

Supplies Needed:


  • Medium weight paper (large sheets or a roll of paper)
  • Triangle templates cut from poster board (bottom crust template should be about 5" longer than the top crust so you can roll the triangle up and make the crust of the pizza)
  • Pencil
  • Scissors
  • Ruler
  • Newspaper or paper scraps to stuff the form
  • Stapler with staples
  • Red tempera paint (or white if you like a white sauce)
  • Paint brushes
  • Water bucket, paper towels
  • Paper scraps for pizza toppings
  • Elmer's glue
Directions:

1. Cut two triangles from kraft paper for the top and the bottom of the pizza slice. As I said above, the bottom crust triangle should be about 5" longer than the top crust so you can roll the triangle up and make the crust of the pizza.

2. Layer the two triangles on top of one another and staple along the two pointy, side edges or the pizza, through both layers. Leave the crust edge open, creating a pocket.

3. Crumple up newspaper, lightly, and stuff the pizza slightly, to give the pizza slice some dimension. 

4. Roll the open edge of the pizza slice inward a couple inches to create the pizza crust and secure with a couple of staples. You now have a giant slice of pizza!

5. Use tempera paints to paint the sauce on your slice of pizza. 

6. While it dries, you can use paper scraps to create toppings. To create the toppings you can rip, or cut the paper, or even use different punches as you see fit. To create multiple shapes (for mushrooms or other unique veggies), fold the paper multiple times and then cut through all the layers--you'll make a number of uniform shapes at once. Much better (and faster) than cutting out individual mushrooms!


6. When the paint is dry, attach the toppings to your pizza slice with glue. I had the children dribble the Elmer's glue in a zigzag motion over the sauce and then sprinkle the toppings on. Lightly press the toppings into the glue (the glue will dry clear).

YUM! Let's eat!


Related Posts Plugin for WordPress, Blogger...