Showing posts with label nature. Show all posts

Wednesday, June 30, 2021

Little Visitor

Today I was journaling outside and enjoying the summer weather before it gets too hot. I love sitting on the back deck before the children get up! 

I looked up and saw this little visitor. Thankfully he was gracious enough to wait while I darted inside to grab my binoculars for a closer look. His ears were the most beautiful shade of seashell pink--I had seen this little guy before, but had never noticed that. He was enjoying the clover in the yard and looked adorable with a piece hanging from his mouth!


Supplies: Micron pen (PN) and Prismacolor colored pencils (Scholar quality)

Tuesday, June 24, 2014

A Project That Really ROCKS!

I'm a little behind with my postings, but I wanted to share this great project I did with my after school "Spring Into Art" class for Mother's Day. Not only is this a great project to show mom you care, it's great for pretty much anytime! I mean, who doesn't like painted rocks, wire sculpture and poetry?!? ;-)


This piece was made for me by my 4th grade son.
He enjoyed this project and liked writing the poem about me
(to read it, scroll down).

I linked this project to nature, of course, and Alexander Calder, since the wire portion reminded me of his stabiles and standing mobiles. Check out this one at his website, www.calder.org:


This project can take off in a variety of directions: you could skip the poem and focus on creating a mobile-like structure where students explore balance, or you could use wood or foam core for the base, or mount the poem or a famous quote to the base…it is really up to you! Although the poetry piece makes a great integrated arts project.

Here are the directions for the version we did…Enjoy!

Rockin' Stabiles

Supplies Needed:

  • A rock the size of a softball, or so…
  • Acrylic paints
  • Paint brushes, water buckets, paper plate palettes, newspaper
  • Medium gauge copper wire (I think ours was 24 gauge, but check to see what works for you)
  • Wire cutters
  • Poem/Thank You Note Worksheets
  • Pencils
  • Plain white index cards (we used 4"x 6" ones)
  • Fine point Sharpies
  • Pretty colored paper or card stock (optional)
  • Glue Sticks
  • Scissors
  • Craft foam scraps
  • Hole punch
Directions:

1. Select a nice rock for your base, brush it off and paint it with the acrylics. Let dry.

2. Choose a poem/thank you note worksheet to work with. I downloaded the Diamante template from www.ReadWriteThink.org for the students to use. I encouraged the older students (4th grade) to use those. For the younger students and ones who struggle with writing, I let them write a thank you note to their mom. I provided a template for the thank you note as well, to prompt them a bit. As a mom, either writing is appreciated! 

My son wrote this about me:
Brandie
Beautiful, Awesome
Cleaning, Cooking, Vacuuming
You are very awesome.
Resting, Eating, Playing
Cool, Calm
Mom

3. Once the students were done their writing, I proofread them (although I let some of the creative spelling go sometimes because it was just so darn cute!). Transfer the writing to the index cards using Sharpies to make a nice-looking final copy.

4. Glue the index cards with the final writing onto a pretty piece of paper to create a nice border around the poem.

5. Cut a piece of wire to about 36" long. Wrap the wire around the rock a couple of times and twist the ends. One end can be a spiral to hold the poem you've written, the other end can curl out and around like the arm on Calder's work. You can cut smaller pieces of wire to make a mobile-type structure at this time, but I had students cut a shape from craft foam, punch a hole in it, and hang the shape from the arm.

6. Place the poem/thank you note in the spiral portion of the stabile (you may need to secure the note on the back with a bit of tape).

Enjoy!

My other son, who is in first grade, was finding it hard to write that day,
so he painted the rock and created the wire heart sculpture instead.

Friday, June 20, 2014

Nature Walk Scavenger Hunt and Sketches

Are you heading outdoors with a bunch of kiddos to look around? How about a Nature Scavenger Hunt? A couple of years ago, I worked for the Nature Center in town, Peabody Mill Environmental Center, and they sent me off to a Kindergarten to do a class visit. I thought an outdoor exploration of the playground, discussion about plants and their parts, and a sensory nature walk/scavenger hunt would be great! I met with multiple classes that day and we had a blast!

This is a great project and can be adapted for an outing with a bunch of scouts,
a camp experience, an art classroom, general classroom, homeschooling field trip, etc.

Prepping For The Lesson:
This is a nice lesson that requires very little prep--although you may want to buzz around the playground before the kiddos join you, so you have an idea of what is out there that you might want to point out to them.

Also, you'll need to print out the scavenger hunt form--I used one from The Bird Feed NYC--they have a bunch of them there (and some other neat stuff too!). We would all be using the same form and filling it out as a class (each class got their own). I glued the scavenger hunt form to a large piece of construction paper, so I would have room to draw my diagram of a flower and its parts. I also wrote some good scientific words on the poster such as: look, listen, touch, smell, observe, identify, dissect, and collect (apparently I misspelled dissect the first time around!).

I also brought a bunch of star stickers, a sharpie for me, some pencils and sticky notes, too.

Starting Off:
I met the classes in the art room and told them that we'd be heading outside to do some exploring. We talked about using out senses to experience the world around them. However, we would not be using our sense of taste! No licking the trees! I then went over the rules for outside behavior and how we'd be working together to complete the scavenger hunt form.

Moving Outside:
We went out and sat down. We experienced the playground by using our senses and we discussed what we heard, saw, felt, and smelled. We checked off as many things from the scavenger hunt form that we could while sitting there--it was quite a bit!

Then I let the children move around and I pointed out a few things that I thought would interest them, such as a little mushroom I found, etc. We stopped and looked at a dandelion and we discussed the parts of a flower and I drew them on the poster and labeled the parts. They loved this part and they really enjoyed dissecting the dandelions and seeing up close the parts of the flower!

Wrapping It Up:
We took a couple of minutes to see if we could find anything else on the list, then I brought them over to the picnic tables and gave them each a pencil and a sticky note and invited them to draw a picture of something they saw, heard, touched, or smelled today on the walk. I them glued their sketches all around the edges of the poster and gave the finished piece to their teacher to display in the classroom.

In the future, I could make the poster a bit better, I think, but I really liked how this easy lesson came together and I loved the sketches the children drew--it was great to see what they took from their time outside.

Enjoy!


Friday, June 13, 2014

Andy Goldsworthy Nature Sculptures

My Spring Art class headed outside to create some beautiful Nature Sculptures inspired by Andy Goldsworthy. Many of the children weren't familiar with his work, but really got inspired as we looked at a book I had brought called, "Hand to Earth." As we flipped through the pages, they were amazed at his work and itching to get started!


I had wanted a quick lesson where they could create outside and had intended that while they were creating their sculptures, I would work with small groups to make sun prints--a natural link, in my opinion. But alas, the weather didn't cooperate and the sun prints were a no-go due to the sun going away as soon as class started! At least it didn't rain! :-)

Unfortunately, the students can't take something him from a class like this--we even needed to destroy them before we left--that was hard for some. But, I brought the iPad and took some photos of each sculpture. Once I went home, I used PicCollage to bring all of the images from class together into a collage that could be printed as a poster--a very pretty one, I'd say! I emailed those out that afternoon to the families so the children could remember their sculptures forever.

This is a great lesson! The prep is pretty minimal, of course, but it really gets a good discussion going about the following themes:

  • Looking closely at nature
  • Being good stewards of the land
  • Working together as a team/taking turns/helping
  • Elements of art/principles of design
  • What is sculpture?
  • What is art?
  • The job of artist (How does an artist get paid for work such as this? What inspires an artist? How long will pieces like this last in nature?)
So, here's the final poster--enjoy!


Thursday, October 18, 2012

Preschool Leaf Exploration

The other day I had a lovely class with a bunch of preschoolers at Peabody Mill Environmental Center. They stop by once a month to learn about science and nature and this month I was asked to teach them about leaves. This is what we did:

Outdoor Activity
We discussed how trees change throughout the seasons. Right now the leaves are very colorful and are falling to the ground since it is Autumn. We went on a leaf hunt and collected interesting leaves. We noticed how leaves can come in different shapes, colors, and sizes. A nice book that tied in with our walk was "Leaf Jumpers," by Carole Gerber. I quickly skimmed the book showing them the different leaf shapes and pointing out the ones that matched the leaves we had collected. We were able to collect red maple, birch, burr oak and regular oak leaves (as well as a couple I could not identify).

Indoor Time:
We discussed the seasons and talked about how trees look different in each season. I read the book "Leaves!" by David Ezra Stein and pointed out the trees depicted in each season. This is a cute book about a little bear who doesn't understand why the leaves are falling off of the tree, but is VERY happy (and reassured) when he sees new leaves in the spring. We were able to tell what season it was in the pictures by looking at the details in the illustrations.

Leaf Critters:
Once we came back inside with our leaves, we glued them to paper. We then added eyeball stickers to them and used a marker to add details such as arms, legs, wings, and/or antennae to make Leaf Critters. A good book that ties in with this craft would be "Leaf Man," by Lois Elhert.


Making Trees of Our Own:
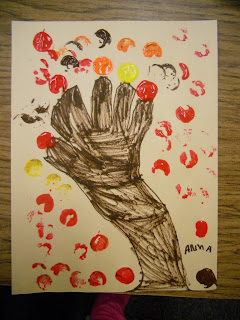
The children also created autumn trees using simple art supplies. This was similar to the project I did the other day with the Kinders at Clark, but I used smaller paper (9" x 12") and traced their hands and had them color the "trunk" and "branches" with crayons. Then they were able to use wine corks to stamp paint "leaves"onto their pictures. They came out very cute and this gave us an opportunity to try some new stuff (stamping/printmaking, tracing, coloring) while learning the parts of the tree and noticing all of those beautiful fall colors.


Additional Activities:
Leaf collecting is fun for little ones--it is nice to see how many different kinds they can find! You can keep the leaves as they are or glue them to pieces of paper to make a leaf book.

Leaf rubbing may be overdone in some people's eyes, but it is fun! One thing I've done (that I saw on Pinterest) is to take a big long piece of paper (from a roll--maybe the piece is about 6' long) and tape it down to the floor or on a long table with various leaves scattered underneath. Show the children how to use the side of a crayon to make a leaf rubbing and the leaves magically appear on the paper. I used newsprint on a roll with great results.

Additional Fall Books: "Why Do Leaves Change Color," by Betsy Maestro is a great book for older children (and for parents to read so that we can answer all of those questions about Autumn!). It is one of the Let's Read And Find Out series of science books. "Red Leaf, Yellow Leaf," by Lois Ehlert is also a good one, as is "When The Leaf Blew In," by Steve Metzger (this one is great for cause and effect and a bit of silliness!).

Sing a Song of Autumn: many sites have great songs to get children up and moving. One site I like is  Perpetual Preschool. What a wonderful way to end the day with a song!


Friday, August 24, 2012

Rockin' Robins


In Art/Nature Camp, we talked about birds. We went on a hike and I gave each of the children a homemade pair of binoculars to help them with their bird watching. As we hiked around we looked for signs of birds and, of course, actual birds. Signs of birds included: bird droppings, nests, bird feeders and bird houses. I had a couple of bird identification books on hand in case we spotted birds.


Rockin' Robins--simple and fun!
We discussed what makes a bird:
  • Have bills, but no teeth
  • Have feathers
  • Hatch from eggs
  • Have wings (but not all can fly!)
  • Have hollow bones
  • Breathe oxygen
  • Are Warm blooded
And then we talked about the parts of a bird:
  • Head (with two eyes and a bill)
  • Body (with feathers)
  • Two Wings (more feathers)
  • Two Legs and Feet
We then created Rockin' Robins. This is an easy craft that is inexpensive to make. The resulting bird easily rocks back and forth--it's up to you to sing, though! My students and my children particularly loved hearing me sing "Rockin' Robin" to them (poor guys!).

Rockin' Robins

Supplies Needed:


  • One lightweight paper plate
  • Pencil
  • Crayons (brown and red are what we used)
  • Scraps pieces of brown and yellow construction paper
  • Scissors
  • Glue stick
  • Eyeball stickers (optional, you could use white paper and draw two eyes)
  • Feathers
  • 5" piece of yarn
  • Tape
Directions:

1. Write your name on the side of the paper plate you would eat off of.

2. Fold the paper plate in half with the name on the inside.

3. Open up the plate and color a 1" wide border of red around the entire plate. This will be the robin's red breast and belly when the bird is finished.

4. Color the center circle of the plate brown. This will be the robin's back when the bird is finished.

5. Cut a triangle of yellow construction paper for the beak. Attach to the underside of the plate at one of the fold lines for the beak of the bird.

6. Add two eyes to your bird. I found some neat eyeball stickers in the supply closet at PMEC, but you can cut them from construction paper.

7. Cut two brown wings from construction paper and glue to each side of the bird.

8. Glue feathers to the wings and at the tail end of the bird.

9. We taped a piece of string to the underside of our birds to keep the two edges of the plate from moving apart (and make it so the robin was able to rock back and forth).

The underside view of the Robin, showing the yarn
that we taped to the bottom to keep it from flattening out.

Sing the song as your Robin rocks out!

Rockin' Robin (Excerpt)
Originally performed by Bobby Day


He rocks in the treetops all the day long
Hoppin' and a Boppin' and a-singin' his song
All the Little Birds on Jaybird Street
Love to hear the robin goin' "Tweet, Tweet, Tweet!"
Rockin' Robin
Tweet, Tweet, Tweet
Rocking Robin
Tweet, Tweet, Tweet
Go Rockin' Robin 'cause we're really gonna rock tonight!


Thursday, August 23, 2012

Art/Nature Camp: Scheduling Play With 2nd & 3rd Graders

The second week of art camp, I taught a group of 7- and 8-year-old boys. Since the camp was art and nature, I designed our days (9:00 am to noon, Monday-Friday) to include exploration and instruction as well as having the boys create a major art project and a minor art project every day. The prior week, I had taught 5- and 6-year-olds and had used centers VERY successfully, but I didn't think the older kids would go for them (I could see them looking at me with raised eyebrows as I dinged the bell!). But I soon found that the boys enjoyed having some structured down time as well.


What a beautiful setting at PMEC!
Here are some of the boys doing what they LOVE the most--throwing rocks!


Revising the Schedule:

The schedule for these older boys was tweaked slightly. We started off outside with a hike or scavenger hunt. This time outside allowed for more extensive exploration (and much rock-throwing into the pond). I tried hard no to rush them. They were, after all, at camp and camp is supposed to be FUN! There were plenty of opportunities to point out things related to the day's theme and I carried magnifying glasses and their sketchbooks with me constantly throughout the week so they could draw the critters we observed out in the field. Many of the boys used their sketchbooks every day, some multiple times a day.

We then moved inside for a discussion as they ate a snack. After snack we did our big art project as a group. Once that was done, they could sit on the carpet and choose an activity to play with while I cleaned up and prepared for the next thing. Since the boys were a bit older, I didn't use the bell or make them switch center activities. The activities I kept on hand that were popular were:
  • Legos
  • Blocks
  • Matchbox Cars
  • Nature-related Books
  • Sketchbooks (they could free draw or use the magnifying glasses to observe and draw specimens)
  • Bubbles
I had the kids make their own sketchbooks (super-easy) and then we carried them
with us constantly to write observations, draw critters we found, do leaf rubbings, etc.
These are great because other pages can easily slipped in as needed.

The Second Art Activity of the Day:

While the boys played quietly, I would set up the second art activity of the day. One day the boys seemed to be playing well and not interested in doing more art (we had also done some sketching in the field), so I let them stay playing with their chosen activity. But, I found that the boys were happy to do a second project if they were allowed to play on their own for a while. This second activity was small and quick (lasting about 15 minutes) and wasn't as technical. One day it was making owls from clay, another it was making bug-themed bookmarks. This way, I was able to reinforce some ideas from the day, have them do a bit more art, but keep it relaxed.

Throwing Rocks (Lots of them!)

After the boys completed their second art activity of the day, we picked up and headed back outside! These boys were very interested in throwing rocks into the pond and streams onsite and looking for frogs and the resident snapping turtle, Bob, so I made time for that before they went home everyday--about the last half hour of each day. That way, they could leave on a high note and get some wiggles out before their parents arrived. The week went wonderfully and I think it was a nice balance of art, nature, exploration and play!

Monday, August 20, 2012

Using Centers at Art Camp


I had read about using centers in the classroom and the idea intrigued me! However, many of my lessons for my 2nd-5th grade students fit comfortably within my one hour class (including discussion and cleanup). So, I filed the idea of using centers away for later.


Using dollar store foil to create sculptures
(You can also supply pipe cleaners to use for arms and legs if you'd like).

Then, I was asked to teach art camp at Peabody Mill Environmental Center in Amherst, NH. I had two sessions: the first week with 5- & 6-year-olds and the second week with 7- & 8-year-olds. There was no set curriculum, so I needed to design an art & nature camp that would fill the time (9:00 am to noon, Monday through Friday) in a way that would allow the children to create art and take advantage of the beautiful, natural surroundings, and allow for free play and exploration. After all, this is CAMP and it is supposed to be fun!

So, the idea of centers came back out of the files!

As you can see in my previously published post on my art camp schedule, we had center time after we did our main art project. I chose to have three centers each day. One center was located inside and was with me. At this indoor art center, students worked on a smaller art project relating to the day's theme such as making clay birds in nests, making a bug bookmark, or doing a craft about tree rings. The art project at the center was one that would take about 10-15 minutes or so.

The two other centers were located outside on a covered patio. They were (sometimes loosely) related to the day's theme as well, but were self-directed play and exploration. I had a helper outside making sure things didn't get out of hand and that no one ran off into the woods, but other than that, the children were free to play at whatever station they were at.

Rules of the Centers:
  1. Stay with your partner at your center
  2. Play quietly and respect the toys
  3. When you hear the bell ding once, it is time to clean up and stand quietly
  4. When the bell dings the second time, move to the next station with your partner


Ideas for Centers:

  • Blocks (mine were wood-look foam blocks)
  • Build-a-bug toy
  • Plastic Critters (One day I had a bin of insects and another day I had a bin of reptiles and amphibians) with a plastic bin of water for the critters to swim in
  • Cloud dough or moon dough with various molds and scooping toys (too messy for my liking)
  • Bubbles
  • A fishing game with little fishing poles and plastic fish that float in water for the students to "catch"
  • Dauber-type paint pens with large pieces of paper
  • Clay (make your own so you can reuse it and keep in plastic bags between sessions). You can have the clay "as is" or give them the plastic bugs to press into the clay or use as reference when making their own bugs from clay

Building with a toy called "Exobugs" allowed the students
to reinforce what we learned about insects and create
some really unique bugs of their own!

How it worked:

Before we started, I walked them briefly through each center, explaining how to clean-up each center. Then we practiced with the bell (the highlight of the day!). Once in a while, I needed to remind a child to stay in his/her center or to finish picking up, but all-in-all it went great! I was able to spend some focused time with the children doing the smaller art project (this was a great time to have the children do a project that might be hard to do as a group due to multiple steps or different paces within the group). Using centers also broke up the "work time" so that the children weren't standing there listening to me walk them through two art projects the whole time--that would have been boring for them and frustrating for me!). By scheduling in some play time this way, the children were able to take a break and play on their own and with their new friends (we also had hikes, played games, and exploration time outside as well).

It was a great experience and something I will definitely do again!

Building blocks was popular with the children and my helper!

Related Posts Plugin for WordPress, Blogger...