Showing posts with label resist. Show all posts

Monday, April 25, 2016

Third Grade Projects From My Long-Term Sub Gig

Here are some of the projects from my long-term sub gig that appear in the collage here so that you had a bit more info on them...ENJOY!! For the background about where I've been/what I've been doing lately, scroll to the end of the post...

"I am flying over the Eiffel Tower. I had a dream to go near. I am so happy."
Check out the post about this project below...
Third Grade Projects From My Long-Term Sub Gig:

Week 1: Snowglobes (1 day)
A getting-to-know-you project.
Students used construction paper and construction paper crayons to create 3D snowglobes with winter scenes in them. You could use oil pastels for more vibrant colors. The blue background paper is double-thickness so it stands up better and doesn't curl. The pieces could also stand up due to a ringed base. Glittery “snow” was added for sparkle! This one is a keeper in my opinion!

Since I did this project in one day with the students (and they took them with them),
it was a whirlwind and I didn't get any photos of student projects :-(
Week 2 and 3: Jasper Johns Numbers (2 days) 
A continuation of a project started prior to my arrival
Students used pencil and Sharpie to create numbers within a folded grid. Once inked, students could use crayons and paint to add color to the negative spaces within their work.

Jasper Johns, Numbers in Color (1958-59)  
Sorry, I don't have pictures of this, 
but the project was similar to this one, but numbers-only.

Week 5 and 6: Faith Ringgold Story Quilt A similar project can be found here.
Inspired by the book, “Tar Beach,” by Faith Ringgold
I feel that this project is sort of my go-to project with all students--I just love it and it so adaptable. I saw the write-up of a version on scholastic and decided to do that the time. Scholastic has a TON of related activities--check out this wonderful link.

For this version of the project, students looked at the book, “Tar Beach” by Faith Ringgold and used drawing and collage to create storytelling quilts about flying away to someplace special. Students then wrote a description of their piece to be displayed with the work. Individual student work was mounted together to create a whole-class composition displayed in the hallway. Note: the glare on the photos below are due to the glitter glue "stars" we added. Everything is betta with glitta!

The finished quilt--beautiful! 
A quote from the book, "I have told him it's very easy,
anyone can fly. All you need is somewhere to go that you can't get to
any other way. The next thing you know, you're flying among the stars."
The little white pieces below each square are the students' write-ups about
what is going on in their work. 
"Hi. I am Liz and I'm in New York where there's cars and good food
and on the 4th of July we put fireworks up in the sky but right now
I'm flying. Do you want to fly with me?"

"I am the fastest superhero and I like basketball and soccer.
I am speedy."
Week 7: Kandinsky group mural Check out the original post here.
Inspired by Kandinsky’s color studies
Students used paint to create a composition of concentric rings based on the color studies by Kandinsky. Individual student work was displayed with other grade levels to create a multi-age group mural for the hallway.

A close-up of the individual 6" squares all glued together
onto the larger roll of paper using Elmer's glue (a dot in each corner).

The finished mural. Beautiful!!

Friday, April 22, 2016

First Grade Projects From My Long-Term Sub Gig

 Here are some of the projects from my long-term sub gig that appear in the collage here so that you had a bit more info on them...ENJOY!! For the background about where I've been/what I've been doing lately, scroll to the end of the post...
Here's lookin' at YOU! Check out the projects below for some
first grade ARTSY inspiration!
Grade 1 Art Projects From Fairgrounds Elementary School:

Week 1: Winter Windows (1 day)
A getting-to-know-you project.
We looked at the book, “Snowflake Bentley” by Jacqueline Briggs Martin. Students folded their paper to make four “window panes” and used crayons to draw four six-sided snowflakes (just like real snowflakes). They then added watercolor to their work (watercolor resist) to add a colorful sky (sunset, nighttime, etc.) and enhance the snowflake designs. The wet work was sprinkled with salt to add texture and interest to the work.

A close-up of one of the "Winter Windows"--
this light yellow crayon was easier to see than a white crayon on white paper.

Week 2: Aboriginal Bark Paintings (1 day)
A continuation of a project started prior to my arrival
Students used crayons to create mini circles within a photocopied Aboriginal design. They then added a black tempera paint wash to their work (watercolor resist) to enhance the designs. Finished pieces were mounted onto construction paper backgrounds.

No image of these--sorry!

Week 3, 4 and 5: Feathers For Lunch Collage (2-3 day) From Fine Lines
Inspired by the work of Mrs. Pettus--that's ME! (I've been doing collage work lately) and the collage artist Lois Elhert and her book, “Feathers For Lunch”
Students looked at the book, “Feathers For Lunch” by Lois Elhert and used different shapes and papers to create a collage composition of a cat and a bird. Details could be added using crayon and a real feather was attached to represent the one that got away—just like in the book!

Our inspiration!!
We talked about using shapes to make our cats and birds.
We used real feathers and oil pastels for fun details.

If a student wasn't in class the first week, they could make just the bird on week two.
This student was fascinated by the hole punches he found on the supply cart.

I love this cat's expression!


The finished display I copied from Fine Lines Blog--
it was perfect, so I just had to do it!

Here's the write-up that I displayed near the bulletin board-
it really helps everyone to see all of the details of this project
(as well as the National Common Core Standards in Art)

Week 6: Line Study With Pastels (1 day)
The attributes of line were discussed (length and direction) and then students took turns drawing different types of lines. Students then cut out a shape of their choice (emphasis on something that moves such as an animal or vehicle, etc.) and attached it to a piece of white paper. They used Sharpies to drew eight different types of lines coming from their shape and going off the edge(s) of their paper. Lastly, they used chalk pastels to trace their lines and smudged them to add the illusion of movement to their work.

Beautiful shooting star!

Some students chose to have a limited color palette, but they still turned out beautifully.

A flying airplane.


And this is a football flying back and forth between players--LOVE it!
We also had flying pigs, a giraffe or two, cars, superheros, a UFO, a couple of rockets,
LOTS of footballs, a unicorn, some cats and much more!
Week 7: Kandinsky group mural See post here
Inspired by Kandinsky’s color studies

Students used paint to create a composition of concentric rings based on the color studies by Kandinsky. Individual student work was displayed with other grade levels to create a multi-age group mural for the hallway.

A close-up of the individual 6" squares all glued together
onto the larger roll of paper using Elmer's glue (a dot in each corner).

The finished mural. Beautiful!!

----------------
Backstory for this post:

So, it's been a busy Spring for me since I finished student teacherin' in December--I subbed a bit in preschool, kindergarten, elementary and high school and then landed a wonderful 6 1/2 weeks long-term sub gig at an elementary school nearby teaching art to grades K-5. What a blast I had--the students and staff at Fairgrounds rock and I was sad to go (it's hard to stop doing something you love when your next big thing isn't settled upon yet). Since then, I haven't blogged much because I've been daily subbing and working on my dang art teacher portfolio (more on that in a future post or ten). Check the sidebar (over on the right side of the blog) for other posts in this series (k-5 at Fairgrounds Elementary School). ENJOY!!

Monday, February 4, 2013

More Miros

Last Fall I posted a Roll-a-Miro project. I just did this project again with my after school Modern Art class and here are the results--ENJOY!

P.S. If you have been thinking about doing this project but haven't yet, please do! The children really have fun with it!

P.P.S. The link to the Roll-a-Miro chart on Pinterest is here (I haven't been able to find the original source for this):

Creatures From Smoo 57

The Angels of the Ocean

The Angel of the Sky

The Amazing World of Squiggle

The Animal World
The Evil Squidwards

Wednesday, January 30, 2013

Kandinsky Mixed Media Study

This past week was the beginning of semester 2 of Modern Art with my homeschool kiddos. I began with a great little get-to-know-you project I've posted before where the students move about to four different stations experimenting with different media and making color study pictures like Russian painter, Wassily Kandinsky. The students were required to make four squares (one in colored pencil, one in marker, one in collage and one with watercolor resist), but a few had time to complete 6 squares.

Here's the original post on the how-to of doing this projects with the four stations.

Enjoy!


Sunday, October 21, 2012

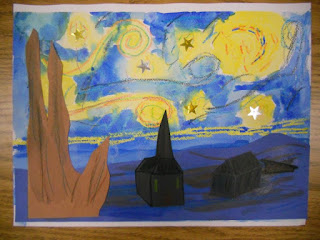
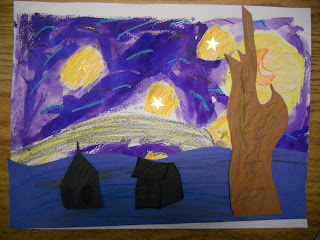
Starry Night, Step-By-Step

Van Gogh is one of the world's most famous artists and it seems that every art educator has his/her own projects already with which they introduce this fabulous artist. There are so many great projects out there and van Gogh's body of work is so large that it was hard for me to choose just one van Gogh-inspired project to do with my Modern Art class. I finally chose van Gogh's "Starry Night." While this is by no means a new and innovative project, I thought it was great. This is how I tackled it with my students:


The basic elements of a Starry Night: sky, buildings, hill, and tree.
We looked at a couple of books about the artist and noticed all of the colors he used in his paintings. We noted that sometimes his color choices didn't even make sense, like when he painted a sky pink! How unusual! We also noticed how he used little dashes or short brush strokes to add color and that our eyes mixed the colors in these areas. These short brush strokes also created movement in his work (similar to how the repetitive lines in our Degas pieces created movement). We also saw that he used VERY thick application of paint in his work--sometimes spreading the paint with a little spatula called a palette knife. WOW!

Poor Vincent sold very few paintings and drawings during his lifetime, because people of the 1890's didn't quite appreciate his vibrant colors. Today his paintings are some of the most famous and most beloved in the world (and sell for millions).

We looked closely at van Gogh's Starry Night and talked about our observations. We then had reproductions of the painting in front of us so we could see how van Gogh would create each section: sky, hill, tree, and buildings. Using the real painting as a guide allows the children to really see the work and bring their own pieces to another level. The children were required to use AT LEAST THREE COLORS in every section they were creating. That pushed them to think of color combos that would work for each section. Some of their color choices were amazing and inspiring.


Van Gogh-Inspired Starry Night

Supplies:
  • Reproduction of van Gogh's "Starry Night"
  • One 9" x 12" piece of watercolor paper
  • Masking Tape
  • Cardboard to tape the watercolor paper to
  • Gold and silver star stickers
  • Crayons 
  • Watercolor paints & brush
  • Water bucket & paper towels
  • Construction paper rectangles: Dark blue, 4 1/2" x 12"; Brown, 4" x 9"; Black, 4 1/2" x 6"
  • Scissors
  • Glue stick
Directions:

1. Tape the watercolor paper to the cardboard on all sides so that the paper doesn't buckle when wet.

2. Use the crayon to draw a moon on the watercolor paper. Make sure your crayon marks are nice a heavy because we'll be adding washes of watercolor and you want them to show up through the watercolor paint.

3. Put 5-6 silver and gold stars on the watercolor paper in the sky area. 

4. Use your crayons to add swirls and dashes all around the moon and stars. Use "Starry Night" as reference. Use at least three colors in these light areas.

5. Use dashes in the dark "blue" area of the sky. Use at least three colors in this sky area. Don't color in the entire sky area with crayon, you'll be filling in the sky in the next step. Keep pressing firmly with the crayon.

6. Once your entire sky has all of the dashes and swirls you want on it, use watercolors to add a yellow glow around the stars and moon. If the yellow is too much for you, dab the paint on the paper with a piece of paper towel. Then add blue paint to the rest of the sky. You can blend the yellow and blue areas of the sky to make a bit of green (that seems to happen in van Gogh's piece). Cover the entire paper with watercolor. The bottom couple of inches will be covered by your construction paper hills, but you don't want to have a gap where the sky ends and your hills begin. Set the sky aside to dry.

7. Create the ground: grab your dark blue construction paper rectangle (4 1/2" x 12"). Use a dark crayon to draw the hills for your painting. Using additional crayons, add dashes of color (at least three colors!) to the hills. You can use a bit of watercolor in streaks as well, but don't soak the paper. Cut the hills out and set aside.

8. Create the cypress tree: grab your brown construction paper rectangle (4" x 9"). Use a dark crayon to draw the tree for your painting. Using additional crayons, add dashes of color (at least three colors!) to the tree. You can use a bit of watercolor in streaks as well, but don't soak the paper. Cut the tree out and set aside.

9. Create the buildings: same deal as steps 7 & 8 above, but use the black paper rectangle (4 1/2" x 6"). You can use at least three colors here as well. The watercolor streaks and crayon will show up on the back paper. I had the children do at least two buildings. Cut them out and set aside.

10. Once your background is dry, glue the hill, tree, and buildings to it.

WOW! You're done! Great job!


Friday, April 13, 2012

Kandinsky Media Study

For my after school Modern Art class I wanted to try something a bit different. I usually do a Kandinsky project inspired by Art Projects For Kids using watercolor and crayon resist, but I thought I'd mix it up a bit and try not only experimenting with color, but also with media. I had each child create two 3" squares using the following media:

  • watercolor and crayon resist
  • collage
  • colored pencils
  • collage (using magazine pages)
This piece was created by a 13-year-old student I teach private lessons to.
Feel free to vary the amount of squares depending on the
age and ability of your students. This project looks great with
four, six, eight, nine, twelve squares, or more!

The lesson is perfect as an introductory project when getting to know students or as an assessment project. Originally, Kandinsky created his circle compositions as color studies, so we can too!

I set up four stations in the room, explained how to use the media at each station properly and then let them go. I timed about 10-15 minutes per station (they created 2 squares at each station). About two-thirds of the students were able to create the necessary squares in the allotted time. I think I would break this into two class sessions in the future and have them do watercolor and marker the first week and collage and colored pencil the next. Or, maybe have students just do one square each (for a total of 4 squares).

The finished pieces were glued to black construction paper. Lovely color and media studies! Thanks, Mr. Kandinsky!

Kandinsky Media Study

This project is designed to be worked in four stations. I'll describe each individually...

Station 1: Markers

Supplies Needed:
  • 3" squares of marker paper (marker doesn't bleed)
  • Pencil with eraser
  • Markers (We used Sharpies)
  • Newspaper to protect workspace
Directions:

1. Use pencil to write your name on the back of two squares. 

2. Draw concentric circles on the paper using pencil. The circle can stay within the box or go beyond the box slightly.

3. Color the rings in with various colors of markers. 

Marker Example (Using Sharpies)


Station 2: Colored Pencils

Supplies Needed:
  • 3" squares of drawing paper
  • Pencil with eraser
  • Colored Pencils
Directions:

1. Use pencil to write your name on the back of two squares. 

2. Draw concentric circles on the paper using pencil. The circle can stay within the box or go beyond the box slightly.

3. Color the rings in with various colors of colored pencils. You can use light or heavy pressure to vary the intensity of the colors.

Colored Pencil Example

Station 3: Collage

Supplies Needed:
  • 3" squares of drawing paper
  • Pencil with eraser
  • Ruler
  • Scissors
  • Glue stick
  • Magazines or paper scraps
Directions:

1. Use pencil to write your name on the back of two squares. 

2. Cut a 3" square from a solid-color section of a magazine picture. Adhere to the 3" square of drawing paper.

3. Cut rings of various colors of magazine paper and glue to your squares.

Collage Example
(Using Magazine Paper)


Station 4: Watercolor Resist

Supplies Needed:
  • 4" squares of watercolor paper (note the larger size)
  • Masking tape
  • Piece of cardboard
  • Pencil with eraser
  • Crayons
  • Watercolor paints & brush
  • Water bucket, paper towels
Directions:

1. Use pencil to write your name on the back of two squares. 

2. Tape the two squares to the cardboard or to the table. Tape a 1/4" border all around the squares--this will keep the paper from buckling as it dries.

3. Draw concentric circles on the paper using pencil. The circle can stay within the box or go beyond the box slightly.

4. Using a crayon, trace the pencil lines, pressing hard enough to leave a nice, thick pencil line.

5. Color the rings in with various colors of paint. You may not want to paint the rings in order since painting two sections that touch could cause the paint to bleed.

6. Let dry thoroughly. Trim squares to 3 inches.

Watercolor Example


To finish:

Mount all squares, touching, in a pleasing arrangement, onto black construction paper. Most squares will adhere nicely using a glue stick, but the watercolor paper may need tacky glue to stay glued down properly. Enjoy!


Related Posts Plugin for WordPress, Blogger...