Showing posts with label autumn. Show all posts

Friday, October 24, 2014

Leaf Man Nature Collages

The beautiful fall colors are fading away up here in New Hampshire (since we've had days of rain and wind), but I wanted to share one of my favorite art projects to do with kids of all ages: "Leaf People (or Leaf Critters)" made with elements from a nature walk and inspired by Lois Ehlert's book, "Leaf Man."


My teacher followers might say, "YAWN. Seen it before." And you are right, but kiddos from Pre-K to 4th like doing this project and every time they do it, their pieces get more and more sophisticated. Also, their observations of the natural elements develop the older they get. What a great link to literature and science!

Here's the "Leaf Man"Book.
Another book by Ehlert that is also perfect
for this time of year is "Red Leaf, Yellow Leaf" as well...

My after-school kiddos were stuck inside due to rain, so I was responsible for gathering materials for this project. Ideally, I like to take students outside to gather/discuss leaves and seeds. Either way, it pays to have some teacher-supplied elements so that everyone isn't using the same shape leaf in their pieces. I collected about 15 different types of leaves, some twigs, acorns, and maple tree "helicopter" seeds, but I bet you could find even more than that given a little time. Collect the leaves right before you plan to use them since you want them to be pliable and not crispy.

Here's the abbreviated timeline for the project:

  1. Read the book "Leaf Man." How did the Illustrator, Ms. Ehlert, use natural materials such as leaves to make animals, insects, and people?
  2. Talk about background. Notice the backgrounds in the book--how are they made? Are they all the same?
  3. Show the students how to tear a piece of scrapbook paper in half in an interesting way. Now we have two pieces of paper. They can be layered this way (demonstrate) to create different types of backgrounds: a lake with mountains in the back, etc. Trade one of your pieces with someone in the classroom and practice making different backgrounds until you get one that you like.
  4. Glue down the background pieces onto a third piece of scrapbook paper using a glue stick.
  5. Create a leaf person, a leaf critter or both on your background. Don't glue the nature pieces down right away--try out different leaves and seeds. When you are happy, then glue it down using goopy glue (Elmer's glue). I had eyeball stickers on hand for them to add as well--the kids like that! But you could use googly eyes, draw the eyes using a Sharpie, or only use natural elements like Ehlert does.
  6. Let dry and enjoy!!
Here are some examples from class:


Did you know: The leaves used on the illustrations of "Leaf Man" were collected all over the U.S. by Ehlert and friends and color photocopied to retain their beautiful colors until she could create the illustrations for the book. What a great way to preserve the leaves--I wouldn't have thought of that!

Thursday, September 26, 2013

Welcome Fall! Birch Tree Project

The leaves are starting to change up here in New England and I love it! I was looking in our local paper this past weekend and they ran a great article about vacationing in Minnesota written by Laurie Hertzel and I just LOVED the beautiful images! Check it out here at the Star Tribune.

This beautiful photo, below, caught my eye especially, since the Birch Tree is the state tree of New Hampshire. 
This photo of birch trees in the Fall taken by Laurie Hertzel at the Star Tribune
inspired this birch tree craft.
This project uses a couple of fun techniques. First, the black lines of the birch bark are made using a hair comb (I saw that on the blog ARTASTIC: Miss Oetkin's Artists), and second, the colorful leaves are sponge painted on the background paper. It's quick, easy, fun, and just a bit messy. I hope you enjoy this craft and this crisp fall weather!


NOTE: I had my son create the birch trees on paper that was being held vertically and then place them on a background that was horizontal--this allows you to have the tree trunks touch the edges of the paper if your child puts them on tilted--some other lessons don't allow for this and there's a gap at the bottom edge of the trees. Sorry, no floating trees here!)

Fall Birch Tree Paint Project

Supplies Needed:
  • 1 8 1/2" x 11" sheet of white card stock
  • 1 8 1/2" x 11" sheet of yellow card stock
  • Tempera paints in black, yellow, orange and red
  • A plastic hair comb
  • A 1" piece of clean sponge
  • An old magazine to use as a palette
  • Newspapers for your work surface
  • Scissors
  • Elmer's glue
Directions:

1. Make the trees: begin by placing the white card stock vertically on your work surface. Put a little of the black tempera paint onto the magazine palette. Dip the teeth of the comb into black paint and scrape it across the surface of the white card stock back and forth horizontally. Make sure you don't use too much paint or you'll get large areas of black on your trees. Also, make sure you go right off the page--you'll be using all of the white paper, so you'll want those little black scratch marks to be all over. Once you are satisfied, set the paper aside to dry.

2. Make the leafy-background: place the yellow piece of card stock on your work surface horizontally. Remove the page of the magazine that had your black paint on it so you have a fresh page. Put a bit of red, orange, and yellow on the palette. Dip your sponge into the paint and dab it all over the yellow piece of card stock. Don't blend the colors too much, or goop on the paint too thick. Check out the photo above to see how the colors blend. When the background is covered to your liking, set it aside to dry.

3. Cut the trees: Take your scissors and cut the white card stock into long, vertical strips (they should be 11" long by about 1/2"-1" wide). These don't need to be perfect, they are your trees, so don't get out a ruler and measure them! Cut strips out of all the white card stock (you may not use all of these trees).

4. Put a line of glue down the back of the birch tree strip and place it onto the horizontal background. The birch trees will extend past the edges of your background, but that is OK, it allows for you to tilt the tree a bit, as in the picture (and real life). Glue as many trees as you would like to your background.

5. Trim the excess bits of the trees that extend beyond the background and discard.

Enjoy this lovely bit of fall!

Friday, October 19, 2012

Last Minute Fall Projects For Older Children

I've been traveling all over these last couple of weeks enjoying some time with kids of all ages! I have been carrying around a couple of projects for my older students to do once their class projects have been completed. Two of these projects are self-directed and able to be set-up, executed, and cleaned-up by the children themselves. Love that!

Both projects are VERY much worth trying. Take a few minutes and try them out yourself!

Leaf prints: a great project I saw online and tried with my older kids this week was one I saw on the blog Deep Space Sparkle. Paint leaves white and print on black paper. Use a sponge to print colors such as red, green, brown, yellow and orange in the negative space around the leaves. This is an easy, but striking, piece. For more info, check out her post here.

Here are some of my students working on the Leaf Print project
from Deep Space Sparkle--they all loved how they came out. Me too!

Symmetrical Leaves: I had a big bag of leaves I carried around with me these last two weeks. I used them for the preschoolers to observe and match, the Kinders made leaf rubbings from them, the Elementary students used them in the leaf printing project above, and my private art students drew them. We cut the leaves down the middle using scissors, glued the half leaves to paper and drew the missing half back in with pencil. This is harder than it looks! It was a great project to do during that transition time between projects or while another project dried.

The drawing on the right were done by my 9-year-old student.

Enjoy these easy projects that celebrate Autumn!

Thursday, October 18, 2012

Preschool Leaf Exploration

The other day I had a lovely class with a bunch of preschoolers at Peabody Mill Environmental Center. They stop by once a month to learn about science and nature and this month I was asked to teach them about leaves. This is what we did:

Outdoor Activity
We discussed how trees change throughout the seasons. Right now the leaves are very colorful and are falling to the ground since it is Autumn. We went on a leaf hunt and collected interesting leaves. We noticed how leaves can come in different shapes, colors, and sizes. A nice book that tied in with our walk was "Leaf Jumpers," by Carole Gerber. I quickly skimmed the book showing them the different leaf shapes and pointing out the ones that matched the leaves we had collected. We were able to collect red maple, birch, burr oak and regular oak leaves (as well as a couple I could not identify).

Indoor Time:
We discussed the seasons and talked about how trees look different in each season. I read the book "Leaves!" by David Ezra Stein and pointed out the trees depicted in each season. This is a cute book about a little bear who doesn't understand why the leaves are falling off of the tree, but is VERY happy (and reassured) when he sees new leaves in the spring. We were able to tell what season it was in the pictures by looking at the details in the illustrations.

Leaf Critters:
Once we came back inside with our leaves, we glued them to paper. We then added eyeball stickers to them and used a marker to add details such as arms, legs, wings, and/or antennae to make Leaf Critters. A good book that ties in with this craft would be "Leaf Man," by Lois Elhert.


Making Trees of Our Own:
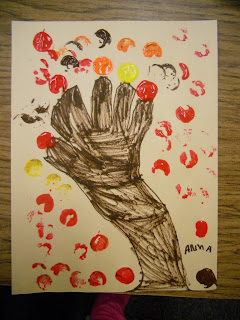
The children also created autumn trees using simple art supplies. This was similar to the project I did the other day with the Kinders at Clark, but I used smaller paper (9" x 12") and traced their hands and had them color the "trunk" and "branches" with crayons. Then they were able to use wine corks to stamp paint "leaves"onto their pictures. They came out very cute and this gave us an opportunity to try some new stuff (stamping/printmaking, tracing, coloring) while learning the parts of the tree and noticing all of those beautiful fall colors.


Additional Activities:
Leaf collecting is fun for little ones--it is nice to see how many different kinds they can find! You can keep the leaves as they are or glue them to pieces of paper to make a leaf book.

Leaf rubbing may be overdone in some people's eyes, but it is fun! One thing I've done (that I saw on Pinterest) is to take a big long piece of paper (from a roll--maybe the piece is about 6' long) and tape it down to the floor or on a long table with various leaves scattered underneath. Show the children how to use the side of a crayon to make a leaf rubbing and the leaves magically appear on the paper. I used newsprint on a roll with great results.

Additional Fall Books: "Why Do Leaves Change Color," by Betsy Maestro is a great book for older children (and for parents to read so that we can answer all of those questions about Autumn!). It is one of the Let's Read And Find Out series of science books. "Red Leaf, Yellow Leaf," by Lois Ehlert is also a good one, as is "When The Leaf Blew In," by Steve Metzger (this one is great for cause and effect and a bit of silliness!).

Sing a Song of Autumn: many sites have great songs to get children up and moving. One site I like is  Perpetual Preschool. What a wonderful way to end the day with a song!


Tuesday, October 9, 2012

Fall Trees With Cork-Stamped Leaves

I had the best time today with about 60 kindergardeners! I was asked to do an art project with them as part of a Fall-themed day their teachers had created for them. It was wonderful--the children were so happy and they were able to explore outside, do some fun movement activities (I joined in too!) and they also did leaf rubbings and this stamping project with me. Thank you so much to the Kindergarten teachers at Clark Elementary School for allowing me to come in for the afternoon.


This picture has a flurry of fall leaves
flying wildly all over--and note the piles on the ground.
I'm so glad I'm not raking all of those leaves up!

I shared a nice little book called "Leaf Jumpers," by Carole Gerber with the children. This book was different than I expected--it's a fiction book. It described the sound, shapes and colors of leaves and identifies eight different kinds of leaf shapes within its pages. This would be a great book to read before going on a leaf hunt! It got us thinking about the colors and shapes of leaves. It also had some very poetic ways of describing the colors of the leaves: "...flame bright and vivid like a match." The back of the book has a little page on the science of leaves and why they change color.

I had the children listen carefully since this project had tracing, cutting, gluing and stamping. We need to listen when doing so much stuff with our art.  I then gave them a quick demo on how to stamp using the corks: dip in paint then stamp gently on paper--no smooshing the cork around! We aren't painting with a brush. It's up and down only.

Next we went over to our tables and began to work. What a great time and a lovely lesson on color and printmaking. Enjoy!

Fall Cork-stamped Trees

Supplies Needed:
  • One 12" x 18" piece of construction paper for background (light blue or whatever color you'd like)
  • One 9" x 12" piece of brown construction paper for tree trunk and branches
  • Pencil
  • Scissors
  • Glue stick
  • Wine Corks
  • Paper plates for paint palettes
  • Red, Orange, Yellow, and Brown Tempera Paint
  • Newspapers to cover work surface
Directions:

1. Trace the child's hand and part of his/her forearm onto the brown paper. This will be the trunk and branches of the tree. Cut the tracing out (most of the children were fine with this--we only lost a couple paper fingers, er, I mean, branches. Glue the trunk and branches to the background paper, making sure the base of your tree trunk is at the bottom of the page.

2. Dip the cork into the paint and stamp leaves all over the paper, filling your tree with beautiful colored leaves!  It's important to have the children fill the ENTIRE top of the tree with leaves--not just a couple along the edges of the branches! No naked trees--this isn't winter. Make sure you get all four colors of paint on your tree.

That's it! A beautiful fall keepsake!

Fall Leaf Rubbings:

When the children were done, they could move over to a couple tables where I had long sheets of newsprint from a roll, taped down. Under the paper, I had placed different types of leaves. They then could use flat-sided crayons to do rubbings and discover the different leaves I had "hidden" under the paper. This was a nice project to keep little hands busy for the last five minutes of class.

Saturday, September 22, 2012

Focal Point Fruit Print Tote

Fall is in the air! And for those of us in New England it's apple picking time! I took the kiddos out and we picked a HUGE bag of Cortlands, Macouns and (my favorite) Honey Crisp apples. YUM! This is also a wonderful time to do an art project that is a lesson in basic printmaking techniques, using fruit to make prints.


One of these things is not like the other...

Variations of this lesson abound, but with this one, you can use apples or pears to make a fall-inspired tote bag to carry all of those library books around! If you don't want to go through the expense of printing on canvas totes, just use tempera paints on heavy-weight paper.

In her book "Teaching Art With Books Kids Love," author Darcie Clark Frohardt has a similar lesson. She uses fruit prints to illustrate the concepts of focal point and dominance to students. She suggests using the book "Saint George and the Dragon" by Margaret Hodges--which has gorgeous illustrations, by the way, to show the concept of focal point and then stamp the fruit onto the surface with one of them being a different color. That different colored fruit becomes the focal point of the piece.

No matter how you choose to do this project, it is fun way to explore printmaking!

Focal Point Fruit Print Tote

Supplies Needed:
  • Canvas tote (or heavyweight paper)
  • Fabric Paints in two colors for the fruit (red and green or green and yellow, etc.)
  • Brown or black fabric paint for seeds and stems (or you could use a Sharpie marker if you are doing this on paper)
  • Fruit such as a pear or apple (or experiment with whatever fruits and veggies you have on hand)
  • Knife (to cut fruit, a grown-up's job)
  • Paper plate palette
  • Newspaper to cover work surfaces
Directions:

1. Cut your fruit in half using a sharp knife (a grown-up's job).

2. Place some fabric paint on a paper plate. Dip the fruit into the fabric paint and try a test print (or two) on paper. Once you've got the technique down, you can stamp the fruit in rows across the tote. To make the focal point, use an alternate color of paint to stamp one of your fruit a different color than the rest.

3. Use brown or black fabric paint with a fine tip to add details like seeds and stems to the fruit. I didn't add seeds to the focal point fruit because I thought that made it look like it wasn't cut open but the rest were.

4. Let dry for at least 24 hours (or whatever the fabric paint manufacturer suggests).

A variation of this would be to use any of the books by Saxton Freymann and Joost Elffers such as "How Are You Peeling: Foods With Moods" and after your initial fruit prints are dry, add faces to them expressing different feelings and moods. FUN!


Thursday, December 1, 2011

Story Totem Poles

The last time I taught an art class about totem poles I had the children create family totem poles. They could bring in pictures of their family members or draw them. They came out great and the children were very happy with them. While looking online for totem pole images, I came across an idea that got me thinking a bit: Story Totem Poles from Art Smarts 4 Kids. She used a simple story, Goldilocks and the Three Bears, and had the children illustrate the characters and plot on a totem pole.

In this piece, the student shows the Old Man with his cloak, and then attached the Old Man and Rock with the same fastener so that he could show 1. the rock on top of the fallen Old Man and 2. the rock cracking in two. The Night Hawk is on a tab so that it moves down the Totem pole and can touch the rock (and crack it in two) as in the story.
So clever!

I decided to have the children illustrate a Native American tale and I found a few great ones at Apples 4 The Teacher. I chose "Why The Night Hawk Has Beautiful Wings." Besides having a couple of moral lessons, it is also a funny story and has great visuals for the children to explore. Here's the tale.


Supplies Needed:

  • Paper towel roll
  • Construction paper (I used green, brown and white)
  • Markers/Colored Pencils/Crayons
  • Scissors
  • Glue stick
  • Clear tape
  • Wing template, optional
  • Brass fasteners, optional
  • Images of totem pole figures and a picture of a Night Hawk for reference, optional
Directions:

1. Read the story to the students. Once I was finished, we discussed characters and plot. I then gave a brief discussion on totem pole art, highlighting some of the features they may want to include in their totem pole designs (3D wings, etc).

2. I gave each student a 6 1/2" x 12" piece of construction paper (green) to use as a base for their artwork. The children then divided it into about 5 horizontal sections (change this based on how many characters and plot points you want to show). I instructed the students to work directly on or attach their work on this piece of paper--flat on the table--and then when it was done, they could glue it to the tube.

The children could draw right on the background paper, or could illustrate their characters on a half sheet of white construction paper, cut them out and glue them to the background paper. I also gave them a half sheet of brown to use for the Night Hawk and/or the stone from the story, if they wanted. 

I also showed them how they could add motion to their totem poles (not really traditional, but fun!), by attaching characters to the background paper with brass fasteners (you know, the ones that allow things to spin. See the pictures for reference). I showed them how they could attach a picture of a stone with a brass fastener to make it roll, a key point in the "Night Hawk" story. They loved that idea and many of them took the mechanical aspect of the project even further (see photos).

3. Once the characters and images of plot points are completely colored in, cut them out and attach them to the background paper with glue. Work the story from the bottom of the totem pole up (that is more traditional). Attach any pieces that require the brass fasteners to the background NOW (before you glue the paper to the background). Wings and other 3D elements are added later, in step 5.

4. Once all of the pieces are on the background, turn the entire thing over and spread glue on the back (we used a glue stick, but white school glue would work). Roll it around the paper towel roll and secure with a couple pieces of clear tape, if needed.

5. Add any 3D elements such as wings or a beak using the glue stick.

Done! Enjoy watching your child retell the story using his or her Story Totem Pole!


Friday, November 11, 2011

Fall-inspired Shoji Screens

The art from the 1500's-1700's is so wonderful and we really do begin to see the art of so many cultures starting to emerge since many nations were exploring the globe. I wanted to introduce my students to panel paintings and altarpieces this week. A couple of years ago I had my students create multi-paneled images of the saints and we used gold tissue paper to "gild" the images. The pieces were fantastic! But I felt that that was more of an advent-type of lesson, so I was hesitant to re-do that lesson (even though we had snow about 10 days ago!).
Is it a triptych? Is it a Shoji screen? Wait, it's both! And pretty, if I may say so!
This time, I wanted to get the concept of altarpieces across, but I wanted to do something a bit more Fall-inspired. I had a bucket of tissue paper squares I've been using for the past few years (I swear those pieces multiply in there by themselves!). So I thought about having students create a fall landscape, sort of like stained glass. I usually use Contact paper for my stained glass projects with the children, but didn't have any & experimented with waxed paper instead. The result was a muted Japanese-screen-looking creation. So, I was able to introduce the children to that art form as well.

This craft is inexpensive and little ones can do it with help from a grown-up and older students can customize the piece in their own way. I hope you try this craft with your family. Enjoy!

Fall Shoji Screens


Supplies Needed:

  • Black Construction Paper (Ours was 12"x18")
  • Pencils
  • Ruler
  • Scissors
  • Glue stick
  • Construction paper for trees (we used 9"x12" pieces in black, brown and white)
  • Crayons and/or colored pencils
  • 2 12"x18" pieces of waxed paper
  • Tissue paper squares (1" squares in whatever colors you wish)
  • Iron & Pressing cloth
Directions:

1. Create the frame for your triptych (3 paneled piece of artwork). Mine took up the entire 12'x18" piece of paper and had a 1" frame all around it.

2. Use the scissors to remove the "window" portions of the triptych, taking care to leave the frame intact.

3. Create your "trees." Rip black, brown and white construction paper into 1/2" strips. If you are having trouble ripping the paper, try ripping it in the other direction. Flip your frame over and use the glue sticks to attach the trees to the back of the frame. I suggested the children put a couple of trees in each of the three "windows." We used black for trees that were far away and then brown for pine trees and white for birch trees.

4. Once you are done glueing on the "trees," flip the frame over and add details to the front of your trees with the crayons and/or colored pencils. We discussed how tree bark can be bumpy or smooth and have knots on them, etc. I also reminded the students that tree trunks have shadows on them and explained that the shadows would be on the same side of all the trees.

5. Flip the frame over, so the back of the piece is facing up. Apply glue to the back of the frame and trees. Press a 12"x18" sheet of waxed paper onto the frame.

6. Working in one section at a time, apply a few lines of glue stick to the waxed paper and attach the tissue paper squares. You don't need to use a lot of glue, once you iron the waxed paper together, the tissue paper will be fused in place. Cover all of the spaces between your "trees" with the tissue paper squares.

7. Once all of your tissue paper squares are in place, place a piece of waxed paper on top of them. Using an iron set to the "polyester" setting (medium heat) and using a pressing cloth to protect your iron, gently press the piece so that the two pieces of waxed paper fuse together with the tissue paper squares in between them.

8. Use scissors to trim the excess waxed paper from around the frame. This piece looks nice in a window or with a battery-operated candle behind it. Keep it out of direct light so that the piece stays intact longer and the colors don't fade. ENJOY your fall scene!

Wednesday, October 19, 2011

Fall Frescos

Plaster of Paris scares me a bit. It's one of those materials I hear that people use, but I've never used myself. Well, I've decided that if I'm serious about this "art teacher thing" I'd better start moving outside my comfort zone and trying some media I've been shying away from. So, I bought a big 'ol bucket of Plaster of Paris at the craft store and created a project!
A Scarecrow with a Sunset Sky!

Frescos are paintings done on wet plaster. I showed my students a couple examples of Giotto's work from the late 1200's. He was considered quite good at using color to model his figures and create the illusion of form. When we look at his work today, we may think what he was doing is pretty obvious, but it was innovative at the time when paintings lacked perspective and figures were more "flat."

I also showed them an example of Leonardo da Vinci's Last Supper, also an example of a fresco. Although this piece is considered one of da Vinci's masterpieces, it was also a major mess-up of his as well. He was experimenting with paint and plaster techniques and before the piece was completed it was falling apart. The piece has been restored many times throughout the years, but it is a wonderful way to show the students that sometimes when they are trying something new, they may make a mistake. It's OK. We discussed ways that they could work their mistake into their piece. I was able to share with them my mistake that I made the week before when trying this project out at home: I had mixed some egg yolks with some dried paint pigments someone had given me and tried to paint on plaster--I had been trying to simulate egg tempura, but it was pretty disappointing. I tried to salvage the technique to no avail, and ended up switching to watercolor on plaster instead. SIGH.  Sometimes that happens.

Well, on to the fresco project! Worth the try and embraced by my students! ENJOY!

Supplies Needed:

  • Plaster of Paris (quantity will vary depending on the size of your mold)
  • Plastic plate for mold (I used a plate that was 1/2" deep and was 5" across the bottom)
  • Paper clip for hanger
  • Stirring stick and disposable pan to mix the plaster in
  • Cold water
  • Paper plate
  • Pencil
  • Piece of paper the size of your cast to plan your drawing on (ours was a 5" circle)
  • Hole punch, optional
  • Bit of crushed charcoal and cotton balls tied in a muslin cloth, optional
  • Watercolors and brush
  • Water container
  • Paper towel
Directions:

1. Following the manufacturer's directions, mix up some Plaster of Paris and pour into your mold. Insert a paper clip if you'd like the piece to be able to hang on the wall.

2. Let the mold set up for about 1/2 hour or so. While you are waiting, plan what you are going to paint on your fresco. Use the pencil to draw the picture on a piece of paper the size of your mold. Fill up the entire area of the paper with big, bold shapes. You'll want to add detail to make the piece interesting, but not so much that everything becomes a jumble--you are painting with a paintbrush so tiny details will become lost. This drawing that the fresco is planned from is called a cartoon.

3. Once the plaster has set up enough that you can pop it out of the mold, do so gently and place it onto a paper plate. You can transfer your drawing onto the paster in one of two ways. Either, 1. place the drawing onto the plaster and retrace your image with pencil pressing down so a fine impression is left in the wet plaster OR, 2. punch holes around your image using a hole punch. Then place the paper onto the plaster and tap the charcoal-filled bag over the holes in the image. Remove the paper and "connect the dots" using a pencil and the original image as a guide (option 2 is more historically accurate). Go easy on the charcoal if you go with step #2, it will make your image gray and dirty-looking if you put too much.

4. Paint your image using watercolors. You'll need to get your brush loaded with paint and water since the plaster soaks up the liquid. Also, start with the lightest colors you want to paint, say, yellow, and work your way down the line towards black. You can always go darker, but you can't lighten up watercolors on plaster.

5. Make sure you add details and a ground and sky, if applicable. I encouraged the students to paint right off the edge of their pieces (on the 1/2" side of the plaster piece). I thought it made the piece look more finished that way. Let the piece dry for a few days before hanging. Hang out of direct sunlight and away from moist areas. ENJOY!
This flower has some beautiful brushwork in the background.

A beautiful fall pumpkin!

Wednesday, October 12, 2011

Dancing Skeletons

This project is one of those "I can't believe I never thought of that!" type of projects. I was brainstorming during a play date this week about some ideas I had for a quick craft to make relating to Fall/Halloween. My girlfriend, who used to be a teacher, shared the idea for this craft with me. Thanks Jill! It is super easy and super inexpensive--I bought the chalk & dog bones at the dollar store. The dancing skeletons are cute and remind me of an old Disney cartoon I used to watch when I was a girl! Have fun making a whole conga line of dancing skeletons!


Supplies Needed:

  • Dog bones (the hard crunchy kind, the ones I used are "medium" and are about 2" long)
  • White tempera paint
  • White chalk
  • Black construction paper (you can use 9x12" or a larger sheet if you want to create a background)
  • Paintbrush
  • Paint tray
  • Water & paper towels


Directions:

1. Using chalk, draw the skeleton's head (skull) onto the paper. This should be somewhere at the top and be about 2" tall. I like to make my skeletons happy and smiling--they are dancing after all!

2. Place some white tempera paint onto the paint tray. Dip the dog bone into the paint, getting a nice coat on the dog bone's flattest side. Place the dog bone, paint side down, onto the black paper and slightly rock the dog bone a bit to make a nice print. You may want to practice your technique before you start your piece. I stamped one bone shape for the body and two each for the legs and arms.

3. Use the chalk to draw the fingers and toes on your skeleton. You can also draw a background if you'd like, but you may want to keep it simple. I drew a couple of gravestones, some stars and a moon.

You are done! Enjoy your happy, dancing skeletons!

**This project doesn't have to be for Halloween. It is a good activity for a younger child to do when learning about the body and the skeleton inside him/her. I know it isn't anatomically correct, but it gets a dialogue going and if fun to create.

Saturday, October 8, 2011

Fall Wall Hanging

This is a quick and inexpensive craft that celebrates the beautiful colors of fall while teaching children about basic printmaking skills. After I explained the basics of printmaking and showed them a couple of options for layout, I let the children make their own creative decisions on this project. They seemed to really enjoy it!


Some background information on printmaking: Some would say that the most important invention to come from the medieval time period was the printing press. I showed my students the double page spread from the Eyewitness book on the Renaissance which has a wonderful picture of a printing press from that time. I also brought in a wooden letter from a press for them to examine. I explained that printing plates could be used over and over. This seemed like a much better idea than spending one's whole life creating one book (like some scribes and clerks did with illuminated manuscripts!).

I then did a short demo on how to use the stamps I created to make a print and we discussed some of the different ways to lay out the leaf prints (in rows, in a circle, to make an initial, etc.), then the children went to work!

Supplies:

  • Kraft paper or brown paper bags for stamping on
  • Stamps (I glued sticky-backed foam shapes stuck to pieces of foam core)*
  • Brushes
  • Paint trays (I used foam meat trays)
  • Acrylic paint (I used red, orange and yellow)
  • Water and water containers
  • Paper towels
  • Background paper (I used wrapping paper in green)
  • Glue sticks & Elmer's glue
  • Sharpies or markers
  • Scissors (I used regular and decorative edged)
  • Stapler or tape
*If you don't want to purchase the supplies to make stamps, you can use an apple cut in half--this also makes a wonderful fall banner

Directions:
  1. Create the stamps or cut the apple in half (a grown-up's job). I cut 4" squares of foam core and attached some ready-made foam stickers I found at a craft store to them.
  2. Place a bit of acrylic paint in the meat tray. Using a paint brush, paint a thin coat of paint onto the surface of the stamp. If you put too much paint, the stamp will be slippery and not make a good print. Print the leaf shapes onto the kraft paper in a circle (wreath shape) or in the shape of your initial (or whatever you choose). Once you are done all the stamping, put the piece aside to dry.
  3. Cut a piece of wrapping paper (background paper) to create the background of your wallhanging. Fold over a section of the top to make a casing to hang the finished banner. You can secure the casing with tape or staples.
  4. Use the scissors to create fringe on the bottom edge of the banner. To do this, make a series of cuts up from the bottom about 1/4" apart. The fringe can be any length you'd like.
  5. My students used the Sharpies to decorate the banner and write things like "Welcome Fall," their name, or just make a decorative pattern on the banner.
  6. Glue the kraft paper with the leaf prints on it to the background using Elmer's glue. 
  7. Once the leaf prints are completely dry, use the Sharpies to draw in the veins of the leaves, if you'd like.
  8. Insert a twig into the casing, and hang your fall banner for all to see!


Thursday, September 22, 2011

Leaves are "FALL"-ing Picture

In honor of the first day of Fall which is tomorrow, I have this super craft. I saw it on display at a local library and had to try it at home with my preschooler who is four. It was a bit challenging for him, so I worked with him to do the tissue paper "puffs" so he didn't get too frustrated with them. My 9 yo was saying he just had to make one as well!

This project is a good way to explore a few different kinds of media and practice fine motor control. It also uses many items you may have on hand. I liked spending time with my little one and we had a wonderful discussion about fall and leaves. ENJOY!

Supplies Needed:

  • 8 1/2x11" piece of white card stock
  • pencil and eraser
  • scissors
  • black marker
  • crayons, colored pencils or markers to color in the tree trunks
  • tissue paper, various colors, cut into 1" squares
  • Elmer's glue in a little tray
  • zip-top plastic baggie
  • tape
  • hole punch
  • various paper scraps in leaf colors
Directions:
1. Fold the card stock about 4" up from the bottom. On the larger portion of the cardstock, draw two trees in a way that creates a frame. You can keep it simple. Make sure the area that is in the center of the trees (that you will be cutting away) is smaller than your zip-top bag, so that the edges of the baggie don't show. 

2. Once you have the drawing the way you want, outline the trees, trucks, roots, ground, etc. with a black marker, if desired.

3. Using the scissors, cut away the center portion of the drawing. 

4. Talk about the color of bark and grass. Have your child look outside for inspiration. My son noticed that bark is kind of gray sometimes, so he colored his tree trunks grey. Have your child color those in (a side note: I don't ever say something HAS to be a certain color. We may look at something in nature & talk about the colors we see, but the artist gets to choose what color s/he wants).

5. Pour a bit of Elmer's glue (white school glue) in a tray. Take a square of tissue paper and cover the end of a pencil eraser with it. Dip the tissue-covered end of the pencil into the glue and then touch it to the paper in the leaf section. Pull the pencil away and the tissue "puff" will be left behind. Continue doing this until the entire leaf section is full of puffs.
Working on his tissue paper "leaves," he says "Mom, I'm excited about this picture!"

6. Now, to make the falling leaves: use a hole punch to punch different colors of paper. Gather all of the little dots you've punched out and add them to the zip-top bag. Seal the baggie and attach the baggie to the back of your frame with clear tape. We folded the bottom portion of the card stock around and stapled the layers together at the edges.

Once the piece is dry, your child can shake the picture and show the autumn leaves falling to the ground! ENJOY!
Related Posts Plugin for WordPress, Blogger...