Showing posts with label inuit. Show all posts

Tuesday, January 8, 2013

Igloo Landscape With Northern Lights

I'm really excited about this project! I did this project as part of a special winter-themed afternoon with the Kindergardeners at Clark School this week. Previous visits have used cut paper and printmaking and they've learned all sorts of great skills and art techniques. This little lesson uses something every teacher on hand: bulletin board borders to give that wavy look in the sky. I bought mine at the dollar store (a package of 14 for $1).


The art concepts that the children learn with this project are the parts of a landscape (foreground, background, ground, sky), as well as collage, cutting with scissors & working on a multi-step, multi-layered project. The children can rip the paper for the ground and use geometric shapes (squares and rectangles) to create the semicircular igloo. They create their own shape for the moon--that can vary quite a bit and they are all darling. Pastels can be messy, and this project uses that to its advantage! The pastels are perfect for the bright colors and streakiness of the Aurora Borealis, or Northern Lights.

There are also great literature, music, science and cultural links to this project as well: the Northern Lights are part of the rich spiritual culture of the Inuit people (indigenous people of the arctic), as are igloos. The Inuit people live in stick framed houses now, but there are still times when igloos are used as shelter today. Igloos are temporary shelters that can be erected in as little as two hours! WOW!

There are many tales associated with the Northern Lights. I found a great book called The Fiddler of The Northern Lights by Natalie Kinsey-Warnock about the Northern Lights, that is a bit of a different tale. In the book, there is a man from Cape Breton who plays the fiddle and his music makes the Northern Lights dance. I was fortunate to find that my library had two CDs of fiddle music from Cape Breton--so I could share this great music with my students!

I hope you enjoy this lovely little lesson!

Igloo Landscape With Northern Lights

Supplies Needed:
  • 12" x 18" piece of black construction paper
  • 1 bulletin board border from the dollar store (or you can cut a wavy template from poster board)
  • Masking tape and clear cello tape
  • Chalk pastels
  • Tissues
  • Elmer's glue (or other white PVC glue)
  • White construction paper (some ripped into strips, some cut into 1" squares)
  • Semi-circle to trace for igloo shape
  • Pencil
  • Scrap of yellow construction paper (for moon and window)
  • Scissors
Directions:

1. Tape the border to the table: tape it on either end with a piece of clear tape so that it is nice and secure, but your sheet of black paper can slide under it.

2. Slide the black paper under the border. Use the pastels to color on the paper along the top edge of the border. It's OK if you get the pastels on the border and on the black paper at the same time. Just keep the black paper still while you are doing it. Once you've traced along the entire edge of the border piece, take a tissue and gently rub upward (away from the border), along the entire edge of the border. This will give you the lovely, streaky look of the Northern Lights. Don't scrub with the tissue--that won't give you the same effect. Repeat this 2 or 3 more times on the page.

3. When you are done your sky, move over to the collage table. Apply a thin line of glue along the bottom edge of the black paper. Attach strips of white paper along the bottom to make the snowy ground. Ripping the strips of paper gives a nice effect.

4. Trace a semicircle onto the background with the pencil--make sure you are having the igloo rest ON the ground--not float in the air! We used paper plates cut in half as our templates. Apply some glue to the inside of the semicircle area you've traced on the paper. Use the white 1" squares of paper to fill in the semicircle for the igloo.

5. When your igloo is done, cut a 1" square of yellow for the window of the igloo and attach.

6. Cut a moon shape from the yellow construction paper and glue in the sky area.

What a serene landscape! Enjoy the view!


Monday, December 3, 2012

Soap Carving and a Collaborative Totem Pole

In my Tribal Art of North America class, we were able to do a fun technique that the students always enjoy: soap carving. I've done soap carving with my students before when I taught Inuit carvings (see my original  post here). This time, I thought the children could carve the soap and work together to make a totem pole.


The completed Totem Pole--each of the students
created a section (one animal). I placed them on
a background that looked like sky just to snap the picture.

I found a great handout online about totem poles. It gave some background information as well as great images of some typical animals that appear on totem poles along with a description about the symbolism of each animal. The children chose one of the animals to replicate in soap and began carving with their tools: a vegetable peeler, plastic spoon and a toothpick. Features such as beaks, tongues and wings that protruded far away from the main carving were added later using craft foam. I had a sheet of white craft foam on hand for these "extras," but encouraged the children to do most of their carving in the soap.

Detail of the BEAR (symbol of power on the earth).
The tongue is made with a bit of craft foam.

Once the children were done carving their individual totem animals, we put them together into one totem pole and I snapped a picture. The children took their individual pieces of the totem pole home, but before they left, they had enough time to create a second carving of their choosing that was more like the Inuit. We had a great discussion of how different their two sculptures were: the totem was more of a shallow carving meant to be viewed from a very limited radius, but the Inuit-inspired carving was meant to be held and seen from all angles. The carving was much more intense on the Inuit piece in that they had to think about removing the excess and accurately carving their animal on a variety of planes.

And here's one of the Inuit carvings: a polar bear.
These soap carvings are hard to take pictures of
with my camera--sorry they are blurry!
The children did a great job! ENJOY!


Thursday, December 8, 2011

Inuit Soap Carvings

I have been wanting to try this project for a long time! In my "Art Around the World" class we have a little extra time, so I thought it would be the perfect class to try an introduction to carving using soap and simple tools. I originally saw this project in the book "A Survival Kit for the Elementary/Middle School Art Teacher, " by Helen Hume. This is a wonderful book that has a number of great projects. I like how her projects have a "Teacher Page" with background info and alternative lesson plans as well as a "Student Page" that you could photocopy and hand to students to refer to as they work their way through the project.
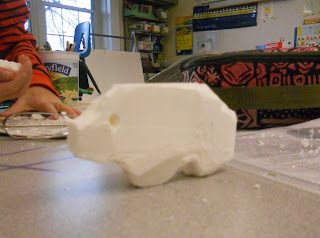
Polar Bear, looking up.

I started class by flipping through the book "The Inuit: Ivory Carvers of the Far North," by Rachel A. Koestler-Grack. This book is full of great information and images that aided in my giving a brief background on the Inuit people and their beautiful carvings.

I then gave each student a copy of the Inuit Bear Carving Lesson plan from Dick Blick Art Supplies. That lesson is intended to be done by carving a foam block, but the diagrams easily translate to a bar of soap. The handout shows, step-by-step, how the child should carve the block to create a lovely 3D representation of a bear.

I really do encourage you to try this project with your child. It's wonderful to see them working and planning as they carve the soap away! Enjoy!

Supplies Needed:

  • Bar of soap (I used plain Ivory)
  • Newspaper (for working on and collecting soap chips)
  • Skewer or toothpick
  • Potato peeler, plastic knife and spoon
  • Plastic kitchen scrubber
  • Handout from www.dickblick.com (optional, but helpful)
Directions:

If you are creating a polar bear, you can follow the handout from Dick Blick. Some of my students decided to create turtles since I had brought in a carving of a turtle. I had them work from the figure and I walked them through carving the piece. 

I think older students could design their own carvings, but younger students or first-timers may have more success if they work from a plan. Or, if your student is comfortable "winging it," let them go for it and see what animal emerges from their carving!

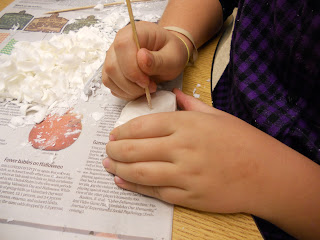
Carving the rough shape of the turtle with a vegetable peeler.

Adding the final details with the point of a skewer.


Another Polar Bear!

And a cute little turtle!

Related Posts Plugin for WordPress, Blogger...