Friday, January 29, 2016

Happy Birthday, Paul Cezanne! (On January 19th)

In honor of Cezanne's birthday, I thought I would REPOST a popular lesson from 2013 that is fun and easy and is appropriate for a wide range of students. The painting below is my youngest son's and was featured in the book "500 Kids Art Ideas" by Gavin Andrews published by Quarry Books. While this is a nice fall-inspired still life, you could change it to pears or lemons/limes for a more winter or spring theme. Either way, the results are fabulous and the lesson is chock-full of active learning.

-------------------------------

We are all into fall over here and I thought this week would be a nice time to do a still life with apples with my after school art class. This is the first time we've met this school year, and the group has 1st-4th graders in it. I had an idea of what I wanted to do, it's actually a combination of two lessons I saw out there:
My 1st grader's example with Cezanne's reproduction.
I can't show you the still life--he ate it!
(UPDATE: He's now in 3rd grade, but still eats still eats everything in sight!)

"Still Life With Oil Pastels and Baby Oil" (2 posts) from Fine Lines
http://kids-finelines.blogspot.com/2012/04/still-life-with-oil-pastels-and-baby.html
http://kids-finelines.blogspot.com/2012/04/oil-pastels-and-baby-oil-part-2.html

That was pretty much the lesson I used, but I modified my talk in the beginning to be about Paul Cezanne's work showing them "Still Life With Apples."

I then used the talk I found on That Artist Women: "Open vs. Closed Composition"
http://www.thatartistwoman.org/2011/09/open-vs-closed-composition.html

I really like how she shows real art examples in her post. I showed those to my kiddos as well.

Then I gave them time to experiment with arranging the apples (and one girl's donated pear) into closed and open compositions. There were three students to a table and the table needed to agree on a composition they liked best.

And then we were off! I walked them through drawing, demoed how to use the oil pastels and baby oil, and gave a quick watercolor demo.

These are their creations! Beautiful! They are so proud (me too!).

Enjoy!


Grade 5 Romare Bearden Storytelling Collages

The second project I did with my fifth graders was a storytelling collage. This project idea was one that the art teacher left for me to complete with them. However, I decided to present the idea of collage to them by showing them Romare Bearden's collage "The Dove" from 1964. I have a HUGE laminated print of this from the "Picturing America" series from the National Endowment for the Humanities (http://picturingamerica.neh.gov). For those of you not familiar with this collection, check it out! I'm not sure if you can actually get the portfolio of laminated images anymore, but you can access the images digitally through the website as well as a bunch of other resources (discussion questions and lesson plan ideas). I am constantly amazed and delighted by the images in the collection--there seems to be an image for just about every art concept I've been wanting to teach lately (1 point perspective, 2 point perspective, landscape, portrait, radial symmetry, etc.).

So, back to the collage. We had a great discussion about collage, storytelling, setting, mood, and the figure based on the discussion questions in the Picturing America Teacher's Handbook and some of my own questions. Bearden's collage shows a place and time very different from our town! The children enjoyed looking for the dove and the cats as well as commenting on how the people were dressed and (gasp!) how there was a cigarette in the image. Great discussion that got us all thinking!


Then students were given a piece of card stock and could browse the big bin of magazines in the classroom to find images to create their own collage that told a story. I advised them to be open-minded about the story--I couldn't guarantee they'd be able to find *exactly* what they were looking for--sometimes you need to let the story emerge on its own! As they worked, students also needed to think about focal point.

One they had the entire surface of their piece covered, they could create a frame that enhanced their piece (also with collage)--students could think about colors and textures that would go with their main collage.

And lastly, we coated the entire piece with an, ahem, liberal coat of Mod Podge to seal it all in. I had the students complete a quick little write-up of their piece where they titled their collage and told me a one sentence story about it. Some of them were so funny!
After students completed this sheet,
they taped it to the back of their collages. 


If you'd like to learn more about "The Dove," check out this link from PBS: http://www.thirteen.org/picturing-america/romare-bearden-the-dove/

Gifts From the Art 2012: Watercolor Pin

I just finished a two session mini course called "Gifts From the Art" where children can make three projects a session (a total of six gifts) for their families and friends. I did this course last year as well and it was a big hit. The class was comprised of 2nd-4th graders and I had 2-3 fabulous helpers each session. Doing this many projects a week is a bit crazy, so having good helpers is key. I try to keep things fun and moving along, but I definitely prefer my normal teaching routine where we focus on one project a week!

Here is one of the projects we did:

Aren't these just beautiful! I want to make these by the dozen!

Watercolor Heart Pin

When planning this course I try to think of gifts that can be gifted to a variety of people. A pin is a nice gift for a variety of ladies: mom, stepmom, grandma, aunt, cousin, babysitter. Here's my version that uses watercolors with a neat technique along with a few findings to create a lovely one-of-a-kind pin that is sure to be a hit!

Supplies Needed:

  • Two little pieces of watercolor paper (ours were about 2 1/2" x 3")
  • Pencils
  • Watercolors and brushes
  • Plastic wrap (maybe two 6" lengths)
  • Wooden heart shape (ours were 1 3/4" wide)
  • Scissors
  • Tacky glue
  • About a 14" piece of contrasting embroidery floss, optional
  • Hot Glue Gun and Glue sticks
  • 5" strand of copper wire
  • Various glass beads and/or word beads (I bought both at Michael's--the word beads are plastic, the other beads are glass).
  • Pin backing (ours were adhesive-backed so they were just peeled and stick-EASY!)
Directions:

1. Write your name on both pieces of watercolor paper. Wet most of the center of your paper and apply watercolor paint to the paper in nice, saturated color. Use a couple colors of paint and allow the water to blend the colors (wet on wet technique). Choose colors that are next to each other on the color wheel (analogous) so that the colors look nice when they mix. I suggested having the children create a reddish or purplish color combo on one of their papers and a greenish/bluish color combo on the other. Make sure the colors you are using are nice and saturated and while the paint is still wet, crumple up the plastic wrap and press it into the paint. Leave it there and let it dry overnight.

2. When the watercolor pieces are nice and dry, remove the plastic wrap and discard. Trace the heart shape onto the front of the watercolor paper in an area of the watercolor that you like. Cut the heart shape out. Use tacky glue to glue the watercolor paper heart to the wood form. Press for a couple of minutes until the paper no longer curls (you can also place the piece under a book or something to help it adhere better.

3. Wrap a strand of contrasting color embroidery floss around the heart, securing the ends with hot glue.

4. Attach one end of the copper wire to the back of the heart pin. Wrap it around to the front and add a couple of beads. If you are using the word bead, use it now. Keep wrapping the copper wire around, adding a couple more beads if you'd like. Make sure you only add beads to the part of the copper wire that is on the front of the pin--no beads on the back of the pin (a couple of my students tried that--but no one would ever see them that way!). Secure the end of the copper wire with hot glue.

5. Attach the pin finding to the back of the Watercolor Heart Pin and press nice and hard to make sure it sticks on there. 

What a beautiful pin--so artsy! Any mother would love to receive this! It was neat to see how different the pins came out. The children had lots of fun choosing their favorite watercolor swatch, floss color, glass beads and word bead. They took such care with each detail.


Laminated Snowy Day Calendar

YAY! I got a laminator! For those of you who work in a school, it may seem like no big deal, but I work a mish-mash of part-time gigs right now, so when I want to laminate something, I have to go to the office supply store.  Since I'm often pressed for time (and money), I usually use Contact paper or I slip the paper into a sheet protector.


I love the Cardinal--what a bright bit of color!
I probably would have kept doing the sheet-protector-thing, but I saw this great image online and thought it would make a lovely image for my Gifts From The Art Class that is coming up soon. I read that the artist used the ultra-thin tissue paper that shoes come wrapped in. How clever ! I loved the look of the image--I couldn't tell if it was a spring or winter picture--it seems like it could be either--perfect to go with a year-at-a-glance calendar. My challenge was to see how I could recreate the piece for my students and have it hold together to make it gift-worthy. That's when I thought of the laminator! My friend had one and she sold it to me for $1, and here I am.

Snowy Day Calendar

Supplies Needed:


  • One 8 1/2" x 11" piece of medium blue card stock (I used scrapbooking paper)
  • One 8 1/2" x 11" (or so) piece of dry wax paper (or tracing paper or thin tissue paper); dry wax paper is sold at restaurant supply places and it has less wax on it than regular wax paper--it is used to wrap sandwiches
  • White paper scraps
  • Scissors
  • White glue stick (not the purple ones)
  • A year-at-a-glance calendar trimmed to fit on the page, allowing enough space for the image, I got mine at www.believingboldly.com, she has a few free printable year-at-a-glance calendars to choose from. I printed it out at 75%
  • Tiny scrap of red card stock
  • Laminator & laminating film

Directions:

1. Draw a very faint line halfway down the blue paper, this will be a guide for the bottom edge of your tree image. Use your glue stick to make a line of glue in the ground area and make four circles of glue where each of your trees will be. Don't worry about getting the glue perfect--you are just putting the glue where you want the confetti to go.

2. Cut the white paper into strips about 1/8" wide. Then hold a couple of strips together and cut the strips into 1/8" squares, over your blue paper, so that the little confetti squares fall onto the areas that have glue on them. Shake the excess confetti off the paper.

3. Crumple the dry wax paper slightly. Rip the paper into circles, ovals, squares and/or strips and apply them to create layered areas on the ground, leaf area of the trees and for the trunks of the trees. When we got to this tissue paper part, I had my students gently dab the dry wax paper on the glue stick instead of using the glue stick on the blue paper (which moves the confetti around). You don't have to goop on the glue--you just need the dry wax paper to stay still until you've laminated the piece.

4. Once you have the leaf areas, trunks, and ground done, you can add a cardinal cut from red card stock. If you had a bit of tan card stock, you could make a female cardinal, too.

5. Use a glue stick to attach the calendar printout to the piece. Trim any excess tissue paper and have the artist sign the piece.

6. Laminate and enjoy your artwork all year long!

Modern Art Class Roll-a-Miros

A little while back I posted about a neat project I saw on Pinterest (but couldn't find the source). The idea was to use a die and a chart to help students create Miro-inspired creatures. I did this project with my Modern Art homeschool artists and they loved it! Some of them said it was the best project so far this year! 

Here is the original post and the how-to for the Roll-a-Miro on my blog.

And here are some of the finished pieces from the home school group:


Artist Statement Form for Middle School

I love to have my students write about their work. Even the littlest people can have a lot to say about their creations! Also, having the students self-assess their work is part of the National Core Art Standards...

When I was at Amherst Middle School, 7th and 8th grade students needed to write artist statements for their final projects, but I also dabbled with having the 5th and 6th grade students create them as well. I found that quality artist statements took a bit of prompting, so I created this Artist Statement Worksheet to get them started. Once the students had this form in front of them, the quality of the artist statements increased dramatically. Sometimes filling out the form was enough, but with the older students, I had them use this as a "rough draft" and students needed to type their final artist statements in Word and print them out to be displayed alongside their final projects.

Do you have students write artist statements? What do you ask them to include? Let me know in the comments below!


Tuesday, January 26, 2016

Stop Motion and KOMA KOMA

Hey there!

I had a wonderful time Friday at the Integrated Arts Conference at Plymouth State University in Plymouth, NH. It is so fun to connect with other teachers and create. In case you didn't get a chance to check it out, a colleague and I presented about digital storytelling and shared a TON of info and links to get started (check out the post here).


The attendees only had about 15 minutes to play with stop motion animation, but had fun with clay, Lego, and drawing as they created their masterpieces.

I wanted to do a little post about the stop motion APP I chose to use on Friday. KOMA KOMA is a neat stop motion app I was introduced to about a year or so ago. It's an easy-to-use app that only has four buttons. Yep, FOUR. So it is easy to use and a great introduction to animation for even your youngest kiddos (or hesitant grown-ups).


Never done stop motion animation before? No problem! No money for software and digital cameras? No problem! KOMA KOMA is free and uses the digital camera in the iPad! The KOMA KOMA website is fascinating--those folks are designing some very cool things! 

How To Use It:
Just do it! Here's a quick screen shot from the KOMA KOMA website that explains how to use the APP. Click here to see it larger and to get additional tips on the KOMA KOMA website.

Image Source: KOMA KOMA
(http://komakoma.org/en/?page_id=671)
Some Examples:
Check out the Digital Storytelling folder on my GoogleDrive to see what the attendees created. Remember, we didn't have much time, but you'll get the idea. The sky's the limit here! This is what grown-ups did with only about 15 minutes of time and no prior experience with KOMA KOMA. With more time and scaffolding, your students could really excel! So, check out KOMA KOMA and see what you come up with.

Another feature I LOVE about KOMA KOMA is that you have the option to create a printable flip book from your animation--instantly! That is really cool as a takeaway for the students since animation doesn't always give you a lasting product for the students to take home to share. Just print out the flip book on card stock, cut out and assemble--the pages are already numbered (hint: use a binder clip to hold the sturdy pages together for flipping).

Here's a screenshot of one of the flip books the attendees created from their animation
(it was a short animation, so the flip book is short as well).

A Student's Perspective:
I usually teach stop motion animation with another app called StopMotion Studio by Cateater, LLC. It's also easy to use and students like the fact they can add sound to their movies. I thought KOMA KOMA might be a better solution for us, since it was easier to use. Here's what one student said:

"I like Stop Motion better since you can add sound. I don't think it's that hard to use [Stop Motion]. It just does more than KOMA KOMA."

SO, perhaps KOMA KOMA would be good for younger students or students who are new to using APPs and doing stop motion.

How do you do animation?
Do you do stop motion animation with your students? What programs do you use, or are you old school and use a digital camera? I'd love to hear about it! Comment below or email me!


Thursday, January 21, 2016

"This is Our Story:" An Intro to Digital Storytelling

I'm so excited to be be co-leading a session at the Integrated Arts Conference at Plymouth State University. My colleague, Tiffany Dube, and I will be talking about Digital Storytelling. Tiffany is sharing a bunch of (mostly) free and fabulous tools educators can use with their students to create comic strips,  audio files, books and more. I am going to talk about using stop motion animation and give attendees some time to play around with a couple different APPs I've used with students. It should be fun!

Here's the Thinglink clickable image I've created with all of our resources and links--check it out!

Friday, January 15, 2016

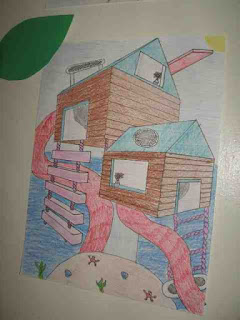
8th Grade 2-Point Perspective Dream Tree Houses

While I was subbing last spring, I was asked to teach two point perspective to the 8th graders. Instead of having them draw a standard house, I decided it would be fun to have them draw dream tree houses. This project is from Mini Matisse and she does it with 7th grade students, but the 8th graders enjoyed it. She also has a video that walks you step-by-step through the project (that was great for students who were absent and needed to catch up).

I had grand plans of also doing a shared project with my son's second grade classroom, but it didn't pan out due to time restrictions (but NEXT time I would have the littles brainstorm dream treehouse elements and have the 8th graders incorporate those into their work and then bring the treehouse images back to the second graders and have them write about the tree houses and create their own images).

This house has a car coming out of it!

I had the book, "Treehouses: The Art and Craft of Living Out on a Limb" by Peter Nelson on hand for some creative inspiration. WOW! Some of those tree houses are just fantastic!!


Vocab for the project: 2 point perspective, horizon line, vanishing points, parallel, horizontal, vertical, construction lines, recede, diverge, cube, depth

Anyway, the project was a great learning experience and I created two worksheets/handouts to go with the project. The first, a treehouse brainstorming sheet allowed the students to come up with ideas for their tree houses and tell me a story about their houses (those were fun to read!). I also came up with a an assessment checklist for the student and I to make sure that all of the expectations for the project were met.

Treehouse brainstorming sheet to be passed in with final drawing.
The checklist I used to assess the drawing.
Enjoy these creative dream tree houses! Sorry some of the pictures are wonky!


The bulletin board display. I added a title and the book by Nelson to the case as well.

Tuesday, January 12, 2016

Looking for a last-minute project for antsy students? Masking Tape Graffiti!

Not that this post comes at the proper time of the year up here in New Hampshire, but Pin It for later...

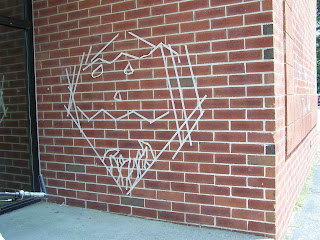
Ahhhh, the last day of the semester. Art projects done, self-assessments done, art room clean (ha!), and antsy 7th graders with nothing to do. Uh-oh! Not on my watch! I did this project last year with the 7th grade students on the last day of art class (and almost the last day of school, so they were on summer vacation in their minds already!). I saw this fabulous post by Ian Sands at the Art of Ed entitled Five (Almost Legal) Street Art Projects and knew it was just the thing for my students!

How clever was this to use the manhole covers as eyes?!

So, I grabbed a roll of masking tape per student, some scrap paper and pencils for planning, and some print-outs of masking tape murals from the Interweb and led them outside for some sunshine and art!

Students could work alone or in teams and they had one 50 minute art class to create their masterpieces. Here's some of what they come up with:

How do you know when your abstract composition is done?
When someone writes "DONE" next to it!


Get it?! The Wall! Seriously, middle school students are awesome!

I had one of the guidance counselors come by and "judge" the compositions and first and second place winners had bragging rights and received a $5 gift card to the nearby convenience store/art school hangout. Murals stayed up for the rest of the day and were taken down after school, sadly, by me (I say "sadly" because I wished they could have stayed up longer!).

This project is a great one--try it out!

Saturday, January 9, 2016

You Gotta Try It! Super-Easy Monoprint Foam Plate Printmaking

I love printmaking and can't believe that I didn't take printmaking in college (my art program was so full--I barely had any electives). I'm a self-taught printmaker, and since I don't have a printmaking press, and I have four kiddos around, I like to find easy ways to create prints that they can do too. This here project is definitely one you have to try--either by yourself, with your children, or in the classroom. It is that fun and easy and uses supplies you already have on hand...

Look at this beautiful print created by my five-year-old! Love it!
And this one was done by me showing a more abstract possibility...
perhaps exploring line.
According to DCimPRINT, what we are doing here is a monoprint (versus a monotype--different thing--read more about this here). With a monoprint, a plate is incised, color applied, and a print is made. They say:

"Monoprints are the outcome of matrices that have permanent features, and can be considered variations on a theme.  The theme is the result of permanent features of the plate (such as a silkscreen template or etched lines). Variations on the theme are made when the plate is inked differently prior to each print. Possibilities for variance are infinite, and include monoprints of different color, ink density, or even size, but certain permanent features on the plate will always carry on 
from one print to another." --DCimPRINT

Because the plate is colored by hand before each print, prints can vary greatly; that is truly the fun of this project...check it out...

Supplies needed:
  • Foam tray from the supermarket (I use the green ones from veggies--not meat). These can be purchased in bulk from some nice supermarkets for pennies a piece.
  • Scissors
  • Crayola washable markers (I didn't use the ultra washable ones--just the ones you see in the photo)
  • A dull pencil
  • A sponge and a bit of water
  • White paper (I used some cheap-o paper I had, you should use drawing paper that can handle ink--DO NOT use construction paper, it won't hold up to the water).

Directions:
  1. Remove the rims from the edges of the foam tray using scissors. Our finished piece of foam was roughly 3 1/2" x 8," but you can use any size for this).
  2. Use a dull pencil to draw a design into the foam plate. A simple activity would be to draw different types of lines (straight, curved, zig zag, etc.), but you could draw a recognizable image. The dots you see on our designs were done by poking the plate with the dull pencil.
  3. Use the markers to apply color to the plate between the lines you created. Cover the entire plate with color. Older children can experiment with layering colors within sections.
  4. Prepare your paper: Cut the paper to size (a little larger than your plate). Use a slightly wet sponge to dampen your paper. You don't want the paper too wet, so you'll have to play around with this a bit. 
  5. Place the dampened paper onto the hand-colored plate and press gently, using your hand to smooth the paper onto the plate. I also use the damp sponge to smooth the paper onto the plate--don't scrub the paper or it will shift (and create a blurry image) or the paper will tear.
  6. Remove the paper and let dry.
At this time, you can recolor the plate to make another print. Try changing your colors this time or swapping plates with a friend and coloring their plate. You can keep the print as is (a nice work of art on its own) or use your print to create a card or bookmark (like we did).

Have fun with this easy and fun printmaking project!

Thinking of warm weather and our favorite pastime... 
And a minion card for a friend
(this one was colored by my five-year-old).
And the finished prints can be folded in half, glued and laminated
to make bookmarks. These were some of the ones we created.
The tassels are "Loops and Threads Craft Thread"
which is a bit thicker than embroidery floss.

And here's a close-up of one of the finished bookmarks.
This would be a fun project for a month when your school
celebrates reading.

Friday, January 8, 2016

Still Life Self Portraits With 7th Grade

Self portraits can be daunting, but students can express themselves without painting a traditional portrait. This project is based on one that the art teacher at Amherst Middle School, Rachel Rouillard, does with her 7th grade students. Students learn about self-portraits (traditional and non-traditional) and then bring in three objects from home to arrange into a composition and paint. Rachel has the students use acrylic and paint a mini composition (I think 4" square on canvas board, if I remember correctly). With the group of 7th graders I had at the time, I thought I'd try having them use ink, watercolor and colored pencil--I think that combination offers students more control and they can still explore value and color-mixing using paint.


These photos don't seem to do justice to these pieces.
They are really beautiful in person!

We spent a good amount of time sketching and working on composition for these pieces so that they were dynamic. I did not specify the size for the final pieces and there was a nice variety of little compositions and larger ones. The only trouble I ran into with this project was having the students bring in items from home--that just didn't work well for some. I'm not sure how I would work that in the future (perhaps give them the chance to bring objects in, but if they don't they use objects from the classroom?).

Anyway, I was SUPER-impressed by the work the students did. I think some of them were too! Once these were on display, they generated lots of discussion and comments from the middle school students and teachers in the hallway outside of class. ENJOY!

I like the inclusion of body spray in this one. ;-)

Some students preferred to focus on one object at a time.
I like how this student worked the background as well
adding color around each object and a shadow below.

This student also wanted to have the objects separate because he felt they were easier
to read with some space between them. He did a nice job with the details
and these objects have a great deal of personal significance to him.
And here are more of the students' work from the display...

And even more! Finished pieces were mounted onto mat board.
I feel this elevates the work from ho-hum to a finished piece worthy of display
(and preparing work for presentation is one of the National Core Art Standards).


Related Posts Plugin for WordPress, Blogger...