Tuesday, November 27, 2012

Christmas Is Early: New Books For Me! YAY!

I love books and I love reading. That being said, I don't own a ton of books. You wanna know why? Besides the fact that we live in a little house, I am, ahem, cheap. Why pay all that money for a book to use for one or two lessons a couple times a year and then have it collect dust (and take up valuable shelf space) the rest of the time? 


YAY! Merry Christmas to me!
(Thanks, mom!)
Exactly.

That's why I love the library! I keep extensive records of all of the books I use for reference for my projects and I never pass up an opportunity to add to that list. My library card is the most important card I carry in my wallet. I constantly used intra-library loans and I am always toting stacks and stacks of books around. Borrowing from the library is so easy! I can browse and make my requests from home and then pick them up and go.

But, sometimes I take a book out over and over again and my late fines start to approach the actual cost of the book. and I'vr referred to it so often that I have a Post-it note on every other page. That's when I know it's time to buy.

These are a few gems that I just added to my collection:

  • "Only One You," by Linda Kranz (Picture book for children) Neat painted "fish" rocks and inspirational sayings/words of wisdom.
  • "Uncle Andy's," by James Warhola (Children's book about Andy Warhol)--I like how the author (who is related to Warhol), really brings this quirky artist to life. It's also a lovely book about finding inspiration (for artwork, for what you want to do in life) around you. I love to see the little boy in the book drawing in his room because he was inspired by his Uncle.

So I'll be enjoying my early Christmas here in New Hampshire. Feel free to write in the comments what YOUR must-have book(s) are...


Thursday, November 15, 2012

Magical Fauve Landscapes

Every year I teach my students about color theory and the color wheel. This year, we're focusing on Modern Art, so I thought a perfect color-theory tie in would be learning about the Fauves. The Fauves (or Wild Beasts) are a bunch of radical artists that created some bright and beautiful pieces of artwork that didn't quite match up with the colors of reality.


I know these landscapes are pretty basic, but read the post to find out why...

I have always loved the work of the Fauves! When I was in college, I used to take this great book called "Fauve Landscape," by Judi Freeman out of my school library. The paintings just made me happy and after I renewed the book at least three times, I decided I needed to own it! I pulled the book off the shelf for this project, and it was full of inspiration for the kiddos.

I began my lesson by having the children fill in a basic color wheel. My standard 6-color color wheel worksheet allows the children to learn about primary, secondary, complementary, warm and cool colors. There was a bit of grumbling about doing the worksheet (some of my students had done this before), but understanding the color wheel is really important for this project to be a success.

Then we looked at examples of works by the Fauves (and artists that are sometimes classified as Fauvists). We had a discussion about the paintings (the colors that were used and how they make us feel, why the artists might have chosen to use the colors they did, etc.).

Then we moved on to the main project. This project was one I saved pre-Pinterest. It is from the book "Art is Fundamental," by Eileen Prince and I always thought my students would enjoy it. In short, students create a simple landscape scene using complementary colors for the objects in the scene. Prince suggests doing the lesson as a draw-along, so that's why all of our pictures look alike. This is a great project because it only needs one piece of paper, a pencil and markers. Having the color wheel on hand really helps them get the idea of complementary colors. By the end of the lesson, they were pros!

Once they are done coloring their scene with nice, solid color, students stare at the completed image for about 30 seconds and then quickly look at the white surface. If done correctly, they will see an afterimage of the scene with the colors appearing properly. It took some of the students a couple of tries to see the afterimage, but most of them were able to see it.

This project didn't impress some of my students as much as I thought it would, but I think I'll keep it in the curriculum because it is a great lesson on color theory and some really cool artists. I also think it is a great lesson to teach children about creating art "in your own way."

The white space on the lower portion is the "white field"
the children look at to see the afterimage.

Nice, solid colors are key to this project.

This project is like a "art vocab ninja"!
The children don't even realize they are learning so much
about color, landscapes, and Modern art.


Sunday, November 11, 2012

Amherst PTA Online Auction Has Begun!

YAY! The day is here! The Amherst PTA's Online Auction has begun. This is a wonderful fundraiser for our local schools and there are so many wonderful things to kick-start your Holiday Shopping. Click here to enter the auction site and browse. The auction ends promptly November 17th at 11:00pm ET.


There are categories such as:

  • Fun At School (lunch with principals and teachers, etc.)
  • We Love Sports (karate lessons, etc)
  • Eat, Drink and Be Merry (Wine, GC at Restaurants)
  • Pamper Yourself (Gift baskets, jewelry, etc.)
  • Let's Go Shopping! (More GC's, etc.)
  • More Great Stuff (Classes and items for yourself and for giving)


I donated two things to the auction: the first is the Kandinsky-inspired canvas with the learning quote "You Learn Something EVERY Day IF You Pay Attention." This is perfect for home or classroom! We can all use a reminder to pay attention, right? NOTE: If someone outside of driving distance to Amherst, NH (say, over 30 miles--but still in the continental U.S.) is the winning bidder of this piece, I'll pay to ship it to you.

The other thing I donated is full tuition for my "Gifts From The Art" Class held in Amherst at Wilkin's Elementary School in December 2012. This is a fun 2-day class where children can create art-inspired gifts for their family and friends for the holidays. It really is a blast and the children create all sorts of amazing pieces. This one you'll have to be in Amherst to attend. Right now, this class is open to 2nd-4th graders. Here's the post about last year's class.

Both of my items are in the "More Great Stuff" category.

OK, so there's my commercial--get bidding!

Friday, November 9, 2012

Giacometti-Inspired Dancing Figures

Just wanted to share the piece that my private art student did this week in our session about the figure based on Giacometti. This piece is reminiscent of his famous work "City Square," but since my student is a dancer, she chose to make four figures dancing on a stage. This added a lovely dimension to the work in that my student needed to think about how the figures were interacting with one another in the space.

After she was done, she added the shadows and then decided to add skirts to her figures like Degas' "Little Dancer." Wow, this little girl is one smart cookie! What a lovely connection.

Fabulous piece!

"Dancing Figures"
This piece is inspired by a lesson in a previous post. Click here, to see my post on the Giacometti Figure Study.

Saturday, November 3, 2012

2012 PTA Auction Item: Colorful Learning Quote

Our local PTA is great! They provide so many wonderful enrichment programs at my childrens' schools. Since I have three children in school, I feel it is my duty to help the PTA with their fundraising efforts. The online auction allows me to help in a way that is easy for me. Last year, I went into my oldest son's classroom and helped them create a piece as a group to donate. They learned about mosaics and math and created a beautiful piece that raised $50 for the PTA.

This year, I asked some children to help me create a piece inspired by Kandinsky (one of my favorite artists) which I combined with a learning quote to create a unique and colorful piece that should appeal to a wide audience.
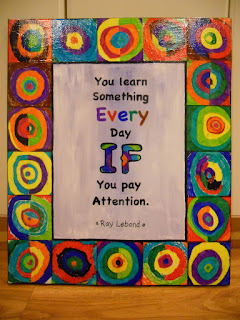

Ta da! Here's this year's piece I created
for the Amherst (NH) PTA's Annual Online Auction.
Now to get it to the auction coordinator so she can get it online...
Here's how we created the piece:

First off, I took inspiration from Kathy Barbro at Art Projects For Kids. It was in her blog that I first saw the technique of having children use Sharpies on dry wax paper and then adhering it to canvas. What an awesome idea and I'm so glad she posted it. Really, once you try this technique, you'll be hooked! I bought my dry wax paper at a food service supply store in our town. It came in sheets and it used to wrap sandwiches--it is less waxy than regular wax paper and is thicker than tracing paper.

Kandinsky Inspired PTA Piece

Supplies Needed:
  • Dry wax paper
  • Pencils
  • Sharpies in various colors
  • Scissors and ruler or paper cutter
  • Pre-primed and pre-stretched canvas (or you can use a canvas board), mine is 20" x 24"
  • Mod Podge and paint brush (I used matte Mod Podge while working & the Glossy for the final coat)
  • Acrylic paints (I used black, blue and white)
  • Quote printed out to size needed
Directions:

1. Figure out what size squares you want for your border and how many you need. I needed 18 four inch squares for my border. Cut squares of dry wax paper slightly larger than you need (I cut them to be 4 1/2" so little fingerprints on the edges could be trimmed away for a neater look. You can skip this step and make your squares actual size if you want to--it would save some time later).

2. Use the pencil to draw a circle in the center of the dry wax paper square. Then draw concentric circles radiating from that. The circles don't have to be perfect, it actually looks better if they are imperfect.

3. Use the Sharpies to color in the concentric circles. You can color in the circles entirely with one color, or split a circle and do the left side one color and the right side another color (check out Kandinsky's work and the photos of this project for inspiration). Fill in your entire square with rings of color. 

4. Once all of the squares are done, trim them to the size you need. I trimmed mine to be 4" square.

5. Use a ruler and pencil to measure and lightly draw guidelines to place your border squares. I did a 4" border all around the canvas with little tick marks every four inches so I could make sure I was lining everything up properly as I went.

6. Use Mod Podge to attach the squares to the canvas around the border. I suggest laying out all of your squares first to make sure you like the arrangement before you start gluing. Paint the Mod Podge onto the canvas, lay the dry wax paper square onto the glue and then paint a coat of Mod Podge on top of the square, gently easing the wrinkles and bubbles out. Let dry.

7. At this point, I painted the inner area of the piece. I used white acrylic paint and a touch of blue to create a painterly sky feel. I kept the color choice light since I knew I would be adding words over this area. Feel free to use the color(s) of your choice here.

8. I then painted black acrylic paint on the side edges of the canvas that had not been covered by the dry wax squares border. This makes the piece look more finished and makes it ready to hang--no frame needed! The buyer of this piece will appreciate that. I allowed the black to cover the sides of the canvas and come over the face of the painting a little bit. If you are using a canvas board, you could skip this step, if you wanted.

9. Once the center area is dry, you can add a little inner border of black paint, as I did. Use a thin brush (I used a soft, flat brush that was about 3/16" wide). Let dry.

10. Tape some dry wax paper over the printout of your quote. Trace the letters and fill them in using Sharpie. Cut out the words you traced on the dry wax paper close to the words (I kept all the words on a line together). Adhere the words to the canvas using Mod Podge. Let dry.

11. Once the entire canvas is dry, go over the entire piece with a thin coat of glossy Mod Podge, if desired. This will provide a nice sheen to the piece, sealing everything onto the canvas. Let dry and enjoy!

P.S. If anyone knows who Ray Lablond is, let me know, I tried to look him up online and couldn't find the man that matches the quote. ENJOY!
Related Posts Plugin for WordPress, Blogger...