Showing posts with label puppet. Show all posts

Thursday, February 4, 2016

Chinese New Year 2016: The Year of the MONKEY

February provides a wealth of integrated arts inspiration for Art Teachers! February 8th (2016) is Chinese New Year--the Year of the Monkey. Here are some of the projects from my site that I've done with my students over the years along with some resources and projects from the interweb that I love. 


My previous posts:


Projects I LOVE from around the web:

And a recipes to enjoy:


Resources I've used:

  • "China: DK Eyewitness Books," by Poppy Sebag-Montefiore (A nice overview of China and Chinese culture. The book has some clear, beautiful images of calligraphy, writing, and dragon costumes).
  • "Gung Hay Fat Choy," by June Behrens (This is a great nonfiction book that has lots of pictures and info about Chinese New Year. I love the pictures of the dragons used in the Dragon Dance).
  • "Moonbeams, Dumplings & Dragon Boats," by Nina Simonds, Leslie Swartz & The Children's Museum, Boston (A wonderful book of Chinese holiday tales, activities and recipes).
  • "The Boy Who Painted Dragons,"by Demi (All of Demi's books are beautiful! This artist has been known to paint with a mouse's whisker! She's also created books on Mother Theresa, Mary and Jesus).
  • "The Kid's Multicultural Art Book," by Alexandra M. Terzian (This is a great go-to book for a number of crafts from around the world. A must for an art teacher's personal collection. I love the whole series of art books for children by this publisher).
  • "The Paper Dragon," by Marguerite W. Davol (LOVE this book! And artist saves his village from a dragon by using creativity and intelligence. A great book!)
  • "You Can Write Chinese," by Kurt Wiese (A bit dated, but the way the information about Chinese symbols is presented is wonderful and very kid-friendly).
  • A China Family Adventure. http://www.china-family-adventure.com/chinese-writing-symbols.html (Accessed January 2012) This site has a section entitled, "Learning Chinese Writing Symbols for Kids" that has some wonderful, clear images of chinese calligraphy and a nice chart that shows the evolution of a few Chinese characters (this is where you will see that the original Chinese character for rain looks like rain falling from a cloud)
  • Chinese Calligraphy By Kids. http://library.thinkquest.org/3614/intro.htm (Accessed January 2012) A wonderful website by two elementary girls that is very child-friendly and has a ton of wonderful information about Chinese calligraphy, great picture examples and explanation of some symbols and the combination of symbols. Lovely!


Monday, January 21, 2013

Valentine's Day Projects (Repost)

Looking for a couple easy projects for St. Valentine's Day? Well, here ya go! These previous posts have been popular and deserve a second go. Some are good for making and giving en masse, and some are for your special sweetie. Either way, enjoy making something for someone you care about!
Positively Cute "I Love You"

This is a nice project to teach positive and negative space and symmetry and makes a cute last-minute Valentine for the wall or as a bookmark. It is super-inexpensive and pretty darn easy. Make one of these for your Valentine today!


Positive/Negative "I Love U" Valentine

Supplies Needed For The Wall Art:

  • Piece of black construction paper (9" x 12") in black
  • Pieces of red and pink construction paper (the red sections are 3" tall and the pink sections are 2 1/4" tall)
  • Pencil
  • Glue stick
  • Scissors
Supplies Needed For The Bookmark: 
  • Piece of white posterboard (2" x 5") in white
  • Pieces of red and pink construction paper (1" square)
  • Pencil
  • Glue stick
  • Scissors
  • Clear packing tape (2" wide)
  • Hole punch
  • 8" of ribbon
Directions:

1. Decide on the order of your colored paper pieces.

2. For the first section, the heart, draw a half a heart shape onto the first piece of colored paper. Cut it out. Glue the outside of the heart shape onto the backing of your piece (either the posterboard if you are making a bookmark or the black construction paper if you are making a larger piece). Line up the cut edge the square with the center of your backing paper.

3. Glue the corresponding half heart shape along the center line, "flipped out" from the square it came from. Hmmm....sounds confusing, but look at the picture for a guide.

4. Continue down the column, cutting out half an uppercase "I" another half heart and half an uppercase "U." Finish with another heart, if desired.

5. If you are making the wall art, you are done! If you are making a bookmark, put a strip of clear of packing tape over your design to protect it. Punch a hole in the top edge of the bookmark and add a ribbon, if desired.

Sealed with a kiss! ENJOY!

Monday, February 6, 2012

Wild Valentine Puppets

Yet another craft idea for your Valentine's Day card-giving needs OR for a classroom project: "Wild About You" Puppets! 
Research shows that 9 out of 10 people people prefer to be bitten
 with pom pom teeth vs. real dinosaur teeth.
I recently was killing time between my sons' basketball games and needed to keep my 4-year-old occupied. I dug into my totebag, folded a scrap piece of paper and "ta-da!" instant puppet. It sure kept him busy, but then I had two teams of boys crowded around me wanting them! Here's a version fancied up a bit for giving:

Easy Paper Puppets

Supplies Needed:

  • Colored piece of paper (your choice) for the puppet head
  • Scrap pieces of paper, optional
  • Embellishments such as googly eyes, pom poms, etc.
  • Tacky glue and glue stick
Directions:

1. Fold the piece of paper you are using for the puppet in thirds lengthwise. Secure the top flap with glue stick. You now have a sort of flat tube. This will make it easier for little hands to know where to put their fingers in the finished puppet.

2. Fold the tube in half and then fold each of the ends back to make an "M" shape. This is the puppet's head.
A detail of the "M" shape that you are creating.

3. Use tacky glue to attach embellishments such as googly eyes and pom pom teeth. If you would like to make features out of paper, the glue stick should work fine to attach them. 

4. Write your message such as: "I'm WILD About You!" or "You're DINO-mite!" on a strip of pink or red paper and glue it in the mouth like a tongue.

5. You can write the "To:" and "From:" info on the underside of the puppet, if desired.

This shows one of the puppets with its mouth opened wide
so you can see how the entire piece is decorated.

ENJOY your WILD puppet!

Thursday, January 12, 2012

Dragon Puppets

Gung Hay Fat Choy! Happy New Year!

Chinese New Year falls on Monday, January 23rd this year, the Year of the Dragon! In previous years I have had my art students create Dragon puppets and lanterns in honor of the holiday. This year, I'm going to post a couple of related projects so your family can mix and match and have a celebration of your own! These projects are appropriate for a variety of ages, have fun!


Dragon Puppets:

I have made dragon puppets in the past, but I really wanted to try creating the version I saw in Family Fun Magazine about a year ago. They are elaborate (in terms of kid crafts), but worth the work since they definitely have a "WOW" factor! You can find the directions here.

A quick note: I don't usually have projects where children create carbon-copies of the same craft, but these dragons we created in class look very much the same since I didn't have four weeks to let the children all do unique dragons in terms of color and body, etc. Someday maybe I can allow a bit more choice, but for now I chose the colors they would do. 

Here are some suggestions I have when doing this project with a group:

  • Enlist some grown-up help. I had one helper (besides me) for 10 children. We don't have water in our room, so I think I would grab a bucket of water so that no one was leaving to refill water buckets. Have an empty bucket for dumping dirty water into.
  • Precut the egg cartons in the sections.
  • Precut the fabric into rectangles.
  • Create stations to break the craft down into manageable pieces. I had a station for painting the eyes, a station for painting the mouth, and a station for painting the fabric body. When the children were done all of the painting they could go to the cutting station and cut out all of their "extra" pieces like the eyebrows, etc.
  • At each station, have step-by-step instructions for the specific piece they are creating at that station with a finished example of that piece (not the whole dragon).
  • Have grown-ups in charge of dispensing paint.
  • Create a drying area. I laid out sections of newspaper and wrote each child's name on a section. When they were done a piece of their dragon, they could put it onto the newspaper with their name on it to dry. This kept all of their pieces together and I could quickly see what each child needed to finish before class ended.
  • Allow for drying time. It would be great if you could leave the pieces to dry overnight. I don't have space for this since the room I use needs to be empty when I leave. Use a cardboard tray to move and store the pieces between classes if you have to move them.
  • Paint during one session, assemble during another. You could even make this a three (or four) part class if you had time. 
  • Photocopy the chin and tail templates directly onto the colors of paper you want to use. I also needed the children to cut multiple shapes at the same time, but cutting many layers of paper can be too tricky (and time consuming) for some. I stapled the paper together through the shapes they should be cutting out. This held the layers together so they could cut them out. Once the shapes were cut out, I removed the staples (the holes left behind are small).
  • On assembly day, work with 2 children at a time to assemble the finished dragons while the rest of the class does something else (maybe Chinese calligraphy?). It is a nightmare to try to walk more than two children through assembly process. Call in another grown-up if need be to speed the process along.
  • Cover everything with newspaper and have everyone (including grown-up helpers) wear aprons. I was painted on a couple of times yesterday by accident :-)
  • Don't use good paintbrushes for this. Due to the nature of this craft the paint gets ground into the brushes no matter what you do. Encourage the children to place the brushes back in the water when they are done painting so the paint doesn't dry on the brushes (especially if using acrylics).
Despite all of these warnings, I really did love this craft! I think it is totally worth doing and would be very manageable with a small group or single child. Just plan ahead and take your time! ENJOY!

Friday, May 20, 2011

Clothespin Theater

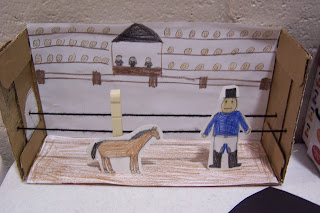
I love this project! This clothespin theater is one of those projects which kids can totally make their own! I originally taught this project as part of a medieval art course. I tied in medieval puppetry and theaters and it was a wonderful way to link history with art. 


While I had envisioned creating backgrounds and characters to act out a play about St. George and the Dragon, the children created a wide variety of characters and backgrounds such as a rainforest explorer, a soccer team, a horse and rider, and more. This project would also be a wonderful way for children to make an interactive diorama for a project at school or a book they've read (imagine Little House on the Prairie!).


Enjoy this wonderful project and the creative options it inspires!


Background:

Medieval life was hard! But during festivals, children and adults alike were able to enjoy puppet shows. There are woodcuts, paintings and illuminations that show people enjoying puppet shows. These shows were also a great way to illustrate stories for people who could not read.

One popular type of puppet during medieval times was the marionette. We created marionette during my first semester art class. Marionettes have jointed body pieces that are controlled from above with strings. Although there were also puppets that were glove puppets (that fit over a person's hand) and "jiggling" puppets that were controlled from below with a stick.

I brought in a few different types of puppets for the children to see: a finger puppet, a marionette from our first semester class, and a glove puppet. We talked about the elements of a stage: the floor, or stage itself, the background, the actors, etc.

In this project, we use a cardboard box with the top and front removed, for our theater. We then created backgrounds and floors by drawing on pieces of paper and inserting them into the box. The actors (or puppets) are drawn on index cards or cardstock and glued to clothespins. The puppets are then placed onto a piece of yarn that has been strung across the width of the box. The child can then move the puppets along the yarn as s/he acts out the story.


Supplies Needed:
  • A cardboard box (we used a box that juice pouches came in)
  • Yarn to go across the width of the box 1 or 2 times 
  • A nail to make the holes for the yarn (a grown-up's job)
  • A plastic needle
  • Plain white paper for the background (ours were 10 1/2" wide x 5 3/4" tall)
  • Plain white paper for the floor (ours were 10 1/2" wide x 3 1/4" deep)
  • Pencils
  • Crayons or colored pencils
  • Sharpie marker (optional)
  • Clothespins (the non-spring type)
  • Index cards or card stock, white
  • Hot glue or tacky glue
  • Scissors
  • Glue dots or masking tape (optional)
Directions:

1. Remove the top and front of the cardboard box you will be using for your theater.


2. Measure the back and floor of the inside of your box and cut plain white pieces of paper to fit. These will be the background and floor of your theater.

3. With pencil, draw the details of the background and floor. In my case, I created two backgrounds: one that shows the outside of the castle with a seascape and misty hills shrouded in thunder storms (that is where the mean dragon lives) and an inside view of the castle. This was a great opportunity for me to draw all of the things we've learned about this year in our medieval-themed art class: shields, tapestries, swords, etc. When drawing your background think about drawing things near and far (the foreground, mid-ground and background)--that will add depth to your drawing.
The two backgrounds I created. I only colored one in.

When I drew the pieces to line the bottom of my clothespin theater, I drew a dirt path for the outside view and a castle floor with rug for the inside view of the castle.

The two "floors" of my theater.

4. If you'd like, go over your pencil lines with black Sharpie marker and then color the images in with crayons or colored pencils.

5. Create the puppets or actors: You will need one clothespin and one index card per puppet. Draw the puppet onto the index card (put the puppet's feet at the bottom of the index card), trace over your pencil lines in Sharpie, if desired, and color in as you did the background. I made my puppet about 5" tall. When done, you can cut around the figure with scissors to remove the excess paper. Using hot glue or tacky glue to attach the puppet to the clothespin as shown in the photo below. This will allow your puppet to move along the yarn.
Puppet front

Puppet back. Note how the clothespin is glued to the puppet.

6. Assembling the theater: Have a grownup poke holes in the side of the box. They should be the same height as the clothespin slot. Now, using the plastic needle, thread the yarn through the holes and knot each piece outside the box. Slip the background into the box and place it into position (if you want to change the background, you can just prop the background in there, or you can use glue dots or masking tape to permanently attach the background paper to the back of the box). Slip the floor into place (you can attach that with tape or glue dots if desired). Place the puppets onto the string and enjoy the show!

You can string one, two or more lengths of yarn across the theater.

Here are a couple of the clothespin theaters the children in my art class created:


Related Posts Plugin for WordPress, Blogger...