Showing posts with label quilt. Show all posts

Monday, April 25, 2016

Third Grade Projects From My Long-Term Sub Gig

Here are some of the projects from my long-term sub gig that appear in the collage here so that you had a bit more info on them...ENJOY!! For the background about where I've been/what I've been doing lately, scroll to the end of the post...

"I am flying over the Eiffel Tower. I had a dream to go near. I am so happy."
Check out the post about this project below...
Third Grade Projects From My Long-Term Sub Gig:

Week 1: Snowglobes (1 day)
A getting-to-know-you project.
Students used construction paper and construction paper crayons to create 3D snowglobes with winter scenes in them. You could use oil pastels for more vibrant colors. The blue background paper is double-thickness so it stands up better and doesn't curl. The pieces could also stand up due to a ringed base. Glittery “snow” was added for sparkle! This one is a keeper in my opinion!

Since I did this project in one day with the students (and they took them with them),
it was a whirlwind and I didn't get any photos of student projects :-(
Week 2 and 3: Jasper Johns Numbers (2 days) 
A continuation of a project started prior to my arrival
Students used pencil and Sharpie to create numbers within a folded grid. Once inked, students could use crayons and paint to add color to the negative spaces within their work.

Jasper Johns, Numbers in Color (1958-59)  
Sorry, I don't have pictures of this, 
but the project was similar to this one, but numbers-only.

Week 5 and 6: Faith Ringgold Story Quilt A similar project can be found here.
Inspired by the book, “Tar Beach,” by Faith Ringgold
I feel that this project is sort of my go-to project with all students--I just love it and it so adaptable. I saw the write-up of a version on scholastic and decided to do that the time. Scholastic has a TON of related activities--check out this wonderful link.

For this version of the project, students looked at the book, “Tar Beach” by Faith Ringgold and used drawing and collage to create storytelling quilts about flying away to someplace special. Students then wrote a description of their piece to be displayed with the work. Individual student work was mounted together to create a whole-class composition displayed in the hallway. Note: the glare on the photos below are due to the glitter glue "stars" we added. Everything is betta with glitta!

The finished quilt--beautiful! 
A quote from the book, "I have told him it's very easy,
anyone can fly. All you need is somewhere to go that you can't get to
any other way. The next thing you know, you're flying among the stars."
The little white pieces below each square are the students' write-ups about
what is going on in their work. 
"Hi. I am Liz and I'm in New York where there's cars and good food
and on the 4th of July we put fireworks up in the sky but right now
I'm flying. Do you want to fly with me?"

"I am the fastest superhero and I like basketball and soccer.
I am speedy."
Week 7: Kandinsky group mural Check out the original post here.
Inspired by Kandinsky’s color studies
Students used paint to create a composition of concentric rings based on the color studies by Kandinsky. Individual student work was displayed with other grade levels to create a multi-age group mural for the hallway.

A close-up of the individual 6" squares all glued together
onto the larger roll of paper using Elmer's glue (a dot in each corner).

The finished mural. Beautiful!!

Tuesday, April 19, 2016

Kindergarten Projects From My Long-Term Sub Gig

Hello!

So, it's been a busy Spring for me since I finished student teacherin' in December--I subbed a bit in preschool, kindergarten, elementary and high school and then landed a wonderful 6 1/2 weeks long-term sub gig at an elementary school nearby teaching art to grades K-5. What a blast I had--the students and staff at Fairgrounds rock and I was sad to go (it's hard to stop doing something you love when your next big thing isn't settled upon yet). Since then, I haven't blogged much because I've been daily subbing and working on my dang art teacher portfolio (more on that in a future post or ten). ANYHOW....I thought I'd break out some of the projects that appear in the collage here so that you had a bit more info on them...ENJOY!!

For more info on this awesome project--READ ON!
Kindergarten Art Projects From Fairgrounds Elementary School:

Week 1: Lots of Hearts (1 day)
A getting-to-know-you project.
Inspired by Valentine’s Day, students used chalk pastels to trace the outline of a heart shape (line) and then smudge the edges with cotton balls. Once the heart tracer is removed a glowing heart (shape) remains. Students were asked to repeat the procedure 5-6 times using whatever colors they wished.
 
Sorry, all I have of this project is my teacher example.
The finished pieces were WAY better!

Week 2: Picasso Bouquets (1 day) See post here
Inspired by Pablo Picasso’s drawing: Hands With Bouquet
Students looked at and talked about the drawing “Hands With Bouquet” by  Pablo Picasso. Students then used oil pastels to create a similar bouquet of flowers using circles and ovals and vertical lines. When they were done, I painted the palm of their hand with black paint and they stamped their handprint onto the work to look as though they were holding the bouquet.


Week 3 and 4: Mondrian Mixed Media Collages (2 days) From Art Room 104
Inspired by the work of Piet Mondrian
Students looked at the work of Mondrian and discussed how his work was similar to (and different from) the work of Picasso. Students then used scissors to cut squares and rectangles from paper to create a collage. On day two of the project, students added horizontal and vertical lines to the work using scraps of mat board and black tempera paint.
 
This is the info I put with my displays.
Many people comment about how helpful the info is.

A student example.

The finished display--there's one class in here, I think.


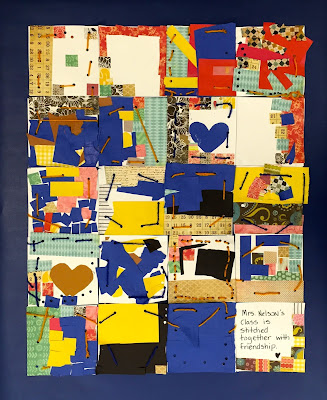
Inspired by the 19th and 20th Century Quilts from the Picturing America Series (Particularly the “Crazy Quilt” Image)
We reviewed the shapes we had been using the past few weeks and the art method they had used recently (collage). Students then used scissors, glue and a variety of papers to create individual quilt squares that had whatever colors and shapes they wanted. On day 2, the teacher used a hole punch to add holes to each quilt square (about 8 per square) and students used yarn to sew their quilt square. Individual student work was mounted together to create a whole-class composition displayed in the individual Kindergarten classrooms.

Each Kindergarten class made their own quilt for their classroom.

An example of a quilt square (they are 6" square).

I needed one more square and decided to create this piece--
the teachers LOVED the quote.
Week 7: Kandinsky group mural See post here
Inspired by Kandinsky’s color studies

Students used paint to create a composition of concentric rings based on the color studies by Kandinsky. Individual student work was displayed with other grade levels to create a multi-age group mural for the hallway.

A close-up of the individual 6" squares all glued together
onto the larger roll of paper using Elmer's glue (a dot in each corner).

The finished mural. Beautiful!!

Sunday, November 23, 2014

Make a quilt in an evening--A PAPER ORIGAMI quilt that is!

Once upon a time, I used to quilt. I wasn't super-great at it, but I loved it and had fun. I think it's the graphic designer in me seeing all of those neat little shapes in neat little rows just makes me happy! But now I have four kiddos and I'm going to grad school. As for quilting..."Ain't nobody got time for that!" But, my sister is a wonderful quilter and churns out quilts left and right. And her work is better than mine ever was or will be--she's into detail and hand-stitching and all other sorts of craziness :-) And she has a stash of fabric that is *to die for!!*


I thought my quilting days were done (or on hold for a good long time), but, stay with me on this...

My family and I also *LOVE* origami--I don't know what it is about folding a tiny piece of paper a few times and magically getting a little shirt, a ballon, a lantern, or a samurai hat, but we can't get enough! So, awhile back, I saw this neat origami piece that had a bunch of what I figured out were origami samurai hats/helmets arranged on a colored background that looked like--a QUILT! OK, now quilts are still one of my favorite things--so I pinned it and would look at it fondly whenever I saw it in amongst my 5000+ pins...


The last time I stumbled on my origami quilt pin, I thought, "Hey that would be great for my sister!" So, I bought a pack of origami paper from the craft store (about $12.00 for 200 sheets) and coerced my kiddos to help me make a bunch of samurai hats.

Samurai hats are easy to make and even my four-year-old could do them. She ended up making about 15 or so! They were a little "unique" but usable, nonetheless! Here's link to see how to make a samurai hat.


You'll need 32 hats for this arrangement. We made so many, we had enough to make two "quilts"--one for me and one for my sister! The hats are mounted on 18" x 24" piece of Canson pastel paper. You could use mat board, but this is what I had on hand and it is wonderful quality paper and comes in a bunch of colors (and it is easy to measure and cut at home).

This project would make a great class project either for a teacher or for a group auction piece. It's also great for anyone who loves quilts and quilting. It's unusual and a conversation starter! The project took us a night to make two completed "quilts." You could make smaller versions that would fit in a 12" x 12" frame (so three rows of 6 samurai hats) or you could work with the mini origami paper (it's about 3" square) to make cards for your friends.

I hope you try this project and have fun with it and origami! ENJOY!

Friday, January 24, 2014

The Heart Needs ART!

I just got home from a wonderful conference at Plymouth State University on Integrating the Arts. So awesome! I met a ton of great educators. You'll be hearing more about my findings from the conference soon since I'm taking a related course for Grad credit. Now I need to come up with a project that integrates the arts with other subjects in the curriculum...now, if you're like me, I can't teach a lesson without tripping over a dozen standards! So hopefully this integrated arts project will be fun to create!

One thing we did to wrap up the conference was that we each created a "quilt square" from a variety of media that represented something we learned at the conference. Here's mine:


It's a positive/negative space Notan that is meant to show how the arts are related and connected to one another (theater, visual arts, music & dance) and the top triangle represents one of my loves: New Hampshire! It's supposed to depict the mountains of NH--hey, I only had about 15 minutes or so! Maybe I could go as far as to say the top triangle represents the NH Common Core Standards!?! See how the Common Core standards are connected to the Arts? Man, I'm good!

But really, this image is based on something one presenter said: "New Hampshire has a long-standing tradition of a love for the arts!" And another presenter said "The Heart Needs ART!"

I'm happy to be a part such a great profession!

FYI: the quilt squares made by the conference-goers were complied into a larger paper quilt that was displayed at the performing arts center at PSU. What a great idea, huh? Having everyone create a bit of art to get them thinking about what they learned during the day. It was great to see how different all of the squares were.

So make your heart happy--and do some ART!

The 2014 AIC Reflection Quilt

Thursday, April 18, 2013

All About Me: More Faith Ringgold Story Quilts

The other day I started a new series of classes called "All About Me" which is, sigh, not actually about ME, but has children creating artwork inspired by THEM: their portraits, their names, their interests.


With the first project I wanted to do something that would get their imaginations going, so we created quilt squares inspired by Faith Ringgold's "Tar Beach." I had originally posted this lesson here.

This project is great because the main character of the story is the same age as my students (about 3rd grade). In this lesson, the children are asked "where would you fly if you could go anywhere, real or imagined?" This project is a wonderful way to get to know my students--they come up with the best places to fly to! This project originally took two one-hour class sessions with my homeschool kiddos, but I only wanted to devote one class to this project with my after school kiddos. So, I downsized the project a bit. Here's how:

  • For the background, we used 8" x 10" rectangles of mat board 
  • For their drawn image, we used a 6" square of white paper
  • For the area they wrote on, we used a 2" x 6" rectangle
  • The patterned paper pieces, we used 1" squares (as in the other post)
How'd it go?

I was very happy with the process! The prep was easy and the project very portable (that's important since I am an "art-on-a-cart" teacher. We had time to read the entire book, discuss it a bit and then take our time drawing where we would go if we could fly. After the initial discussion, the children just worked along. This was a bit of a larger group than the last time I presented this project (we had 13 Daisy Girl Scouts visiting the classroom), but it was a smooth-running lesson. Some of the children finished about 10 minutes early (we meet for an hour and fifteen minutes). Early finishers could look at quilt-related books or work on quilt coloring pages.

When they were done, I put all of the quilt squares together and magically our finished quilt appeared. Enjoy! 

If I could fly I would go to...
the moon, Atlantis, Hawaii, out for ice cream,
to the beach, to Chihuahua Land, to a horse farm...

Thursday, March 7, 2013

Faith Ringgold Story Quilts

I had been planning to create story quilts inspired by Faith Ringgold's "Tar Beach" with my homeschool students, but couldn't think of the right angle for it. I didn't want to have them spend a class writing a story--we are too limited on time. Then I saw the post for Story Quilts done by Ms. Gram. She posed this question to her students: "If you could fly anywhere in the world, real or imaginary, where would you go?" Ah-ha! Just what I needed! 


Our completed quilt (I have a much smaller class this semester,
check out Ms. Gram's site to see this on a larger scale).

Check out the specifics for her lesson, here.

Here are our quilt squares...

I'd fly to a meadow; I'd fly to Cabela's

I'd fly everywhere; I'd fly to outer space ad touch the stars

I'd fly to some random Tokyo mall; I'd fly to L.L. Bean

I'd fly to Moscow, I'd fly to Australia to see bats
And here are some other books you may find helpful for a project like...

"Cassie's Word Quilt," by Faith Ringgold (The main character of the "Tar Beach" book stars in this picture book full of words).

"Dia's Story Cloth: The Hmong People's Journey to Freedom," by Dia Cha (This is more of an embroidered quilt, but it chronicles the journey of these refugees from Southeast Asia and their search for freedom).

"Talking With Tebé: Clementine Hunter, Memory Artist," Edited by Mary E. Lyons (the quilts and paintings of this self-taught African American folk artist pair well with Ringgold's textile art).

"Tar Beach," by Faith Ringgold (this was the specific book I used for this project--the children had me read it to them twice).

"The Keeping Quilt," by Patricia Polacco (this shows a quilt moving though generations of immigrants coming to the new world).

Enjoy!

Friday, December 7, 2012

To Brighten Your Day: Frank Lloyd Wright Windows

My Modern Art Class created some lovely faux stained glass windows based on the work of American architect, Frank Lloyd Wright. I've done this project with students before, and the process can be seen in this post.

This time, I tweaked my presentation a bit. I showed a large poster of Fallingwater, one of Wright's most famous houses. I talked about what an architect does, and about Wright's design philosophy. We made some observations about the building and I pointed out the horizontal, vertical & diagonal lines of the building (later on, I showed how these same lines appear in his stained glass windows).

Then we discussed how Wright was, um, a bit of a control freak when it came to his interior designs. He designed every little pillow, lamp, rug and even the dishes that would go into the house. We looked at some of his stained glass window designs. I was fortunate to have a great article that I have had FOREVER, well, since 1995 anyway, that appeared in American Patchwork & Quilting Magazine about a quilter named Jackie Robinson, who recreates Wright's stained glass windows in fabric. This is an awesome article because it shows how she constructs the quilts and really helps the children see the windows broken down into sections; leading vs. glass, and shapes such as squares, rectangles, rhombi, and triangles. I think this article really helped me simplify his work for the children.

I tried to access the article through the American Patchwork & Quilting's official site, but they didn't have it available. However, Jackie Robinson has her own site called Animas Quilts Publishing. Robinson had published an entire book of quilt designs based on Wright's stained glass windows titled, "Quilts In The Tradition of Frank Lloyd Wright." It is currrently out of print, but there are a few copies still floating around out there. There is a Frank Lloyd Wright section of her site showing examples of Wright-inspired quilts made from her book.

So, here are the beautiful results of my Frank Lloyd Wright lesson! Enjoy!


Tuesday, March 20, 2012

Complementary Color Crazy Quilts

This amazing "quilt" was done by some of the students in my home school art class. This past summer, I picked up a book called, "Using Color in Your Art!" by Sandi Henry. I LOVE her books--they are always full of wonderful, kid-friendly projects! One of the projects she calls, "Dancing Stripes," is really a  lesson in complementary colors and color mixing. It reminded me of a crazy quilt square so I thought my home school students would enjoy making these and then we could group them together at the final art show for an amazing art piece.


I began by showing my students some books I have on quilting (both traditional and "story quilts"). I also had a beautiful poster of crazy quilts that was perfect to show them. We then created the pieces using acrylic paints on canvas boards. One of the parents had donated three sets of acrylics to the class, so I was able to introduce "real" paint and canvases to the children. The children enjoyed mixing primary colors to achieve secondary colors and then mixing the complementary colors and watching an array of earth tones and neutrals appear.

I think the final pieces came out great and it allowed me to teach the children how to use acrylics  as well as color mixing and brush techniques, but I think that next time I may structure the class a little differently. Here are my tips:


  • If the children you are teaching are young, use tempera paints instead of acrylics. Color mixing can use A LOT of paint when kids are doing it. Ours were donated and grown-ups are in charge of dispensing paint in my classroom, so we could monitor it a bit.
  • Begin with a color wheel. I teach 2nd-5th graders in my class. The older kids had a good grasp of the color wheel, but the younger ones weren't as sure. Have the children do a color wheel before or along side their canvas. 
  • Sandi Henry suggests breaking the canvas into four sections: 1 for each primary color and one for black and white. I'd only stick to the primaries. My younger students got confused dividing up the canvas into so many sections.
  • Maybe work in some "hands-on" color mixing. I thought that next time I may break the students into groups and have them mix secondaries in plastic bags and then squirt the resulting color onto a palette for the group to use. It might pace the class better and the older students could help the younger ones. Plus, everyone loves squishing paint in a zip top bag!
  • Have better definitions of color terms as well as examples where artists have used complementary colors in their work. I want the students to understand WHY color mixing and color theory is important.
  • I may use different sized canvases next time. I had wanted to display these as a "quilt" all linked together. One idea I saw online for displaying artwork like this (that would have been perfect) was duct-taping zip-top bags together at the seams to create a quilt. Each baggie forms a reusable "pocket" for a child's artwork allowing the teacher to display the pieces together as a unit and change them out when s/he likes. HOWEVER, the 9x12" canvases I used won't fit in standard-size baggies. Maybe 8x10" canvases would work (gallon size freezer bags are roughly 10x10"). SIGH. 
I will certainly do this project again, but I'm going to try some tweaking to make the process easier and hopefully more understandable to the children. Ah...live and learn!
Related Posts Plugin for WordPress, Blogger...