Showing posts with label christmas. Show all posts

Saturday, December 10, 2016

Dunkin Donuts Box O'Joe Gingerbread House Craft!

I have a really cool project for you today that my daughter and I are super-excited to share with you! One of my family members had brought a "Box O' Joe" from Dunkin Donuts to Thanksgiving dinner and since I am a hoarder, ahem, art teacher, I couldn't throw the weird-shaped box away. I thought it would be perfect as a gingerbread house!

Box o' Joe Image Source: dunkindonuts.com

I thought of having my daughter create her own decorations for the house, but she's six and I thought she might get frustrated creating all of the "bits" from construction paper. Then I thought I could print out a couple of coloring pages that have candy on them, have her color them and then cut them all out. A good example of a *free* candy printable you could use is here. Now my daughter's good with scissors, but you know who would actually get stuck cutting all of those little bits out!

Then I was out at Hobby Lobby the other night and happened to see foam candy shapes. The package had 100 foam shapes for $5.99 but it was on sale for $3. There were gingerbread people, red and green glittery gumdrops, and red and green starlight mints (all peel and stick). Unfortunately, I do not see these on their online site, but you could probably get similar items near you.

This was a great craft for us to do together but with little involvement from me. I love crafts like that where I don't have to set the pace and she can really go on her own and make the project her own. I was there just there to make the windows and use the glue gun, if needed. It was a relaxing, calorie-free project that will last throughout the holiday season!

Enjoy!


--------------------

And in case you are looking for step-by-step directions, here they are!

Materials Needed:

  • 1 empty Box 'o Joe from Dunkin Donuts (remove the bag of liquid and discard)
  • A piece of red corrugated cardboard for the roof and windows (our piece was 12" square and came from our recycling bin)
  • Scraps of yellow or orange paper, optional, for the windows
  • Scraps of green paper for trees
  • Hot glue and glue gun
  • Scissors and an X-acto knife
  • Tempera paint (brown, white, red (for roof, if you can't find red cardboard))
  • Paint brushes
  • Glitter glue (totally necessary!!)
  • Bag of sticky-backed foam candy shapes (or you can make your own decorations)
  • A base for your creation--ours is a cardboard used when cake decorating
Directions:
  1. Paint the outside of the box with brown tempera paint. Let dry.
  2. Cut a square for the roof and edge with white paint. Let dry.
  3. Cut a slit in the roof and slide it over the handle of the box. Adhere with hot glue.
  4. Adhere the entire box to the base now, if you'd like.
  5. Create some windows by cutting 6 little strips of red cardboard and glueing them to make a window. Glue the window frame to a piece of yellow or orange paper, if desired to create the illusion that a light is on inside the house. Make as many windows as you like and glue to the house with hot glue.
  6. Now's the fun part--stick candy all over the house! I love peel-and-stick foam shapes so that the kids can to it themselves and don't have to wait for glue to dry.
  7. Create trees from paper and stand-up gingerbread people and attach them to the base with hot glue.
  8. Glitta it up baby!! I squeeze glitter glue on a paper plate and have my daughter use her finger or a paint brush to add some bling all over everything!
You are done! Enjoy your easy-peasy gingerbread house!


Box o' Joe Image Source: dunkindonuts.com


Friday, January 29, 2016

Gifts From the Art 2012: Watercolor Pin

I just finished a two session mini course called "Gifts From the Art" where children can make three projects a session (a total of six gifts) for their families and friends. I did this course last year as well and it was a big hit. The class was comprised of 2nd-4th graders and I had 2-3 fabulous helpers each session. Doing this many projects a week is a bit crazy, so having good helpers is key. I try to keep things fun and moving along, but I definitely prefer my normal teaching routine where we focus on one project a week!

Here is one of the projects we did:

Aren't these just beautiful! I want to make these by the dozen!

Watercolor Heart Pin

When planning this course I try to think of gifts that can be gifted to a variety of people. A pin is a nice gift for a variety of ladies: mom, stepmom, grandma, aunt, cousin, babysitter. Here's my version that uses watercolors with a neat technique along with a few findings to create a lovely one-of-a-kind pin that is sure to be a hit!

Supplies Needed:

  • Two little pieces of watercolor paper (ours were about 2 1/2" x 3")
  • Pencils
  • Watercolors and brushes
  • Plastic wrap (maybe two 6" lengths)
  • Wooden heart shape (ours were 1 3/4" wide)
  • Scissors
  • Tacky glue
  • About a 14" piece of contrasting embroidery floss, optional
  • Hot Glue Gun and Glue sticks
  • 5" strand of copper wire
  • Various glass beads and/or word beads (I bought both at Michael's--the word beads are plastic, the other beads are glass).
  • Pin backing (ours were adhesive-backed so they were just peeled and stick-EASY!)
Directions:

1. Write your name on both pieces of watercolor paper. Wet most of the center of your paper and apply watercolor paint to the paper in nice, saturated color. Use a couple colors of paint and allow the water to blend the colors (wet on wet technique). Choose colors that are next to each other on the color wheel (analogous) so that the colors look nice when they mix. I suggested having the children create a reddish or purplish color combo on one of their papers and a greenish/bluish color combo on the other. Make sure the colors you are using are nice and saturated and while the paint is still wet, crumple up the plastic wrap and press it into the paint. Leave it there and let it dry overnight.

2. When the watercolor pieces are nice and dry, remove the plastic wrap and discard. Trace the heart shape onto the front of the watercolor paper in an area of the watercolor that you like. Cut the heart shape out. Use tacky glue to glue the watercolor paper heart to the wood form. Press for a couple of minutes until the paper no longer curls (you can also place the piece under a book or something to help it adhere better.

3. Wrap a strand of contrasting color embroidery floss around the heart, securing the ends with hot glue.

4. Attach one end of the copper wire to the back of the heart pin. Wrap it around to the front and add a couple of beads. If you are using the word bead, use it now. Keep wrapping the copper wire around, adding a couple more beads if you'd like. Make sure you only add beads to the part of the copper wire that is on the front of the pin--no beads on the back of the pin (a couple of my students tried that--but no one would ever see them that way!). Secure the end of the copper wire with hot glue.

5. Attach the pin finding to the back of the Watercolor Heart Pin and press nice and hard to make sure it sticks on there. 

What a beautiful pin--so artsy! Any mother would love to receive this! It was neat to see how different the pins came out. The children had lots of fun choosing their favorite watercolor swatch, floss color, glass beads and word bead. They took such care with each detail.


Sunday, December 27, 2015

Merry Christmas to me! a.k.a. WHEW! It's done!

Well, hello again!

This little house is one of the many that my children
and I created this holiday season from leftover Christmas cards.
The directions can be found here:
http://christmasnotebook.com/2009/11/11/christmas-card-putz-houses/
It's been a while since I have posted, but I've been trying not to stress over it (too much), since I've had a VERY busy few months. It went kind of like this:

  • (March-June) I had a long-tern substitute art teacher position at the Middle School in my town (which I absolutely loved!). I have a bunch of stuff to show you about that, and I promise, I will in the next few posts.
  • (June-August) I had four kiddos at home, went on three camping trips (one by myself with the kids for WHOLE WEEK--yes, we had a blast, it just sounds scary). Also, I took two graduate classes--that really was scary :-) Naw, it wasn't that bad, but I definitely used up a good portion of my summer working hard.
  • (August-December) I student taught. I taught first-fourth grade at Riddle Brook Elementary in Bedford, NH and then hopped over to Souhegan High School in Amherst, NH for another 7 weeks with ninth-twelfth grade students. 
I just finished student teaching about a week and a half ago and apparently there was this Christmas thing that people were talking about!?! YIPES!

So here I am, a day or two after Christmas and realizing that I am done graduate school (like, really done) and am now able to realize my dream since I was nine years old: becoming an art teacher. I am speechless--and if you knew me you'd realize that I am rarely speechless. Finishing graduate school was a great deal of work, but thanks to my husband, mother, sister, and children, I made it! I couldn't have done it without their love and support (and cheerleading efforts!). I am so lucky and thankful.

Merry Christmas and I hope you all have a wonderful holiday season full of love and friendship.

Thursday, November 21, 2013

Neat photo my 3-year-old took

All of my children have digital cameras--my mother bought them cameras for Christmas one year. They love them and, over the years, have documented important events such as their Grandma's 70th birthday and a little sibling's arrival into the world.

I remember my own 110 camera and Disc camera! Man, I loved those cameras!

When children are allowed access to their own cameras they also will document other things that mean something to them: my children have taken lots of pictures of Lego creations, favorites toys, and me in my nightgown (argh!). They also took pictures of our cat, Marty, before he died (he had cancer and kidney failure). It really helped them with the grieving process, I think, to cuddle with Marty and they often look at the pictures of themselves with Marty when they miss him.

Of course, I've deleted many a digital photo--like the series of close-ups of the couch or the rug taken without knowing! But here's a neat photo my 3-year-old recently took of our German Shepherd, Ruby. I really like it.

So, if you are looking for a Christmas gift for a child in your life--consider a digital camera (and possibly, a camera case). Prices for digital cameras are much more reasonable now and you can get one for under $50. We have a couple of the Fisher-Price ones that can be dropped (and they have), but a child over 7 or so may want a camera that looks more like a grown-up one. Either, way, it is a wonderful way for your child to experience the world!

Tuesday, December 18, 2012

Artsonia Ornament Picture How-To

I saw this project on Artsonia and thought my students would love to make this, and guess what? I did too! I made this along side one of my private art students and it was fun and easy and I love the contrast and graphic look of the piece.


Ornaments and Evergreen Picture

Supplies Needed:

  • Scraps of watercolor paper 
  • A circular object to trace--I used a glass (our circles are about 2 1/2" in diameter)
  • Pencil
  • Watercolor paints and brushes
  • White watercolor pencil or crayon
  • Water bucket and paper towels
  • Black mat board
  • Oil Pastels
  • Tacky glue
  • Gold and silver Prismacolor colored pencils
Directions:

1. Use the pencil to trace the circular object onto your watercolor paper about four to five times. Trace lightly. It is better to have a couple more circles than you'll use, just in case.

2. Use the watercolor crayon to add the highlights to each of the ornaments.

3. Wet the entire circle of an ornament. Use the watercolors to create juicy, saturated colors on the ornaments, letting the water blend the colors (wet on wet technique). Use your brush to blend the colors into the highlight a bit to soften the edges. Try to use three colors per ornament--choosing colors that are next to each other on the color wheel (analogous) so that they blend nicely. Repeat with all of the ornaments. Let dry.

4. Use the oil pastels to create the branches of the evergreens. I had my student start with the brown part of the branches. Use a chocolate brown first and rough in the branch. Then go over the branch with a lighter brown (like a yellow ochre) for the highlights. 

5. Use the oil pastels to create the needles of the evergreen. Start with a dark emerald green and rough in some of the needles. Then layer on the medium kelly green color for the bulk of the needles. Finally, use a light moss green for the highlights. Remember to make the needles start at the branch and curve toward the tip of the branch, the way real evergreen needles do.

6. Glue the ornaments onto the background. you may need to place a book on top of them to keep them from curling.

7. Use the gold colored pencil to add the top of the ornament (the finial?) and the hook. Use the silver to create a bit of highlight on the gold.

Merry Christmas!

Sunday, December 9, 2012

(Plastic) Chestnuts Roasting On An Open Fire....

OK, so this is an art blog, but I had to show you all this very cool LEGO fireplace my oldest son and I built last night! Hey, it could be considered a sculpture!


We found the directions online to build a fireplace "frame" from Legos and then you insert your iPod (or other such device) into the side with the "Eternal Flame" app playing on it. There's even the sound of the crackling fire!

When we were done, our whole family gathered around our new fireplace and enjoyed the view. My son then took the mini fireplace up to his room and fell asleep to the crackling fire! How cute!

Now, to make some Lego stocking to hang on the mantel...

Thursday, December 6, 2012

Pinterest Party 2012!

My friends are too busy to get together over the holidays. They work, they have children, they have large families with lots of commitments. Me too, but sometimes going without seeing or talking to my friends for two months, or so, is too long! Friends are what help me get through all of that everyday stuff and offer me a bit of comic relief--and I certainly need that when I'm up to my eyeballs in "to do's" and tinsel!
Look at this LOOT!
I mean, look at all of these presents I was able to make...
I could have had a cookie swap, but I didn't want the stale cookies or calories. I could have had a gift swap, but that didn't seem right either. So, I had a Pinterest Party. Here's how it worked:

How It Works:
I invited 7 of my crafty friends. I asked that they choose an easy, gift-worthy craft from Pinterest, make a sample of it and bring the supplies needed to make 7 more. Making a sample beforehand let us know what we'd be making and allows the person to work all of the kinks out beforehand. I asked that they only spend $20-$25 total for all of the supplies necessary to make their craft. Then, the plan was for us to all get together, eat, drink and craft and go home with one of seven different crafty gifts.

I also asked that they bring a snack, drink or dessert from Pinterest to share.

What I Did To Prepare:
Along with making my own craft, I made sure I had a few tables on hand for us to craft on (instead of my one little dining room table). It's great to have some basic supplies like a hot glue gun, scissors, glue sticks, extra ribbon in various sizes and colors (I just grabbed my ribbon bin) and tape. Having a cleaning spray, paper towels and dustpan and broom easily accessible will also help when you need to tidy between projects.

I think next year I will have a gift bag station for wrapping the gifts and a dedicated place for people to put their gifts as they finish them (maybe a large gift bag or grocery bag with handles).

I also set up a group board on Pinterest and invited all of my guests to pin their craft and food item so that, after the party, we'd have access to the directions and recipes, if needed. Our Board is here.

The Projects:
Wow! I was so thrilled at the diversity of the projects! Here's what we made:

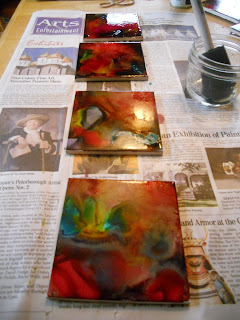
  • Alcohol Ink Coasters (set of 4)
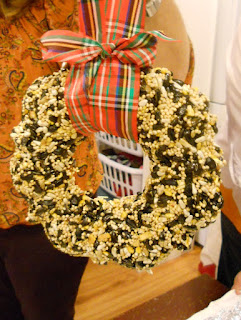
  • Birdseed Wreaths
  • Mason Jar Soy Candles
  • Terrariums in a Glass Ornament
  • Desktop Dry Erase Board
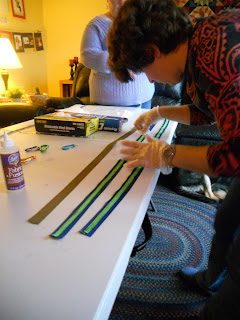
  • No-Sew Lanyards
  • Washer Necklaces

We took turns having the person who brought a specific project lead the rest of us through it in a mini tutorial. We learned so much about so many different types of crafts and we were able to try things that we might otherwise have never done.

Working on the No-Sew Lanyards
The Food:
YUM! Too many good things and WAY too much food! But I enjoyed working my way through the buffet! I had coffee and tea on hand as well as juice spritzers. One of my good friends brought eggnog from a local dairy. These are some of the recipes from Pinterest that were there (Check out the Pin Board for the links/recipes):

  • Pumpkin Whoopie Pies
  • Candy Cane Dip With Apples & Oreos for dipping
  • Asian Slaw With Ginger-Peanut Dressing
  • Buffalo Chicken Enchilada Roll-ups
  • Goat Cheese Stuffed Bacon Wrapped Dates
  • Seven Layer Bars
  • Hummus & Salsa with veggies and chips, etc.

Some of the coasters drying--these really brighten up
after they are sprayed with the sealant.
Some Thoughts:
If you think you'd enjoy a Pinny Party, do it! It was fun and it's great to come away with lots of little gifts for giving. It does take some advance planning since you have to give your guests time to come up with an idea, try it at home, and shop for the supplies to create enough for your guests.

We had allowed three hours for the party (from 1:00-4:00 on a Sunday afternoon). That really wasn't enough time. Have your guests think of how they can prep some of their supplies ahead of time to save time and try to keep each project to about 1/2 hour. Limiting the guest list to 4-6 can help with time, but who wants to limit the guest list too much! Maybe if the party is held a bit earlier in the year (mid-November?) and there are two evenings of crafting (3-4 projects and evening) then that would allow for more time and more fun. But I wouldn't try to hold a party with two sessions in December--much too crazy!

But I LOVE the projects we made and I'm worried I won't be able to part with them! I'm so thrilled I was able to spend time with my friends and have some crafting therapy! I may not be entirely ready to face the holidays, but when things get stressful, I'll try to remember the good time I had with my friends this weekend.

And a present for our feathered friends, too!

Tuesday, November 27, 2012

Christmas Is Early: New Books For Me! YAY!

I love books and I love reading. That being said, I don't own a ton of books. You wanna know why? Besides the fact that we live in a little house, I am, ahem, cheap. Why pay all that money for a book to use for one or two lessons a couple times a year and then have it collect dust (and take up valuable shelf space) the rest of the time? 


YAY! Merry Christmas to me!
(Thanks, mom!)
Exactly.

That's why I love the library! I keep extensive records of all of the books I use for reference for my projects and I never pass up an opportunity to add to that list. My library card is the most important card I carry in my wallet. I constantly used intra-library loans and I am always toting stacks and stacks of books around. Borrowing from the library is so easy! I can browse and make my requests from home and then pick them up and go.

But, sometimes I take a book out over and over again and my late fines start to approach the actual cost of the book. and I'vr referred to it so often that I have a Post-it note on every other page. That's when I know it's time to buy.

These are a few gems that I just added to my collection:

  • "Only One You," by Linda Kranz (Picture book for children) Neat painted "fish" rocks and inspirational sayings/words of wisdom.
  • "Uncle Andy's," by James Warhola (Children's book about Andy Warhol)--I like how the author (who is related to Warhol), really brings this quirky artist to life. It's also a lovely book about finding inspiration (for artwork, for what you want to do in life) around you. I love to see the little boy in the book drawing in his room because he was inspired by his Uncle.

So I'll be enjoying my early Christmas here in New Hampshire. Feel free to write in the comments what YOUR must-have book(s) are...


Monday, January 23, 2012

FOUND! Antique Mexican Metal Ornaments

Wow! Look what a good friend of mine brought me today: three beautiful little metal ornaments from Mexico! Ornaments like these are the inspiration for my Mexican Folk Art Ornaments I posted in December. My friend found them in an antique shop in Massachusetts. Two have the tags on them and say "House of Openheim, C. Juarez, Mexico" and are priced for 25 cents and 39 cents. The other is stamped with "Mexico." All of them are colorful and have some amount of tooling. How great!

I love to have real examples of artwork for the children to touch and examine and these are perfect! I'm sure they will inspire my students the next time I present this project. Thanks to my friend Karen for thinking of me and my students!

Bell, Angel & Star Mexican Folk Art Metal Ornaments
And...the ornaments made by my students!

Thursday, December 15, 2011

Mexican Folk Art Ornaments

Ooooh, I have a special treat for you today! Tooled metal ornaments inspired by Mexican folk art! They are so bright and shiny, the children just loved making them!
Mexican Folk Art Ornament

When I am looking for inspiration for art projects, I look pretty much everywhere: my Art History books, gift catalogs, and magazines to name a few of my sources. My grandmother loves to bring me magazines that she's done with. No matter how old the magazine is, I love to look through them for techniques and inspiration. This craft was originally published in "Crafts" magazine in 1984. I loved the look of these ornaments and thought my art kids would love to make them. I was right! They LOVED making these. I had them make little cards to put them in so they could give them to a loved one as a gift.

The tooling aluminum needed to be ordered online from www.dickblick.com, but it was so worth it! I ordered a roll for just under $6 and combined with a couple of other things, shipping was only $7. I know that seems like a bit much, but I did have a few things in my order and the tooling aluminum is a roll of 15' or so, enough for plenty of ornaments! Plus, it is a medium that is unusual for the children to work in. I highly recommend it! So, let's get started!

Supplies Needed:

  • Tooling aluminum, available from www.dickblick.com
  • Newspaper
  • Dull pencil or blunt stick for tooling the design
  • Sharpie markers or other permanent felt tipped markers in a variety of colors (I had an eight color assortment available, but so many beautiful colors are available!)
  • Hole punch
  • 8" piece of ribbon for hanging
If you would like to make this as part of a card, see the end of this post.

Directions:

1. Choose a design for your ornament, we used the full size ornament patterns that were published in "Crafts" magazine, but I also had a few blank ornament shapes available for children to design their own. I encouraged the children to design bold designs with clear, large shapes. I also told them to fill up the entire ornament shape and add some details to their design (tons of little details may get lost, but I didn't want them to just draw one little shape in the middle of the ornament and say they were done). Just to be sure they created designs that would work, I had them show me their drawings "for approval" before they started tooling.

2. Using scissors, cut a piece of the aluminum roughly the size of your ornament. We used 4 1/2" x 6" rectangles. Tape the paper with your ornament design to the aluminum to hold it in place while you work.

3. Place the aluminum onto a pad of newspaper. This will create a soft surface for the metal. Using a dull pencil and firm pressure, trace over all of the lines of your design.

4. Once your design is done, use scissors to cut out the shape of the ornament. I found that younger children had trouble with this part and sometimes the ornament would get all bent up or the outer shape would become distorted. So if you are working with younger children, you may want to cut the ornaments out yourself.

5. Flip the ornament over and gently color the raised surfaces with permanent markers. The children can create large areas of color and then add details with a darker color on top. Encourage doing one's best work, taking one's time and adding details and pattern.

6. Once done, have the child add his/her name and date to the back.

7. Use a hole punch to create a hole for hanging and add ribbon to hang the ornament.

8. Attach to a card if desired. See my card directions, below. Feliz Navidad (Merry Christmas)!

Some of the ornaments done my my students

----------------------------


To make this project into a card:

Additional Supplies Needed: you'll need construction paper for the card, an envelope, tape to adhere the ornament to the card and the optional information for inside the card (see the info later on in the post).

Cut a piece of construction paper so that it fits inside the envelope you have. Inside the card, glue the greeting and the information about the project. Have the child sign the card.

The greeting I used was:

Feliz Navidad, próspero año y felicidad!

(Merry Christmas, a prosperous year and happiness)

 May the Spirit of the season bring you joy and peace.


I also included this information on the card: 

Tooled Metal Ornaments


Congratulations! You are the proud recipient of a hand-tooled and hand-colored metal ornament. These ornaments are done in the style of Mexican folk art with markers standing in for the traditional paint. The children used tooling aluminum from www.dickblick.com, pressing their designs into the metal with a dull pencil, then added color with permanent Sharpie markers.

Care of your ornament: the tin is bendable, so care should be taken to keep it from being crushed. It should also be hung up away from little ones since the marker could come off if the ornament is chewed on and the edges are a bit sharp for delicate fingers.


Use tape to attach the ornament to the front of the card and draw a "frame" around the ornament with a felt tip marker to fancy up the front of the card. Done!

Note: if you are going to write a name on the front of the envelope, do so before you put the ornament in the envelope or you will ruin the ornament. Also, take care not to fold or bend the ornament--the metal is pretty thin and will crush and/or bend easily. If you want to mail this card, you'll have to put it in a crush- and bend- proof package.
Related Posts Plugin for WordPress, Blogger...