Showing posts with label 2d. Show all posts

Thursday, October 27, 2016

NH Art Educator's Fall Conference 2016!!

The New Hampshire Art Educators Association's (NHAEA) Fall Conference is one that I look forward to every year--"Clear the calendar! My Conference is coming up!!!" I love to connect with old friends, meet new friends, enjoy a lunch that is made for me and that I don't have to clean up after (hey, I do have four kids!), and get my artsy-ness on!! I purposely sign up for hands-on art making workshop choices. While I love me some lecture on art education theory, I don't get to make art as much as I would like, and art school was a-ways back in time, so any chance I have to create and learn new things I can take back to my classroom, I am game!

Interacting with the art at the Currier Museum...

This year's conference was fabulous and inspiring! It was held at the New Hampshire Institute of Art (NHIA) in Manchester, NH. Keynote speaker NH Artist/Illustrator/Author Marty Kelly spoke about his artistic process and how his multiple "failures" have been useful to his creative process. He urged us as educators to create a "culture of failure" in our classrooms where it is OK to make mistakes and take chances (leading students to further growth, risk-taking, exploration). He suggests that failure is part of the learning process and is essential to learning and growth. He encouraged us to change our attitude about failure as well as our students' attitudes about it as well. He explained that if we are afraid to fail we will be afraid to imagine, innovate, explore, and try. Having a classroom culture where failure is accepted and seen as an opportunity for discussion and growth also allows students to begin to accept advice and criticism and use what is right for them. He says that failure is a "pit stop along the road to success." 
Keynote Speaker: Author and Illustrator Marty Kelly
Photo courtesy: NHAEA website (www.NHAEA.org).
This is particularly useful to me as much of what we do in the middle school art room is moving away from product-focused, cookie cutter art to process-focused, student-centered work where the students are encouraged to problem-solve, explore and make the piece their own. This is a tough transition for some and some students struggle when they do not have a teacher-model to "copy" and are asked to try and explore and adapt. I've often have students come up and ask, "Is this an A? Am I done?" The first couple of times this happened I was floored, now I counter with: "I don't know, are you done? Take a look at the project objectives and talk to one of the other students in class to see if they have suggestions for further improvement (or to see if your piece is "saying" what you want it to say)." To me, this part of the creative process is a gradual release as the students' confidence and skill-level increases, ultimately preparing them for the independence and self motivation that high school will require. 

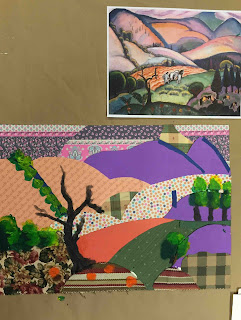
Session 1: Reinterpreting With Recylables. I went on a mini field trip to the Currier Museum of Art and saw the Mount Washington show that just opened. Mount Washington is the highest mountain in New Hampshire and is known throughout the world for its crazy weather. We went downstairs to classroom and Linn Krikorian taught us how we can use the art and artifacts within the Currier's collection as well as from life and other disciplines and have students reimagine them using recycled materials. Resources were shared for places to get interesting recyclables and for using this idea across the curriculum. Then Megan McIntyre discussed how art can be used to facilitate other ideas across the curriculum such as Science, Math, etc. This is particularly pertinent to me in my art room as I strive to develop lessons that are individualized and cross-curricular in nature. This lesson idea (and its spin-off ideas) will be helpful to me as I encourage the students to observe and reinterpret art and artifacts in class but make them their own. 

My take on a Robert Indiana from the Currier's collection.

Session 2: Structures to Sculpture (Bookmaking) This was a wonderful hands-on session led by Erin Sweeney, professor at NHIA (and her student helper Karen) taught us about a number of book-making techniques and led an open discussion amongst the creative educators present as to how we are currently using these structures within our classrooms and how we could potentially use them even more. Connections to other courses were discussed as well as connections to STEM/STEAM. While the pieces we made weren't complete (just the "bones" of the books and not fully developed within), the examples took the 2D linear idea of "book" and transformed it into 3D sculptural forms (easily!!) that could be used in our teaching in a number of ways (assessment, reflection, student mini portfolios, the documentation of a unit or the transformation of an idea, etc.). This was a VERY relevant workshop in that it allows a student to move from 2D to 3D in a seamless and accessible way while allowing them to reflect on a process or subject matter and use the 3D model-making techniques that we strive to teach them in class. This will definitely be applied to my future 7th and 8th grade classes next trimester! 


Busily working at the Structures To Sculpture Session led by Erin Sweeney.
Photo courtesy: NHAEA website (www.NHAEA.org).
After our sessions, we met back in the mail hall for closing remarks, a raffle (nope, didn't win anything this year), and a wine a cheese reception sponsored by NHIA. I went away physically tired, but rejuvenated and with so many great ideas that I can bring back to my students!

And here are some other images from the Currier workshop--the art of my classmates. ENJOY!


Wednesday, June 12, 2013

Check out these projects...

"Busy, busy," is the lament of the art teacher and mom at this time of the year! I've been running all over doing some super-awesome art projects with kiddos in Kindergarten all the way to 8th grade. I had been shying away from a couple of art projects because they were beyond my comfort level, but I made myself push on and try some projects I really thought would be worthwhile. Here are the projects I tried with my students with my notes on each project. I didn't get photos of any of these since I was very, ahem, engaged due to messes, etc. But check them out...


Kimmy Cantrell slab masks: So awesome and very engaging! I saw this project on Shine Brite Zamorano. I had never heard of this contemporary artist, but once I saw his work I knew my kiddos would love them. 

Pros of this project:
  • Students get to work with clay--yippee! Who doesn't love that!? Learn slab techniques and "scratch and attach" method using slip to adhere clay pieces together
  • Students draw out their masks before creating in clay. Great for them to work from a plan!
  • Students learn about symmetry/asymmetry 
Cons of this project (for my situation):
  • I don't have access to a kiln, so I used Crayola air dry clay. It works well, but it isn't as sturdy as fired clay. I've hot glued finished air dry clay projects to mat board for stability, that helps most times.
  • I needed to transport these between home and school for the drying stage (I don't have a classroom) and I am super-paranoid that something will happen to these in transit or at my home. If you have a classroom, this is a non-issue, I guess.
VERDICT: This is a keeper!

----------

Marbled Paper Journals: I love Mr. E's site so when I saw his super-simple technique for doing Marbled paper using shaving cream and tempera paints, I thought, "I can do this!" I thought the marbled paper would be great as covers for art journals. What a unique keepsake for my "All About ME!" after school art class.

Pros of this project:
  • Students get to learn about marbling and making a book. Wow!
  • Students get to have a wonderful tactile experience with the shaving cream and get to do all sorts of experimenting with drizzling paint and choosing their own color combinations.
  • The shaving cream smells good (teachers from other classrooms kept coming in to see what smelled so good!).
Cons of this project:
  • I had an energetic group that had some, ahem, listening problems. This was a bad idea for them. Many of them would have been happy just playing in the shaving cream. The. Entire. Time. That's fine, but they were playing in the shaving cream that had paint mixed into it and it was dripping on the floors, the tables, their clothes, etc. And then when they "helped" to clean up, the water from the sink somehow poured onto the floor and we had GIANT puddles everywhere. It was a bit of a challenge. So that brings me to my next "con:"
  • This project can be messy if not managed well. I take responsibility for the mess, certainly, but it's pretty bad when I go through an entire roll of paper towels and I have to ask the custodian for a mop and bucket and spray and spend 45 minutes cleaning with said items--and that was one class!
  • This technique is very teacher-focused. I worked with three kids at a time and they made two prints each. This focus made it so some of my rowdy students had some time to wind-up and get into trouble. I felt like I was constantly juggling naughtiness and shaving cream. It was a great stress test! :-) I think I passed, but then I had lots of time to think about it as I cleaned up after class...Mr. E--you are a saint!
VERDICT: Not again.

--------------

Kinder Rainbow Windsocks: I had my final volunteer art session with the Kindergarteners at Clark School in Amherst in May. I had done all sorts of wonderful projects with them using collage, printmaking, and paint (a bit), but I wanted to make the final project special. I knew I had my project when I saw these beautiful rainbow windsocks online at Kinder Craze. The windsocks have paint and streamers to create the most awesome and beautiful windsocks perfect for Spring! But 60+ kids with 6 different colors of paint and 30 minutes? Was this beyond my skillset? I worried, I planned, but it was awesome in the end...

Pros of this project:
  • Paint! Rainbows! Streamers! Need I say more!?!?
  • The children needed to use each of the colors to made large arcs on their papers moving from left to right. Great for hand/eye control, especially since subsequent arcs needed to touch the previous arc. Also, colors needed to be painted in rainbow order.
  • Children saw that a 2D piece of art, could transform into a 3D form: a cylinder
  • Children needed to share the foam brushes and practice patience. I placed a muffin tray in the center of each table with one of the six colors each well. One brush in each color. I had the first person start with red, paint their arc, and then pass the red brush to their neighbor who would paint and then pass the brush to his/her neighbor. This was repeated through the colors. I was worried this would take too long, but it was awesome.
Cons of this project:
  • It uses 6 colors of paint and six colors of streamers, so it would be pricey if you were buying everything for this one project, but we had everything we needed already.
  • Cleanup can be difficult. I had a helper who rinsed my brushes and trays, but I'd allow for 1/2 hour cleanup. It really wasn't all that bad at all. Those Kinders are awesome.
  • It doesn't get done in 1 day. We glued the streamers on first, then painted and then put them on the drying rack to dry. The teachers then formed the pieces into cylinders and stapled them closed the following day. They said it was super-easy (I try not to leave the classroom teachers with anything to do once my visit is done).
VERDICT: This is a keeper!

-------------------

Jean Dubuffet Paper Sculptures: What could be easier-a sheet of white paper, some markers (limited color palette--2-3 colors, plus black), scissors, glue stick and a piece of black mat board--TA DA! Instant art just like Jean Dubuffet. I've had this one pinned for a while now, but never quite had the chance to get to it. Then, in Sculpture class, we had a little free time after painting our Kimmy Cantrell masks (see above) and I thought I'd try this project. I'm glad I did--it was perfect! See a similar project here at Art Smudge.


Pros of this project:
  • Limited supplies (and the supplies needed are inexpensive).
  • Limited teacher involvement--YEAH! This is great for a sub or if you are helping students finish up/clean-up.
  • Children saw that a 2D piece of art, could transform into a 3D form.
  • Allowed for creativity in the lines, pattern, color, and 2D and 3D shapes and forms.
Cons of this project:
  • It is over quickly--I'd say, 1/2 hour from start to finish. That could be a pro, but if you are planning for it to take an entire class session, it's a con.
  • They are relatively delicate. May not make it home on the bus and cannot be stored, really.
VERDICT: This is a keeper!


-------------------

I'm very happy I tried these projects! What projects have you been hesitant to do but, in the end, were glad you did? I'd love to hear about them!

Friday, April 5, 2013

Kindergarten 2D Shape Robots

I saw this fantastic art project on Teach Preschool and knew I just  HAD to do it with my son's Kindergarten class! So this past Tuesday I was able to go in and spend a robot-themed afternoon with them. We had so much fun! Here are the robots they made using 2D shapes:


Deborah at Teach Preschool is totally great! I wish she lived near me so I could send my little ones off to her! Every day she sends out posts that are full of great learning ideas for the Preschool set. I've found that my Kinder guy also enjoys some of the activities from her site.

So check out her original post for the Shape Robots here.

Here are some of my notes on the lesson:

  • This project is great for Preschool and Kinder-aged kiddos. Both boys and girls enjoyed creating their robots.
  • This project tied in nicely with what my son was learning at this time: 2D versus 3D shapes and had a bunch of different shapes for them to use, identify and talk about while they were working.
  • This project has some very interesting kinetic-learning opportunities. The shapes are secured by poking bits of pipe cleaner through the shapes and into the foam. The kids loved doing that and really enjoyed that the legs and arms could move once they were secured with the pipe cleaner "bolts."
  • The featured book, "The Robot Book," by Heather Brown was a bit hard to find locally since it currently out of print but it is being rereleased in June. I ordered it from Amazon and it has become a favorite in our house. It talks about the parts of a robot, but it is ultimately what's inside the robot (it's heart) that counts. You could get along without the book, I guess. But I was glad to have it. It is a board book with moving parts which tied in perfectly to our robots. 
  • I was able to buy the craft foam sheets for the shapes at Michael's and just spent a few minutes cutting random shapes out of the foam: big rectangles, little rectangles, squares, half circles, and triangles. I also had peel and stick hearts and stars available, too. Maybe having circles would be nice, but I didn't have any and I wasn't going to cut them!
  • I bought the 1/2" thick styrofoam sheets at the dollar store in the floral section. They were 12" square and I was able to get three 5" x 7" rectangles from them and then I used the scraps to piece together another one (so I got four 5" x 7" styrofoam pieces from one 12" x 12" styrofoam piece). I hot glued the styrofoam rectangles to an 8 x 10" piece of mat board.
  • The only thing we used glue for were the googly eyes.
  • I encouraged the children to add details (button, switches, patterns, lines) with a Sharpie. They were more than happy to do so!
  • I worked with about 6 children at a time and at the other "stations" or centers they could play with gears (like Deborah suggested) or play Robot Bingo which I picked up at the dollar store (score!!).
It was a great day and I had a lovely afternoon with the children! They were all so proud of their robots and had a great time exploring shape and line and form. Thank you to Mrs. Greany for having me visit and to Deborah at Teach Preschool for the super-awesome lesson!

Thursday, April 4, 2013

Easy-Peasy Pizza Sculptures!

I'm always looking for a better way to do projects. I had done pizza sculptures a la Claes Oldenburg before (see here) and I thought that my Modern Art kiddos would like them too. I had originally had students create the pizza form from two pieces of newsprint stapled and stuffed with crumpled up newspapers ad then paint the sauce and toppings. While that worked out OK, the pizzas got a bit muddy with all of those toppings being painted over one another before they were dry. So, I got to thinkin'...
YUM! Bacon, sausage and pepperoni pizza!

I bought some red and kraft-colored wrapping paper at IKEA this past Christmas and thought the weight and color of them would be nice for the sculptures. I thought the children could cut a brown triangle for the bottom crust part and a top triangle from red for the sauce part...however, I used all of the red wrapping paper at Christmastime. Oops! But I had a plan...

I had the children cut both triangles for the pizza from the kraft paper, staple & stuff and then paint the sauce on with red tempera. While they were drying, the children created their toppings from construction paper scraps. This worked out great for timing and they came out great--love the bright red sauce!

The toppings are a study in size, shape and color! I had some take-out menus from pizza places and we made a huge list of toppings the children could use on their pizzas. I also made my "at least three" rule with the toppings: the children had to create at least three different toppings for their pizza (not including the cheese). Most of them were happy to oblige!

So have a no-calorie pizza party for your class or family and have fun using up all of those paper scraps you've been hanging onto!

Easy-Peasy Pizza Sculptures

Supplies Needed:


  • Medium weight paper (large sheets or a roll of paper)
  • Triangle templates cut from poster board (bottom crust template should be about 5" longer than the top crust so you can roll the triangle up and make the crust of the pizza)
  • Pencil
  • Scissors
  • Ruler
  • Newspaper or paper scraps to stuff the form
  • Stapler with staples
  • Red tempera paint (or white if you like a white sauce)
  • Paint brushes
  • Water bucket, paper towels
  • Paper scraps for pizza toppings
  • Elmer's glue
Directions:

1. Cut two triangles from kraft paper for the top and the bottom of the pizza slice. As I said above, the bottom crust triangle should be about 5" longer than the top crust so you can roll the triangle up and make the crust of the pizza.

2. Layer the two triangles on top of one another and staple along the two pointy, side edges or the pizza, through both layers. Leave the crust edge open, creating a pocket.

3. Crumple up newspaper, lightly, and stuff the pizza slightly, to give the pizza slice some dimension. 

4. Roll the open edge of the pizza slice inward a couple inches to create the pizza crust and secure with a couple of staples. You now have a giant slice of pizza!

5. Use tempera paints to paint the sauce on your slice of pizza. 

6. While it dries, you can use paper scraps to create toppings. To create the toppings you can rip, or cut the paper, or even use different punches as you see fit. To create multiple shapes (for mushrooms or other unique veggies), fold the paper multiple times and then cut through all the layers--you'll make a number of uniform shapes at once. Much better (and faster) than cutting out individual mushrooms!


6. When the paint is dry, attach the toppings to your pizza slice with glue. I had the children dribble the Elmer's glue in a zigzag motion over the sauce and then sprinkle the toppings on. Lightly press the toppings into the glue (the glue will dry clear).

YUM! Let's eat!


Wednesday, February 20, 2013

More Giacometti Figures

Last fall I did a foil project with my homeschool kiddos where they learned about Giacommetti, figure drawing and sculpture and they created figures out of aluminum foil. Here's the original post.

"I'm thinking...I'm thinking..."
They came out great! So, I thought my after school Modern Art kiddos would also enjoy making the project. I was really surprised when most of the kids DID NOT dig this project. I presented the same way, but that day, my after school kids had a case of spring fever and this project wasn't able to hold their attention (even with a bit of charades, gesture drawing and squishing foil). One longtime student said, "I hate this project, can I throw it away?"

Despite the bad reviews, the children created some really interesting pieces. One student worked and reworked his figure and finally got the idea to recreate Rodin's "The Thinker." WOW!

Here are the results, enjoy!


Related Posts Plugin for WordPress, Blogger...