Showing posts with label recycle. Show all posts

Thursday, October 27, 2016

NH Art Educator's Fall Conference 2016!!

The New Hampshire Art Educators Association's (NHAEA) Fall Conference is one that I look forward to every year--"Clear the calendar! My Conference is coming up!!!" I love to connect with old friends, meet new friends, enjoy a lunch that is made for me and that I don't have to clean up after (hey, I do have four kids!), and get my artsy-ness on!! I purposely sign up for hands-on art making workshop choices. While I love me some lecture on art education theory, I don't get to make art as much as I would like, and art school was a-ways back in time, so any chance I have to create and learn new things I can take back to my classroom, I am game!

Interacting with the art at the Currier Museum...

This year's conference was fabulous and inspiring! It was held at the New Hampshire Institute of Art (NHIA) in Manchester, NH. Keynote speaker NH Artist/Illustrator/Author Marty Kelly spoke about his artistic process and how his multiple "failures" have been useful to his creative process. He urged us as educators to create a "culture of failure" in our classrooms where it is OK to make mistakes and take chances (leading students to further growth, risk-taking, exploration). He suggests that failure is part of the learning process and is essential to learning and growth. He encouraged us to change our attitude about failure as well as our students' attitudes about it as well. He explained that if we are afraid to fail we will be afraid to imagine, innovate, explore, and try. Having a classroom culture where failure is accepted and seen as an opportunity for discussion and growth also allows students to begin to accept advice and criticism and use what is right for them. He says that failure is a "pit stop along the road to success." 
Keynote Speaker: Author and Illustrator Marty Kelly
Photo courtesy: NHAEA website (www.NHAEA.org).
This is particularly useful to me as much of what we do in the middle school art room is moving away from product-focused, cookie cutter art to process-focused, student-centered work where the students are encouraged to problem-solve, explore and make the piece their own. This is a tough transition for some and some students struggle when they do not have a teacher-model to "copy" and are asked to try and explore and adapt. I've often have students come up and ask, "Is this an A? Am I done?" The first couple of times this happened I was floored, now I counter with: "I don't know, are you done? Take a look at the project objectives and talk to one of the other students in class to see if they have suggestions for further improvement (or to see if your piece is "saying" what you want it to say)." To me, this part of the creative process is a gradual release as the students' confidence and skill-level increases, ultimately preparing them for the independence and self motivation that high school will require. 

Session 1: Reinterpreting With Recylables. I went on a mini field trip to the Currier Museum of Art and saw the Mount Washington show that just opened. Mount Washington is the highest mountain in New Hampshire and is known throughout the world for its crazy weather. We went downstairs to classroom and Linn Krikorian taught us how we can use the art and artifacts within the Currier's collection as well as from life and other disciplines and have students reimagine them using recycled materials. Resources were shared for places to get interesting recyclables and for using this idea across the curriculum. Then Megan McIntyre discussed how art can be used to facilitate other ideas across the curriculum such as Science, Math, etc. This is particularly pertinent to me in my art room as I strive to develop lessons that are individualized and cross-curricular in nature. This lesson idea (and its spin-off ideas) will be helpful to me as I encourage the students to observe and reinterpret art and artifacts in class but make them their own. 

My take on a Robert Indiana from the Currier's collection.

Session 2: Structures to Sculpture (Bookmaking) This was a wonderful hands-on session led by Erin Sweeney, professor at NHIA (and her student helper Karen) taught us about a number of book-making techniques and led an open discussion amongst the creative educators present as to how we are currently using these structures within our classrooms and how we could potentially use them even more. Connections to other courses were discussed as well as connections to STEM/STEAM. While the pieces we made weren't complete (just the "bones" of the books and not fully developed within), the examples took the 2D linear idea of "book" and transformed it into 3D sculptural forms (easily!!) that could be used in our teaching in a number of ways (assessment, reflection, student mini portfolios, the documentation of a unit or the transformation of an idea, etc.). This was a VERY relevant workshop in that it allows a student to move from 2D to 3D in a seamless and accessible way while allowing them to reflect on a process or subject matter and use the 3D model-making techniques that we strive to teach them in class. This will definitely be applied to my future 7th and 8th grade classes next trimester! 


Busily working at the Structures To Sculpture Session led by Erin Sweeney.
Photo courtesy: NHAEA website (www.NHAEA.org).
After our sessions, we met back in the mail hall for closing remarks, a raffle (nope, didn't win anything this year), and a wine a cheese reception sponsored by NHIA. I went away physically tired, but rejuvenated and with so many great ideas that I can bring back to my students!

And here are some other images from the Currier workshop--the art of my classmates. ENJOY!


Monday, January 19, 2015

Out with the old! Art catalog magnets

So, are you feeling the urge to organize your classroom, your paperwork, your art space? No, me neither! Just kidding!

But if you are throwing out some old magazines and art catalogs, here's a great project that you really should try (I know you've probably seen it everywhere)! Take a couple of those great art catalogs from last year (Crystal Publications catalogs are my favorite for this!) and grab a few inexpensive art supplies and get crafting! The reason I love the art catalogs is that they have tons of little images of art posters that are the perfect size for this project. It's sort of addicting once you get started--it's so fun to create your own gallery of art magnets!


You can also use magazine images and text (Family Fun magazine is another favorite of mine) if you like more random images and funky text for your magnets. You may be able to use your own images--just make sure they are laser color copies and not inkjet since the ink will bleed when you brush on the Mod Podge.

These make a nice little gift when you display them in a unique way. I had my art students attach them to a piece of card stock and slip them into a zip-top bag, but I've seen people put them in an old Altoids tin. The would be nice on a card that looked like a fancy frame (or maybe a whole bunch of little frames with one magnet in each frame)--really the sky's the limit on how you can present these. They are great gift for the artsy people in your life! (hint, hint!)

Art Catalog Magnets

Supplies Needed:

  • Old art catalogs or magazines
  • 1" clear glass "blobs" from the dollar store--these were bigger than the standard 1/2" blobs that I use for other projects
  • 1" circle template (see below)
  • Pencil
  • Scissors
  • Mod Podge
  • Foam brush
  • Palette for Mod Podge
  • Newspapers for work surface
  • Circle magnets (I bought mine at Michael's for $7 for a pack of 50 magnets, I think)
  • Super glue (I tried jewelry glue but, WHEW! it stunk--serious brain cell killing going on with that stuff!)
Directions:

1. Create your template/viewing window: I used a 1" circle punch to punch a hole in a scrap piece of white card stock. I then used this 1" hole to view my art catalog images and select the images for my magnets. Clear, bright images work best. I also suggested to my students that they take one of the glass blobs and place it over any images that were questionable to see if they would read easily--most are fine.

2. Once you find an image that would work well for you magnet, use the template and pencil to trace a circle onto the image. Cut out using scissors.

3. Use the foam brush to brush a bit of Mod Podge onto the flat side of the glass blob. Place your image face down onto the Mod Podge and brush another coat of Mod Podge onto the back of the image. Set aside to dry thoroughly.

4. When you are sure the image is completely dry on the glass blob (give it a couple hours), add a dot of Super glue to the back of the glass blob and place a magnet on top. Allow the glue to dry according to manufacturer's directions before using.

5. ENJOY!

Wednesday, September 19, 2012

Art and the ABC's of Ecology

I was asked to spend some time with 4-year-olds and talk about ECOLOGY. I said "YES!" and then ran to my computer to look up what "Ecology" was!

Ecology is: 1. the branch of biology that deals with the relations of organisms to one another, and 2. The study of the interaction of people with their environment.


You'd "B" Crazy Not To Try This Recycling Craft! (GROAN!)

I started off having the children play with blocks. We talked about how we needed to share the blocks. If one person took all of the blocks, there wouldn't be enough for everyone. This is a good way to illustrate the concept of REDUCE. If you use less, everyone can have some. Then I talked a bit about how people and nature can be connected. If we go on a picnic and throw our trash on the ground it will dirty up the environment and outside is where animals live--it is their home! Imagine our homes filled with trash! YUCK!

So we went outside with a shopping bag and looked for trash. They were good at that game and found quite a bit! We also talked about biodegradable vs. non-biodegradable. Leaves will break down over time, but a plastic coffee cup will not.

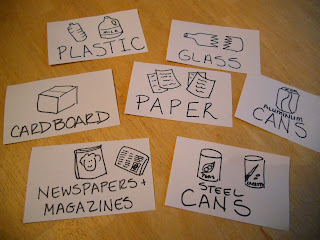
We went back inside and I introduced the next concept: RECYCLE. If we threw everything away or landfills will fill up quickly, and some of the stuff we throw away is still good or can be turned into something else. For example, water bottles can be turned into Polar Fleece fabric. I had a bunch of different recyclables on hand, in a pile, to show them. I had a ton of categories for them to sort the recyclables into (our town has a wonderful recycling center!). I had seven bins with labels such as:
  1. Paper
  2. Plastic
  3. Cardboard (Corrugated)
  4. Steel Cans
  5. Aluminum Cans (Soda cans)
  6. Newspaper/Magazines
  7. Glass (be careful with that!)
Here are my basic labels for the Recycling Bins

Then they sorted the recyclables into the appropriate bins. This went quite fast! I explained that other things can also be recycled: clothing, books and toys, by giving them away to someone who may need them.

On to the art project!

Recycled Letters

Supplies Needed:
  • Poster board (we used black)
  • Scraps of construction paper, magazines, newspapers, labels from cans, etc.
  • Glue stick
  • Scissors (young children can rip the paper if they aren't ready for scissors).
Directions:

1. Cut the first letter of the child's name from poster board. It should be about 10 inches tall and wide enough so that s/he has space to glue paper to the surface.

2. Have the child use the glue stick to attach bits of paper to the surface of the letter.

This project REUSES paper that normally would have been thrown away.

We then went back to the pond onsite and looked for trash and critters. We found water bugs and a frog and we also saw trash that we couldn't reach, floating in the pond, such as a tennis ball. This allowed me to reiterate the information I had talked about earlier about how humans and nature are connected and how our actions affect other living things.

Home Connections

To strengthen the learning this lesson at home, parents can do the following:
  • Discuss with children how they can be kind and not so kind to the environment.
  • Set up a recycling station at home and visit the Recycling Center in their town.
  • Look through outgrown toys, books and clothing and donate the items to those in need.
  • Go on a hike and/or picnic and be good stewards by staying on the paths and carrying out their trash and disposing of it properly.


Wednesday, June 6, 2012

Father's Day: Recycled Ship in a Bottle

Father's Day is on the way! This week, in my Recycled Art class, I'm having the children create a project that they can give to Dad--A Ship in a Bottle! Many of the kids had never seen a real ship in a bottle--and they had fun trying to figure out how I got the ship inside the bottle (like countless generations have done with real ships-in-bottles!). But it was simple, here goes...

Hey, how'd ya do that??
By the way, I apologize for the awful pictures, my camera is challenging me today (grrrrr....)....

Recycled Ship in a Bottle

Supplies Needed:

  • A small, clear plastic bottle (I used a bunch of bottles from juice I had bought from Cosco so they were all the same size for my students)
  • Corrugated cardboard (cheap, thick sheets work best)
  • Pencil
  • Ruler
  • Scissors
  • Tacky glue
  • Hot glue with glue sticks
  • Toothpicks
  • A pointy nail
  • Paper scraps--card stock has the best color (blue, white, brown, red, etc.)
  • Yarn or string, optional
  • Clear tape
  • 6 popsicle sticks
Directions:

1. This may take a bit of fiddling--you'll need to adjust these instructions to fit the dimensions of your bottle, but here's what we did. Cut a rectangle from the bottle of the plastic bottle. I did this for the kids because I didn't want anyone to poke themselves with the scissors. Make sure the piece you are cutting doesn't come up the side of the bottle too much, because then you'll see it when you put the bottle back together. We were fortunate since our bottles were square-shaped. You'll be reattaching this piece of plastic to the bottle, so you'll want to plan your ship so that it doesn't extend beyond this piece (or you won't be able to fit it in the hole you created in the bottom of your bottle!).

We used 10 ounce Naked juice bottles
2. Create some water for your boat to sit on. Cut a piece of blue paper for water and glue it to the rectangular piece of plastic you cut from the bottle using hot glue or tacky glue. Make sure your water doesn't extend beyond the edges of the plastic rectangle.

3. Create your ship (you only need one per bottle, unless you have a really big bottle):

To create a sailboat: Cut a boat-shape from corrugated cardboard that is pointy at one end and flat at the other end. Depending on the size of your bottle, your boat might be pretty small. Our sailboats were about 1 1/2"-1 3/4" long. Trace this shape on corrugated cardboard three more times and cut out so you have four layers of corrugated cardboard, making the hull of your boat about 1/2" tall (thick). Stack and glue the layers of your ship together.

Cut a strip of paper 1/2" tall and wrap it around the outside of your sailboat. securing with glue. This will finish off your sailboat--you can make the sailboat any color you wish.

Use the nail (or something equally "pokey") to poke a hole in the center of your sailboat. through the layers of corrugated, for the mast. Insert a toothpick into the hole and cut it down so that it fits the height of your bottle.

Cut a triangular-shaped piece of white card stock for a sail. Use the nail to poke a holes in the sail, insert the sail onto the mast and then secure to the mast with glue, if necessary. Hold the sail in place until the glue is set.

Sailboat in the background and multi-sailed ship in foreground.
To create a many-sailed ship (pirate ship, the Mayflower, etc.): Cut a boat-shape from corrugated cardboard that is pointy at both ends. Depending on the size of your bottle, your boat might be pretty small. Our many-sailed ship was about 2" long. Trace this shape on corrugated cardboard three more times and cut out so you have four layers of corrugated cardboard, making the hull of your boat about 1/2" tall (thick). Stack and glue the layers of your ship together.

Cut a strip of paper 1/2" tall and wrap it around the outside of your ship. securing with glue. This will finish off the hull of your ship--I used brown for my example to make a traditional-looking ship, but you can make your ship any color you wish.

Use the nail (or something equally "pokey" to poke two holes in the top of the hull of your boat. through the layers of corrugated, for the masts. Insert a toothpick into each of the holes and cut them down so that they fit the height of your bottle.

Cut three square-shaped pieces of white card stock for sails. Use the nail to poke a holes in the sails, insert onto the masts and then secure to the mast with glue, if necessary. Use the photos as a guide. Hold the sail in place until the glue is set.

Add a bit of string or yarn, as rigging, to your ship for detail, securing it with glue.

4. Glue the ship onto the water, and let everything dry completely. This is important since you'll be fiddling with it to get the whole thing back in the bottle--you'll want your ship to be secure!

5. Insert the boat into the ship and use the clear tape to secure the plastic rectangle base back in place. Tape all four side of the rectangle.

6. Stack and glue popsicle sticks together to make two legs to use as a display "base" for the bottle. Glue the popsicle stick legs to the bottom of the plastic bottle, covering the seams of the piece you had originally removed.

7. The finished ship in a bottle can be attached to (or inserted in to) a piece of card stock decorated with a message for Dad on his big day! 

Poster board "card" decorated and with slits cut
to accommodate the finished piece.

Anchors Away! Enjoy!!

Tuesday, June 5, 2012

"No Tie" Tie Dye Bags

I love the look of tie dye, but I don't like the mess...and the prep...and the post-dying process to set the colors...it's just too much work for this mama! So I was intrigued when I saw the "No Tie" Tie Dying technique online using Sharpies and rubbing alcohol to create tie dyed effects on T-shirts! 


Why should you do this?
  • WAYYYYYY less mess than traditional tie dye! Actually no mess at all!
  • You probably have the supplies already (Sharpies, white T-shirt, rubbing alcohol).
  • It's addicting and the success rate is high (good for Kinders to adults).
  • This project not only combines ART (color mixing, warm & cool colors, the color wheel, etc.) but it also is a SCIENCE lesson in solvents and molecules.
I did this with my after school Recycled Art class--I had the children do their "No Tie" Tie Dying on squares of white T-shirt fabric I had pre-cut to about 9" square. This gave each child the opportunity to create 4-6 designs. Once their panels were done, I sewed them to bags I had made from an old T-shirt. The design for the bag mimics a traditional plastic shopping bag and is very easy to create (two seams) from an old T-shirt. 

This created a bag from RECYCLED resources (old T-shirts) and REDUCED our art supply consumption (using items we already had on hand) to create a beautiful and useful project students can REUSE over and over (instead of using a disposable bag). WOW!

Don't want to work that hard? Instead of creating a bag, use a plain white T-shirt or a plain bandana--the results are fabulous and perfect for the summer! ENJOY!

"No Tie" Tie Dye Bags

Supplies Needed:
  • White T-shirt
  • Sharpie in rainbow colors
  • Eye droppers or pipettes (I bought ours at Michael's craft stores in the soap-making section--five for $2.00)
  • Plastic cups (we used old yogurt containers)
  • Elastic bands
  • Rubbing alcohol
Additional supplies for the bag:
  • Other color T-shirt (we used blue)
  • Ruler
  • Sewing machine and matching thread
  • Scissors
  • Pins
Directions:

1. Cut the white t-shirt into 9" squares. Discard the rest of the t-shirt, or keep for another use.

2. Use the Sharpie markers to draw a simple design, about the size of a quarter, onto the white t-shirt material. We experimented with a variety of designs from simple, geometric designs to flowers and peace signs (see the photos).

3. Place the t-shirt over the plastic cup, centering the design over the opening of the cup. Secure with a rubber band. 

4. Using the pipette, slowly drip rubbing alcohol onto your design. Don't flood the design--you want to allow the rubbing alcohol to slowly dissolve the ink and allow the colors to blend as the fluid wicks along the threads of the fabric. We used about 20-30 drops of alcohol.

5. Repeat so that the surface of the t-shirt square is nicely covered. Allow the square to dry toroughly before heat setting. Fifteen minutes in the dryer is recommended, but you can also use an iron on cotton setting for a couple minutes.

Make the t-shirt bag:

6. Place the t-shirt you'll be using for the bag onto a table and smooth out. Referring to the photo, use sharp scissors to cut off the collar and sleeves close to the seams. You can use a real plastic shopping bag as a guide or just eyeball it. Leave the shoulder seams about 3"-4" wide.

7. Increase the sleeve openings to be 7"-8" tall. I used kid-sized t-shirts for my art class, so I made the arm holes 7" tall, but if you are using a grown-up t-shirt, you might want to make the openings 8" tall or so.  

8. Enlarge the height of the opening of the collar by cutting a "W" shaped hole--use the photos as a guide. This will make the opening of your bag larger and easier to use. Still keep the shoulder seams about 3"-4" wide.

9. Fold the inner and outer seam at the shoulder of your t-shirt in and tack it (with a sewing machine) to make the handles narrower as they are on a real plastic grocery bag. The finished shoulder seams can be about 1" wide or so.

Detail of the finished shoulder seam.

10. Pin and sew the bottom edge of the t-shirt. You can add gussets to the side edges of your bag before sewing the bottom seam (see photo). Real plastic grocery bags have gussets on the bottom and it make the finished bag look nicer (in my opinion). Sew two seams at the bottom of your bag for durability.

Detail of the gusset on the right side of the bag.
11. Pin the square of fabric you tie dyed onto the front of your bag. Sew on.

12. Go shopping!


Thursday, December 1, 2011

Story Totem Poles

The last time I taught an art class about totem poles I had the children create family totem poles. They could bring in pictures of their family members or draw them. They came out great and the children were very happy with them. While looking online for totem pole images, I came across an idea that got me thinking a bit: Story Totem Poles from Art Smarts 4 Kids. She used a simple story, Goldilocks and the Three Bears, and had the children illustrate the characters and plot on a totem pole.

In this piece, the student shows the Old Man with his cloak, and then attached the Old Man and Rock with the same fastener so that he could show 1. the rock on top of the fallen Old Man and 2. the rock cracking in two. The Night Hawk is on a tab so that it moves down the Totem pole and can touch the rock (and crack it in two) as in the story.
So clever!

I decided to have the children illustrate a Native American tale and I found a few great ones at Apples 4 The Teacher. I chose "Why The Night Hawk Has Beautiful Wings." Besides having a couple of moral lessons, it is also a funny story and has great visuals for the children to explore. Here's the tale.


Supplies Needed:

  • Paper towel roll
  • Construction paper (I used green, brown and white)
  • Markers/Colored Pencils/Crayons
  • Scissors
  • Glue stick
  • Clear tape
  • Wing template, optional
  • Brass fasteners, optional
  • Images of totem pole figures and a picture of a Night Hawk for reference, optional
Directions:

1. Read the story to the students. Once I was finished, we discussed characters and plot. I then gave a brief discussion on totem pole art, highlighting some of the features they may want to include in their totem pole designs (3D wings, etc).

2. I gave each student a 6 1/2" x 12" piece of construction paper (green) to use as a base for their artwork. The children then divided it into about 5 horizontal sections (change this based on how many characters and plot points you want to show). I instructed the students to work directly on or attach their work on this piece of paper--flat on the table--and then when it was done, they could glue it to the tube.

The children could draw right on the background paper, or could illustrate their characters on a half sheet of white construction paper, cut them out and glue them to the background paper. I also gave them a half sheet of brown to use for the Night Hawk and/or the stone from the story, if they wanted. 

I also showed them how they could add motion to their totem poles (not really traditional, but fun!), by attaching characters to the background paper with brass fasteners (you know, the ones that allow things to spin. See the pictures for reference). I showed them how they could attach a picture of a stone with a brass fastener to make it roll, a key point in the "Night Hawk" story. They loved that idea and many of them took the mechanical aspect of the project even further (see photos).

3. Once the characters and images of plot points are completely colored in, cut them out and attach them to the background paper with glue. Work the story from the bottom of the totem pole up (that is more traditional). Attach any pieces that require the brass fasteners to the background NOW (before you glue the paper to the background). Wings and other 3D elements are added later, in step 5.

4. Once all of the pieces are on the background, turn the entire thing over and spread glue on the back (we used a glue stick, but white school glue would work). Roll it around the paper towel roll and secure with a couple pieces of clear tape, if needed.

5. Add any 3D elements such as wings or a beak using the glue stick.

Done! Enjoy watching your child retell the story using his or her Story Totem Pole!


Friday, April 22, 2011

Last Minute Bunny Basket & Filler Ideas

No art class for me this week--the cooperative is closed for Holy Week (Easter is this Sunday). I thought this would be a great time to write about some of my favorite artsy gifts to help out with filling those Easter baskets! Come on--one cannot live on chocolate alone!

My theory on Easter baskets and the like is to buy consumables that can be eaten (Peeps candy), used up (a suncatcher kit) or added to what we have (markers) with little impact. With four children, I have WAY too much stuff! While I'm sure you already have a list of candy for those Easter baskets, here's a list of some other stuff to make your children's Easter baskets shine!
  • Basic art supplies (crayons, markers, watercolor paints, glue sticks, glitter glue)
  • A new sketchbook (spiral bound)
  • Mini art kits (make your own picture frame, a suncatcher kit, paint your own pottery, a scratchboard kit, etc.)
  • Origami paper
  • A disposable camera and scrapbook kit or supplies
  • Beads and cord to make a necklace, bracelets, etc.
  • Dover art books--Dover makes a series of mini-books that have mazes, paper dolls, sticker books and more--these are so fun and there is one for every interest! (Buy these online or at book stores).
  • Klutz makes a line of books that foster creativity and come with the supplies needed to create the projects in the books. They have doodle books, window art, pom pom creations and so many more! These books are more pricey (about $15-$20 each), but for older children, one of these books and a couple of candies might be the Easter gift.
  • Yarn and crochet hooks or knitting needles
  • A bucket of air dry clay or play-doh (or you can make your own)
  • Stickers
  • A mini notebook, ruler, and mechanical pencils (for the future draftsperson!)
  • Pipecleaners and googly eyes to make critters
  • A big pack of construction paper
  • New scissors--either straight edge or with decorate edging
  • Sidewalk chalk for outside doodling
Have fun with the "basket" as well--it doesn't have to be traditional! You can use a pail, an art caddy or plastic tote with handle (see the post about art supplies to have on hand). A canvas totebag is also a great "basket" and the child can decorate it as a project as well. One of my girlfriends said that she saw premade baskets made from an upside down sunhat. You can often find plain colors of these and paired with a set of fabric markers, you have an easy project your child will love!

The bunny basket idea below, is a wonderful preschooler craft (or for anyone who is young at heart!). This is not original, it is just the version I improvised with my four-year-old the other day. Excuse the photos--it was difficult to take nice photos while doing the project with a four-year-old! He's very proud of it though--he shows it to everyone who walks though the door!


Spring Bunny Basket

Supplies Needed:
  • A one gallon milk jug, washed and dried
  • A sharpie or other marking pen
  • Scissors
  • 2 Googly eyes (about 3/4"-1" diameter)
  • Glue dots, tacky glue or a hot glue gun and glue sticks
  • 3 pom poms (about 3/4"-1" diameter), 1 pink and 2 white
  • 3 pipe cleaners (any color)
  • Scrap cardstock, white
  • Pencil and eraser
  • Crayons
  • Stapler
Directions:

1. You'll want to start by making a hole at the top of the bunny basket for all of those Easter treats! We left the handle of the milk jug on so that my preschooler could carry it around for an Easter egg hunt. Use the photo below as a reference. A grown-up should use scissors to carefully cut the milk jug.
The cutting line is marked with Sharpie.

2. We then used glue dots to glue on the googly eyes. I like to let the children glue them on because I love the cute expressions that are created when the kids glue the eyes on askew! So cute!

3. I then cut a set of teeth out for the bunny and had my son glue those on using glue dots.

4. I then cut a small slit (about 1/2" long) on either side of the teeth and we threaded all three pipe cleaners through the slits to create whiskers.
The pipecleaners are just fed all at once through two slits--one on either side of the bunny teeth.

5. Using the glue gun (a parent's job), I attached the pom poms to finish the bunny's face.
Awwww....look at that cute bunny face!

6. I then cut two ears out of cardstock and drew an inner ear shape inside of them. My son got busy coloring them in, and then we attached them to the back of the bunny basket with a stapler (he helped me and thought that was the best part of the entire project!).
Not perfect, but what do you expect with a 4yo breathing down my neck!

Rainbow colored ears!

This basket could be done up much more fancy then we did it. You could add a bow tie for a boy bunny and flowers and bows for a girl bunny. Don't worry if you don't have the exact supplies that we used here--using what you have on hand is a great way to teach children how to reduce, reuse and recycle. Enjoy this simple craft with your child!

And, when it's time to help the Easter bunny fill your child's Easter basket--have fun! Helping your child to "spring" into creativity can be easy!

Have a wonderful and joyous Easter! Welcome Spring!

Friday, February 11, 2011

St. Valentine's Day--Little Scribblers

So, St. Valentine's Day always gets my creative juices going since I need to come up with something for my kids to give away at school and I usually volunteer to send in a craft for the kids to do during their parties.

So, my criteria for both are: cheap, easy & fun (usually something that lasts and doesn't get thrown away the minute it arrives in the house).

One of my sons is giving away pencils with cute little bee toppers I picked up a few months ago at a discount store. We taped mini granola bars to them to make them "more." I think they are cute, but they weren't the first choice of the kids. Unfortunately, I didn't have enough supplies to make the "Little Scribblers" that the other son is taking to school to hand out. "Little Scribblers" are bits of old, broken crayons melted down in a muffin tin to create swirly, beautiful chunks of colored wax that children can scribble with.

I first made the "Little Scribblers" many years ago when my first son was about 2 years old. He was in the habit of peeling the paper off of his crayons and breaking them. Frustrating for mom! I felt as though he was wasting them, but then I found a recipe for "Scribble Cookies,"* as one author called them. I was able to repurpose the broken bits and made a batch of colorful crayon chunks for him to use.

I was reinspired by Family Fun Magazine, when I saw that they published a recipe just like it, and suggested making the cookies in heart shapes to give away for St. Valentine's Day. Ah-ha! I could do that! The kids were very excited and I started peeling, chopping and melting our old crayons.

But alas, the Scribblers take a good amount of old crayons so I only was able to make enough for one class (with a few to use at home).

"But wait," you say, this is a craft for a little kid--like a preschooler. "My children would never use this!!" I disagree. This craft is awesome on many levels.

First, it recycles something that everyone with children has a bucket of already in their homes.

Second, you can do this with your children. Anytime you can sneak some family time or one-on-one time into your life is a bonus. You can talk with your kids while they peel the crayons and my littlest boy (who is three), used a safety knife and his little hands to break the pieces of crayons up.

Third, it facilitates a discussion of colors. Warm colors, cool colors, colors that mix well and those that don't mix so well! As your children are plopping the crayon pices into the muffin tins, they are learnng about color theory. You could whip out a color wheel to show them if they are older.

Fourth, they are fun to use for little and big kids! While my 3yo just scribbles along all over the paper, my older kids use them to make multi-colored mohawks on the people they've drawn or make awesome sunsets on pictures (the scribblers are great to fill in large areas of drawings). They are also good to use when making rubbings. Children can study textures by placing different elements such as bubble wrap, leaves, coins, etc. under a white piece of paper and rubbing over the area with their Little Scribblers.

Wonderful! Something that looks beautiful (wait 'til you see how the Scribblers look when you pop them out of the pans with all of their swirly colors!), reuses something I was gonna throw out anyway, and inspires creativity!

Enjoy!
Mrs. P

Here's the link to the recipe on the Family Fun site:
http://familyfun.go.com/crafts/crayon-hearts-671639/?CMP=NLC-NL_FFUN_Crafts_021011_crayon-hearts

If the link above doesn't work, go to www.familyfun.com and search for "crayon hearts"

*I've looked around for the source of the Scribble Cookie recipe in my stacks of books, but I'm unable to find it at this time. I'll keep looking and credit the author when I find the info.
Related Posts Plugin for WordPress, Blogger...