Showing posts with label pattern. Show all posts

Friday, September 24, 2021

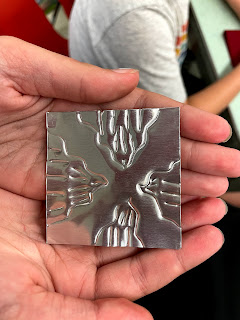
Sneak Peek: Tooled metal Line and Pattern Designs

 We've started our first art project in grade 5 and it's one that the kids always love! We use tooling foil and create lines and patterns. We then attach them to mat board and extend the lines and patterns all over the board. 

I tie the work into our ARTifact of the week: Metal Ornaments from Mexico

Here's a sneak peek of what the kids are doing. I have them make three designs with pencil and paper before they start, but once they tool that first design, they have freedom to create three more of their choosing (I don't make them go back and plan--they can just go). 


I'm excited to see how these turn out and I'll post final pictures and a more complete write-up about the process later.

ENJOY!

Friday, August 14, 2015

REPOST: Symmetrical Paper and Clay Butterflies

It's been a long summer here in New Hampshire--my kiddos have been on break since June 10th and don't start school again until September 8th--WOW! So, the long and lazy days of summer need some crafting with mom time. Here's a butterfly that Little Miss did today. This is a post from back in September of 2012, but it's a good one--very fun (and shhh....educational too!). ENJOY!


And here's the original post:

Do you know some students who are studying butterflies? This is a great project for children in Kindergarten and elementary school. You can work in so many great concepts with this project: parts of an insect, symmetry, pattern, and more.


I started by having my students cut out the wings and design them and then I walked them through the making of the butterfly body. We finished up by adding the details such as antennae and legs. I really enjoyed this project because it taught science and art concepts, but it also because it allowed the students some self expression; a win/win in my book!

Clay Butterfly With Paper Wings

Supplies Needed:

  • One 6" x 9" piece of construction paper for the wings (light color)
  • Pencil with eraser
  • Scissors
  • Assorted markers
  • Model Magic by Crayola (about the size of a chicken egg), whatever color you want
  • 3 pipe cleaners (chenille stems), whatever color you want

Directions:

1. Fold the construction paper in half the short way (hamburger or taco fold).

2. Arrange the construction paper so the fold is on the left. Draw a capital letter "B" on the paper extending it so the top and bottom of the "B" touch the top and bottom of the paper.

3. Cut out the "B" shape, but don't cut the middle line (in between the upper and bottom bumps). Write your name on the paper and open it up so your name is face down. These are your butterfly wings.

4. Decorate the wings with whatever designs you would like: big dots, little dots, lines, etc. I showed a couple of butterfly books to the children before they started drawing. I asked them to make their designs symmetrical, or the same on both wings.

5. I then gave each child a ball of Model Magic the size of a chicken egg. I had them pull off a piece and roll it into a 3/4-1" ball. This is the butterfly's head. Place this ball of dough at the top of your butterfly's wings and press down slightly.

6. Divide the remainder of the dough in half (two equal parts). Form he first into a ball. This is the thorax for your butterfly. Place this ball of dough below your butterfly's head on the wings and press down slightly.

7. Roll the remainder of the dough into a hot dog shape about 3" long or so. This is the abdomen of your butterfly. Place this ball of dough below your butterfly's thorax on the wings and press down slightly.

8. Use scissors to cut each pipe cleaner into three equal sections. Poke 2 pipe cleaner pieces into the butterfly's head as his antennae. Wrap another pipe cleaner piece into a coil and poke it into the head for the butterfly's proboscis.

9. Poke the remaining 6 pipe cleaner pieces into the butterfly's thorax (3 on one side, 3 on the other). These are the butterfly's legs.

You're done! Enjoy your colorful butterfly!

Thursday, August 13, 2015

Grade 5 Tooled Metal Lines and Patterns

My fifth grade students loved this great little project. We talked about different types of lines (dotted, straight, curved, dashed, etc.) and pattern. I gave the students four little 3 1/2" square pieces of white paper and they could create little compositions that included line and pattern.

Once they were done, they selected one of their compositions to tool into metal. This is a very neat media to work with and this relief technique is called repoussé which is French for "to push back." You can get the tooling foil online at Dick Blick. It is quite reasonably priced--I was able to get enough 3 1/2" and 4" squares for multiple classes from one roll with some left over.  The foil is easy to cut and use (I use a box cutter but you can use scissors too). To make the marks, I have students use a dull pencil on the metal while it is on a piece of felt that has been folded in half to make a double-thickness. Sometimes students need to go over their lines twice to make a nice, deep mark, but otherwise students have a high rate of success with this media. 

Once the metal portion of the project was done, I gave each student an 8" x 10" piece of mat board and they could take a pencil and extend the patterns and lines beyond the metal square over the surface of the mat board. They then colored the lines and patterns on the mat board with oil pastels. Once done, we hot glued the metal squares to the mat board. 

I think they came out beautiful!

Students could place the tooled metal square wherever they liked
on the mat board (in the center, off to the side, etc.). They then used
color, line and pattern to fill up the space.

The students were VERY engaged during this project and loved the results. The photos don't do them justice--they are beautiful and colorful. ENJOY!


The partially completed bulletin board that shows the variety of the work.
BEAUTIFUL!

When they were done, I had them affix all four of their design squares (the preliminary sketches they did on paper) to a worksheet and fill out a self-assessment on the back.


P.S. For additional tooled metal projects, check out my Mexican Folk Art Ornaments and Mexican Folk Art Trinket Boxes

Thursday, June 13, 2013

Easy Paper Name Sculpture For DAD

Yep, Father's Day is right around the corner, but don't fret if you haven't made Dear Old Dad a present yet...here's a fun and easy sculpture you can make for him that will look nice on his desk or toolbox (that's how the dads in our family roll). 


This project is based on one I saw on pinterest that had no destination or info--it was pretty much a picture on the internet. I've tried to do it justice, so here's my version. My early finisher students did this one day after painting some other sculptures. I'd say this project takes less than a half an hour to do if you choose an easy word like "dad."I'd love to have my students create multi-leveled sculptures with their entire names (more letters = a more exciting sculpture), but that's for another time!

Paper Name Sculpture For DAD

Supplies Needed:
  • 3" x 5" index cards, white on both sides (one for each letter of the name you choose)
  • Pencil
  • Scissors
  • Markers
  • Clear Tape
  • Mat Board, we used black
  • Oil Pastels
Directions:

1. Draw nice, thick letters onto the index cards making them as big as you can (touching all edges of the index card, if possible). Cut out your letters with scissors.

2. Decorate both sides of each letter with markers. Use at least two colors on each side of every letter. Try using different patterns and colors for each letter--have fun!

3. Use clear tape to attach the letters to the mat board so they stand up. Make your letters touch and lean against one another, if you'd like. The more letters you have, the more elaborate your sculpture will be. You can even make your sculpture go up vertically if you have enough letters. Think of building this sculpture like you would build a house of cards with a deck of playing cards, but you can hold the letters together with clear tape (bonus!).

4. Once all of your letters are taped where you'd like them, use the oil pastels or craypas to write a message on the base such as "I Love You!" or "Dad Rocks!" The decorate the rest of the base with the oil pastels with swirls, lines, and patterns.

Now you have a colorful sculpture for Dad! Enjoy!


Some students made sculptures with their initials instead.

And this student made a sculpture for his dog, Lulu!

Wednesday, December 19, 2012

Poinsettia Mosaic Collage

The other day I set out the supplies for my son to make this great poinsettia craft. He's in Kindergarten, so I wanted to give him some tracing, cutting and other fine motor control practice--oh, and he made this nice little piece for the art wall in our dining room. A win/win, I'd say!


I first saw a version of this project this fall, I think, on the blog Panther's Palette written by Pam Speaker. Her version was colorful and I was instantly drawn to it--as was my son who was looking over my shoulder and said, "I want to make THAT!" As he was adding the tissue paper poofs to his original piece, I thought how we could change the colors of the project to make it look like a daffodil for spring. The more I thought about it, I thought it could also make a great daisy or black-eyed susan for the summer, and poinsettia for winter. I'd love to make four of these depicting the four seasons! I'll put it on the neverending to-do list! For now, here's the winter version:

Poinsettia Mosaic Collage

Supplies Needed:

  • 1 9x12" piece of off-white construction paper
  • Red, green, white and yellow construction paper scraps
  • Scrap of card stock, optional
  • Yellow tissue paper, cut into 1" squares
  • Pencil
  • Scissors
  • Glue stick
  • Elmer's glue
  • Little cup for glue
Directions:

1. Glue a strip of green paper onto the page for a stem. Add a circle of yellow in the center of the page for the center of the flower.

2. Create a petal shape on card stock. Trace the petal shape onto the red paper and cut out 6 petals or so. I showed my son how to fold the paper a couple of times, then trace the shape and cut through the entire stack to create multiple petals in one shot. Glue the petals on around the flower's center.

3. Cut some 1/2" strips from red, green and white paper. Staple the strips together at one end. Use the scissors to cut through all of the strips at the same time to make a bunch of little 1/2" squares. Glue these down in a pattern around the outside edge of the piece.

4. Pour a bit of Elmer's glue in a small bowl or tray. Take one of the tissue paper squares and wrap it over the eraser end of the pencil. Dip the tissue paper in the glue and then touch ot to the paper in the center of the flower. Release the tissue paper and it should create a 3D "poof" with the tissue. Repeat as desired. I thought my son would use the tissue paper just in the center of the flower, but he put them on the petals too. Whatever you like...

You can also look up the story, The Legend of the Poinsettia online if you wanted to add a literature/moral/spiritual aspect to this project. Enjoy!

Friday, December 14, 2012

Matching Mittens and Printmaking Snowflakes

This week, I had the great opportunity to spend time with the PM Kinders at Clark School. They were so great and really excited to be creating some winter-themed art! 


Matching patterns and lots of different snowflakes using
a variety of found materials.

We began by talking about how cold winter is and how we need to dress warmly. We talked about the different things that we should wear when going outside to play during winter , including hats, boots, warm socks, and mittens! I told them that we were going to create mittens that matched, or that were a pair.

How were we going to do this? Collage. That's where we take bits of paper and make a picture with it. Some famous illustrators who do this are Lois Elhert and Eric Carle. I had a couple of books on hand to show: "Feathers For Lunch" and "A Pair of Socks," all illustrated by Elhert were perfect. I even mentioned the fine artist Henri Matisse and how his collage pictures are famous and sell for millions. WOW!

We went to the tables and crafted our mittens, making sure that both of our mittens matched (both in pattern and color choices). This is a great way for children to learn some math concepts and critical thinking skills. Creating a unique pattern and then matching it is quite an accomplishment!

Then they could move over to the "Snow Table" and experiment with different items I had brought in to stamp and make snow. This was a fun lesson in basic printmaking, and the children enjoyed experimenting with the different "stamps."


Patterned Mittens

Supplies Needed:
  • 1 12x18" piece of black paper
  • 1  6x9" piece of construction paper, whatever color you chose for mittens
  • Paper scraps, various colors (I had multiple colors available in 1/2" strips, 1" strips, and little 2"x3" pieces they could cut shapes from
  • Pencil
  • Glue stick
  • Scissors
  • Paint tray
  • White tempera paint
  • Assorted stamps, see below
Directions:

1. Create your stamps. You don't need anything fancy for this part. I had some plain wine corks, some pom poms hot glued to corks, and some sprigs of evergreen tree branches. I also made some fancier stamps with some foam snowflakes I found at Michael's hot glued to corks.

2. Fold the 6x9" piece of construction paper in half (the hamburger fold) and trace the child's hand onto the paper. Go around all of the fingers at once, like a mitten. Cut along the tracing line, through both thicknesses of the paper, to make two mittens that are alike.

3. Use the scraps of paper and the paper lines to create a pattern on your mittens. You can use lines and shapes such as squares, rectangles, circles, and triangles. Make sure that whatever design you do on one mitten is done on the other mitten.

4.  When your mittens are done, glue them to the black background paper.

5. Dip the stamps in the white tempera paint and add snow all over the background. Try out different stamps. The sprigs of evergreen looked great if the students stamped the tips onto the page, but some tried stamping the sprigs sideways, and that looked really neat, too. Pom poms gave a lovely, fuzzy snowflake, and some of the children were purists and used the stamps that had the foam snowflake shapes glued to them. 

They turned out great! I was also thinking of adding hats next time and/or a little string of yarn going from one mitten to the other. That would look so cute! I had a lovely time hanging out with these kiddos!

ENJOY!


Friday, September 28, 2012

Mini Hand Drawing With Pattern & Ribbon

Well, here's another project I saw on Pinterest only to follow the link to nowhere. If you know where this came from, let me know so I can give credit where credit is due! When I originally saw this project I thought it would be great for my 13-year-old private art student. It was, but I also modified it and had my 9-year-old student do it as well. Here are my notes and method:


This is a lovely project that encompasses a variety of art concepts: inking patterns, drawing hands, shading with colored pencils, depth, positive and negative space, and value (in the ribbon and in the patterns). But, in order to make it manageable, I suggest only drawing one hand on an oversize index card. This keeps the size relatively small and you should be able to actually get the piece done at some point. My 13-year-old student used a large piece of paper (maybe 11" x 14"?) and had two hands in the composition and divided up the space with lots of ribbons and she worked on it for over three weeks (each an hour long session) and it was only about 1/3 of the way done. It got to be pretty tedious for her, I think.

With this smaller format, you get all of the fun and it is just enough to keep it interesting. Here's how we did it:

Mini Hand Drawing With Pattern & Ribbon

Supplies Needed:
  • Oversize (6" x 9") white index card, blank (or card stock)
  • Pencil with eraser
  • Sharpies (fine and ultra fine tips)
  • Colored pencils, assorted colors
Directions:

1. Place the hand you don't draw with onto the index card. You can make the hand go off the page a bit, but extend your fingers so that the space around your hand is broken up a bit by your fingers. Trace your hand with pencil.

2. Move your hand off of the paper and use it as a model to fill in some of the details of the hand you traced on your paper. Add wrinkles, rings, bracelets and fingernails. Don't add too many wrinkles though!

3. Draw a ribbon curling around your hand or through fingers and take care to have the ribbon divide up the negative space in your piece. Make it interesting!

4. Erase the lines of your fingers where the ribbon overlaps them. You'll want to take a minute and really make sure that your lines make sense--you don't want to ink something that shouldn't be there!

5. Trace the hand and the details on your hand with the ultra fine point Sharpie. Also trace the ribbon with the Sharpie.

6. Use your pencil to draw different patterns in the different sections of the background. Patterns can be made of lines, dots, squares, triangles, zig zags, and more!

7. Once you have your patterns down, ink them in with the Sharpies.

8. Erase all pencil lines.

9. Use the colored pencils to add color to the ribbons. Once you've built up nice layers of color, use darker colors in areas to create shadows.

My 9-year-old art student created her piece in two one-hour sessions. I'd think that this would take 3-4 regular class sessions if you were doing this project in a classroom setting. 


Saturday, September 1, 2012

Clay and Paper Butterflies

Do you know some students who are studying butterflies? This is a great project for children in Kindergarten and elementary school. You can work in so many great concepts with this project: parts of an insect, symmetry, pattern, and more.


I started by having my students cut out the wings and design them and then I walked them through the making of the butterfly body. We finished up by adding the details such as antennae and legs. I really enjoyed this project because it taught science and art concepts, but it also because it allowed the students some self expression; a win/win in my book!

Clay Butterfly With Paper Wings

Supplies Needed:

  • One 6" x 9" piece of construction paper for the wings (light color)
  • Pencil with eraser
  • Scissors
  • Assorted markers
  • Model Magic by Crayola (about the size of a chicken egg), whatever color you want
  • 3 pipe cleaners (chenille stems), whatever color you want

Directions:

1. Fold the construction paper in half the short way (hamburger or taco fold).

2. Arrange the construction paper so the fold is on the left. Draw a capital letter "B" on the paper extending it so the top and bottom of the "B" touch the top and bottom of the paper.

3. Cut out the "B" shape, but don't cut the middle line (in between the upper and bottom bumps). Write your name on the paper and open it up so your name is face down. These are your butterfly wings.

4. Decorate the wings with whatever designs you would like: big dots, little dots, lines, etc. I showed a couple of butterfly books to the children before they started drawing. I asked them to make their designs symmetrical, or the same on both wings.

5. I then gave each child a ball of Model Magic the size of a chicken egg. I had them pull off a piece and roll it into a 3/4-1" ball. This is the butterfly's head. Place this ball of dough at the top of your butterfly's wings and press down slightly.

6. Divide the remainder of the dough in half (two equal parts). Form he first into a ball. This is the thorax for your butterfly. Place this ball of dough below your butterfly's head on the wings and press down slightly.

7. Roll the remainder of the dough into a hot dog shape about 3" long or so. This is the abdomen of your butterfly. Place this ball of dough below your butterfly's thorax on the wings and press down slightly.

8. Use scissors to cut each pipe cleaner into three equal sections. Poke 2 pipe cleaner pieces into the butterfly's head as his antennae. Wrap another pipe cleaner piece into a coil and poke it into the head for the butterfly's proboscis.

9. Poke the remaining 6 pipe cleaner pieces into the butterfly's thorax (3 on one side, 3 on the other). These are the butterfly's legs.

You're done! Enjoy your colorful butterfly!

Thursday, June 28, 2012

Words of Wisdom From 2nd Graders...

Another project I was able to do at a local elementary school, before the end of the year, was the paper plate fish project relating to the book "Only One You." My original post is here.

"Be Artistic!" What a great idea!!
I had the teacher  share the book with the children before I arrived and get them thinking of "words of wisdom" that they could impart to others. This was a great thing to do before my arrival so they were ready to go on the art project!

I started my presentation, by sitting with them and the book and talking with them about it. I did a quick recap of the plot and then we looked at the book from an artistic point of view. This was a good discussion in realism, pattern, line and repetition.

Then we got to work! I wasn't sure if the lesson would engage all of the students since I hadn't done this project with a group before (only my "test subjects" at home). It went VERY well! The project kept the children engaged the entire time and their words of wisdom were wonderful! There are some very wise second graders in Mrs. Bevilacqua's class!

As you can see, each fish was so unique!

This one gives new meaning to "Rainbow Fish." Beautiful!
Some of these read: "Think Positively" and "Don't Lie"
"Have a Vivid Imagination," "Be Unique," and "Be Careful"

Wednesday, May 2, 2012

Inspiring Art Books: "Only One You," by Linda Kranz

I'm an avid reader and I'm always looking for ways to create a multi-layered experience in the art classroom: music, movement, looking at a real piece of artwork, performing a play, etc. I also like to bring in books to share. This is kind of tricky since I have a short period of time to teach and I don't want to spend the whole class reading a book AND some children want to get creating when they get to my classroom (and won't sit still for me to read an entire book)....BUT, nonetheless, I keep trying!


Sometimes I show them the pictures (illustrations) from the book and comment about the images and then while the children are working I actually READ the book to them. This seems to be what works right now with my students.

Anyway...I heard about this great little book and it is perfect for an art project! "Only One You," by Linda Kranz, is a wonderfully colorful book full of great litle nuggets of wisdom. The story itself is of a mother and father fish imparting words to live by to their son, Adri. The illustrations are simple and combine underwater photo backgrounds with rocks painted to look like fish. But these aren't the fish you are used to--they are painted with tons of bright colors and patterns--the artwork is truly inspiring! And don't miss the endpapers (the paper on the inside of the front and back covers), they are filled with little sayings that are great and are good reminders to us all.

Of course, you could paint rocks to link to this book, but I thought a project I saw on Art Moments could be tweaked a bit and work nicely.

Only One ME Paper Plate Fish

Supplies Needed:

  • Paper plate
  • Pencil and eraser
  • Scissors
  • Glue stick and Elmer's glue
  • Sharpie or other black permanent marker
  • Colored markers (we used Crayola washable markers)
  • Large sheet of blue construction paper (12" x 18")
  • Green and brown construction paper
  • The book, "Only One You," for inspiration!
Directions:

1. Cut away a triangle shape from one side of the paper plate to create the fish's mouth. Glue the triangular piece you removed onto the side of the fish opposite the mouth to represent the fish's tail (see photo).

2. Use the pencil and draw an eye, lips, and a fin on your fish.

3. Look at the book for inspiration and discuss line, pattern, color, etc. With younger children, you may want to have them practice drawing lines and patterns to get their creative juices flowing. Use the pencil  to divide the areas of the fish into different patterns. The sky's the limit!

4. Once the fish is all patterned-up, have the child draw over the pencil lines with a permanent black marker (if you use a washable marker for this, it will bleed later on). Erase the pencils lines after you've inked the entire fish.

5. Fill in the areas of the fish with color using the markers. Everyone's fish will be different, and that's the point! Make sure the fish is nice and colorful!

6. Have the child rip green and brown paper for the seaweed and ground and adhere them to the blue construction paper background using a glue stick. I used Elmer's glue to adhere the fish to the background.

7. You could add another layer to this project by having the child either write his/her name in a speech bubble coming from the fish's mouth OR have the fish be imparting a bit of wisdom. The children can make up their own bit of advice or use one of the quotes from inside the end pages of the "Only One You" book such as: "Enjoy Every Day."

Another great idea for this project would be to create a bulletin board with all the fish from one class. Decorate the bulletin board with blue paper and add seaweed and a ground from ripped construction paper. Then add a special quote from the book or one that has particular meaning to your class and arrange all of the fish around the quote.

No matter how you do this project, it is a great way to learn some of the basic elements of art while allowing children to express their individuality. The words of wisdom will also spark quite a bit of discussion, no matter what age group you try this project with. Enjoy!

Monday, April 9, 2012

Frank Lloyd Wright Faux Stained Glass

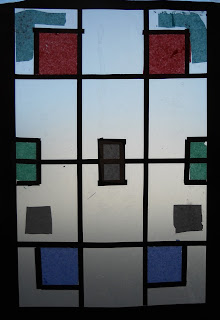
Last week my after school class created Frank Lloyd Wright-inspired stained glass windows. I showed them a variety of his stained glass designs and then let them explore line, shape and pattern to create their own stained glass designs. They looked wonderful on the windows with the bright spring sun shining through!


Frank Lloyd Wright-Inspired Stained Glass Windows

Supplies Needed:

  • 1" Grid template, optional (more info below)
  • Clear Contact paper (2 sheets 18" x 12")
  • Black construction paper strips, some 1" wide and some 1/4" wide, 18" long
  • Additional black construction paper for circles or other non-linear shapes
  • Scotch tape
  • Scissors
  • Ruler
  • Pencil and eraser
  • Tissue paper, various colors
Directions:

1. This piece is worked from the back. I created a grid template for my students to use that had 1" squares on it. I used two sheets of 8 1/2 x 11" paper taped together. This is a nice space to work on encouraging the students to use the grid for their pieces. Some disregarded it and others really utilized it for the creation of their designs. I had each student tape a template to their desk.

2. I then had the students remove the paper film from the Contact paper and lay that on the grid template sticky side up. This is the surface on which the window will be created.

3. I had the children place 1" wide black construction paper strips around the outside of the grid gently pressing them onto the Contact paper. This creates the frame for the window.

4. I then had the children create a Wright-inspired design over the grid using 1/4" wide strips of black construction paper. This is the leading of the stained glass window. I explained that the lines can be horizontal, vertical or diagonal. Also, the intersection of the lines can make shapes such as squares, rectangles, triangles and rhombi. Circles and portions of circles could also be added.

I told them that they did not need to fill the entire window with lines and shapes (look at Wright's work) . I also kept encouraging them to take their time and plan.

A look at the pieces in progress...messy but fun!

5. Once their leading was done, I took a quick look and then demonstrated how they could add color to their piece. Some of the more geometric shapes could easily be cut from tissue. They could use the grid to help: if they had a shape that was 2 squares by 3 squares on the grid, they could cut a 2" x 3" rectangle from tissue paper. For younger students or for shapes that were trickier to cut from tissue, I suggested the children tear off pieces and just fill in the section with "bits" of tissue. The tissue easily sticks to the Contact paper. I told the children it is OK if the tissue paper extends onto the black lines a bit since this is the back of their window and that won't be seen when it's done. I suggested that the children not fill the entire piece with color since Wright often left portions of his windows clear.

6. Once the children had added all the color they wanted I adhered a second piece of Contact paper over their work creating a sandwich to seal the tissue and construction paper inside. I've done a similar project to this using just one sheet of Contact paper and it doesn't hold up as well as the "sandwich" of two pieces of Contact paper).

7. The children could then use their scissors to cut the excess Contact paper from around the piece using the outer edge of the frame as a guide.

I placed these pieces on the windows immediately so we could all enjoy the bright colors and beautiful designs!


Tuesday, March 13, 2012

Mexican Folk Art Trinket Boxes

The final project that I did with my after school art class, Art Around the World 2, needed to be quick and easy since they were also finishing up their Oaxacan snakes. I had such wonderful success at Christmastime having students make Mexican Folk Art Tooled Metal Ornaments, so I had them use that process to make metalwork tops for wooden trinket boxes. They came out great! The boys in the class had just as much fun creating these as the girls did.


Mexican Folk Art Trinket Boxes:

Supplies Needed:

  • Tooling aluminum from www.dickblick.com
  • Newspapers
  • Dull pencil
  • Sharpies or other permanent markers
  • Wooden box (I bought ours at AC Moore for $1.00 each, I think)
  • Acrylic paints, assorted colors
  • Paintbrush
  • Paper plate for palette, water & paper towels
  • Hot glue & glue gun
  • Mod Podge (glossy) or spray varnish, optional

Directions:

1. Cut a circle from tooling aluminum slightly smaller that the top of the wooden box.

2. Place the aluminum onto a stack of newspapers and use the dull pencil to press the design into the aluminum.

3. Flip the aluminum over and use the Sharpies to add color to the raised design. Set aside.

4. Choose a color for your wooden box. Put a bit of paint onto the palette and add a couple of drops of water to it to thin the paint slightly. Use your paintbrush to work quickly and paint the outside & inside of the box. While the paint is still wet, use a paper towel to wipe off the excess. This technique creates a stained effect on the wood of the box, allowing the wood grain to show through. You may need to work in sections to be able to wipe the paint off while it is still wet. Let the box dry completely.

5. You can now add a decorative pattern to the box. Choose 1-2 colors that coordinate with your design and squeeze a bit of each color onto your palette (about a pea-sized amount of each). Dip the wooden end if the paintbrush into the paint and touch it to the surface of the box to make a dot. Continue around the edge of the cover or around the base of the box, as you like.

6. Once all the paint is dry, you can seal the wood with 1-2 coats of Mod Podge, if desired.


7. Once the sealant is dry, attach the tooled metal piece to the top of the box using hot glue (a grown-ups job). 


Thursday, March 8, 2012

Oaxacan Papier Maché Snakes

I love papier maché, even though it is messy! Many children seem to love it as well (although there are a few who don't like the goopy paste on their hands!). In my Art Around the World 2 Class, we studied the art of Mexico and I had the children make snakes from papier maché and decorate them in the style of Oaxacan woodcarvings. So beautiful!


Beautiful colors and patterning!

About traditional Oaxacan carvings:
The folk art carvings from the state Oaxaca (pronounced wa-HAH-ka) in Mexico are colorful and unique and steeped in generations of tradition. Carved entirely by hand from copal wood, each piece is then uniquely painted with bright colors and patterns. Carvings can include figures such as mermaids, saints and everyday people or any sort of animal, both real or imaginary.

While this art form is centuries old, it is thought that one carver, Manuel Jiminez popularized the style that we see today. There are many great artists in Oaxaca and their carvings have become so popular they can be seen in museums and private collections from around the world!

This project idea came from the book "A Survival Kit for Elementary & Middle School Teachers," by Helen D. Hume. I have mentioned this book before. The projects are for upper elementary school students and each project has a "teacher page" and a "student page." The original lesson encouraged students to make whatever animal they wanted (there were size parameters), but I wanted to keep the lesson somewhat under control since this was the first time my students would be doing papier maché.

I was able to show them images from two wonderful books: "Oaxacan Woodcarving: The Magic in the Trees," by Shepard Barbash and the children's book, "Dream Carver" by Diana Cohn. Both of these books are wonderful and full of a variety of images that will get student's creative juices flowing! The book by Barbash does contain figures with some cartoon nudity so may not be appropriate for all ages.

Oaxacan Snakes

Supplies Needed:
  • Aluminum foil
  • Ripped up pieces of newspaper
  • Papier maché paste (recipe to follow)
  • Waxed paper sheets
  • White tempera paint
  • Elmer's glue
  • Paint brushes
  • Water containers & paper towels
  • Acrylic paints
Directions:

1. Mix up a batch of papier maché paste:

Papier Maché Paste
(from the book "The Little Hands Art Book" by Judy Press)

3 cups cold water
1 1/2 cups flour
oil of peppermint (optional)

In a heavy saucepan combine the flour and water.
Cook over low heat until the mixture thickens to
a creamy paste. Cool and then stir in a couple
drops of oil of peppermint to act as a preservative.
(I didn't, but I used the paste right away).

2. I gave each child two pieces of aluminum foil about 3 feet long. I had them lay their pieces on top of one another, so that there was a double thickness of foil 3" long. I then had them twist and bend the foil into the shape of a snake. We discussed different positions a snake could be in: straight, zig zig, ready to strike, curled up in its nest, etc.

3. Take a newspaper piece and dip it into the paste. Use your fingers to squeegie the excess paste from the newspaper and then lay it onto the foil snake form. Repeat until the entire snake form is covered with a nice layer of newspaper. Let dry on waxed paper (this can take a day or so).

4. Apply another layer of newspaper and paste. Let dry on waxed paper (this can take another day or so).

5. When your second layer of newspaper and paste is completely dry, mix one part Elmer's glue with one part white tempera paint to make a gesso or base coat that will cover the ink on the newspaper and make a nice surface for you to paint on. Paint on a coat of the homemade gesso and let dry thoroughly (a couple hours).

*If you don't want to use homemade gesso, you could paint a coat of white acrylic paint or just paint on a couple coats of whatever paint you are using.

6. Decide how you want to paint your snake and begin by dividing it into sections and painting the base coat of each section.

7. When the main colors of your sections are dry, you can add a second coat if needed. Then use Q-tips, small paint brushes and/or the wooden end of a paintbrush to dab dots and paint lines and patterns onto your snake in true Oaxacan style! The sky is the limit with your designs. Have fun and be creative!


Related Posts Plugin for WordPress, Blogger...