Showing posts with label bead. Show all posts

Friday, January 29, 2016

Gifts From the Art 2012: Watercolor Pin

I just finished a two session mini course called "Gifts From the Art" where children can make three projects a session (a total of six gifts) for their families and friends. I did this course last year as well and it was a big hit. The class was comprised of 2nd-4th graders and I had 2-3 fabulous helpers each session. Doing this many projects a week is a bit crazy, so having good helpers is key. I try to keep things fun and moving along, but I definitely prefer my normal teaching routine where we focus on one project a week!

Here is one of the projects we did:

Aren't these just beautiful! I want to make these by the dozen!

Watercolor Heart Pin

When planning this course I try to think of gifts that can be gifted to a variety of people. A pin is a nice gift for a variety of ladies: mom, stepmom, grandma, aunt, cousin, babysitter. Here's my version that uses watercolors with a neat technique along with a few findings to create a lovely one-of-a-kind pin that is sure to be a hit!

Supplies Needed:

  • Two little pieces of watercolor paper (ours were about 2 1/2" x 3")
  • Pencils
  • Watercolors and brushes
  • Plastic wrap (maybe two 6" lengths)
  • Wooden heart shape (ours were 1 3/4" wide)
  • Scissors
  • Tacky glue
  • About a 14" piece of contrasting embroidery floss, optional
  • Hot Glue Gun and Glue sticks
  • 5" strand of copper wire
  • Various glass beads and/or word beads (I bought both at Michael's--the word beads are plastic, the other beads are glass).
  • Pin backing (ours were adhesive-backed so they were just peeled and stick-EASY!)
Directions:

1. Write your name on both pieces of watercolor paper. Wet most of the center of your paper and apply watercolor paint to the paper in nice, saturated color. Use a couple colors of paint and allow the water to blend the colors (wet on wet technique). Choose colors that are next to each other on the color wheel (analogous) so that the colors look nice when they mix. I suggested having the children create a reddish or purplish color combo on one of their papers and a greenish/bluish color combo on the other. Make sure the colors you are using are nice and saturated and while the paint is still wet, crumple up the plastic wrap and press it into the paint. Leave it there and let it dry overnight.

2. When the watercolor pieces are nice and dry, remove the plastic wrap and discard. Trace the heart shape onto the front of the watercolor paper in an area of the watercolor that you like. Cut the heart shape out. Use tacky glue to glue the watercolor paper heart to the wood form. Press for a couple of minutes until the paper no longer curls (you can also place the piece under a book or something to help it adhere better.

3. Wrap a strand of contrasting color embroidery floss around the heart, securing the ends with hot glue.

4. Attach one end of the copper wire to the back of the heart pin. Wrap it around to the front and add a couple of beads. If you are using the word bead, use it now. Keep wrapping the copper wire around, adding a couple more beads if you'd like. Make sure you only add beads to the part of the copper wire that is on the front of the pin--no beads on the back of the pin (a couple of my students tried that--but no one would ever see them that way!). Secure the end of the copper wire with hot glue.

5. Attach the pin finding to the back of the Watercolor Heart Pin and press nice and hard to make sure it sticks on there. 

What a beautiful pin--so artsy! Any mother would love to receive this! It was neat to see how different the pins came out. The children had lots of fun choosing their favorite watercolor swatch, floss color, glass beads and word bead. They took such care with each detail.


Tuesday, November 18, 2014

Scenes from Jewelry-Making Artist's Workshop

Last Thursday I had the pleasure of hanging out and creating jewelry with a few lovely students at Amherst Middle School. We learned some basics of jewelry design and construction and students were able to go home with duct tape earrings, beaded earrings, a glass bead bracelet, and a shrink art necklace. While they were creating, they were learning how to use jewelry-making tools and jewelry findings.


While these pieces are easy to make, they form the foundation of basic jewelry-making skills students can use to make a number of fabulous pieces! Hopefully they are inspired to create some lovely pieces at home!

And here's the link to the tutorial we used as inspiration for our duct tape earrings--I'm now sporting a pair of rainbow tie-dyed feather earrings my son made me! :-) *LOVE*

Saturday, September 7, 2013

Plimoth Plantation and Wampum Belts

This past weekend my family and I took our final camping trip of the season. We camped in Plymouth, Massachusetts so we could explore Plimoth Plantation, a living history museum. There are a few different sections to the place:
A view from the fort at the top of the hill.
One section of Plimoth Plantation has a recreation of the first settlement of the pilgrims with people dressed up and acting like pilgrims. It's pretty neat and the children enjoyed watching woman working in the kitchen and got a tour of a surgeon's garden where he pointed out all sorts of plants and their medicinal properties. My husband and I thought there could have been more work happening. We wanted to see people baking bread and making clapboards for siding, mending fences, etc. But my children liked chasing the chickens and looking at the goats and talking with the people.

Another area of the museum is a craftsman's area. This was not part of the reenactment area. Here there are modern craftspeople working creating all of the neat things the pilgrims are using in the settlement: pottery, leather cups and jugs, and wooden chairs and chests. There were two craftsmen there that day, one was making leathercrafts and was very talkative, knowlegable and helpful. The second, the potter, was there but wasn't working at that time. There was also an area for a person who might have been doing Native beadwork, but that person wasn't there. So, while that area could have been interesting, it wasn't as active as it could have been.

Another section of the museum was the Wampanoag settlement. This area was a reenactment of a Native settlement from the time of the pilgrims and, while there were real people dressed as Native Americans doing things here, they do not act like they are from the 1600's--they are themselves as Native representatives. I have to say, they were super-talkative and super-knowlegable and I loved this area most of all. We saw a lady making dinner for her children (her children were actually there running around and playing with other worker's chidren). She was roasting corn over the fire and making a stew that all of the children were going to eat when it was done. She had a baby on her hip and, as he started to get fussy, she laid a fur on the ground and he took a nap.

There was another lady making woven mats for the homes on site. Beside her were a number of toys that Native children may have played with: a canoe, a couple of dolls, and a game made of bones that is like the "ball and cock" game that we played as kids.

Here are the mats inside the longhouse. This is the winter house.

There was also a man creating a canoe by burning the wood center out of a log. We got some serious time looking at that! My boys were fascinated!


And finally, there was a lady in the longhouse talking about pretty much anything you'd like to know: what Natives would eat, who lived in the long houses, what they wore, how they repelled bugs, how they prepared their food...the list went on and on. We sat in that longhouse for while just listening to her talk about all sorts of stuff. This area of the museum felt real and comfortable to me. I think I could have spent all day there. My oldest (a 6th grader) whispered to me:  "When I grow up, I want to be a Native American and work here."

Now, the Wampanoag people are from the Massachusetts area and I've mentioned them before on my blog. One of the artforms they are known for are their Wampum beads that are made into Wampum belts and other items. See my post about a cool art/math/social studies project you can do on this theme here.

While I was in the gift shop at Plimoth Plantation, I noticed all sorts of jewelry made from Wampum--the shell of the quahog clam. But alas, real wampum is too expensive for this art teacher (even as a tax write-off...What? It's for a lesson!). But I was able to get a real quahog shell for $2--and that price is just right!
The humble quahog shell...


Enjoy this repost of the Wampum Belt project!

Wampum Designs


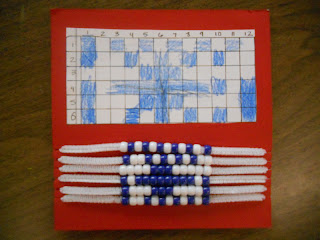
Wampum are beads made from the quahog shell and strung on string in intricate patterns of purple and white (although some sources say that red and black beads were used sometimes too). Quahog's are endangered today and, I guess, artisans can only get one or two truly purple beads per shell, so one wampum bead costs around $5--way too pricey to use for large belt designs. The beadwork we did today had 72 beads per child so each child would have used $360 worth of beads for their project. The children loved hearing that!

We used plain old pony beads I bought from Michael's for our designs. I had been looking for a way for students to easily realize their own bead designs without sewing or doing crazy things with string (my students are in 2nd-4th grade) and I finally found a solution on the blog Mrs. Erb's Art Page. Mrs. Erb uses pipe cleaners (chenille stems) to hold the beads in each row. Perfect! I had the children fit them onto matte board that had been donated to me. This allowed a nice way to display their original designs along with the finished wampums. They came out great and didn't take long at all.

Beaded Wampum

Supplies Needed:
  • Worksheet for practicing designs
  • Crayons in purple (and red and black if you want to use those)
  • Six chenille stems-white
  • Purple and white pony beads (ours were more royal blue)
  • Matte board (ours were red and about 8" square)
  • Clear tape (I used packing tape because it's stickier than regular tape)
  • Scissors
  • Glue stick
Directions:

1. I passed out the worksheets and instructed the children to create a couple different designs using geometrics shapes and using pattern. My worksheet had two 6x12 grids so the children could try out a couple of designs before beginning to bead. We looked at real wampum for inspiration. Word of advice: only put out the crayon colors that correspond to the colors of beads you will be using. If you are only using purple beads, only put out purple crayons for them to diagram with. Trust me.

2. Once they had a couple of designs down on paper, they could bring them to me and we'd discuss which one they wanted to do. 

3. Our designs were 6 rows of beads, each with 12 beads per row. My directions will reflect that. I had them start off with the first pipe cleaner (which represents the first row) and follow their diagram to place 12 beads on it. After that, they worked down the rows, using their diagram as a guide. I cautioned them to keep their rows in order so they didn't get mixed up. If you are doing this with a group you could have them label the chenille stems with a piece of tape or prepare the matte board (as in step 4, below) and have them transfer each row, as it is finished, to the matte board.

4. Once all of the rows were completed, I had them affix them to matte board, again using their diagram as a guide. The way I did it was to cut 1/4" slits on the right and left side of a piece of matte board. Since we have 6 rows, I cut 6 slits in each side of the board (one for each row). The children then slipped the chenille stem in the slits (pulling tight) and we wrapped the ends around the back and secured them with the packing tape to the back side of the matte board. I thought this looked tidy, although there was space enough for the children to do a much larger design (maybe they could repeat their design twice next time...).

5. I then had the children cut out the diagram they had used to create their wampum and affix it above the beadwork on the matte board using glue stick.


Monday, March 4, 2013

Fun Calder Fish

One of my private art students is open to any art project...while we work I talk to her about all sorts of art and artists and I've been letting her interests guide our studies. She had done the Calder Monogram Mobile project I posted here, but one of Alexander Calder's sculptures I showed her inspired her. So...one of our next sessions, I got out some wire (in a variety of guages and colors) and lots of different kinds of beads and I let her go to town! 


It was great talking about Calder's work with her and then watching her make choices for her fish mobile. This was also a great project for problem solving (How do you get the beads spaced evenly along the wire? And, How do you keep the vertical rows of beads still within the fish "frame"?). 

When she was done, we created a stand for her mobile using a cork with a clothes hanger stuck in it, glued to a piece of mat board (this is my standard mobile "base").

Enjoy!


Thursday, July 5, 2012

Super Simple Dream Catcher From a Paper Plate

Third son had a terrible dream last night. It didn't help that he fell out of bed (which I hadn't heard but was described by my first son as "something crashed into the house--it made the whole house shake!" A few minutes later I heard the little guy crying and went in & located him (still on the floor). He was shaking and crying and still dreaming away. Man, that's tough!

$1 for the pony beads at the Dollar Store and $2 for feathers-
the rest of the supplies I had on hand. What a nice and easy craft!
So today, we made a super simple dream catcher to hang above his bed to catch all of his bad dreams. This is a lovely craft to do as part of a summer camp, Native American craft session or part of the library's summer reading program (our local library's theme this summer is "Dream Big!").

Well here's the super simple dream catcher and may all of your dreams be pleasant!

Paper Plate Dream Catcher

Supplies Needed:

  • One paper plate
  • Scissors
  • Hole punch
  • Yarn (four 12" sections and one 48" section)
  • Clear tape
  • Pony beads
  • Feathers (ours were about 3 1/2-4" long)
  • Markers
Directions:

1. Cut a 5" (or so) circle from the center of the paper plate, leaving the outer rim of the plate intact.

2. Use the hole punch to make a series of holes every inch or so around the inner edge of the ring.

3. Use markers to decorate the ring with patterns and images as desired.

4. Weave the 48" piece of yarn through the holes in the inner edge of the ring going across the ring to create a web for the bad dreams to get caught in. This is the fun part--even young children can relax and weave this inner section. The funkier, the better! We secured the beginning and ends of our yarn to the back of the ring with clear tape.

5. Use the hole punch to create a single hole at the top of the ring to hang the dream catcher. Make a loop from one of the 12" long strands of yarn, run it through the hole and knot it to secure. If you like, you can string a couple of pony beads onto the hanging loop to add some color.

6. Use the hole punch to create three holes about an inch apart along the bottom edge of the dream catcher. Feed the remaining 12" strands of yarn through the holes and double knot to secure. Feed pony beads onto the yarn coming from each hole. Knot and then use clear tape to attach a feather to the bottom of each strand. Trim excess yarn with scissors. Repeat to make three strands of beads with feathers coming off the bottom of the dream catcher. I made the center stand slightly longer than the other two.

7. Hang above your bed to catch all of those bad dreams! Nighty-night!


Monday, May 21, 2012

Three Recycled Art Projects in Progress

I haven't posted in a few days, but I have been busy. My students have three recycled art projects in the works! All three I've seen floating around on the web, but they are super-cool and my students seem very excited about them (as am I):

Abstract Sculptures (wire and pantyhose)
These are seriously awesome! You can't make just one! I've seen the idea in a couple of spots, but most recently on A Faithful Attempt. The basic idea is to insert a metal coat hanger into a wooden block. Twist and turn it & cover it with a knee-high pantyhose. Twist and turn some more & coat in gesso, then paint. Seriously cool. I'm doing this with one of my private art student (she's thirteen). Right now her sculpture is sitting in gesso. Next class, she'll paint it and we'll sketch it with charcoal from a variety of angles.

The abstract sculpture in gesso
(we used tempera paint mixed with Elmer's glue).


Sole Pendants
Also cool! I saw this on www.dickblick.com and thought my boys would love to make them. Now I'm making them with my Recycled Art class after school. My goal with this class is to get the children looking around and being inspired to create art from everyday object. These pendants get their funky texture from the soles of the students' shoes. How great is that? These were molded last week and this week we'll paint them and string them on a cord to make necklaces.


Some of the pendants in the drying phase.
The texture is made from the soles of our shoes.
Magazine Bowls
Ah...the humble magazine! Great for collage and now used as the structural component for a funky bowl! Once the after school students were done molding their Sole Pendants, I had them start prepping their magazine strips as suggested on the blog Mini Matisse. This week, we'll start coiling the strips into the form that will magically transform turn into the magazine bowl.

My magazine bowl demo with some of the strips cut from
National Geographic Magazines.

WHEW! Lot's going on here! I'm loving the energy and creativity of my students! So what are YOU working on?

Wednesday, November 16, 2011

Burlap Weavings (Class #2)

My homeschool art class also did burlap weavings this week (just like my after school class, see the original post here). 

The project was slightly different since the class is shorter (only an hour) and my class is made up of students in 2nd through 5th grade. I brought out my samples from my original post, but did not have the paint element this time. The burlap was also cut into smaller pieces and I did not mount them to mat board, but affixed a layer of masking tape on the back of the top edge so the piece didn't unravel while the children were working in it.

Done this way, the project makes for an inexpensive project for a group. Many of the children were able to complete their pieces in this session, but two sessions could be used. This really got the children thinking and working with their hands in a new way!

Here are some examples of the finished pieces:

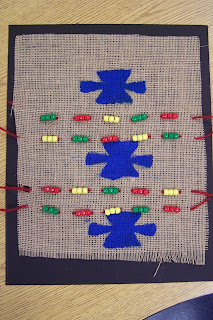
Beadwork and straight stitches to create an image.

Exploring color, texture and stitching.

Love that variegated yarn!

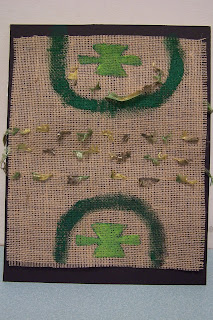
Beautiful! Great Job Everyone!

Tuesday, November 15, 2011

Burlap Weavings

This week I wanted to introduce my after school students to the art of weaving. Weaving many times makes people think of the Native Americans, but I pointed out to the children that almost every culture has some form of weaving: Africa, Mexico, South America, China, and Japan as well as Europe in the Middle Ages.

I gave each student a piece of burlap that had been hot-glued to a piece of mat board. Burlap is great because it has a nice open weave, so it is easy to see the WARP (threads that run vertically) and WEFT (threads that run right to weft, er, I mean LEFT).

The students can weave yarn into the spaces of the fabric or can gently pull on the weft threads of the burlap and remove them to create spaces where the exposed warp threads can be tied together or larger ribbons can be woven in.

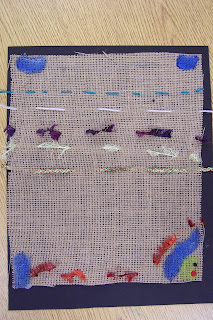
I created an example board for the students to view during my discussion. It shows the following:

First Example:

1. Yellow thread: Single strand woven in one row.

2. Purple threads: Single strand woven into three rows (multiple rows).

3. Multi-colored Fuzzy Yarn: Single strand using large "stitches" so that the fuzzies can be easily seen.

4. Dark Purple Eyelash Yarn: Single Row, large stitches.

5. Burgundy Yarn: Single row with beads and a fuzzy yarn stitched along with it. Stitched in an open area of the burlap where the weft threads have been removed.

6. Burgundy Yarn (2):  Single row stitched into the plain burlap

7. Pale green: Single strand woven in a pattern. You could also do X's or other patterns.

Burlap Weaving: First Example

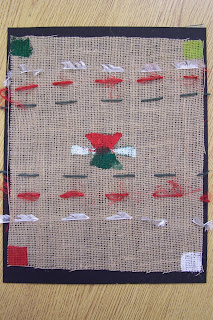
Second Example:


8. Ribbon woven into a section where the weft threads have been removed. Ends are tacked down with hot glue on the back of the piece.

9. Section where weft threads were removed and remaining warp threads were gathered and tied. Some with yarn and one with yarn with bead added.

10. Stamping with acrylic paints. Diamonds, squares, etc.

11. Fringe: Fringe created using yarn and an example of fringe created by removing the last few weft rows.
Burlap Weaving: Second Example

The possibilities are endless with this. I also provided some acrylic paints and stamps with Navajo motifs that the children could add to their pieces. Here are the step-by-step directions:

Supplies Needed:
  • Burlap (I bought ours at a fabric store)
  • Mat Board, optional (I glue to top edge of the burlap to the board to keep the whole thing from fraying apart as the children work. The final piece looks more finished this way)
  • Hot glue gun & glue sticks
  • Assorted yarn and ribbon 
  • Beads (I used plastic pony beads)
  • Scissors
  • Plastic needle (easy to thread the yarn through and won't poke little fingers)
  • Acrylic Paints, brushes, craft foam, optional
Directions: 

1. Cut the burlap to size: ours was 10"x13." The students I have are 3rd and 4th graders and we have an hour and 15 minutes to work, so that size seemed appropriate. Younger students and less time would require a smaller piece of burlap to work with. When cutting burlap, wear eye protection since the fibers may scratch your cornea.

2. Cut a piece of mat board slightly larger than the burlap square: ours was 11"x14."

3. Hot glue the burlap to the mat board along the top edge of the burlap (leave the bottom edge unattached so that the child can work with it).

Stamps Include a starburst-like shape, diamonds and squares.
4. If you would like to use the paints to stamp Navajo motifs, do so now. I cut a motif from craft foam and had the children apply paint to the shape with a brush and stamp it onto the burlap. 

5. While the acrylic is drying, plan the rest of your design. Choose a few different types of yarn and ribbon to complete your design. Weave the yarn into the fabric using the plastic needle, adding beads if you'd like. If you would like to use ribbon, remove a few of the weft threads first to create an open section. Instead of the plastic needle, we used a safety pin to weave the ribbon into the fabric. You can also sew around the stamped designs, if you'd like.

6. Create fringe at the bottom of your piece by removing the last few weft rows and/or using yarn knotted into the fabric.

This piece is very open to the student's individual creativity. Have fun and encourage self-expression. Here are a few of the examples from today's class. ENJOY!

The student said this is an "Elvis-inspired" weaving!

The student said this is a Christmas-inspired weaving.
Lovely Beading!

Painting and eyelash yarn create a nice symmetrical image. 


Related Posts Plugin for WordPress, Blogger...