Showing posts with label color. Show all posts

Wednesday, August 14, 2024

EASY Mandala Color Scheme Practice Worksheet: Sub, Early Finisher

 EASY ACTIVITY-5 COLOR SCHEMES!

Use this black and white Color Scheme Practice Worksheet as a follow up activity on your color theory lesson. I usually have students complete it AFTER they've completed a practice color wheel.


HOW TO USE:
This worksheet is great for early finishers (I have them hold onto it all semester and work on it whenever they have free time). OR, this could be a great sub activity.

AGE RANGE: Upper Elementary and Middle School

This activity would be appropriate for students in grades 4-8. Thinking of using it with older or younger students? Cool! You may need to offer additional support/resources to ensure student success.

GETTING STARTED:

I usually start it with the students as a demo, and work on it here and there myself to model exectations for the activity.

This pdf also incudes a slide with a partially-colored example and tips for use. This can be used by the teacher or displayed (or printed) for student use.


Find it in my Teachers Pay Teachers store:

https://www.teacherspayteachers.com/Product/EASY-Mandala-Color-Scheme-Practice-Worksheet-Sub-Early-Finisher-12023428

EASY Sugar Skull Color Scheme Practice Worksheet: Sub, Early Finisher

 EASY ACTIVITY-5 COLOR SCHEMES!

Use this black and white Color Scheme Practice Worksheet as a follow up activity on your color theory lesson. I usually have students complete it AFTER they've completed a practice color wheel.


HOW TO USE:
This worksheet is great for early finishers (I have them hold onto it all semester and work on it whenever they have free time). OR, this could be a great sub activity.

AGE RANGE: Upper Elementary and Middle School

This activity would be appropriate for students in grades 4-8. Thinking of using it with older or younger students? Cool! You may need to offer additional support/resources to ensure student success.

GETTING STARTED:

I usually start it with the students as a demo, and work on it here and there myself to model exectations for the activity.

This pdf also incudes a slide with a partially-colored example and tips for use. This can be used by the teacher or displayed (or printed) for student use.


Check it out here on my Teachers Pay Teachers store:

https://www.teacherspayteachers.com/Product/EASY-Sugar-Skull-Color-Scheme-Practice-Worksheet-Sub-Early-Finisher-12023671

Tuesday, August 13, 2024

Color Scheme Practice: Mandala-Sub Activity Early Finisher

Use this black and white Color Scheme Practice Worksheet as a follow up activity on your color theory lesson. I usually have students complete it AFTER they've completed a practice color wheel.


HOW TO USE:
This worksheet is great for early finishers (I have them hold onto it all semester and work on it whenever they have free time). OR, this could be a great sub activity.

AGE RANGE:

I use this activity with my 7th and 8th graders, but it would be appropriate for high school students. For younger students, check my other listing for a simplified version of this activity (fewer color schemes).


GETTING STARTED:

I usually start it with the students as a demo, and work on it here and there myself to model exectations for the activity.

This pdf also incudes a slide with a partially-colored example and tips for use. This can be used by the teacher or displayed (or printed) for student use.


Go to my Teachers Pay Teachers store for more info: https://www.teacherspayteachers.com/Product/Mandala-Color-Scheme-Practice-Worksheet-Sub-Early-Finisher-12022312

Monday, August 12, 2024

Sugar Skull Color Scheme Practice Worksheet

Use this Color Scheme Practice Worksheet as a follow up activity on your color theory lesson. I usually have students complete it AFTER they've completed a practice color wheel.


This worksheet is great for early finishers (I have them hold onto it all semester and work on it whenever they have free time). OR, this could be a great sub activity.

I usually start it with the students as a demo, and work on it here and there myself to model expectations for the activity.

Get the worksheet in my Teachers Pay Teachers store:

https://www.teacherspayteachers.com/Product/Sugar-Skull-Color-Scheme-Practice-Worksheet-12019044

Monday, March 7, 2016

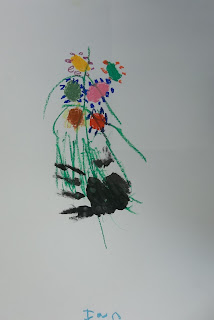
Picasso's Hands With Bouquet With KINDERS


 I've been having a blast with the elementary students at the school I am working at temporarily. I've been having the Kinders explore art materials a bit and this week I thought they'd enjoy doing a project I originally posted back in 2013 as we continued our discussion about line and shape. This is not my idea, as you can read in the original post, but it's a great one that I'm sure I'll be doing again and again in the coming years!


The only thing I changed this time was to have the students draw all of their flowers first, then add the stems, and when they were done they could line up and they could make their hand print at the back of the room at a table by the sink (and near the drying rack). Other times I'd have them print their hand first and then add the flowers.

Again, it helps if you have a bucket or two of water ready for them to rinse their hands in and paper towels ready to go right near the sink (already ripped to single-serve sizes). This was a wonderful project that helped them explore some of the elements of art (shape, line, color) and explore a new material and technique or two. They have some really good observations and insight about Pablo Picasso's work and, it's a FUN project--I mean, who doesn't love to have their hand painted by the art teacher!!??

VOCAB: Pablo Picasso, bouquet, shape (circle, oval), line, color, drawing

CROSS-CURRICULAR CONNECTION: Science (flowers (petals, stems), spring), kindness/giving

MATERIALS: 12" x 18" white paper, oil pastels, black tempera paint, paint brush

Our inspiration!

ENJOY!


Thursday, August 13, 2015

Grade 5 Tooled Metal Lines and Patterns

My fifth grade students loved this great little project. We talked about different types of lines (dotted, straight, curved, dashed, etc.) and pattern. I gave the students four little 3 1/2" square pieces of white paper and they could create little compositions that included line and pattern.

Once they were done, they selected one of their compositions to tool into metal. This is a very neat media to work with and this relief technique is called repoussé which is French for "to push back." You can get the tooling foil online at Dick Blick. It is quite reasonably priced--I was able to get enough 3 1/2" and 4" squares for multiple classes from one roll with some left over.  The foil is easy to cut and use (I use a box cutter but you can use scissors too). To make the marks, I have students use a dull pencil on the metal while it is on a piece of felt that has been folded in half to make a double-thickness. Sometimes students need to go over their lines twice to make a nice, deep mark, but otherwise students have a high rate of success with this media. 

Once the metal portion of the project was done, I gave each student an 8" x 10" piece of mat board and they could take a pencil and extend the patterns and lines beyond the metal square over the surface of the mat board. They then colored the lines and patterns on the mat board with oil pastels. Once done, we hot glued the metal squares to the mat board. 

I think they came out beautiful!

Students could place the tooled metal square wherever they liked
on the mat board (in the center, off to the side, etc.). They then used
color, line and pattern to fill up the space.

The students were VERY engaged during this project and loved the results. The photos don't do them justice--they are beautiful and colorful. ENJOY!


The partially completed bulletin board that shows the variety of the work.
BEAUTIFUL!

When they were done, I had them affix all four of their design squares (the preliminary sketches they did on paper) to a worksheet and fill out a self-assessment on the back.


P.S. For additional tooled metal projects, check out my Mexican Folk Art Ornaments and Mexican Folk Art Trinket Boxes

Thursday, June 13, 2013

Easy Paper Name Sculpture For DAD

Yep, Father's Day is right around the corner, but don't fret if you haven't made Dear Old Dad a present yet...here's a fun and easy sculpture you can make for him that will look nice on his desk or toolbox (that's how the dads in our family roll). 


This project is based on one I saw on pinterest that had no destination or info--it was pretty much a picture on the internet. I've tried to do it justice, so here's my version. My early finisher students did this one day after painting some other sculptures. I'd say this project takes less than a half an hour to do if you choose an easy word like "dad."I'd love to have my students create multi-leveled sculptures with their entire names (more letters = a more exciting sculpture), but that's for another time!

Paper Name Sculpture For DAD

Supplies Needed:
  • 3" x 5" index cards, white on both sides (one for each letter of the name you choose)
  • Pencil
  • Scissors
  • Markers
  • Clear Tape
  • Mat Board, we used black
  • Oil Pastels
Directions:

1. Draw nice, thick letters onto the index cards making them as big as you can (touching all edges of the index card, if possible). Cut out your letters with scissors.

2. Decorate both sides of each letter with markers. Use at least two colors on each side of every letter. Try using different patterns and colors for each letter--have fun!

3. Use clear tape to attach the letters to the mat board so they stand up. Make your letters touch and lean against one another, if you'd like. The more letters you have, the more elaborate your sculpture will be. You can even make your sculpture go up vertically if you have enough letters. Think of building this sculpture like you would build a house of cards with a deck of playing cards, but you can hold the letters together with clear tape (bonus!).

4. Once all of your letters are taped where you'd like them, use the oil pastels or craypas to write a message on the base such as "I Love You!" or "Dad Rocks!" The decorate the rest of the base with the oil pastels with swirls, lines, and patterns.

Now you have a colorful sculpture for Dad! Enjoy!


Some students made sculptures with their initials instead.

And this student made a sculpture for his dog, Lulu!

Friday, May 10, 2013

Graffiti Names...ooh, Edgy!

Here in southern NH we aren't exactly urban or edgy. Our town is more "quaint" and "quiet" and is best known for its Colonial feel. Graffiti can be seen here and there, but it is looked upon as vandalism. Probably for a couple of reasons: 1. It appears in inappropriate places such as on street signs and, 2. For the most part, it isn't very good...Sorry!

I am not crazy about the swear words or anatomy lessons that sometimes appear on the underpasses. It's always lovely to have your emerging reader sounding out four letter words he has seen as you make the trip to Grandma's house! That's not the kind of graffiti I'm talking about. I'm talking about the artform in which artists use spray paint to create images and lettering in a colorful, concise way in a public setting. This is a type of artwork I cannot do (at least in spray paint), but I highly admire. The colors are out-of-this world! The way the artists combine text and image is amazing and creative. So, I needed to do this with my kiddos and see what they could come up with.

This student is in 3rd grade.
I did this project with students in 2nd-4th grade and then again with 5th-8th graders and both groups of students took to the project easily. I love the creative results and would highly recommend this project! A site that I found VERY helpful when planning the project was www.graffitidiplomacy.com--lots of visuals and handouts and how-to's. Another great take on this project can be seen at Art Room With a View. Danielle's 7th graders created graffiti tags but then went above and beyond with the backgrounds--you have to go check those out!

Graffiti Names

Supplies Needed:
  • Lettering Sheets (examples of the alphabet in different styles of graffiti--bubble, tag, etc.)
  • White copy paper
  • Pencils with erasers
  • Sharpies (I had fine point and ultra fine on hand)
  • Colored pencils
  • Scissors
  • Glue sticks
  • Print-out of a photo of a brick wall
Directions:

1. Choose a word, nickname, or your name to use for your tag and sketch out a few ideas for your tag. 

2. Choose a font for your tag. Are you going to use bubble letters or a more edgy, linear font? Draw or trace the letters for your tag on the white copy paper.

3. Thicken the letters in your tag, if desired, and then retrace your letters so that they touch one another.

4. Make your letters 3D, if desired.

5. Add "bits" such as shiny highlights on the letters, a crown, hearts, bubbles, or arrows.

6. Add a "forcefield," or two to hold it all together. The forcefield is the cloud around the letters.

7. Ink pencil lines with Sharpie. Erase any extra pencil lines.

8. Add color with colored pencils. Colors can be bright, you can use complementary color combinations for "pop," the letters should be different than the forcefield for readability, use effects such as gradients, textures, patterns, etc. 

9. Cut out the finished tag. Glue to the printout of the brick wall with a glue stick. Re-outline the tag with Sharpie, if necessary.

Have fun with this artform and make it yours! Don't worry if your first try isn't exactly perfect--just try again! Try using your tag as your homescreen on your phone or iPod or putting it in a tee-shirt. So cool!

This student is in 5th grade. 
This student is in 5th grade.
This student is in 2nd grade.

This student is in 7th grade.
This student is in 5th grade.
This student is in 3rd grade.

This student is in 2nd grade.

This student is in 2nd grade.
This student is in 5th grade.

Friday, April 5, 2013

Kindergarten 2D Shape Robots

I saw this fantastic art project on Teach Preschool and knew I just  HAD to do it with my son's Kindergarten class! So this past Tuesday I was able to go in and spend a robot-themed afternoon with them. We had so much fun! Here are the robots they made using 2D shapes:


Deborah at Teach Preschool is totally great! I wish she lived near me so I could send my little ones off to her! Every day she sends out posts that are full of great learning ideas for the Preschool set. I've found that my Kinder guy also enjoys some of the activities from her site.

So check out her original post for the Shape Robots here.

Here are some of my notes on the lesson:

  • This project is great for Preschool and Kinder-aged kiddos. Both boys and girls enjoyed creating their robots.
  • This project tied in nicely with what my son was learning at this time: 2D versus 3D shapes and had a bunch of different shapes for them to use, identify and talk about while they were working.
  • This project has some very interesting kinetic-learning opportunities. The shapes are secured by poking bits of pipe cleaner through the shapes and into the foam. The kids loved doing that and really enjoyed that the legs and arms could move once they were secured with the pipe cleaner "bolts."
  • The featured book, "The Robot Book," by Heather Brown was a bit hard to find locally since it currently out of print but it is being rereleased in June. I ordered it from Amazon and it has become a favorite in our house. It talks about the parts of a robot, but it is ultimately what's inside the robot (it's heart) that counts. You could get along without the book, I guess. But I was glad to have it. It is a board book with moving parts which tied in perfectly to our robots. 
  • I was able to buy the craft foam sheets for the shapes at Michael's and just spent a few minutes cutting random shapes out of the foam: big rectangles, little rectangles, squares, half circles, and triangles. I also had peel and stick hearts and stars available, too. Maybe having circles would be nice, but I didn't have any and I wasn't going to cut them!
  • I bought the 1/2" thick styrofoam sheets at the dollar store in the floral section. They were 12" square and I was able to get three 5" x 7" rectangles from them and then I used the scraps to piece together another one (so I got four 5" x 7" styrofoam pieces from one 12" x 12" styrofoam piece). I hot glued the styrofoam rectangles to an 8 x 10" piece of mat board.
  • The only thing we used glue for were the googly eyes.
  • I encouraged the children to add details (button, switches, patterns, lines) with a Sharpie. They were more than happy to do so!
  • I worked with about 6 children at a time and at the other "stations" or centers they could play with gears (like Deborah suggested) or play Robot Bingo which I picked up at the dollar store (score!!).
It was a great day and I had a lovely afternoon with the children! They were all so proud of their robots and had a great time exploring shape and line and form. Thank you to Mrs. Greany for having me visit and to Deborah at Teach Preschool for the super-awesome lesson!

Thursday, April 4, 2013

Easy-Peasy Pizza Sculptures!

I'm always looking for a better way to do projects. I had done pizza sculptures a la Claes Oldenburg before (see here) and I thought that my Modern Art kiddos would like them too. I had originally had students create the pizza form from two pieces of newsprint stapled and stuffed with crumpled up newspapers ad then paint the sauce and toppings. While that worked out OK, the pizzas got a bit muddy with all of those toppings being painted over one another before they were dry. So, I got to thinkin'...
YUM! Bacon, sausage and pepperoni pizza!

I bought some red and kraft-colored wrapping paper at IKEA this past Christmas and thought the weight and color of them would be nice for the sculptures. I thought the children could cut a brown triangle for the bottom crust part and a top triangle from red for the sauce part...however, I used all of the red wrapping paper at Christmastime. Oops! But I had a plan...

I had the children cut both triangles for the pizza from the kraft paper, staple & stuff and then paint the sauce on with red tempera. While they were drying, the children created their toppings from construction paper scraps. This worked out great for timing and they came out great--love the bright red sauce!

The toppings are a study in size, shape and color! I had some take-out menus from pizza places and we made a huge list of toppings the children could use on their pizzas. I also made my "at least three" rule with the toppings: the children had to create at least three different toppings for their pizza (not including the cheese). Most of them were happy to oblige!

So have a no-calorie pizza party for your class or family and have fun using up all of those paper scraps you've been hanging onto!

Easy-Peasy Pizza Sculptures

Supplies Needed:


  • Medium weight paper (large sheets or a roll of paper)
  • Triangle templates cut from poster board (bottom crust template should be about 5" longer than the top crust so you can roll the triangle up and make the crust of the pizza)
  • Pencil
  • Scissors
  • Ruler
  • Newspaper or paper scraps to stuff the form
  • Stapler with staples
  • Red tempera paint (or white if you like a white sauce)
  • Paint brushes
  • Water bucket, paper towels
  • Paper scraps for pizza toppings
  • Elmer's glue
Directions:

1. Cut two triangles from kraft paper for the top and the bottom of the pizza slice. As I said above, the bottom crust triangle should be about 5" longer than the top crust so you can roll the triangle up and make the crust of the pizza.

2. Layer the two triangles on top of one another and staple along the two pointy, side edges or the pizza, through both layers. Leave the crust edge open, creating a pocket.

3. Crumple up newspaper, lightly, and stuff the pizza slightly, to give the pizza slice some dimension. 

4. Roll the open edge of the pizza slice inward a couple inches to create the pizza crust and secure with a couple of staples. You now have a giant slice of pizza!

5. Use tempera paints to paint the sauce on your slice of pizza. 

6. While it dries, you can use paper scraps to create toppings. To create the toppings you can rip, or cut the paper, or even use different punches as you see fit. To create multiple shapes (for mushrooms or other unique veggies), fold the paper multiple times and then cut through all the layers--you'll make a number of uniform shapes at once. Much better (and faster) than cutting out individual mushrooms!


6. When the paint is dry, attach the toppings to your pizza slice with glue. I had the children dribble the Elmer's glue in a zigzag motion over the sauce and then sprinkle the toppings on. Lightly press the toppings into the glue (the glue will dry clear).

YUM! Let's eat!


Thursday, February 21, 2013

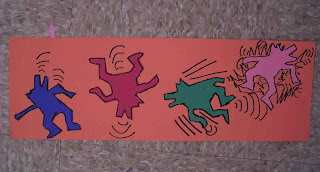
Peace, Love & Keith Haring!

Right around Valentine's Day, I was having one of my Modern Art after school classes and I thought it would be a great time to have a Keith Haring-inspired lesson. When I look at some of Haring's work, I see social activism and I think he was also encouraging people to get along and join together to change the world. 


Peace, Love and ART!
(Although this artist is frustrated!)

I showed the children some of Haring's work and they had lots to say about the colors, style and message of the images. I then gave each of them a little articulated paper figure that was cut from card stock that they could use in case they needed help drawing the figures. I got the little figure here, on Christy Hale's website. I told the children that they didn't HAVE to use the figure, it was there if they needed help. I encouraged them to complete the sentence "Peace, Love, and..." We brainstormed a bit on how we could finish that sentence and they came up with some great ideas such as:

  • Peace, Love, and Minecraft (of course!)
  • Peace, Love, and Cheeseburgers
  • Peace, Love, and Art
So, I set them loose. I had stacks of different colors of construction paper available for them to trace the figures onto and then cut out. After they had cut their figures out, they glued them onto a background paper and then traced around them with Sharpie. For the backgrounds, I had long strips of paper or squares they could use, depending on their composition. I encouraged them to add motion and voice lines, etc. with the Sharpie.

I kept this project VERY open-ended because I wanted to see what he students would do. I think I would maybe stress next time that the viewer would need to be able to SEE (ie. figure out) how they are completing the sentence "Peace, Love, and..." that might help them with the imagery a bit. I'll have another opportunity to try the project out with my homeschool kids in a couple of weeks so we'll see how they interpret the lesson.


Peace, Love and Dancing!

When the children were done their projects, I had black paper and chalk for them to create graffiti like Haring did in the subways in NYC. I wish I had had some black paper on a roll and I could have had them work really large, but this worked (and they could take their graffiti home with them afterwards!).


Other Keith Haring Lessons to check out:
  • Again, this is Christy Hale's Lesson that was published in the Jan/Feb 2006 issue of "Instructor." This link has the instructions for her project to make a frieze as well as a printable template for a little figure that can have either a dog, cat, or mouse head. 
  • Dali's Moustache has a great lesson where students drawing and painting to create four figures per page with bright-colored backgrounds. Then she has them turn create 3D foam sculptures inspired y their drawings-WOW! I absolutely LOVE her bulletin board display!
  • Sarah Ellis Traci has a great Haring lesson where children paint full size Haring figures and make a HUGE mural in the lunch room or down a hallway.
  • Once Upon An Art Room uses pastels on black construction paper to create multi-colored gradient backgrounds (great negative space lesson!).
Stop by the above links, tell them Mrs. P sent you and give them some LOVE!
Related Posts Plugin for WordPress, Blogger...