Hello!
It's been eight months since my last post!!! YIPES! I cannot begin to express how bad I feel about that! I am generally bad about blogging over the summer (with four kids and a countless number of neighbor kids over, I just can't find the time!). I actually LOVE blogging and this is something I do for "me" so I thought it was high time I got back to it!
WHEW! I have missed you all! So, let's get caught up! First, I'd like to post the other New Hampshire Art Educators' Association newsletters I created in the past year (my last post was about that, so it's as good a place as any to start, I think!).
So, here is the SPRING 2017 NHAEA Newsletter I am editor of. The info is a bit outdated NOW, but it is great to have it archived on here and for y'all to see what we are up to in NH. Some highlights include: Scholastic Arts and Writing Awards 2017, Youth Art Month (YAM) celebrations from around the state, and our NHAEA Annual Member Reception held at the Currier Museum of Art!
Enjoy!!
Showing posts with label spring. Show all posts
Showing posts with label spring. Show all posts
Saturday, September 9, 2017
Friday, June 13, 2014
Andy Goldsworthy Nature Sculptures
My Spring Art class headed outside to create some beautiful Nature Sculptures inspired by Andy Goldsworthy. Many of the children weren't familiar with his work, but really got inspired as we looked at a book I had brought called, "Hand to Earth." As we flipped through the pages, they were amazed at his work and itching to get started!

I had wanted a quick lesson where they could create outside and had intended that while they were creating their sculptures, I would work with small groups to make sun prints--a natural link, in my opinion. But alas, the weather didn't cooperate and the sun prints were a no-go due to the sun going away as soon as class started! At least it didn't rain! :-)
Unfortunately, the students can't take something him from a class like this--we even needed to destroy them before we left--that was hard for some. But, I brought the iPad and took some photos of each sculpture. Once I went home, I used PicCollage to bring all of the images from class together into a collage that could be printed as a poster--a very pretty one, I'd say! I emailed those out that afternoon to the families so the children could remember their sculptures forever.
This is a great lesson! The prep is pretty minimal, of course, but it really gets a good discussion going about the following themes:
- Looking closely at nature
- Being good stewards of the land
- Working together as a team/taking turns/helping
- Elements of art/principles of design
- What is sculpture?
- What is art?
- The job of artist (How does an artist get paid for work such as this? What inspires an artist? How long will pieces like this last in nature?)
So, here's the final poster--enjoy!
Monday, May 5, 2014
Spring is here in NH!
OK, I have to brag! That's what you get then you follow a blog of a mom of four! :-)
My oldest son, took a wonderful photo this weekend! He was retrieving a ball that had got stuck in a beauty bush in our yard and was surprised to find two robin's eggs in a nest we thought had long been forgotten!
He took the photo with the iPad and immediately posted it to Instagram for his "peeps" to see (couldn't resist). We were looking at the photo together and I told him how much I truly liked the composition and he said the most wonderful thing..."I love photography."
SIGH, I ain't gonna lie--this artsy momma was happy! Not just because it is nice to have a child who is interested in art, but because I always like to see people talk about things that they love to do: read, dirt bike ride, scrap book, cook, etc. I love to see people light up when they talk about their passions.
And the photo was even accepted on our local TV station's website:
http://ulocal.wmur.com/galleries?groupId=400855&type=1
So now he's famous! :-)
So, enjoy this bit of spring from NH care of my 12-year-old!
My oldest son, took a wonderful photo this weekend! He was retrieving a ball that had got stuck in a beauty bush in our yard and was surprised to find two robin's eggs in a nest we thought had long been forgotten!
 |
SIGH, I ain't gonna lie--this artsy momma was happy! Not just because it is nice to have a child who is interested in art, but because I always like to see people talk about things that they love to do: read, dirt bike ride, scrap book, cook, etc. I love to see people light up when they talk about their passions.
And the photo was even accepted on our local TV station's website:
http://ulocal.wmur.com/galleries?groupId=400855&type=1
So now he's famous! :-)
So, enjoy this bit of spring from NH care of my 12-year-old!
Thursday, May 9, 2013
Mother's Day Flowerpot Ideas
I was asked to create a painted flowerpot idea or two for our PTA to use as a fundraising kid activity at last weekend's 1st Annual PTA World's Fair. The idea for this event was to have a fun-filled day where families could come and browse different vendors, taste foods from around the world, play carnival games, do crafts, jump in a bounce house, etc.
I was set up in the Japanese garden area of the gym. One vendor had let the PTA borrow all sorts of trees and flowers and they were arranged all around my work area-beautiful! In keeping with the Japanese theme, I brought some sheets of origami paper and the instructions to fold a few simple pieces such as a helmet, a dog, a butterfly, etc. Since I was busy overseeing the flowerpot painting, the origami didn't attract as much interest as I had hoped. I have some ideas about that for next year, though...
On to the flowerpots...these ideas aren't mine, they are ideas I've seen here and there multiple times or are things I've received as a mom myself. But they fit the bill for the craft request: something for mom, a painted flowerpot, easy for whatever age group showed up (this was the first year of the event and we had no idea who was going to show), and cheap (the children "paid" four tickets, roughly $2.00 to do the craft and it is supposed to be a fundraiser for the PTA). Each pot included an herb or flower plant that was donated by a local organic farm.
The supplies needed are:
So, here are the (poorly taken) photos of my examples, complete with my cheapo fake plant from IKEA sticking out of it. SIGH. But you get the idea...

The children ran with these ideas and we ended up selling about 30 of them. There are going to be many happy mothers in southern NH this Mother's Day!
 |
| Ladybugs were VERY popular... |
I was set up in the Japanese garden area of the gym. One vendor had let the PTA borrow all sorts of trees and flowers and they were arranged all around my work area-beautiful! In keeping with the Japanese theme, I brought some sheets of origami paper and the instructions to fold a few simple pieces such as a helmet, a dog, a butterfly, etc. Since I was busy overseeing the flowerpot painting, the origami didn't attract as much interest as I had hoped. I have some ideas about that for next year, though...
On to the flowerpots...these ideas aren't mine, they are ideas I've seen here and there multiple times or are things I've received as a mom myself. But they fit the bill for the craft request: something for mom, a painted flowerpot, easy for whatever age group showed up (this was the first year of the event and we had no idea who was going to show), and cheap (the children "paid" four tickets, roughly $2.00 to do the craft and it is supposed to be a fundraiser for the PTA). Each pot included an herb or flower plant that was donated by a local organic farm.
The supplies needed are:
- 4" flower pots with your choice of herb or flower
- Acrylic craft paints (we used red, orange, yellow, green, white and brown)
- Foam brushes if the children wanted to paint the rim of the pots
- Sharpies for details, optional
- Fingers for fingerprints! That's what makes them so easy--no brushes to clean up!
So, here are the (poorly taken) photos of my examples, complete with my cheapo fake plant from IKEA sticking out of it. SIGH. But you get the idea...

 |
| This example is great for little ones since they are the only ones who could fit their handprints on the little pots! I had a couple people do this version... |
 |
| When the children were done, they could choose one of these poems on a skewer to stick in their finished pot. These bring tears to my eyes--so sweet! |
The children ran with these ideas and we ended up selling about 30 of them. There are going to be many happy mothers in southern NH this Mother's Day!
Wednesday, April 17, 2013
Inspired By Spring and Alma Woodsey Thomas
I posted a project idea about African American artist Alma Woodsey Thomas awhile back, check out the post here. Thomas was a art teacher for almost 4 decades, became a prolific Abstract Expressionist painter during her retirement, and had her first show at 80 years old! WOW! How inspiring!
For my last Modern Art class with my homeschool kiddos, I thought we'd do a relaxed collage project based on Thomas' work. The children had fun and created some very beautiful pieces. It was also a great opportunity to use up all of those paper scraps I've been collecting all year!
When they were done their personal pieces, they could work together to create a group piece that will be on display at the Grande Finale next month. I love how the group project came out--so different than the one the group in the original post created (and I loved that one too!). Amazing!
Enjoy this one-day, earth-friendly project!
 |
| Here's the group project: "Sunset Over the Ocean." |
When they were done their personal pieces, they could work together to create a group piece that will be on display at the Grande Finale next month. I love how the group project came out--so different than the one the group in the original post created (and I loved that one too!). Amazing!
Enjoy this one-day, earth-friendly project!
 |
| "Colours" |
 |
| "Falling Fire" |
 |
| "Falling Leaves" |
 |
| "Flowering Meadow" |
 |
| This one had a title, but he wrote it after I took the picture! I think the bits are falling stars... |
 |
| "Color Wave" |
Wednesday, April 10, 2013
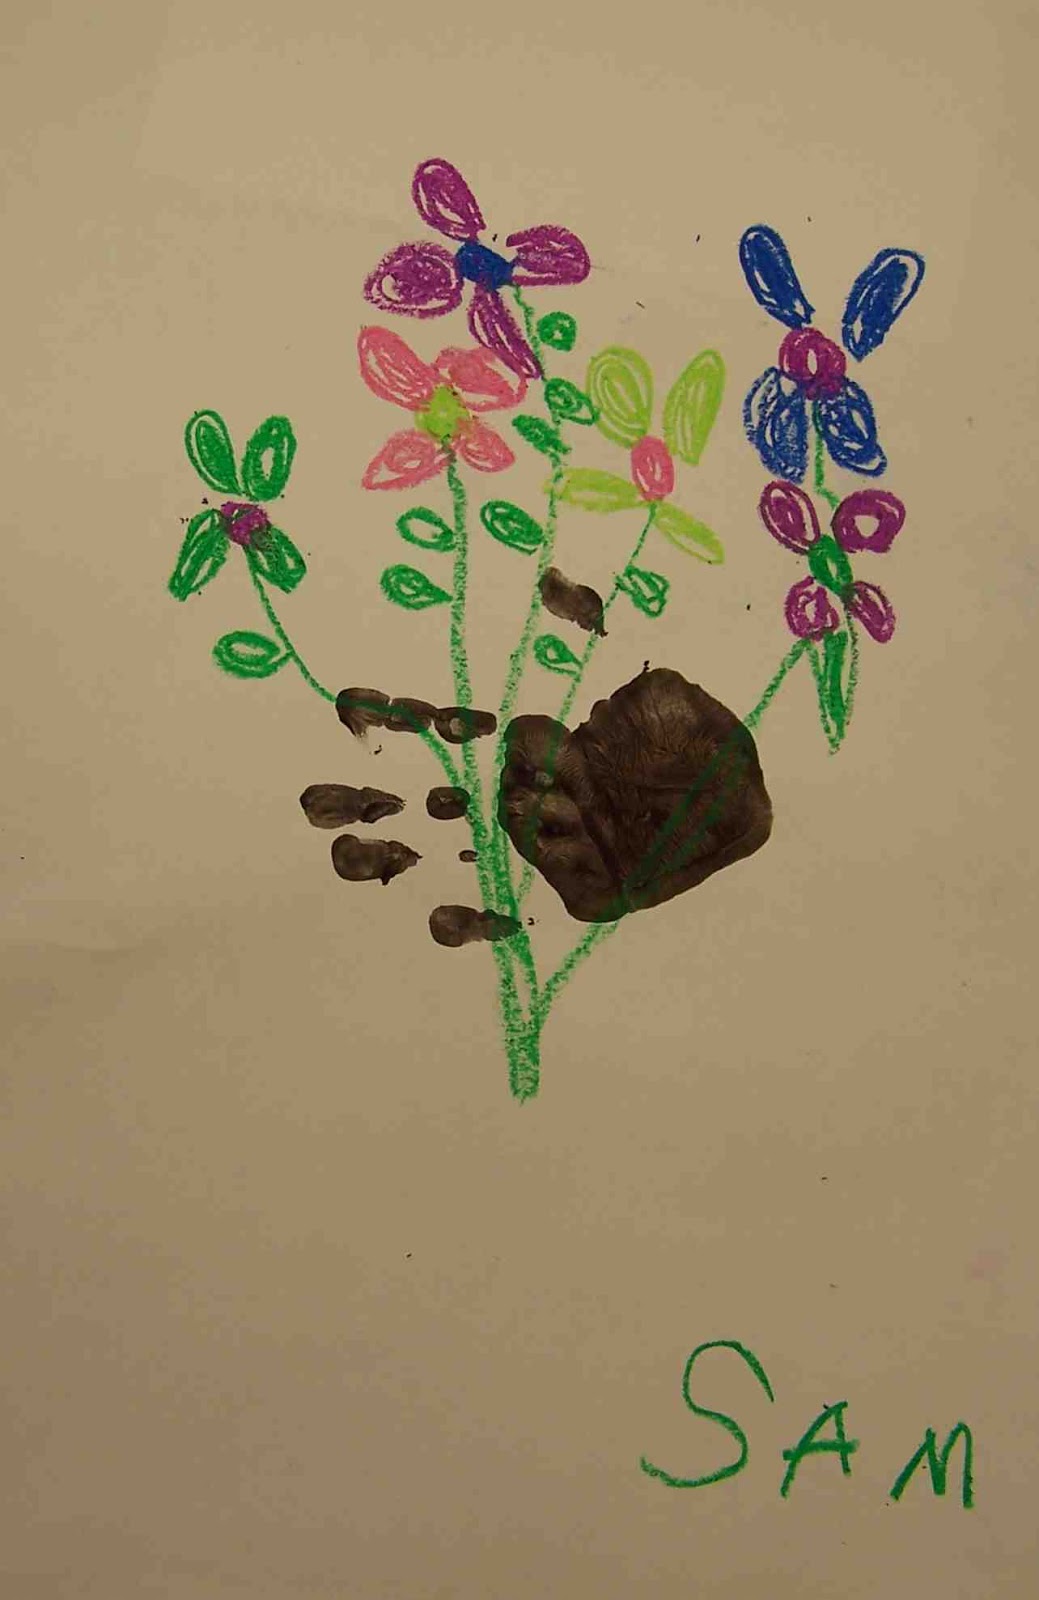
Kinder Picasso "Hand With Bouquet"
I've been visiting the Kinders at a local school (Clark Elementary in Amherst, NH) once a month doing an art enrichment program. I usually tie in a book or music or fine art (and sometimes all three) to make the experience a rich and multi-layered one. I have absolutely LOVED working with the children--Kinders are so cool. They are up for anything and so smart!

We've done some fall- and winter-themed art, but Spring is here! So I thought we'd create a piece that celebrates warm weather, flowers and color! I'm not a huge Picasso fan, but when I saw the piece "Hand With Bouquet" I immediately thought the children would love it. I experimented a bit with using cut paper and paper muffin liners to make a daffodil bouquet (which came out fine), but then I saw this version on the blog "Splish, Splash, Splatter." Rebecca uses the child's hand print as the hand holding the bouquet--WOW! Now, I'm a mom and anything that has a handprint in it instantly gets a place in my heart (and on the wall). It was a no-brainer--this was gonna happen!
But, I have to say, I was a bit worried about handprints and Kinders and only having a half hour per session...but it went great! We have a small sink in the art room, so I brought in two plastic bins, filled them with water, and had the children wash their hands in those. This allowed all 18 kids (or so) to wash their hands in about 5-7 minutes. I had a grown-up helper at the bins keeping an eye on things-I'm sure that helped!
I am so thrilled with the results and so were the kiddos! This lesson was fun and inexpensive and has a great "WOW" factor. It would be lovely for Mother's Day, too. I particularly enjoyed painting my own hand and then giving each student a high five before they printed their hand on the paper (that allowed me to check that they had covered their entire hand in paint and make sure they placed their hand properly on the page). I think the children thought I was silly-but it was so fun!
Here's how we did these colorful pieces:
Kinder Picasso "Hand With Bouquet"
Supplies Needed:
- One 12" x 18" piece of white construction paper
- Paintbrush
- Paper plate for palette
- Black tempera
- Oil pastels/cray pas (assorted colors, but you'll definitely need green)
Directions:
1. Paint your palm, thumb and fingers with the paintbrush and black tempera paint. Make sure you get a nice coat on your hand and go all the way to the tips of your fingers. Press your hand onto the white paper, leaving a handprint. The handprint should be perpendicular to the page. Now you can wash your hand.
2. Look at the picture of Picasso's "Hand With Bouquet." How does he make the flowers? What shapes does he use? Turn your paper so the thumb is up. Check out the examples to see what I mean. This gives a more realistic idea of the hand "holding" the flowers.
 |
| Our inspiration: "Hand With Bouquet" by Pablo Picasso |
I instructed the children to use the craypas to draw a large circle for the center of their flower and then color it in. Then add petals going around the center. Use whatever colors you want, but make 4-5 flowers on the area of the paper above the hand.
3. Then add the stems. They should go from each flower, to the hand, and out the other side. Add a couple of leaves to make your bouquet look realistic.
4. Don't forget to sign your work like Picasso, using a craypas.
Welcome spring!


Tuesday, April 10, 2012
Spring Forsythia Still-life
Spring is gradually coming to New England and we've been enjoying all of the flowers and trees that are starting to bloom. One of my favorite spring blossom is the forsythia--the bright yellow blooms just wake me up and get me ready for warmer days ahead!

Here's a quick project I did a couple years back with my home school kids that is easy and fun to do. Working from life, students create a mixed-media still life while learning printmaking and symmetry. This is a great opportunity to gather up some real forsythia in bloom, set it up in your classroom and then have the children work from life. I was a little late one year, so I brought in fake forsythia to display.
When using real forsythia, pass around blooms to let the children look at them close up and then look at the still life from further away. Display your forsythia in a pretty vase and show the students how the shape of a vase is symmetrical. I had my students fold a piece of construction paper in half and then cut the shape of the vase so it would be truly symmetrical (have some extra construction paper on hand just in case). Brown marker and sponge-painted X's make for an easy finish to this project. Low mess, low stress, and lots of beautiful color!
This project is from "Kids' Art Works," by Sandi Henry. This book is FULL of great art ideas for children and is a must for any art teacher. The directions are clearly written in the book and easy to follow and the results are great! All of the children enjoyed creating beautiful spring pictures full of bright yellow blossoms! Welcome Spring!
Wednesday, April 4, 2012
For Easter or Anytime: Cinna-Bunnies!
I'm an artist and art educator, and I'm a mom, too. I have a five-year-old that stays home with me and he loves art and cooking. I have been trying to make a conscious effort to introduce little fun stuff every once in awhile to make staying home more special and encourage learning. Yesterday, I had an idea for us to make something with dough (biscuit dough in this case) that would be edible and celebrate Spring/Easter. Cinna-bunnies! Or Bunny Biscuits as my big boys call them...

Cinna-Bunnies
Supplies Needed:

Cinna-Bunnies
Supplies Needed:
- 1 Tbsp. sugar
- 1 tsp. cinnamon
- 2 cups all purpose flour
- 5 tsp. baking powder
- 2 tsp. sugar
- 1 tsp. salt
- 1/4 tsp. cream of tartar
- 1/2 cup shortening (or butter or palm oil)
- 1 cup milk
- 1 egg white, slightly beaten
- food coloring, black and pink
- paint brush (new)
- bowl, measuring cups & spoons, small bowls (3), pastry blender, rolling pin, cookie sheet, 2" circle cutter, 1" circle cutter, safety knife
Directions:
1. Combine 1 Tbsp. of sugar with 1 tsp. of cinnamon in a small bowl, set aside.
2. Combine the remaining dry ingredients for the biscuits. Cut in the shortening until it resembles fine crumbs. Stir in milk until a dough forms.
3. Turn dough onto a lightly floured surface and knead for 1 minute. Add a bit of flour if it is sticking.
4. Divide dough in half. Roll half the dough to 1/2"thickness and cut 2" circles of dough (we got about six). Dip each biscuit into the cinnamon/sugar mixture and place on a greased cookie sheet (I use stoneware, so I don't grease the baking stone). These are the bellies of your bunnies.
5. Roll out the remaining dough to 1/2" thickness. Cut six 1" circles. Attach these to one side of the bunny bodies (use a finger dipped in water to attach the parts). These are the bunny heads.
6. Cut six more 1" circles and use the safety knife to cut each in half. Each circle will make two bunny ears. Attach the bunny ears to each bunny head using a bit of water.
7. Pinch off 1/2" balls of dough to make feet and hands, dip in water and attach to each bunny body.
8. Lightly beat the egg white and divide into two small bowls. Use food coloring to color the egg in one bowl pink and the remaining egg white black. Use a paint brush to paint the inner part of the bunny's ears and add eyes, a nose and whiskers.
9. Bake the Cinna-bunnies for 10-12 minutes at 425 degrees until the bunnies are lightly browned. Keep a close eye on them of you are using a metal cookie sheet--you might want to turn the oven temp down to 400 degrees. Adjust time accordingly so the bunny bottoms down's burn.
10. Let sit on cookie sheet for a couple minutes and then remove to a wire rack to cool completely. We slathered our bunnies with butter before gobbling them up. ENJOY!!
Tuesday, March 27, 2012
Origami Butterfly Wreath for Easter or Spring
My family loves origami! So when I saw the directions for an origami butterfly on Pinterest, I knew I had to create a project that used them! So, here 'tis! This is a relatively simple and VERY inexpensive project that would be suitable for children grade 2 and up (the origami may be a bit challenging for a young one and the tissue paper can be time consuming).

The butterfly origami directions are from Go Origami. Many of the gorgeous projects on this site are too advanced for me, but the butterfly is easy enough.
Enjoy making this lovely wreath and bringing a bit of Spring into your home!
Origami Butterfly Wreath for Easter or Spring
Supplies Needed:


The butterfly origami directions are from Go Origami. Many of the gorgeous projects on this site are too advanced for me, but the butterfly is easy enough.
Enjoy making this lovely wreath and bringing a bit of Spring into your home!
Origami Butterfly Wreath for Easter or Spring
Supplies Needed:
- One paper plate
- Pencil
- Scissors
- Elmer's glue
- Glue tray (I used the lid of a yogurt tub)
- Tissue paper in green (I used three colors of green for interest)
- Three pieces of origami paper (or thin colored paper), assorted colors
- Hole punch
- Ribbon
Directions:
1. Trace a 5" circle in the center of the paper plate. Use the scissors to poke a hole in the center circle and then cut and remove the center circle so you are left with an outer ring of a paper plate. This is the base of your wreath.
2. Cut the tissue paper into 1" squares. I can't tell you how many squares you'll need, but you'll probably end up cutting WAY more than you need.
3. Pour a bit of glue into the tray. Take a 1" square of tissue paper and CENTER it over the eraser end of the pencil, smoothing the edges of the tissue paper around the eraser and pencil. Use your fingertips to HOLD the tissue in place and then dip the covered end of the eraser into the glue. Gently touch the tissue-covered eraser to the plate, and remove the pencil. The tuft of tissue paper should remain. You'll be attaching the tufts of tissue paper to the underside of the plate--not the side you'd eat on.

4. Repeat with additional tissue paper squares until the surface of the plate ring is covered. It helps to place the tissue paper tufts next to each other as you go--this will ensure that the wreath is nice and full and doesn't have any bald spots! If you are working with a younger child, you can work with him/her on this part. Many children won't mind the help and it's a wonderful time to sit and chat quietly with your child.
5. Once the front surface of the wreath ring is covered with tissue paper tufts, use a hole punch to make two holes about 5" apart on the top edge of the wreath. This will allow you to hang the wreath up later. Set the wreath aside to dry.
6. Trim the origami paper so that one piece is 6 inches square, another is five inches square, and the third is four inches square. Fold into butterflies. Directions can be found here.
7. Attach ribbon to the wreath. Trim if necessary.
8. Use glue to attach butterflies in a pleasing arrangement.

You're done! Welcome Spring!
**Another option to make this much easier for little ones is to reduce the size of the plate wreath. Making the wreath ring 5-6" across will be much easier for a single child to do on his/her own. Then adjust the size of the butterflies accordingly, maybe a butterfly made from a 5" square flanked by butterflies made from 4" squares.
Monday, May 16, 2011
Springtime Still life
Whew! It's been a busy couple of weeks for me! I've been applying for a teaching job for next year and finishing up my current art class with the home school cooperative. In just a couple of days the co-op will have its Grand Finale and the children from my art class will showcase their artwork! I can't wait! I am so proud of them!
I thought that I'd put a project on here from last year's art class that is perfect for celebrating Spring and Mother's Day: Spring Still life pictures featuring forsythia blossoms. This project can be done by a variety of ages, although little ones might need some grown-up help. This project is from the book, "Kids Art Works," by Sandi Henry--an awesome book. Enjoy!
Background Info:
When I teach this class, I start by having a beautiful arrangement of forsythia blossoms in a vase available in the classroom for the children to look at and touch. I have the children notice how a forsythia blossom is constructed and how it looks up close and far way.
I also like to have a couple of postcards or pictures of still lifes from art history for us to look at and discuss what makes a still life--a type of painting that has as its subject inanimate objects such as fruit, flowers, dishes or food.
Materials Needed:
• 1 9x12" sheet of construction paper either white or light blue for background
• Scissors
• Pencil and eraser
• Glue stick
• Markers, brown for stems and other colors to decorate vase
• Small piece of construction paper for vase (maybe 4x6")
• Yellow tempura paint
• Paper Plate for palette
• Kitchen sponge cut to about 1" long by 1/4" wide
Directions:
1. Cut the vase out of the smaller piece of the construction paper (you can do this by folding the paper and cutting through 2 layers of the paper--good introduction to symmetry). Glue the vase to the along the bottom edge of the larger piece of construction paper so that you have lots of space above the vase for your blossoms.
2. Using the brown marker, draw some stems from your vase into the space above.
3. Place some yellow tempura paint on the tray. Dip your sponge piece into the paint and stamp it gently onto the paper along the stems, creating the forsythia blossoms.
4. If you'd like, use the markers to decorate the vase with designs such as lines, dots, etc.
Voila! A spring still life to brighten up a rainy spring day!
I thought that I'd put a project on here from last year's art class that is perfect for celebrating Spring and Mother's Day: Spring Still life pictures featuring forsythia blossoms. This project can be done by a variety of ages, although little ones might need some grown-up help. This project is from the book, "Kids Art Works," by Sandi Henry--an awesome book. Enjoy!
 |
| Just one example of a beautiful forsythia still life! |
Background Info:
When I teach this class, I start by having a beautiful arrangement of forsythia blossoms in a vase available in the classroom for the children to look at and touch. I have the children notice how a forsythia blossom is constructed and how it looks up close and far way.
I also like to have a couple of postcards or pictures of still lifes from art history for us to look at and discuss what makes a still life--a type of painting that has as its subject inanimate objects such as fruit, flowers, dishes or food.
Materials Needed:
• 1 9x12" sheet of construction paper either white or light blue for background
• Scissors
• Pencil and eraser
• Glue stick
• Markers, brown for stems and other colors to decorate vase
• Small piece of construction paper for vase (maybe 4x6")
• Yellow tempura paint
• Paper Plate for palette
• Kitchen sponge cut to about 1" long by 1/4" wide
Directions:
1. Cut the vase out of the smaller piece of the construction paper (you can do this by folding the paper and cutting through 2 layers of the paper--good introduction to symmetry). Glue the vase to the along the bottom edge of the larger piece of construction paper so that you have lots of space above the vase for your blossoms.
2. Using the brown marker, draw some stems from your vase into the space above.
3. Place some yellow tempura paint on the tray. Dip your sponge piece into the paint and stamp it gently onto the paper along the stems, creating the forsythia blossoms.
4. If you'd like, use the markers to decorate the vase with designs such as lines, dots, etc.
Voila! A spring still life to brighten up a rainy spring day!
Subscribe to:
Posts (Atom)