Showing posts with label landscape. Show all posts

Tuesday, July 27, 2021

Sketchbook Art (aka Art For Me): View From Our Campsite

We've been going to the same campground in Maine for about 10 years--it's one of our "happy places." 

Every year, we get there and set up and I immediately take the same photo--the view of the pond from our campsite. 

See how much of the pond we can see from the site? Gorgeous!

And then I put my phone and/or camera away and forget to take any more pictures. 

Guys, I have FOUR KIDS. I'm supposed to be documenting these memories! But that view! 

My favorite thing do do (besides sit on the beach) is to have a cup of coffee and look at that view. The kids are usually asleep and that helps with the relaxing vibe. :-)

So this year, I photographed the view and sketched it quickly. I had intended to do my regular Sharpie/watercolor treatment to it, but kept it in pencil and just relaxed. Sketchbook project: supposed to be relaxing and get me creating. 

The date is totally wrong!
But I was guessing and too lazy to find my phone.

What's your favorite view?

Enjoy!

Supplies: pencil and sketchbook paper

Friday, March 4, 2016

One day project: Winter Landscapes

This is a getting-to-know-you project I used with some second graders at a school I'm working at temporarily. They are great kiddos and VERY enthusiastic artists! It was fun to see what they drew on their "winter walk through the woods" (snowmen, critters, cabins, and more) and the lovely skies they created! Even though it was 15 degrees outside, we could take a walk in the woods and stay nice and warm!

This project is from Mrs. Knight's Smartest Artists...I should have had them add paint dots for snow in their skies as well---ah, NEXT time!

ENJOY!


VOCAB: landscape, foreground, background, perspective, scale

CROSS-CURRICULAR CONNECTION: science (the seasons/winter)

MATERIALS: 9x12" white drawing paper, gray crayon, black crayon, watercolor paints (I used biggie cake paints I found in the art room), brushes.


Saturday, August 29, 2015

Grade 6 Oil Pastel Fauve Landscapes

Well, I fell in love with these great oil pastels I found in art room of the middle school I was working at. They are chunky and water soluble--Um, hello!?! Water soluble OIL pastels? I do not understand the mysteries of the world, but I must say, my students and I used the bejeebies out of these last semester! 


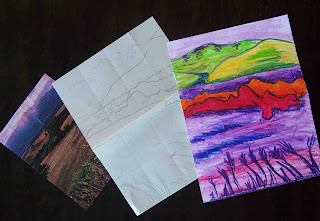
This shows the stages of the project: Image selection, simplified sketch
and completed Fauve Landscape.

One great project the 6th graders worked on was Fauve landscapes. I have posted a Fauve Landscape project before which was more technical and science-oriented since it involved afterimages and such (check it out here--it makes a grew STEAM project). But this time, I went with a simpler version that still allowed the students to learn about the Fauves and color theory. These came out beautiful and made a wonderful display, but I didn't get a picture of them all together (I know, I can't believe it). Trust me, they are awesome and beautiful. :-)

Here's how it worked:
Students looked through the magazines in the classroom for three landscapes they liked that they thought would work to simplify--these oil pastels don't do detail well. The students met with me and we discussed their choices and they selected one to take to final. They could then simplify the landscape on newsprint using a grid format (or freehand it if they preferred).

Once they were done their draft, I had them transfer the image to a poster-weight paper. I thought that would hold up well. However, you could probably use white drawing paper. Students were encouraged to use at least two colors in each section of their drawing using blending. We had talked about color theory, warm/cool colors and atmospheric perspective so they could make great color choices. Once all of the sections of their landscape were complete, they could use a dark-colored pastel to outlines the sections (similar the some of the Fauve artists).

When done, the finished pieces were glued to a black mat (black paper cut 2" larger than the work). This really made the colors seem so bright and also made the pieces look more finished. Matting work just makes it seem more special.

Ta-da! Beautiful Fauve Landscapes! ENJOY!

Friday, January 2, 2015

And another calendar idea! Ripped Paper Winter Landscape

It's not too late to celebrate the New Year!

Here's a quick idea for a calendar you can make with scraps of paper. It's a nice way to use up scraps and practice ripping paper. I made this project with a variety of kiddos from pre-K to 4th grade and they all enjoyed it. I think they especially enjoyed adding the splatter-paint snow at the end!


Here's a close-up of a couple of the calendars. As you can see, some of
the older students added a few details to their scenes.
These were done as part of my "Gifts from the heART" class.

Ripped Paper Winter Landscape Calendar

Supplies Needed:

  • A black or dark blue piece of paper for the night sky (ours was 4 1/2" x 8 1/2")
  • Various white and blue pieces of paper for the snow
  • Small scraps of various green paper for the trees
  • Scissors
  • Glue stick
  • Gold star stickers
  • White tempera paint
  • Stiff bristled brush
  • Paper plate palette
  • One 2015 Year-at-a-glance calendar printed on the bottom half of an 8 1/2" x 11" piece of white paper
  • Laminator and 8 1/2" x 11" laminating pouch
Directions:
1. Rip some strips of white and light blue papers and layer them together onto the black paper to create the illusion of snowy hills. When you like the arrangement you have, glue the layers onto the black background using the glue stick. This part is where younger kids may need a bit of assistance, but they usually catch on fast. :-)

2. Cut some little triangles for trees out of the green papers. Glue them onto the hills you've made. Trees in the way back of your landscape may appear smaller than the ones in the foreground of your landscape. 

3. Add sparkly star stickers to the tops of your trees or in the sky or both. Don't forget to sign your work at this time.

4. Place your completed landscape into a box to reduce splatters. Dip your stiff bristled brush into white paint and use your finger to flick the bristles to splatter paint "snow" onto your landscape. A grown-up may choose to do this, but kids do really enjoy it (yeah, it makes a little mess).  Add the desired amount of snow to your landscape and let dry.

5. Once your landscape is dry, use the glue stick to glue it to the 8 1/2" x 11" piece of paper that has the calendar printed on it. 

6. Run the entire piece through a laminator to seal it and protect it for  a year's worth of use.

ENJOY! Happy New Year!!


Saturday, June 15, 2013

First Place! Yippee!

One of my private art students won First Place in the Keyes Art Show in Milford, NH recently for a piece she did with me. You may remember the tints and shades landscape with charcoal I posted about here.


I am so proud of her! She's only in 3rd grade and LOVES art! I've loved hanging out with her and doing all sorts of art projects (you'll be seeing more of her projects soon, since we did a whole series on animation as well).

Congratulations!

Wednesday, February 20, 2013

Process vs. Product Igloos

I recently have been reading about Process vs. Product in art education. I have long been against cookie-cutter type art and assembly-line creation. So, while I understood the concept of Process vs. Product, I decided to test out a couple of my lessons with the following criteria:

• Little or no finished teacher example (so no copying my work)
• Options for students to customize their work in their own way
• Templates available but not relied upon


So I returned to Clark School in Amherst, NH to teach my Igloo Landscapes With Northern Lights project (original post here), this time to the morning Kinders. In my prep work, I cut out MANY extra yellow squares and rectangles so that children could add as many windows and doors as they wanted. Last time, I suggested one window for each igloo and some students weren't happy with that.

Once there, I welcomed the children with fiddle music softly playing on the CD player and kept it playing throughout the lesson. My presentation of the project was pretty much the same, and I did show them an example of the finished project, but when they moved to the work areas, it was not in plain view (just like last time). The children knew that I was asking them to fill up the sky with lines that looked like the Northern Lights (but they decided which colors and how many lines of color to use), then I showed them the elements of the collage table and we discussed what they could use them for:

• White paper strips (snow covered ground)
• Paper plates cut in half (they could trace if they needed help making a semi-circle igloo shape)
• White squares (snow blocks)
• Yellow squares and rectangles (doors, windows, stars, moons)

Then I let the children begin. As I moved around, I made suggestions on the process ("Make sure to use your helper hand to hold that steady" or, "what is your next step?"). I just made sure that the students understood the WAY to use the tools and materials, but I never said where a piece had to go within their work or that they HAD to add a door or a moon--I was giving them options and letting them decide.

How'd it work? Great! I had discussed the idea of Product vs. Process with one of the Kindergarden teachers beforehand and she assured me that this project, as I had done it last month, was full of "process," so I was already feeling pretty good about it. Being mindful about "Process" this time, I learned the following things:

1. Kinders are pretty capable people. Show them techniques and they'll take off running! They can make all sorts of great choices about using techniques, tools, composition, etc.

2. Always cut more bits than you need--sometimes a student will want more than one window or door or moon. That's cool. I'm not making kits to sell, I'm offering supplies up for creativity.

3. Templates aren't always needed. These Kinders were more than capable of making a semi-circle without tracing a plate. And they did it with glue--and not too much glue, I might add. Bravo!

4. When children make creative choices about their artwork, they are taking ownership of the piece--and will even be able to tell you stories about their work. I bet you many of these children can tell you all about their landscapes and who lives in the igloo and what's going on in that colorful sky. This is probably not the case if they are cutting and pasting with strict guidelines--this active vs. passive involvement in the creative process is exactly what I am striving for. We aren't just creating pretty art--we're learning something here!

So, enjoy these igloos and enjoy the process!


Wednesday, February 6, 2013

Tints Landscape With Charcoal

I love working one-on-one with students! It's just the break I need in my week. I get to focus on art and one person and really enjoy both!

Today, my 3rd grade private art student finished this beauty. I am so proud of her! I had originally seen this post called "Winter White Landscape Paintings" at the blog A Faithful Attempt and loved them! The landscapes are done in tints of blues (in tempera!) and then the details added with charcoal pencils. LOVE IT! Honestly, I didn't think of temperas as a serious art paint, but I am so glad we tried this. I have completed my own piece and have another in the works--they are pretty addicting to create!


So, enjoy my student's work and hop on over to A Faithful Attempt to see how her students did it--and try one for yourself! You'll be glad you did!

With this project, my student learned:

• Color that are mixed with white are called "tints" and there can be many tints of a color!
• How to select a composition to paint (visual interest, balance, value range, etc.)
• How to use opaque water-based paint (tempera) to paint a landscape in layers and in multiple steps that require planning
• How to add details and value to a piece using charcoal pencils and the different ways of applying them as well as grades of softness
• One point perspective (fence) and direction of light and its effects on the shadows in a composition

Tuesday, January 8, 2013

Igloo Landscape With Northern Lights

I'm really excited about this project! I did this project as part of a special winter-themed afternoon with the Kindergardeners at Clark School this week. Previous visits have used cut paper and printmaking and they've learned all sorts of great skills and art techniques. This little lesson uses something every teacher on hand: bulletin board borders to give that wavy look in the sky. I bought mine at the dollar store (a package of 14 for $1).


The art concepts that the children learn with this project are the parts of a landscape (foreground, background, ground, sky), as well as collage, cutting with scissors & working on a multi-step, multi-layered project. The children can rip the paper for the ground and use geometric shapes (squares and rectangles) to create the semicircular igloo. They create their own shape for the moon--that can vary quite a bit and they are all darling. Pastels can be messy, and this project uses that to its advantage! The pastels are perfect for the bright colors and streakiness of the Aurora Borealis, or Northern Lights.

There are also great literature, music, science and cultural links to this project as well: the Northern Lights are part of the rich spiritual culture of the Inuit people (indigenous people of the arctic), as are igloos. The Inuit people live in stick framed houses now, but there are still times when igloos are used as shelter today. Igloos are temporary shelters that can be erected in as little as two hours! WOW!

There are many tales associated with the Northern Lights. I found a great book called The Fiddler of The Northern Lights by Natalie Kinsey-Warnock about the Northern Lights, that is a bit of a different tale. In the book, there is a man from Cape Breton who plays the fiddle and his music makes the Northern Lights dance. I was fortunate to find that my library had two CDs of fiddle music from Cape Breton--so I could share this great music with my students!

I hope you enjoy this lovely little lesson!

Igloo Landscape With Northern Lights

Supplies Needed:
  • 12" x 18" piece of black construction paper
  • 1 bulletin board border from the dollar store (or you can cut a wavy template from poster board)
  • Masking tape and clear cello tape
  • Chalk pastels
  • Tissues
  • Elmer's glue (or other white PVC glue)
  • White construction paper (some ripped into strips, some cut into 1" squares)
  • Semi-circle to trace for igloo shape
  • Pencil
  • Scrap of yellow construction paper (for moon and window)
  • Scissors
Directions:

1. Tape the border to the table: tape it on either end with a piece of clear tape so that it is nice and secure, but your sheet of black paper can slide under it.

2. Slide the black paper under the border. Use the pastels to color on the paper along the top edge of the border. It's OK if you get the pastels on the border and on the black paper at the same time. Just keep the black paper still while you are doing it. Once you've traced along the entire edge of the border piece, take a tissue and gently rub upward (away from the border), along the entire edge of the border. This will give you the lovely, streaky look of the Northern Lights. Don't scrub with the tissue--that won't give you the same effect. Repeat this 2 or 3 more times on the page.

3. When you are done your sky, move over to the collage table. Apply a thin line of glue along the bottom edge of the black paper. Attach strips of white paper along the bottom to make the snowy ground. Ripping the strips of paper gives a nice effect.

4. Trace a semicircle onto the background with the pencil--make sure you are having the igloo rest ON the ground--not float in the air! We used paper plates cut in half as our templates. Apply some glue to the inside of the semicircle area you've traced on the paper. Use the white 1" squares of paper to fill in the semicircle for the igloo.

5. When your igloo is done, cut a 1" square of yellow for the window of the igloo and attach.

6. Cut a moon shape from the yellow construction paper and glue in the sky area.

What a serene landscape! Enjoy the view!


Thursday, November 15, 2012

Magical Fauve Landscapes

Every year I teach my students about color theory and the color wheel. This year, we're focusing on Modern Art, so I thought a perfect color-theory tie in would be learning about the Fauves. The Fauves (or Wild Beasts) are a bunch of radical artists that created some bright and beautiful pieces of artwork that didn't quite match up with the colors of reality.


I know these landscapes are pretty basic, but read the post to find out why...

I have always loved the work of the Fauves! When I was in college, I used to take this great book called "Fauve Landscape," by Judi Freeman out of my school library. The paintings just made me happy and after I renewed the book at least three times, I decided I needed to own it! I pulled the book off the shelf for this project, and it was full of inspiration for the kiddos.

I began my lesson by having the children fill in a basic color wheel. My standard 6-color color wheel worksheet allows the children to learn about primary, secondary, complementary, warm and cool colors. There was a bit of grumbling about doing the worksheet (some of my students had done this before), but understanding the color wheel is really important for this project to be a success.

Then we looked at examples of works by the Fauves (and artists that are sometimes classified as Fauvists). We had a discussion about the paintings (the colors that were used and how they make us feel, why the artists might have chosen to use the colors they did, etc.).

Then we moved on to the main project. This project was one I saved pre-Pinterest. It is from the book "Art is Fundamental," by Eileen Prince and I always thought my students would enjoy it. In short, students create a simple landscape scene using complementary colors for the objects in the scene. Prince suggests doing the lesson as a draw-along, so that's why all of our pictures look alike. This is a great project because it only needs one piece of paper, a pencil and markers. Having the color wheel on hand really helps them get the idea of complementary colors. By the end of the lesson, they were pros!

Once they are done coloring their scene with nice, solid color, students stare at the completed image for about 30 seconds and then quickly look at the white surface. If done correctly, they will see an afterimage of the scene with the colors appearing properly. It took some of the students a couple of tries to see the afterimage, but most of them were able to see it.

This project didn't impress some of my students as much as I thought it would, but I think I'll keep it in the curriculum because it is a great lesson on color theory and some really cool artists. I also think it is a great lesson to teach children about creating art "in your own way."

The white space on the lower portion is the "white field"
the children look at to see the afterimage.

Nice, solid colors are key to this project.

This project is like a "art vocab ninja"!
The children don't even realize they are learning so much
about color, landscapes, and Modern art.


Friday, March 16, 2012

One Point Perspective Paintings

The focus of this year with my home school art class is art from the 1500's-1700's. One of the things I really wanted to teach them about was perspective, but I felt like a couldn't quite find a project that would work for 2nd-5th graders that wouldn't turn into a circus! So I put it off and put it off, but then I saw Natalie's project on one point perspective at the blog, "SmArt Class," and I thought, "This just might work...."


This student has lots of lovely details in her picture!

Well, I'm happy to say, it did! The first week, I showed the students some examples of paintings with and without perspective in them. Then, I walked the students through a guided drawing exercise using Natalie's step-by-step instructions so I didn't miss anything.

The second week, the children finished their pencil drawings (most of them were still drawing windows on buildings) and added details for interest. Then they used Sharpies to ink their drawings. When done, they used erasers to remove their guide lines. I gave a demo on using watercolors properly. Rules I shared were:

  • proper brush technique
  • no splashing the water
  • dabbing brushes dry on paper towels
  • no scrubbing the brush
  • how to create areas of color by using gradual washes of color, etc...
Most of the students were able to start their painting on week two.

The third week, students continued to add color to their pictures with watercolors. Everyone finished up by the end of this class.

The students were very proud of their pieces--they kept saying things such as, "It really looks like you can go down the road!" I was very happy I tried this project with my students!

Love the bridge and the car in this one!


Even the youngest students in my classes really got into this project!


Wednesday, January 25, 2012

Winter Silhouette Landscapes

WOW! This is one of those projects where I think, "Yeah, this will be a good one to do with the kids," but then I do it and, WOW. I was so happy with the way these came out and the creativity my students showed when making these pieces.

Look at that sky! Beautiful!

My homeschool art class just finished up a two-week session on Chinese New Year and we had a class to go before starting African art. I wanted to do a winter-related project that taught them a skill (such as color-mixing) but also tied in some elements of art such as value, etc.

I found this project for a moon-lit landscape in the book, "Using Color in Your Art," by Sandi Henry. It's published by Williamson Books and I LOVE their art books for children.

I also tied in another favorite book of mine, "The Day the Babies Crawled Away," by Peggy Rathmann. It's a great book that has striking skies offset with detailed silhouettes. The story is about a boy who notices the babies in his neighborhood crawling away from a neighborhood celebration (unbeknownst to their parents). He follows the babies to keep an eye on them and the images are hilarious! Oh yeah, and it illustrates the whole "beautiful background/silhouette landscape-thing I'm trying to teach with this project!

This project teaches a whole bunch of concepts to children, here's the info:

We started by talking about landscapes and what that meant. Then we discussed how there can be different values (lights and darks) of colors. When a painter mixed white with a color, it gets lighter. The values that are made by mixing white with a color are called tints. When a painter mixes black with a color, it gets darker. The values that are made by mixing black with a color are called shades.

In the first part of this project, we are going to make the sky (or background) for our Winter Silhouette Landscapes.

Supplies Needed to make the SKY:

  • 11" x 14" White Heavyweight Paper (I used bristol, but you could use posterboard)
  • Pencil
  • Blue tempera paint
  • White tempera paint
  • Disposable plate for a palette
  • Paint brush or piece of sponge
  • Water, paper towels & newspapers

Directions to make the SKY:

1. Using your finger, locate the center of the white piece of paper. Move your finger up about 2" and then over to the right about 2." This is where your moon will be. Use the pencil to make a little dot to mark the place.

2. Put some white and blue paint on the palette. Paint a 2" circle with white paint onto the dot you marked as the "moon" on your paper.

3. With your brush, get a dab of blue and mix it into the entire blob of white paint on your palette (not in your paper!). Use this brush or the sponge to paint this light blue paint in a ring around the moon on your paper.

4. Keep repeating the process (adding blue paint to make the paint on your palette darker and then painting a ring of color onto your paper) until the entire page is filled with rings of color. It's OK if some of the rings go off your paper. Just keep going and continue filling the page.

5. Let this dry. I brought a fan in to speed up the process since I wanted to send this project home today.

Supplies needed to make the SILHOUETTE-LANDSCAPE:

  • 1 Piece of 9" x 12" black construction paper
  • Bits of yellow construction paper, optional
  • Pencil
  • Scissors
  • Glue stick

Directions to make the SILHOUETTE-LANDSCAPE:

1. I started by talking with the children about what they'd see if we went walking in their yard at night. We discussed not only what we'd see (houses, snowmen), but what we'd smell (trees, smoke from a chimney). Then I asked them what we'd hear (crunching snow, dogs barking, children playing). I also showed them the book by Peggy Rathmann and we discussed a few things we saw in there.

2. Draw a ground line on the black construction paper. Add a house, trees, etc. using the pencil making sure that the elements touch the ground and are large enough and simple enough to be recognized and easy enough to cut out with scissors.

3. Cut out the silhouette with scissors.

4. Glue the silhouette to the background/sky painting using a glue stick. The silhouette becomes the foreground of the picture. The moon makes a nice focal point.

5. Using bits of yellow construction paper and the glue stick, add a window or two to your house.

ENJOY the warm, inviting night-time winter landscapes!

This piece shows one of the babies from the book
getting into trouble by hanging upside from a tree limb!


Related Posts Plugin for WordPress, Blogger...