Showing posts with label sculpture. Show all posts

Thursday, October 27, 2016

NH Art Educator's Fall Conference 2016!!

The New Hampshire Art Educators Association's (NHAEA) Fall Conference is one that I look forward to every year--"Clear the calendar! My Conference is coming up!!!" I love to connect with old friends, meet new friends, enjoy a lunch that is made for me and that I don't have to clean up after (hey, I do have four kids!), and get my artsy-ness on!! I purposely sign up for hands-on art making workshop choices. While I love me some lecture on art education theory, I don't get to make art as much as I would like, and art school was a-ways back in time, so any chance I have to create and learn new things I can take back to my classroom, I am game!

Interacting with the art at the Currier Museum...

This year's conference was fabulous and inspiring! It was held at the New Hampshire Institute of Art (NHIA) in Manchester, NH. Keynote speaker NH Artist/Illustrator/Author Marty Kelly spoke about his artistic process and how his multiple "failures" have been useful to his creative process. He urged us as educators to create a "culture of failure" in our classrooms where it is OK to make mistakes and take chances (leading students to further growth, risk-taking, exploration). He suggests that failure is part of the learning process and is essential to learning and growth. He encouraged us to change our attitude about failure as well as our students' attitudes about it as well. He explained that if we are afraid to fail we will be afraid to imagine, innovate, explore, and try. Having a classroom culture where failure is accepted and seen as an opportunity for discussion and growth also allows students to begin to accept advice and criticism and use what is right for them. He says that failure is a "pit stop along the road to success." 
Keynote Speaker: Author and Illustrator Marty Kelly
Photo courtesy: NHAEA website (www.NHAEA.org).
This is particularly useful to me as much of what we do in the middle school art room is moving away from product-focused, cookie cutter art to process-focused, student-centered work where the students are encouraged to problem-solve, explore and make the piece their own. This is a tough transition for some and some students struggle when they do not have a teacher-model to "copy" and are asked to try and explore and adapt. I've often have students come up and ask, "Is this an A? Am I done?" The first couple of times this happened I was floored, now I counter with: "I don't know, are you done? Take a look at the project objectives and talk to one of the other students in class to see if they have suggestions for further improvement (or to see if your piece is "saying" what you want it to say)." To me, this part of the creative process is a gradual release as the students' confidence and skill-level increases, ultimately preparing them for the independence and self motivation that high school will require. 

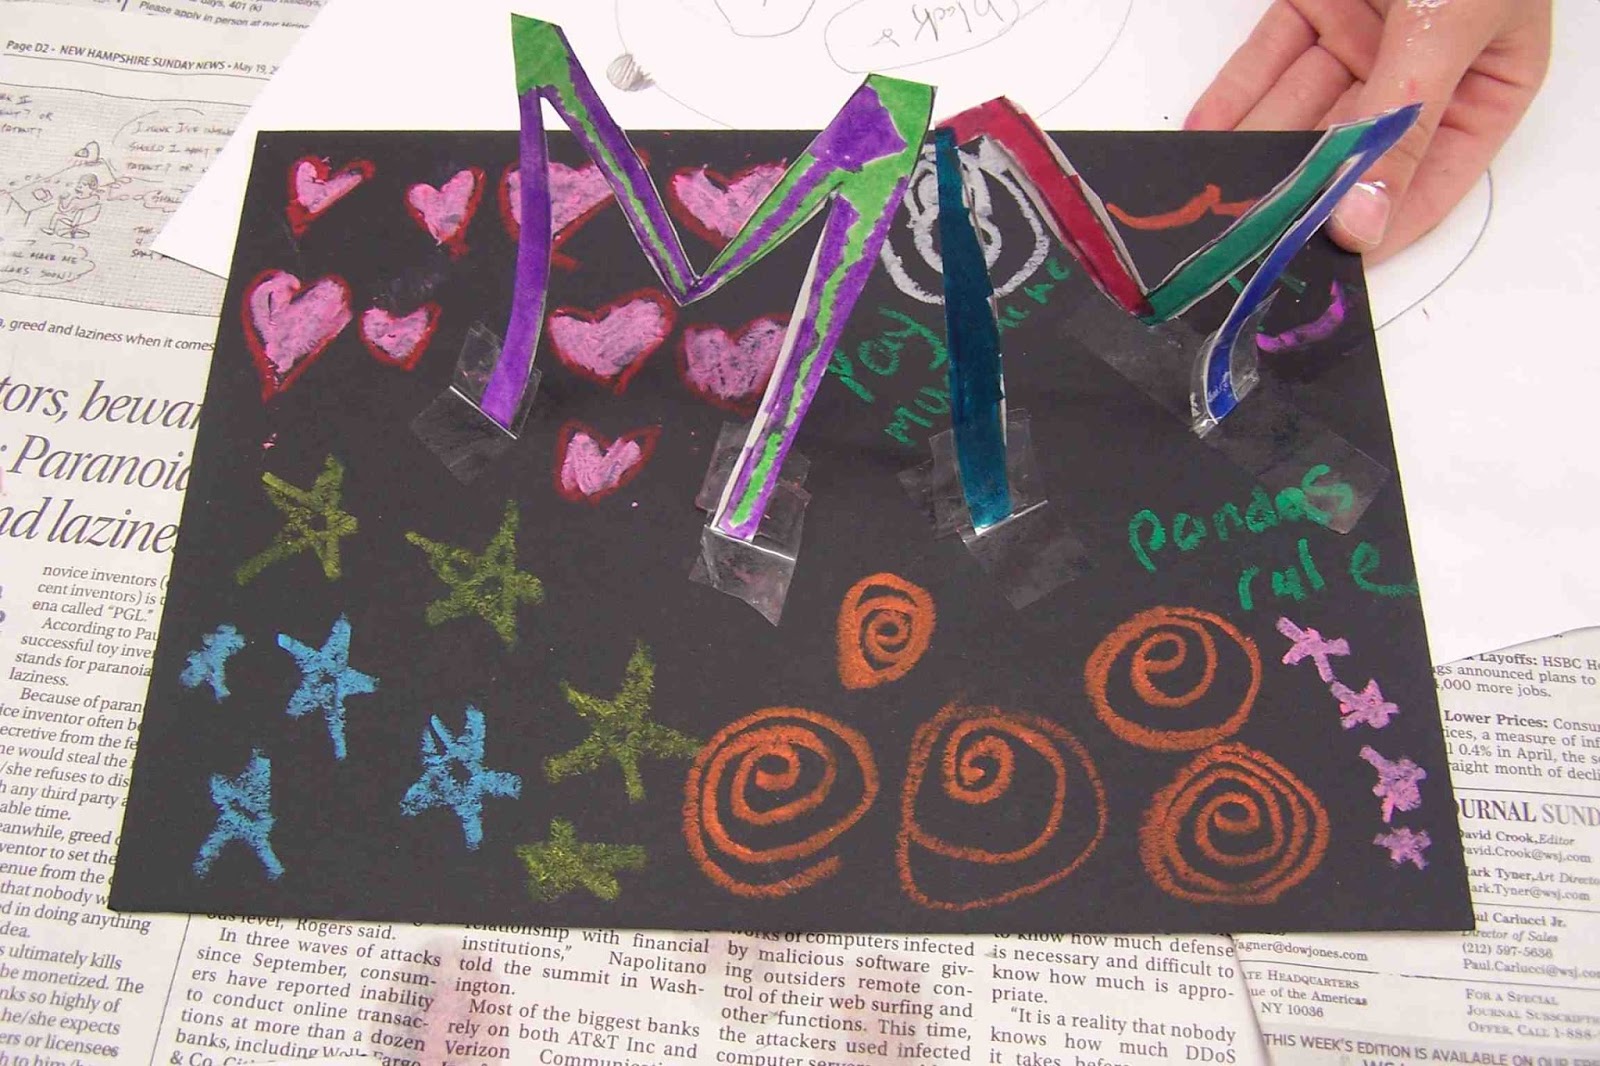
Session 1: Reinterpreting With Recylables. I went on a mini field trip to the Currier Museum of Art and saw the Mount Washington show that just opened. Mount Washington is the highest mountain in New Hampshire and is known throughout the world for its crazy weather. We went downstairs to classroom and Linn Krikorian taught us how we can use the art and artifacts within the Currier's collection as well as from life and other disciplines and have students reimagine them using recycled materials. Resources were shared for places to get interesting recyclables and for using this idea across the curriculum. Then Megan McIntyre discussed how art can be used to facilitate other ideas across the curriculum such as Science, Math, etc. This is particularly pertinent to me in my art room as I strive to develop lessons that are individualized and cross-curricular in nature. This lesson idea (and its spin-off ideas) will be helpful to me as I encourage the students to observe and reinterpret art and artifacts in class but make them their own. 

My take on a Robert Indiana from the Currier's collection.

Session 2: Structures to Sculpture (Bookmaking) This was a wonderful hands-on session led by Erin Sweeney, professor at NHIA (and her student helper Karen) taught us about a number of book-making techniques and led an open discussion amongst the creative educators present as to how we are currently using these structures within our classrooms and how we could potentially use them even more. Connections to other courses were discussed as well as connections to STEM/STEAM. While the pieces we made weren't complete (just the "bones" of the books and not fully developed within), the examples took the 2D linear idea of "book" and transformed it into 3D sculptural forms (easily!!) that could be used in our teaching in a number of ways (assessment, reflection, student mini portfolios, the documentation of a unit or the transformation of an idea, etc.). This was a VERY relevant workshop in that it allows a student to move from 2D to 3D in a seamless and accessible way while allowing them to reflect on a process or subject matter and use the 3D model-making techniques that we strive to teach them in class. This will definitely be applied to my future 7th and 8th grade classes next trimester! 


Busily working at the Structures To Sculpture Session led by Erin Sweeney.
Photo courtesy: NHAEA website (www.NHAEA.org).
After our sessions, we met back in the mail hall for closing remarks, a raffle (nope, didn't win anything this year), and a wine a cheese reception sponsored by NHIA. I went away physically tired, but rejuvenated and with so many great ideas that I can bring back to my students!

And here are some other images from the Currier workshop--the art of my classmates. ENJOY!


Wednesday, March 9, 2016

One Day GROUP Project: Winter Assemblage (Louise Nevelson)

This was a 1-day getting-to-know-you project I did with the fourth grade students at a school I am temporarily teaching at. I probably should have done an easier "box" as our base--I chose an origami version that we did as a class, step-by-step. Most of the classes were able to follow along, but one class struggled a bit with the creation of the boxes. The original post I saw for this project online, describes an easier "box." I may do that NEXT time.


This piece is about 3 feet wide and 4 feet tall--impressive!
I'm so proud of you, fourth graders!!

We looked at Louise Nevelson's work: "Sky Cathedral," from 1958, and then created our own relief assemblage inspired by winter.


VOCAB: origami, sculpture, relief, assemblage, sculptor, horizontal, vertical, space, form

CROSS-CURRICULAR CONNECTION: Science (seasons, winter), Language Arts (poetry)--if you have the students write a poem about the finished piece. Try this poem, here.

MATERIALS: One 9x12" piece of construction paper (for the box), multiple 1"x12" strips of construction paper (about 6 per child), little squares of white paper for snowflakes (optional), scissors, hole punch, glue sticks; for the teacher's use: hot glue gun and glue sticks, stapler

Wednesday, August 19, 2015

FREE ART BOOK GIVEAWAY!

We all can use a little inspiration, can't we?

I have some WONDERFUL news to share: SIX art ideas of mine have been published in the book "500 Kids Art Ideas" by Gavin Andrews published by Quarry Books! 


This soft-cover book is chock-full of great ideas that will really get your creativity going! There are eleven different chapters in the book that show full color pictures of a variety of art media and projects created by a wide range of ages. There are great ideas for working in felts, fibers, paper and book art, sculpture and 3D, technology and more!

It truly is a beautiful book! Each of the 500 projects has a full color illustration along with a quick list of materials used. While there aren't step-by-step directions for each project, there's enough information to get you started and art teachers, homeschoolers and creative kiddos will be inspired none-the-less.

Author Gavin Andrews is an art educator and artist who is currently employed at the Peabody Essex Museum in Salem, Massachusetts. I love what is written about her on Amazon (on the "About the Author" section for this book), "She is dedicated to the role of art and creativity in people's lives, especially those of her two children, and strives to have people understand that everyone can be creative." I couldn't agree with her more!

Want a copy? Well, I have one right here for you! I'm giving away a FREE copy of the book "500 Kids Art Ideas" by Gavin Andrews published by Quarry Books in my first-eva giveaway! Here are the details:

If you would like to be entered in the drawing to receive a copy of the book, leave a comment below with your name, email address and let me know what book YOU can't live without in your classroom or one that you've read that inspired you. 

I will choose a winner at random on August 31st, 2015. Sorry, only those in the continental United States are eligible for this giveaway.

So, get to writing that comment below to enter! Good luck!

Tuesday, August 18, 2015

Sculpture with Grade 5? It's a piece of cake!

The school I was substitute teaching at was celebrating its 40th birthday while I was there. Naturally, I had to have the students create some yummy cake-themed art in celebration! I decided on a Wayne Thiebaud theme for two of the grades. Grade 5 made these awesome 3D papier mache and collage cakes frosted with (get ready) shaving cream mixed with Elmer's glue. Yeah, I know, kind of crazy--but it was AWESOME!!!


Let's get ready to PARTY! Cakes, cakes & more cakes!! YUM!

I got the idea for these cakes from Mrs. Hahn at Mini Matisse and the students had a blast creating these. This was a great project because it used up lots of little bits of paper, sequins, beads and more and allowed the students TONS of creativity. We received so many compliments on them and they truly looked good enough to eat! Definitely a keeper!

ENJOY!!


Friday, April 10, 2015

Catching up and 5th grade sculptures...

I've been offline for a bit because my life's been full and busy! I just began a long-term art substitute position at Amherst Middle School in Amherst, NH! The semester was changing over right when I was being trained so it has taken me a couple of days to focus and get used to it all. I'm teaching 5th-8th grade and I'm really excited about this semester and working with my students.


The intro class for 5th graders is a fun one and a long-standing tradition at AMS: plaster casts of the students' hands. The art teacher at AMS, Rachel Rouillard, walked me through the process. It's a bit messy, a bunch of fun, and it gets the 5th graders sitting really still for 10 minutes!

Students began by painting their hands with watercolors, if they wished. Once the plaster was mixed up, I scooped a yogurt cup size amount of gooey plaster into their cupped hands. Then, they waited about 10 minutes. While they waited I explained classroom procedures, etc. Once they unmolded their "sculptures" they could use the watercolors to add more color. On day two, we finished painting and then used the sculptures in a contour line drawing lesson.

They are pretty cool looking, and every one is unique--just like my students!


Tuesday, June 24, 2014

A Project That Really ROCKS!

I'm a little behind with my postings, but I wanted to share this great project I did with my after school "Spring Into Art" class for Mother's Day. Not only is this a great project to show mom you care, it's great for pretty much anytime! I mean, who doesn't like painted rocks, wire sculpture and poetry?!? ;-)


This piece was made for me by my 4th grade son.
He enjoyed this project and liked writing the poem about me
(to read it, scroll down).

I linked this project to nature, of course, and Alexander Calder, since the wire portion reminded me of his stabiles and standing mobiles. Check out this one at his website, www.calder.org:


This project can take off in a variety of directions: you could skip the poem and focus on creating a mobile-like structure where students explore balance, or you could use wood or foam core for the base, or mount the poem or a famous quote to the base…it is really up to you! Although the poetry piece makes a great integrated arts project.

Here are the directions for the version we did…Enjoy!

Rockin' Stabiles

Supplies Needed:

  • A rock the size of a softball, or so…
  • Acrylic paints
  • Paint brushes, water buckets, paper plate palettes, newspaper
  • Medium gauge copper wire (I think ours was 24 gauge, but check to see what works for you)
  • Wire cutters
  • Poem/Thank You Note Worksheets
  • Pencils
  • Plain white index cards (we used 4"x 6" ones)
  • Fine point Sharpies
  • Pretty colored paper or card stock (optional)
  • Glue Sticks
  • Scissors
  • Craft foam scraps
  • Hole punch
Directions:

1. Select a nice rock for your base, brush it off and paint it with the acrylics. Let dry.

2. Choose a poem/thank you note worksheet to work with. I downloaded the Diamante template from www.ReadWriteThink.org for the students to use. I encouraged the older students (4th grade) to use those. For the younger students and ones who struggle with writing, I let them write a thank you note to their mom. I provided a template for the thank you note as well, to prompt them a bit. As a mom, either writing is appreciated! 

My son wrote this about me:
Brandie
Beautiful, Awesome
Cleaning, Cooking, Vacuuming
You are very awesome.
Resting, Eating, Playing
Cool, Calm
Mom

3. Once the students were done their writing, I proofread them (although I let some of the creative spelling go sometimes because it was just so darn cute!). Transfer the writing to the index cards using Sharpies to make a nice-looking final copy.

4. Glue the index cards with the final writing onto a pretty piece of paper to create a nice border around the poem.

5. Cut a piece of wire to about 36" long. Wrap the wire around the rock a couple of times and twist the ends. One end can be a spiral to hold the poem you've written, the other end can curl out and around like the arm on Calder's work. You can cut smaller pieces of wire to make a mobile-type structure at this time, but I had students cut a shape from craft foam, punch a hole in it, and hang the shape from the arm.

6. Place the poem/thank you note in the spiral portion of the stabile (you may need to secure the note on the back with a bit of tape).

Enjoy!

My other son, who is in first grade, was finding it hard to write that day,
so he painted the rock and created the wire heart sculpture instead.

Friday, June 13, 2014

Andy Goldsworthy Nature Sculptures

My Spring Art class headed outside to create some beautiful Nature Sculptures inspired by Andy Goldsworthy. Many of the children weren't familiar with his work, but really got inspired as we looked at a book I had brought called, "Hand to Earth." As we flipped through the pages, they were amazed at his work and itching to get started!


I had wanted a quick lesson where they could create outside and had intended that while they were creating their sculptures, I would work with small groups to make sun prints--a natural link, in my opinion. But alas, the weather didn't cooperate and the sun prints were a no-go due to the sun going away as soon as class started! At least it didn't rain! :-)

Unfortunately, the students can't take something him from a class like this--we even needed to destroy them before we left--that was hard for some. But, I brought the iPad and took some photos of each sculpture. Once I went home, I used PicCollage to bring all of the images from class together into a collage that could be printed as a poster--a very pretty one, I'd say! I emailed those out that afternoon to the families so the children could remember their sculptures forever.

This is a great lesson! The prep is pretty minimal, of course, but it really gets a good discussion going about the following themes:

  • Looking closely at nature
  • Being good stewards of the land
  • Working together as a team/taking turns/helping
  • Elements of art/principles of design
  • What is sculpture?
  • What is art?
  • The job of artist (How does an artist get paid for work such as this? What inspires an artist? How long will pieces like this last in nature?)
So, here's the final poster--enjoy!


Thursday, June 13, 2013

Easy Paper Name Sculpture For DAD

Yep, Father's Day is right around the corner, but don't fret if you haven't made Dear Old Dad a present yet...here's a fun and easy sculpture you can make for him that will look nice on his desk or toolbox (that's how the dads in our family roll). 


This project is based on one I saw on pinterest that had no destination or info--it was pretty much a picture on the internet. I've tried to do it justice, so here's my version. My early finisher students did this one day after painting some other sculptures. I'd say this project takes less than a half an hour to do if you choose an easy word like "dad."I'd love to have my students create multi-leveled sculptures with their entire names (more letters = a more exciting sculpture), but that's for another time!

Paper Name Sculpture For DAD

Supplies Needed:
  • 3" x 5" index cards, white on both sides (one for each letter of the name you choose)
  • Pencil
  • Scissors
  • Markers
  • Clear Tape
  • Mat Board, we used black
  • Oil Pastels
Directions:

1. Draw nice, thick letters onto the index cards making them as big as you can (touching all edges of the index card, if possible). Cut out your letters with scissors.

2. Decorate both sides of each letter with markers. Use at least two colors on each side of every letter. Try using different patterns and colors for each letter--have fun!

3. Use clear tape to attach the letters to the mat board so they stand up. Make your letters touch and lean against one another, if you'd like. The more letters you have, the more elaborate your sculpture will be. You can even make your sculpture go up vertically if you have enough letters. Think of building this sculpture like you would build a house of cards with a deck of playing cards, but you can hold the letters together with clear tape (bonus!).

4. Once all of your letters are taped where you'd like them, use the oil pastels or craypas to write a message on the base such as "I Love You!" or "Dad Rocks!" The decorate the rest of the base with the oil pastels with swirls, lines, and patterns.

Now you have a colorful sculpture for Dad! Enjoy!


Some students made sculptures with their initials instead.

And this student made a sculpture for his dog, Lulu!

Wednesday, June 12, 2013

Check out these projects...

"Busy, busy," is the lament of the art teacher and mom at this time of the year! I've been running all over doing some super-awesome art projects with kiddos in Kindergarten all the way to 8th grade. I had been shying away from a couple of art projects because they were beyond my comfort level, but I made myself push on and try some projects I really thought would be worthwhile. Here are the projects I tried with my students with my notes on each project. I didn't get photos of any of these since I was very, ahem, engaged due to messes, etc. But check them out...


Kimmy Cantrell slab masks: So awesome and very engaging! I saw this project on Shine Brite Zamorano. I had never heard of this contemporary artist, but once I saw his work I knew my kiddos would love them. 

Pros of this project:
  • Students get to work with clay--yippee! Who doesn't love that!? Learn slab techniques and "scratch and attach" method using slip to adhere clay pieces together
  • Students draw out their masks before creating in clay. Great for them to work from a plan!
  • Students learn about symmetry/asymmetry 
Cons of this project (for my situation):
  • I don't have access to a kiln, so I used Crayola air dry clay. It works well, but it isn't as sturdy as fired clay. I've hot glued finished air dry clay projects to mat board for stability, that helps most times.
  • I needed to transport these between home and school for the drying stage (I don't have a classroom) and I am super-paranoid that something will happen to these in transit or at my home. If you have a classroom, this is a non-issue, I guess.
VERDICT: This is a keeper!

----------

Marbled Paper Journals: I love Mr. E's site so when I saw his super-simple technique for doing Marbled paper using shaving cream and tempera paints, I thought, "I can do this!" I thought the marbled paper would be great as covers for art journals. What a unique keepsake for my "All About ME!" after school art class.

Pros of this project:
  • Students get to learn about marbling and making a book. Wow!
  • Students get to have a wonderful tactile experience with the shaving cream and get to do all sorts of experimenting with drizzling paint and choosing their own color combinations.
  • The shaving cream smells good (teachers from other classrooms kept coming in to see what smelled so good!).
Cons of this project:
  • I had an energetic group that had some, ahem, listening problems. This was a bad idea for them. Many of them would have been happy just playing in the shaving cream. The. Entire. Time. That's fine, but they were playing in the shaving cream that had paint mixed into it and it was dripping on the floors, the tables, their clothes, etc. And then when they "helped" to clean up, the water from the sink somehow poured onto the floor and we had GIANT puddles everywhere. It was a bit of a challenge. So that brings me to my next "con:"
  • This project can be messy if not managed well. I take responsibility for the mess, certainly, but it's pretty bad when I go through an entire roll of paper towels and I have to ask the custodian for a mop and bucket and spray and spend 45 minutes cleaning with said items--and that was one class!
  • This technique is very teacher-focused. I worked with three kids at a time and they made two prints each. This focus made it so some of my rowdy students had some time to wind-up and get into trouble. I felt like I was constantly juggling naughtiness and shaving cream. It was a great stress test! :-) I think I passed, but then I had lots of time to think about it as I cleaned up after class...Mr. E--you are a saint!
VERDICT: Not again.

--------------

Kinder Rainbow Windsocks: I had my final volunteer art session with the Kindergarteners at Clark School in Amherst in May. I had done all sorts of wonderful projects with them using collage, printmaking, and paint (a bit), but I wanted to make the final project special. I knew I had my project when I saw these beautiful rainbow windsocks online at Kinder Craze. The windsocks have paint and streamers to create the most awesome and beautiful windsocks perfect for Spring! But 60+ kids with 6 different colors of paint and 30 minutes? Was this beyond my skillset? I worried, I planned, but it was awesome in the end...

Pros of this project:
  • Paint! Rainbows! Streamers! Need I say more!?!?
  • The children needed to use each of the colors to made large arcs on their papers moving from left to right. Great for hand/eye control, especially since subsequent arcs needed to touch the previous arc. Also, colors needed to be painted in rainbow order.
  • Children saw that a 2D piece of art, could transform into a 3D form: a cylinder
  • Children needed to share the foam brushes and practice patience. I placed a muffin tray in the center of each table with one of the six colors each well. One brush in each color. I had the first person start with red, paint their arc, and then pass the red brush to their neighbor who would paint and then pass the brush to his/her neighbor. This was repeated through the colors. I was worried this would take too long, but it was awesome.
Cons of this project:
  • It uses 6 colors of paint and six colors of streamers, so it would be pricey if you were buying everything for this one project, but we had everything we needed already.
  • Cleanup can be difficult. I had a helper who rinsed my brushes and trays, but I'd allow for 1/2 hour cleanup. It really wasn't all that bad at all. Those Kinders are awesome.
  • It doesn't get done in 1 day. We glued the streamers on first, then painted and then put them on the drying rack to dry. The teachers then formed the pieces into cylinders and stapled them closed the following day. They said it was super-easy (I try not to leave the classroom teachers with anything to do once my visit is done).
VERDICT: This is a keeper!

-------------------

Jean Dubuffet Paper Sculptures: What could be easier-a sheet of white paper, some markers (limited color palette--2-3 colors, plus black), scissors, glue stick and a piece of black mat board--TA DA! Instant art just like Jean Dubuffet. I've had this one pinned for a while now, but never quite had the chance to get to it. Then, in Sculpture class, we had a little free time after painting our Kimmy Cantrell masks (see above) and I thought I'd try this project. I'm glad I did--it was perfect! See a similar project here at Art Smudge.


Pros of this project:
  • Limited supplies (and the supplies needed are inexpensive).
  • Limited teacher involvement--YEAH! This is great for a sub or if you are helping students finish up/clean-up.
  • Children saw that a 2D piece of art, could transform into a 3D form.
  • Allowed for creativity in the lines, pattern, color, and 2D and 3D shapes and forms.
Cons of this project:
  • It is over quickly--I'd say, 1/2 hour from start to finish. That could be a pro, but if you are planning for it to take an entire class session, it's a con.
  • They are relatively delicate. May not make it home on the bus and cannot be stored, really.
VERDICT: This is a keeper!


-------------------

I'm very happy I tried these projects! What projects have you been hesitant to do but, in the end, were glad you did? I'd love to hear about them!

Thursday, April 4, 2013

Easy-Peasy Pizza Sculptures!

I'm always looking for a better way to do projects. I had done pizza sculptures a la Claes Oldenburg before (see here) and I thought that my Modern Art kiddos would like them too. I had originally had students create the pizza form from two pieces of newsprint stapled and stuffed with crumpled up newspapers ad then paint the sauce and toppings. While that worked out OK, the pizzas got a bit muddy with all of those toppings being painted over one another before they were dry. So, I got to thinkin'...
YUM! Bacon, sausage and pepperoni pizza!

I bought some red and kraft-colored wrapping paper at IKEA this past Christmas and thought the weight and color of them would be nice for the sculptures. I thought the children could cut a brown triangle for the bottom crust part and a top triangle from red for the sauce part...however, I used all of the red wrapping paper at Christmastime. Oops! But I had a plan...

I had the children cut both triangles for the pizza from the kraft paper, staple & stuff and then paint the sauce on with red tempera. While they were drying, the children created their toppings from construction paper scraps. This worked out great for timing and they came out great--love the bright red sauce!

The toppings are a study in size, shape and color! I had some take-out menus from pizza places and we made a huge list of toppings the children could use on their pizzas. I also made my "at least three" rule with the toppings: the children had to create at least three different toppings for their pizza (not including the cheese). Most of them were happy to oblige!

So have a no-calorie pizza party for your class or family and have fun using up all of those paper scraps you've been hanging onto!

Easy-Peasy Pizza Sculptures

Supplies Needed:


  • Medium weight paper (large sheets or a roll of paper)
  • Triangle templates cut from poster board (bottom crust template should be about 5" longer than the top crust so you can roll the triangle up and make the crust of the pizza)
  • Pencil
  • Scissors
  • Ruler
  • Newspaper or paper scraps to stuff the form
  • Stapler with staples
  • Red tempera paint (or white if you like a white sauce)
  • Paint brushes
  • Water bucket, paper towels
  • Paper scraps for pizza toppings
  • Elmer's glue
Directions:

1. Cut two triangles from kraft paper for the top and the bottom of the pizza slice. As I said above, the bottom crust triangle should be about 5" longer than the top crust so you can roll the triangle up and make the crust of the pizza.

2. Layer the two triangles on top of one another and staple along the two pointy, side edges or the pizza, through both layers. Leave the crust edge open, creating a pocket.

3. Crumple up newspaper, lightly, and stuff the pizza slightly, to give the pizza slice some dimension. 

4. Roll the open edge of the pizza slice inward a couple inches to create the pizza crust and secure with a couple of staples. You now have a giant slice of pizza!

5. Use tempera paints to paint the sauce on your slice of pizza. 

6. While it dries, you can use paper scraps to create toppings. To create the toppings you can rip, or cut the paper, or even use different punches as you see fit. To create multiple shapes (for mushrooms or other unique veggies), fold the paper multiple times and then cut through all the layers--you'll make a number of uniform shapes at once. Much better (and faster) than cutting out individual mushrooms!


6. When the paint is dry, attach the toppings to your pizza slice with glue. I had the children dribble the Elmer's glue in a zigzag motion over the sauce and then sprinkle the toppings on. Lightly press the toppings into the glue (the glue will dry clear).

YUM! Let's eat!


Wednesday, March 20, 2013

Easy Art Activities For A Snow Day Or Any Day (Part 3)

This Part 3 in a multi-part series. Here are the previous posts you may have missed:
------------

So your children have moved beyond experimenting with art supplies and you need some ideas to engage them? No problem! My solution? Collect, save and access art ideas as needed.

3. Gradually Gather and *Actually Use* Easy Art Ideas

Before Pinterest, I was a ripper. If I saw a cool art or craft idea in a magazine...RIP!...it was torn out and filed away. But that takes up space (which I don't have) and if you are a piler (like me) I'd have to sort through MOUNDS of ideas to find the one I was looking for. If you are a filer, it would be easier, but who has time to file!?

So I love Pinterest. It allows me to pin ideas and categorize them (quasi-filing) and access them later. I rarely rip stuff out anymore (which is helping the clutter a bit).

The point is--gather ideas as you go. If you see something that you think your child may like to do in the future--grab it and file it so you can easily access it in the future. Think easy projects with supplies you are likely to have on hand. Then, on snow days or lazy days at home when you hear the "I'm bored!!" posse coming for you, whip out the ideas and look through them with your child. I often browse my "Art Ideas" board with my five-year-old in the mornings when he needs to create but can't think of something. Sometimes just looking at a picture of a project is enough and he'll run off to the art center and create-a-way. Sometimes I need to get involved and gather some special materials not in the Art Center and walk him through getting started.

We've done a TON of projects this way! It's great because we are actually doing the things I pin (my Pinterest surfing is not in vain!) and he's practicing his cutting, gluing, collage, and painting while being truly engaged since he's the one choosing the projects.

So here are a couple of pin-worthy projects for you to keep in mind for the next day off:

Aluminum Foil Quilt Squares
These are easy and addicting and all of my children were able to do them (even the 2 1/2 year old with a but of help). We mounted a few of them on mat board to protect them and make them easier to display. I found the instructions here at Piikea Street.


Chalk Shapes
This project kept my little ones busy for a while the other day. Cut a shape from cardboard (we used cereal box cardboard), put a little roll of masking tape on the underside to keep it still on your paper and then place it on a dark piece of paper. Trace around it with colored chalk or pastels, then *before you remove the cardboard shape,* gently wipe with tissue to smudge the chalk a bit. Ta-da! Beautiful!


Other Projects to Check Out:

LOVE these Magic Carpets from mnartgal.blogspot.com--they use materials you have on hand and who wouldn't want to make a magic carpet and go to a far off land! Where will YOU go?


And check out these Paper Sculptures from Sharpie Woman! Awesome! My five-year-old made a ton of these last week and even the two-year-old tried her hand at them. They are fun on a shelf or hung on the wall ad are a great way to use up all of those paper scraps you've been saving in your Art Center!

Other ideas to get you started? 

  • Use masking tape to "write" your name on cardboard or poster board, paint over the whole thing and then remove the tape for a great sign for your room!
  • Try your hand at printmaking using Legos or other found objects around your home (ask mom first!!).
  • Make Magic wands or fairy wands or search the web for "Notan" for some paper-cutting fun! I have an easy version of this here with my "Positively Cute I Love You Project."
  • Get out the clay and make dinosaur fossils or press found objects like sea shells into the dough
  • Make a snow sculpture outside or bring a bin full of snow inside and make a snow sculpture in your house! Or make a snow fort inside for your Playmobil guys or Matchbox cars!
  • And of course, you can always search the Create Art With Me site for more inspiration! (Hint hint!)

What are some of your go-to projects for easy fun? Anything you've done that engage your kids for awhile. I'd love to hear about them!

Monday, March 4, 2013

Fun Calder Fish

One of my private art students is open to any art project...while we work I talk to her about all sorts of art and artists and I've been letting her interests guide our studies. She had done the Calder Monogram Mobile project I posted here, but one of Alexander Calder's sculptures I showed her inspired her. So...one of our next sessions, I got out some wire (in a variety of guages and colors) and lots of different kinds of beads and I let her go to town! 


It was great talking about Calder's work with her and then watching her make choices for her fish mobile. This was also a great project for problem solving (How do you get the beads spaced evenly along the wire? And, How do you keep the vertical rows of beads still within the fish "frame"?). 

When she was done, we created a stand for her mobile using a cork with a clothes hanger stuck in it, glued to a piece of mat board (this is my standard mobile "base").

Enjoy!


Wednesday, February 20, 2013

More Giacometti Figures

Last fall I did a foil project with my homeschool kiddos where they learned about Giacommetti, figure drawing and sculpture and they created figures out of aluminum foil. Here's the original post.

"I'm thinking...I'm thinking..."
They came out great! So, I thought my after school Modern Art kiddos would also enjoy making the project. I was really surprised when most of the kids DID NOT dig this project. I presented the same way, but that day, my after school kids had a case of spring fever and this project wasn't able to hold their attention (even with a bit of charades, gesture drawing and squishing foil). One longtime student said, "I hate this project, can I throw it away?"

Despite the bad reviews, the children created some really interesting pieces. One student worked and reworked his figure and finally got the idea to recreate Rodin's "The Thinker." WOW!

Here are the results, enjoy!


Tuesday, January 15, 2013

Secret Code Monogram Calder Mobiles

There are so many great lessons on the mobiles of Alexander Calder, but in case you need another--here's mine! I tried this lesson with my homeschool students and they seemed to enjoy it quite a bit. It's a simple intro to mobile-making which can pose some issues to children regarding balance and construction, if they aren't used to working in 3D. We used the code found in the book "The Calder Game" by Blue Balliett in which the children in the book realize that the shapes Calder used in his mobiles are actually symbols for letters and make up a secret code. 


I first saw the idea of using the code from the blog Salamander Art, and have used it in another Calder mobile project. This project works nicely for monograms since most people have three initials so the children could use three shapes from the chart to create their pieces. It was a fun project and many of the children finished early enough that we were able to have a mini critique and I was able to pass back all of their work for the semester. A great last day project.


Secret Code Monogram Calder Mobiles

Supplies Needed:

  • Code diagram and/or pictures of Calder's work for inspiration (see Salamander Art's blog for code chart)
  • Pens/pencils
  • Foam craft sheets
  • Scissors
  • Hole punch
  • Copper wire (I'm not sure of the gauge I used, but it was easy enough to bend by hand but study enough to hold its shape)
  • Wire cutters
  • Coat hanger
  • Cork from wine bottle
  • Hot glue gun and glue
  • Piece of mat board or cardboard

Directions:

1. Write the first letter (initial) of your first name, your middle name, and your last name. Now, look on the Calder Code Chart for the shape that corresponds to those letters. Draw the shapes near the letters they go with.

2. Draw or trace the shapes onto the foam sheets. I magnified the shapes something like 500% and then printed them on card stock and then put a few on each table. The students moved around from table to table tracing the letters they needed. Cut out your shapes and punch a hole in the top of each using the hole punch. If your shape has internal shapes, take a bit of leftover craft foam, cut the little shapes out and glue onto the larger shape.

3. Cut two lengths of copper wire: one that is about 14" long and the other that is about 8-9" long. Curl the wire at both ends of each of the pieces to make a loop. Don't close it all the way just yet--you'll need to add some shapes. On the short length of wire, add a foam shape to each end. Then twist and form a loop in the center of this short length of wire. Slip the center loop of the short wire onto one of the end loops of the larger wire. Add your third shape to the opposite end of the large wire.

4. Check the piece for balance and make a loop in the middle section of the large wire to hang the piece. We found that our hanging loop needed to be slightly off-center toward one side in order for the piece to be balanced.

5. Glue the cork to the mat board or cardboard. Cut a length of clothes hanger wire and bend it gently and create a loop at the end from which to hang the mobile. Hang the finished mobile on the wire stand and enjoy!


Related Posts Plugin for WordPress, Blogger...