Showing posts with label preschool. Show all posts

Thursday, November 13, 2014

Love printmaking? Try these lessons!

I've rediscovered printmaking over the last month or so. I love printmaking because it is easy and can be done on the cheap. Well, sort of. The process is always so fun for the students and the results are magical--I love to watch them "ooh" and "aah" over their prints!

Well, here's a round-up of some past printmaking lessons from my site that may have you rocking and rolling with your students!

Matching Mittens with Found Object "Snow" Prints

USING FOAM TRAYS:
Reduction Prints (Using Styrofoam trays and found objects)
Andy Warhol Self Portraits (Using Styrofoam trays and a pencil to "carve" an image)
Reduction Print Selfie (Using Styrofoam tray and gradually removing portions of it between inkings)

USING CRAFT FOAM:
Haunted Houses (Using sticky-backed foam shapes)
Fall Banner (Using foam shapes to make stamps--can be changed for any theme or season)

FOUND OBJECTS AS STAMPS:
Create Your Own Stamps (Using found objects and wine corks to make your own stamps)
Matching Mittens and Snowflakes (Cut paper mittens with found object "snow")
Focal Point Fruit Prints (Using an apple or pear to print--exploring focal point too).
Leaf Prints (This is mine, it's from Deep Space Sparkle, but it is my go-to early finisher activity in the fall).
Modern Day Adinkra Cloth (Using stamped symbols on sections of card stock that are joined together into one "cloth")
Spring Forsythia Still Life (Using pieces of sponge to make a lovely arrangement of forsythia blossoms)
Not-So-Scary Dancing Skeletons (Uses doggy bone treats for unique stamps)

USING YOUR HANDS:
Andy Warhol Hand Prints (Seriously one of my most popular posts, but not mine--from Artolazzi--so easy!).

And one of my all-time popular posts--
Quick Andy Warhol Hand Prints

Thursday, May 9, 2013

Mother's Day Flowerpot Ideas

I was asked to create a painted flowerpot idea or two for our PTA to use as a fundraising kid activity at last weekend's 1st Annual PTA World's Fair. The idea for this event was to have a fun-filled day where families could come and browse different vendors, taste foods from around the world, play carnival games, do crafts, jump in a bounce house, etc.


Ladybugs were VERY popular...

I was set up in the Japanese garden area of the gym. One vendor had let the PTA borrow all sorts of trees and flowers and they were arranged all around my work area-beautiful! In keeping with the Japanese theme, I brought some sheets of origami paper and the instructions to fold a few simple pieces such as a helmet, a dog, a butterfly, etc. Since I was busy overseeing the flowerpot painting, the origami  didn't attract as much interest as I had hoped. I have some ideas about that for next year, though...

On to the flowerpots...these ideas aren't mine, they are ideas I've seen here and there multiple times or are things I've received as a mom myself. But they fit the bill for the craft request: something for mom, a painted flowerpot, easy for whatever age group showed up (this was the first year of the event and we had no idea who was going to show), and cheap (the children "paid" four tickets, roughly $2.00 to do the craft and it is supposed to be a fundraiser for the PTA). Each pot included an herb or flower plant that was donated by a local organic farm.

The supplies needed are:

  • 4" flower pots with your choice of herb or flower
  • Acrylic craft paints (we used red, orange, yellow, green, white and brown)
  • Foam brushes if the children wanted to paint the rim of the pots
  • Sharpies for details, optional
  • Fingers for fingerprints! That's what makes them so easy--no brushes to clean up!

So, here are the (poorly taken) photos of my examples, complete with my cheapo fake plant from IKEA sticking out of it. SIGH. But you get the idea...


This example is great for little ones since they are the only ones
who could fit their handprints on the little pots! I had a couple people do this version...
When the children were done, they could choose one of these
poems on a skewer to stick in their finished pot.
These bring tears to my eyes--so sweet!

The children ran with these ideas and we ended up selling about 30 of them. There are going to be many happy mothers in southern NH this Mother's Day!


Friday, April 5, 2013

Kindergarten 2D Shape Robots

I saw this fantastic art project on Teach Preschool and knew I just  HAD to do it with my son's Kindergarten class! So this past Tuesday I was able to go in and spend a robot-themed afternoon with them. We had so much fun! Here are the robots they made using 2D shapes:


Deborah at Teach Preschool is totally great! I wish she lived near me so I could send my little ones off to her! Every day she sends out posts that are full of great learning ideas for the Preschool set. I've found that my Kinder guy also enjoys some of the activities from her site.

So check out her original post for the Shape Robots here.

Here are some of my notes on the lesson:

  • This project is great for Preschool and Kinder-aged kiddos. Both boys and girls enjoyed creating their robots.
  • This project tied in nicely with what my son was learning at this time: 2D versus 3D shapes and had a bunch of different shapes for them to use, identify and talk about while they were working.
  • This project has some very interesting kinetic-learning opportunities. The shapes are secured by poking bits of pipe cleaner through the shapes and into the foam. The kids loved doing that and really enjoyed that the legs and arms could move once they were secured with the pipe cleaner "bolts."
  • The featured book, "The Robot Book," by Heather Brown was a bit hard to find locally since it currently out of print but it is being rereleased in June. I ordered it from Amazon and it has become a favorite in our house. It talks about the parts of a robot, but it is ultimately what's inside the robot (it's heart) that counts. You could get along without the book, I guess. But I was glad to have it. It is a board book with moving parts which tied in perfectly to our robots. 
  • I was able to buy the craft foam sheets for the shapes at Michael's and just spent a few minutes cutting random shapes out of the foam: big rectangles, little rectangles, squares, half circles, and triangles. I also had peel and stick hearts and stars available, too. Maybe having circles would be nice, but I didn't have any and I wasn't going to cut them!
  • I bought the 1/2" thick styrofoam sheets at the dollar store in the floral section. They were 12" square and I was able to get three 5" x 7" rectangles from them and then I used the scraps to piece together another one (so I got four 5" x 7" styrofoam pieces from one 12" x 12" styrofoam piece). I hot glued the styrofoam rectangles to an 8 x 10" piece of mat board.
  • The only thing we used glue for were the googly eyes.
  • I encouraged the children to add details (button, switches, patterns, lines) with a Sharpie. They were more than happy to do so!
  • I worked with about 6 children at a time and at the other "stations" or centers they could play with gears (like Deborah suggested) or play Robot Bingo which I picked up at the dollar store (score!!).
It was a great day and I had a lovely afternoon with the children! They were all so proud of their robots and had a great time exploring shape and line and form. Thank you to Mrs. Greany for having me visit and to Deborah at Teach Preschool for the super-awesome lesson!

Friday, March 29, 2013

Easy Art Activities For A Snow Day Or Any Day (Part 4)

This Part 4 in a multi-part series. Here are the previous posts you may have missed:
-------------

Here's The final installment of this series on encouraging artsy times when you and your children have a day off. I've encouraged you to gather supplies and ideas and let your children play with and explore the art supplies. I also shared a couple of art projects we've been doing in our house during our down times. Now, the final piece to the puzzle: YOU!

4. Stop Cleaning The House and DO ART WITH YOUR KIDS! Specifically: Origami!

I constantly struggle with this one. I have a to-do list a mile long and when the kids are home, it seems as if I clean even more! When they are home on a snow day, I am mopping up puddles of melted snow, picking up four sets of snow boots (again and again!), hanging up snow pants to dry, making cocoa, getting snacks (again?!?), etc. etc. As the day goes on, I find myself getting more and more frustrated as I try to "get stuff done" while the children vie for my attention. So, my advice for you: stop cleaning and play.

Play dominoes, build a snow fort, make a yummy treat, sit and do a craft. The dishes will wait, the laundry will be there later. You'll be spending time with your kids and, let me tell you a secret, after you spend some time with them they MAY even run off and play and you'll have time to fold the laundry. Maybe. If not, you'll relax ad have a good time for a few minutes which is better than yelling "go play!" and fuming while you do the dishes.

One type of art that is great for mommy and me time (with Kinders on up) is origami. I have done origami with all three of my boys and it is fun and addicting! You don't have to have any special paper (you can use copy paper cut into a square) and you can look up directions online for all sorts of awesome ideas! If you are interested in books on origami, your local library will probably have a few and we like the "Origami Kit" with three books from Dover Publications that I featured in this post.


I've seen this kit at AC Moore and Michael's. It is seriously the best!
So great for a holiday or birthday gift!

Here's Number 1 Son creating a sailboat and fish mobile.
Check out the post for that here.
And here's a lovely wreath that will get you thinking "Spring!"
even if it is still 20 degrees and snowing in your area!
Check out the post for this here.

I also picked up this great flipbook by Toshie Takahama called, "Quick and Easy Origami" that is absolutely great! My six-year-old can make many of the projects in the book himself, and we've spent lots of time making dozens of pieces from this book. The kit on Amazon comes with paper so you are ready-to-go when it arrives. Another lovely gift idea!

Toshie Takahama's book called, "Quick and Easy Origami"

Some ideas to go beyond just making random pieces of origami:
  • Make a scene with different pieces of origami glued to a background. Take the little doggie from Takahama's book and glue it to construction paper and add some grass, some origami flowers, an origami bird in the sky, an origami fish swimming in a paper pond--use your imagination to create an entire scene made from origami elements. How about making a spring scene? 
  • Make tiny origami, or HUGE origami. Origami is created from a square of paper. Once you find a project you like, try using different size squares of paper. We made a samurai hat from a traditional piece of origami paper and then used all different sizes of squares to see how big we could make the samurai hats--could we make one to fit our teddy bear? Yes! We used a 24" square to start with. Could we make a samurai hat to fit us? Yes! We used a square cut from a double-wide sheet of newspaper. Use newspaper or wrapping paper to create the largest squares you can and fold away! And how small ca you go? Can you make a piece of origami from a 2" square? How about a 1" square of paper? Have fun experimenting.
  • Make an origami gift. Some of your experiments from above, are great for gifts. Little origami creations make great decorations on cards (send one to grandma to let her know you are thinking about her) and super huge origami can be a gift in itself! Make a wearable samurai hat for your friend--just fold up a super-huge piece of paper into a hat and paint it with tempera paints. Awesome! For a more sophisticated gift, you can use beautifully patterned origami papers to make art that can be mounted on mat board and given to mom, dad, grandma, or a grad for a special occasion. How unique! Here are some great picts of how the samurai hats and shirts can be used to create great pieces of art. I'm planning on making the samurai hat one for my sister for her birthday--I think it looks just like a quilt and she's an avid quilter.
  • Amaze your children and make origami from money! Yep, there's nothing like grabbing a dollar bill from dad, folding it into a tiny button-down shirt, and then giving it to your kid. Not only are they amazed at your coolness of being able to make origami from money, they think it's great they tricked dad out of a dollar bill--hee hee! This kept my kiddos busy while we waited for dinner to be served at a restaurant and they had me leave the waitress' tip that way. Just do a search online and you'll see all sorts of ideas for making little creations from money.
Have fun and enjoy this time with your children! I hear this time goes by quickly--it's time to make memories...


Wednesday, March 20, 2013

Easy Art Activities For A Snow Day Or Any Day (Part 3)

This Part 3 in a multi-part series. Here are the previous posts you may have missed:
------------

So your children have moved beyond experimenting with art supplies and you need some ideas to engage them? No problem! My solution? Collect, save and access art ideas as needed.

3. Gradually Gather and *Actually Use* Easy Art Ideas

Before Pinterest, I was a ripper. If I saw a cool art or craft idea in a magazine...RIP!...it was torn out and filed away. But that takes up space (which I don't have) and if you are a piler (like me) I'd have to sort through MOUNDS of ideas to find the one I was looking for. If you are a filer, it would be easier, but who has time to file!?

So I love Pinterest. It allows me to pin ideas and categorize them (quasi-filing) and access them later. I rarely rip stuff out anymore (which is helping the clutter a bit).

The point is--gather ideas as you go. If you see something that you think your child may like to do in the future--grab it and file it so you can easily access it in the future. Think easy projects with supplies you are likely to have on hand. Then, on snow days or lazy days at home when you hear the "I'm bored!!" posse coming for you, whip out the ideas and look through them with your child. I often browse my "Art Ideas" board with my five-year-old in the mornings when he needs to create but can't think of something. Sometimes just looking at a picture of a project is enough and he'll run off to the art center and create-a-way. Sometimes I need to get involved and gather some special materials not in the Art Center and walk him through getting started.

We've done a TON of projects this way! It's great because we are actually doing the things I pin (my Pinterest surfing is not in vain!) and he's practicing his cutting, gluing, collage, and painting while being truly engaged since he's the one choosing the projects.

So here are a couple of pin-worthy projects for you to keep in mind for the next day off:

Aluminum Foil Quilt Squares
These are easy and addicting and all of my children were able to do them (even the 2 1/2 year old with a but of help). We mounted a few of them on mat board to protect them and make them easier to display. I found the instructions here at Piikea Street.


Chalk Shapes
This project kept my little ones busy for a while the other day. Cut a shape from cardboard (we used cereal box cardboard), put a little roll of masking tape on the underside to keep it still on your paper and then place it on a dark piece of paper. Trace around it with colored chalk or pastels, then *before you remove the cardboard shape,* gently wipe with tissue to smudge the chalk a bit. Ta-da! Beautiful!


Other Projects to Check Out:

LOVE these Magic Carpets from mnartgal.blogspot.com--they use materials you have on hand and who wouldn't want to make a magic carpet and go to a far off land! Where will YOU go?


And check out these Paper Sculptures from Sharpie Woman! Awesome! My five-year-old made a ton of these last week and even the two-year-old tried her hand at them. They are fun on a shelf or hung on the wall ad are a great way to use up all of those paper scraps you've been saving in your Art Center!

Other ideas to get you started? 

  • Use masking tape to "write" your name on cardboard or poster board, paint over the whole thing and then remove the tape for a great sign for your room!
  • Try your hand at printmaking using Legos or other found objects around your home (ask mom first!!).
  • Make Magic wands or fairy wands or search the web for "Notan" for some paper-cutting fun! I have an easy version of this here with my "Positively Cute I Love You Project."
  • Get out the clay and make dinosaur fossils or press found objects like sea shells into the dough
  • Make a snow sculpture outside or bring a bin full of snow inside and make a snow sculpture in your house! Or make a snow fort inside for your Playmobil guys or Matchbox cars!
  • And of course, you can always search the Create Art With Me site for more inspiration! (Hint hint!)

What are some of your go-to projects for easy fun? Anything you've done that engage your kids for awhile. I'd love to hear about them!

Friday, March 15, 2013

Easy Art Activities For A Snow Day Or Any Day (Part 2)

OK, so now you have an Art Center full of inspiring art supplies and you are raring to go! But what are you going to do with all of that stuff? Some children don't need any encouragement--they see the art supplies and they know exactly what they are going to do with them. That's great! 

Free play and exploration of supplies is so important to a child's creative, cognitive, and motor development...BUT, I have to advise you...you are going to have to be flexible. Many children go through a phase where, to a grown-up, it looks as though they are "wasting" supplies. If you haven't experienced it--just wait! I'm talking about puddles of goopy glue, sticking every sticker they can find on their paper, whole rolls of tape shmooshed into a sticky, tangled ball, cutting and cutting until there is confetti everywhere! It's the way it goes--not all artsy activity is going to produce a masterpiece.

My youngest is just getting into the
"cutting and cutting until nothing is left" phase...

Here are my tips for allowing your child to explore the Art Center during this stage of development:

1. Relax. You've set yourself up for success by actually having art materials and tools available to your child, now you have to let them go (a bit). I'm not advocating letting them be truly wasteful on purpose, but they are going to want to "draw" with the Elmer's glue and then float scrap paper bits in it. They just are. Think about how you react to your child exploring, taking creative risks and creating. Is getting stressed and yelling really going to create good feelings about art?

2. Don't buy expensive stuff. If your child is in the "experimenting" phase, this is not the time for artist-quality supplies. Buy washable, inexpensive products when they are on sale (ie. back-to-school time) and keep the "extras" away. Buy a cheap ream of copy paper, an inexpensive sketch book, reuse scrap paper, keep those bits of construction paper and reuse them, buy some things at the dollar store...you get the idea. You won't stress out so much of your child goes through a entire roll of dollar store tape or breaks a box of inexpensive crayons into bits--again--if you are buying kid-friendly products. There will be time for special, fancy art supplies and those fancy supplies will be even more special when your child receives them when s/he is ready.

3. Monitor what you put out. If the scissors are not being used properly (cutting the air, cutting someone's hair, running with scissors, etc.), then they go away. Crayons being broken (or eaten) even though you've explained it is against the rules? They go away too. If too much is being removed, you may need to rethink the free-spirited art center at this time. Perhaps you set aside time to sit with your child to show him/her the proper way to use the supplies. Danger = Not Good, Not Respecting Supplies = Not Good. You will have to determine what your child can understand with regards to rules and expectations for "proper use" of supplies.

4. Meter what you put out. You don't keep all four bottles of Elmer's in the Art Center when your child is going through the "painting with glue" phase. But, you can keep a 1/2 full bottle in there. I can wipe up a half bottle of glue, if necessary. Same with construction paper. If your child is going through the "cut with scissors until there is nothing left" phase, keep just a couple pieces of construction paper in the Center or teach him/her to choose the recycled paper to shred.

5. Have an open mind. What we think of as "art" is not what a 3-year-old thinks of when creating. Sure, you can do projects together, but be flexible. I have seen parents so focused on the finished product that they take over the project while their child looks on. I've also seen people literally hold a child's hand and guide them to place the elements of a project. This is not assembly-line work. This is fun, this is exploring, this is creativity.

6. Think of this as a "teachable moment." Be involved. Saying things like, "This is how we use scissors safely," "Oh, see how goopy this gets when there is so much glue?" and, "How about we use the scrap paper if you are going to cut, cut, cut it up?" It's a process, but children eventually learn how to use art and craft supplies safely and properly.

7. Be OK with throwing it away. If your child is attached to an "experimental" piece and proud of it, hang it on the wall and have him or her show it to visitors. But some of these pieces in this experimental phase get forgotten the minute your child is done with them. You'll be hanging some strange stuff on the wall during this phase, but if your child is loving the work than you should too.

None of this is rocket science, but how your respond to your child in these beginning phases of art-making and exploration is really important. Exploration of tools and media in a healthy, encouraging way creates confidence, increases fine motor control and problem-solving skills and this time will be remembered fondly by you and your child for years to come!

Here's an easy project to do with your child that will remind you to relax during this phase of your child's development. Print this little poem on card stock, add some little handprints, a photo and hang this in the Art Center to help when you are picking up paper confetti and goopy glue. The kit for this piece was given to me when I was pregnant with my first child, so I'm not able to track down the original source.

 Enjoy!
Sorry I couldn't show you the entire piece--it has my kids' names on it.
This is a lovely Mother's Day or any day project!

When I'm big you won't remember
the mud I tracked on the stairs.
Instead I hope you'll hear
my laugh that eased your cares.
The smudges that I leave on walls
will someday fade away.
But the memories of my first steps
will be cherished every day.
As for these two handprints,
Someday you'll be glad
We took the time to make a mess
That didn't make you mad.

Wednesday, March 13, 2013

Easy Art Activities For A Snow Day Or Any Day (Part 1)

I had originally wanted to call this post "Artsy Ways To Survive (Yet Another Snow Day) With Children" but it seemed a bit desperate-sounding...

We just came off of our Winter Break and then this past Friday the kids had a snow day. I'm a homebody (as are many of my kids) so when we have days off we hang around the house. But I'm trying to discourage the amount of screen time they have and I found out that yelling, "Go Play!" over and over at them doesn't usually work to encourage them to find something to do...so in this series of posts, I'll share some tips for days at home with kiddos, be it a snow day, a lazy weekend or a school break.

1. ENCOURAGE CREATIVITY (Also known as "Set Yourself Up For Success")

All of my children are creative, but in different ways. One of them MUST do art every day. I used to keep all of my personal art supplies, my classroom art supplies and my children's art supplies together in my office. Problem? Well, I was constantly running back and forth grabbing supplies for my children, they were always getting into my classroom supplies and using things I had set aside for an upcoming class, and after a creative binge, the cabinets looked like a tornado went through...so I finally figured it out. If I want my kids to be creative, they need access to supplies and they need to be able to put them away themselves. I want this to be 100% access all the time. So, where do they work? The dining room. Where are their art supplies? The dining room.

Our house is small and this set-up isn't going to earn us a spot in Better Homes & Gardens, but this works right now for us. I suggest setting up a temporary art center in a corner of your home and trying it out and making adjustments before buying fancy organization "stuff." See how your children work and do what works for your family.

Here's a tour of our ART CENTER:

LEFT DOOR: Restickable hooks hold regular scissors ad decorative scissors, the red thing is a apron.
TOP SHELF: Elmer's glue, glue sticks and tape such as masking, electrical, duct, and clear tape,
there's a bin for watercolors with brushes, watercolor paper and a water cup, old yogurt bins hold colored pencils and markers.
BOTTOM SHELF: a bin of assorted punches, Twistables, a sketchbook for each child, and a slot filled
construction paper, a bin of crayons with a crayon sharpener.
RIGHT DOOR: rulers hanging on restickable hooks
My kids usually prefer to work at our dining room table, but we're
trying out this table-turned-desk. There is a roll of IKEA paper on there
(which they actually never use)
This ain't pretty, but it is a repurposed bookcase with a place
for "How-to" books o drawing and origami and coloring books,  along with
bins for clay, recycling and interesting bits for sculptures, etc.
along with our scrap paper bins organized by color
(I know that seems a bit weird, but it actually works well so you
can find the paper color you need fast).

Other things that are not shown here but are available to them, on an as-needed (mom-involved) basis:

Tempera paints
Acrylic Paints
Hot glue gun and glue sticks
Higher quality watercolors and paper
Higher quality paint brushes
Craft stuff such as beads, pipe cleaners, craft sticks

I keep the above items high up on a shelf in another room. Every once in a while I take a handfull of crafty supplies and leave them in their art center as an invitation to create, but I wouldn't leave the whole box of craft stick or pom poms out--they'd be gone in a day (or more accurately strewn all over the house)...if they decide they need 100 craft sticks I can always bring the bin out and they can use however many they need.

I must say that I've tried MANY versions of an art center with my kids over the years and usually I have to pack most of it away once I have a new baby and they start walking (and putting the art supplies in their mouths), but at this moment, we are out of the baby phase so I can keep this stuff available all the time.

The addition of an art center to our home has increased creativity for all and I see the children choosing to "do art" more often and it is a cinch to clean up (for both the children and me) because everything has a place.

So, take the plunge and create an art center for your home today!

Wednesday, January 9, 2013

Peek-a-boo! Who's In The Shelter? Science and Drawing


This is a fun project for kids of many ages, especially if they are learning about shelters and habitats and hibernation. This sample was done by my Kindergartener and he had a fun time drawing from photographs (it's too difficult to get a chipmunk to sit still!) and he was able to use the pictures I had on hand to create his own version of the chipmunk, complete with bushy tail (most of the tail is inside the tree).
Peek-a-boo! It's a chipmunk!

Critter In The Hole of a Tree

Supplies Needed:

• One 9" x 6" piece of brown construction paper• Scraps of brown paper• One 9" x 6" piece of black construction paper• One 9" x 6" piece of white card stock• Pictures of the critter you choose• A piece of wood to use for rubbing (make sure it has a nice, raised grain), optional, you could draw the wood grain• Dark brown and/or black crayon• Colored Pencils• Scissors• Stapler with staples

Directions:

1. Choose the critter you'd like to draw. I talked to my son about the types of animals that would live in holes in trees and under the trees among the roots. He chose to draw a chipmunk. I gathered a couple of photos of chipmunks for him to reference.

2. Draw the critter on the piece of white paper. I drew a line on the bottom edge of the white paper about an inch and a half up from the bottom, so that my son wouldn't draw the animal too low (you want to be able to see the critter when the piece is all together). I told him to draw the chipmunk about 4-5" tall (about THIS big, I showed him with my fingers). You don't want to make the critter too small--we need to be able to see it!

3. Color the critter with colored pencils. Use the pictures as a guide to make the colors just like in nature. Cut around the critter, but leave the 1 1/2" border along the bottom edge of the critter. This bottom border is how you'll secure the critter in your project and it boosts him up so he's peeking out of the hole you'll make later. Set aside your critter drawing for now.

4. Place the brown paper on top of the wood surface and secure with tape. Use the edge of the crayon to rub and create the wood grain on the paper. We used our old wooden steps--the texture was just right. My son drew in one of the knots he saw since that didn't transfer well.

5. Cut a U-shaped section out of the wood-grained brown paper from the top edge. This is the flap for your shelter. Set aside for now.

6. Cut some 1/4" wide strips of the brown paper and crumple a few of them in your hands to use for nesting material inside the tree.

7. Assemble the project: Lay the U-shaped piece of construction paper (not the flap piece, the rest of the tree piece) on top of the black rectangle of construction paper. Staple along one side. Place the critter between these two pieces of paper, with the bottom edges of all the pieces of paper lined up an your critter looking out the hole. Staple along the bottom edge of your piece and up the remaining side. This will secure the critter in the hole. Stuff some of the nesting material inside around the opening of the tree. Replace the flap of the brown construction paper back in place and staple across the top edge to secure it to the piece.

Check out who's living in that old tree! What critter do YOU see?


The project with the flap closed--see the woodgrain?

Peek-a-boo!
This is a close-up in case you need it for assembly
or want to check out that cute critter even closer!

Thursday, October 18, 2012

Preschool Leaf Exploration

The other day I had a lovely class with a bunch of preschoolers at Peabody Mill Environmental Center. They stop by once a month to learn about science and nature and this month I was asked to teach them about leaves. This is what we did:

Outdoor Activity
We discussed how trees change throughout the seasons. Right now the leaves are very colorful and are falling to the ground since it is Autumn. We went on a leaf hunt and collected interesting leaves. We noticed how leaves can come in different shapes, colors, and sizes. A nice book that tied in with our walk was "Leaf Jumpers," by Carole Gerber. I quickly skimmed the book showing them the different leaf shapes and pointing out the ones that matched the leaves we had collected. We were able to collect red maple, birch, burr oak and regular oak leaves (as well as a couple I could not identify).

Indoor Time:
We discussed the seasons and talked about how trees look different in each season. I read the book "Leaves!" by David Ezra Stein and pointed out the trees depicted in each season. This is a cute book about a little bear who doesn't understand why the leaves are falling off of the tree, but is VERY happy (and reassured) when he sees new leaves in the spring. We were able to tell what season it was in the pictures by looking at the details in the illustrations.

Leaf Critters:
Once we came back inside with our leaves, we glued them to paper. We then added eyeball stickers to them and used a marker to add details such as arms, legs, wings, and/or antennae to make Leaf Critters. A good book that ties in with this craft would be "Leaf Man," by Lois Elhert.


Making Trees of Our Own:
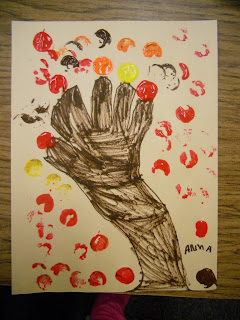
The children also created autumn trees using simple art supplies. This was similar to the project I did the other day with the Kinders at Clark, but I used smaller paper (9" x 12") and traced their hands and had them color the "trunk" and "branches" with crayons. Then they were able to use wine corks to stamp paint "leaves"onto their pictures. They came out very cute and this gave us an opportunity to try some new stuff (stamping/printmaking, tracing, coloring) while learning the parts of the tree and noticing all of those beautiful fall colors.


Additional Activities:
Leaf collecting is fun for little ones--it is nice to see how many different kinds they can find! You can keep the leaves as they are or glue them to pieces of paper to make a leaf book.

Leaf rubbing may be overdone in some people's eyes, but it is fun! One thing I've done (that I saw on Pinterest) is to take a big long piece of paper (from a roll--maybe the piece is about 6' long) and tape it down to the floor or on a long table with various leaves scattered underneath. Show the children how to use the side of a crayon to make a leaf rubbing and the leaves magically appear on the paper. I used newsprint on a roll with great results.

Additional Fall Books: "Why Do Leaves Change Color," by Betsy Maestro is a great book for older children (and for parents to read so that we can answer all of those questions about Autumn!). It is one of the Let's Read And Find Out series of science books. "Red Leaf, Yellow Leaf," by Lois Ehlert is also a good one, as is "When The Leaf Blew In," by Steve Metzger (this one is great for cause and effect and a bit of silliness!).

Sing a Song of Autumn: many sites have great songs to get children up and moving. One site I like is  Perpetual Preschool. What a wonderful way to end the day with a song!


Tuesday, October 9, 2012

Fall Trees With Cork-Stamped Leaves

I had the best time today with about 60 kindergardeners! I was asked to do an art project with them as part of a Fall-themed day their teachers had created for them. It was wonderful--the children were so happy and they were able to explore outside, do some fun movement activities (I joined in too!) and they also did leaf rubbings and this stamping project with me. Thank you so much to the Kindergarten teachers at Clark Elementary School for allowing me to come in for the afternoon.


This picture has a flurry of fall leaves
flying wildly all over--and note the piles on the ground.
I'm so glad I'm not raking all of those leaves up!

I shared a nice little book called "Leaf Jumpers," by Carole Gerber with the children. This book was different than I expected--it's a fiction book. It described the sound, shapes and colors of leaves and identifies eight different kinds of leaf shapes within its pages. This would be a great book to read before going on a leaf hunt! It got us thinking about the colors and shapes of leaves. It also had some very poetic ways of describing the colors of the leaves: "...flame bright and vivid like a match." The back of the book has a little page on the science of leaves and why they change color.

I had the children listen carefully since this project had tracing, cutting, gluing and stamping. We need to listen when doing so much stuff with our art.  I then gave them a quick demo on how to stamp using the corks: dip in paint then stamp gently on paper--no smooshing the cork around! We aren't painting with a brush. It's up and down only.

Next we went over to our tables and began to work. What a great time and a lovely lesson on color and printmaking. Enjoy!

Fall Cork-stamped Trees

Supplies Needed:
  • One 12" x 18" piece of construction paper for background (light blue or whatever color you'd like)
  • One 9" x 12" piece of brown construction paper for tree trunk and branches
  • Pencil
  • Scissors
  • Glue stick
  • Wine Corks
  • Paper plates for paint palettes
  • Red, Orange, Yellow, and Brown Tempera Paint
  • Newspapers to cover work surface
Directions:

1. Trace the child's hand and part of his/her forearm onto the brown paper. This will be the trunk and branches of the tree. Cut the tracing out (most of the children were fine with this--we only lost a couple paper fingers, er, I mean, branches. Glue the trunk and branches to the background paper, making sure the base of your tree trunk is at the bottom of the page.

2. Dip the cork into the paint and stamp leaves all over the paper, filling your tree with beautiful colored leaves!  It's important to have the children fill the ENTIRE top of the tree with leaves--not just a couple along the edges of the branches! No naked trees--this isn't winter. Make sure you get all four colors of paint on your tree.

That's it! A beautiful fall keepsake!

Fall Leaf Rubbings:

When the children were done, they could move over to a couple tables where I had long sheets of newsprint from a roll, taped down. Under the paper, I had placed different types of leaves. They then could use flat-sided crayons to do rubbings and discover the different leaves I had "hidden" under the paper. This was a nice project to keep little hands busy for the last five minutes of class.

Wednesday, September 19, 2012

Art and the ABC's of Ecology

I was asked to spend some time with 4-year-olds and talk about ECOLOGY. I said "YES!" and then ran to my computer to look up what "Ecology" was!

Ecology is: 1. the branch of biology that deals with the relations of organisms to one another, and 2. The study of the interaction of people with their environment.


You'd "B" Crazy Not To Try This Recycling Craft! (GROAN!)

I started off having the children play with blocks. We talked about how we needed to share the blocks. If one person took all of the blocks, there wouldn't be enough for everyone. This is a good way to illustrate the concept of REDUCE. If you use less, everyone can have some. Then I talked a bit about how people and nature can be connected. If we go on a picnic and throw our trash on the ground it will dirty up the environment and outside is where animals live--it is their home! Imagine our homes filled with trash! YUCK!

So we went outside with a shopping bag and looked for trash. They were good at that game and found quite a bit! We also talked about biodegradable vs. non-biodegradable. Leaves will break down over time, but a plastic coffee cup will not.

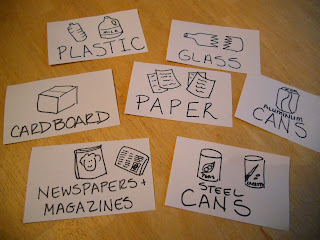
We went back inside and I introduced the next concept: RECYCLE. If we threw everything away or landfills will fill up quickly, and some of the stuff we throw away is still good or can be turned into something else. For example, water bottles can be turned into Polar Fleece fabric. I had a bunch of different recyclables on hand, in a pile, to show them. I had a ton of categories for them to sort the recyclables into (our town has a wonderful recycling center!). I had seven bins with labels such as:
  1. Paper
  2. Plastic
  3. Cardboard (Corrugated)
  4. Steel Cans
  5. Aluminum Cans (Soda cans)
  6. Newspaper/Magazines
  7. Glass (be careful with that!)
Here are my basic labels for the Recycling Bins

Then they sorted the recyclables into the appropriate bins. This went quite fast! I explained that other things can also be recycled: clothing, books and toys, by giving them away to someone who may need them.

On to the art project!

Recycled Letters

Supplies Needed:
  • Poster board (we used black)
  • Scraps of construction paper, magazines, newspapers, labels from cans, etc.
  • Glue stick
  • Scissors (young children can rip the paper if they aren't ready for scissors).
Directions:

1. Cut the first letter of the child's name from poster board. It should be about 10 inches tall and wide enough so that s/he has space to glue paper to the surface.

2. Have the child use the glue stick to attach bits of paper to the surface of the letter.

This project REUSES paper that normally would have been thrown away.

We then went back to the pond onsite and looked for trash and critters. We found water bugs and a frog and we also saw trash that we couldn't reach, floating in the pond, such as a tennis ball. This allowed me to reiterate the information I had talked about earlier about how humans and nature are connected and how our actions affect other living things.

Home Connections

To strengthen the learning this lesson at home, parents can do the following:
  • Discuss with children how they can be kind and not so kind to the environment.
  • Set up a recycling station at home and visit the Recycling Center in their town.
  • Look through outgrown toys, books and clothing and donate the items to those in need.
  • Go on a hike and/or picnic and be good stewards by staying on the paths and carrying out their trash and disposing of it properly.


Saturday, September 1, 2012

Clay and Paper Butterflies

Do you know some students who are studying butterflies? This is a great project for children in Kindergarten and elementary school. You can work in so many great concepts with this project: parts of an insect, symmetry, pattern, and more.


I started by having my students cut out the wings and design them and then I walked them through the making of the butterfly body. We finished up by adding the details such as antennae and legs. I really enjoyed this project because it taught science and art concepts, but it also because it allowed the students some self expression; a win/win in my book!

Clay Butterfly With Paper Wings

Supplies Needed:

  • One 6" x 9" piece of construction paper for the wings (light color)
  • Pencil with eraser
  • Scissors
  • Assorted markers
  • Model Magic by Crayola (about the size of a chicken egg), whatever color you want
  • 3 pipe cleaners (chenille stems), whatever color you want

Directions:

1. Fold the construction paper in half the short way (hamburger or taco fold).

2. Arrange the construction paper so the fold is on the left. Draw a capital letter "B" on the paper extending it so the top and bottom of the "B" touch the top and bottom of the paper.

3. Cut out the "B" shape, but don't cut the middle line (in between the upper and bottom bumps). Write your name on the paper and open it up so your name is face down. These are your butterfly wings.

4. Decorate the wings with whatever designs you would like: big dots, little dots, lines, etc. I showed a couple of butterfly books to the children before they started drawing. I asked them to make their designs symmetrical, or the same on both wings.

5. I then gave each child a ball of Model Magic the size of a chicken egg. I had them pull off a piece and roll it into a 3/4-1" ball. This is the butterfly's head. Place this ball of dough at the top of your butterfly's wings and press down slightly.

6. Divide the remainder of the dough in half (two equal parts). Form he first into a ball. This is the thorax for your butterfly. Place this ball of dough below your butterfly's head on the wings and press down slightly.

7. Roll the remainder of the dough into a hot dog shape about 3" long or so. This is the abdomen of your butterfly. Place this ball of dough below your butterfly's thorax on the wings and press down slightly.

8. Use scissors to cut each pipe cleaner into three equal sections. Poke 2 pipe cleaner pieces into the butterfly's head as his antennae. Wrap another pipe cleaner piece into a coil and poke it into the head for the butterfly's proboscis.

9. Poke the remaining 6 pipe cleaner pieces into the butterfly's thorax (3 on one side, 3 on the other). These are the butterfly's legs.

You're done! Enjoy your colorful butterfly!

Related Posts Plugin for WordPress, Blogger...