Showing posts with label kindergarten. Show all posts

Tuesday, April 19, 2016

Kindergarten Projects From My Long-Term Sub Gig

Hello!

So, it's been a busy Spring for me since I finished student teacherin' in December--I subbed a bit in preschool, kindergarten, elementary and high school and then landed a wonderful 6 1/2 weeks long-term sub gig at an elementary school nearby teaching art to grades K-5. What a blast I had--the students and staff at Fairgrounds rock and I was sad to go (it's hard to stop doing something you love when your next big thing isn't settled upon yet). Since then, I haven't blogged much because I've been daily subbing and working on my dang art teacher portfolio (more on that in a future post or ten). ANYHOW....I thought I'd break out some of the projects that appear in the collage here so that you had a bit more info on them...ENJOY!!
For more info on this awesome project--READ ON!
Kindergarten Art Projects From Fairgrounds Elementary School:

Week 1: Lots of Hearts (1 day)
A getting-to-know-you project.
Inspired by Valentine’s Day, students used chalk pastels to trace the outline of a heart shape (line) and then smudge the edges with cotton balls. Once the heart tracer is removed a glowing heart (shape) remains. Students were asked to repeat the procedure 5-6 times using whatever colors they wished.
 
Sorry, all I have of this project is my teacher example.
The finished pieces were WAY better!

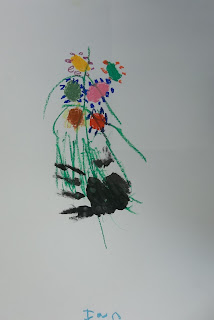
Week 2: Picasso Bouquets (1 day) See post here
Inspired by Pablo Picasso’s drawing: Hands With Bouquet
Students looked at and talked about the drawing “Hands With Bouquet” by  Pablo Picasso. Students then used oil pastels to create a similar bouquet of flowers using circles and ovals and vertical lines. When they were done, I painted the palm of their hand with black paint and they stamped their handprint onto the work to look as though they were holding the bouquet.


Week 3 and 4: Mondrian Mixed Media Collages (2 days) From Art Room 104
Inspired by the work of Piet Mondrian
Students looked at the work of Mondrian and discussed how his work was similar to (and different from) the work of Picasso. Students then used scissors to cut squares and rectangles from paper to create a collage. On day two of the project, students added horizontal and vertical lines to the work using scraps of mat board and black tempera paint.
 
This is the info I put with my displays.
Many people comment about how helpful the info is.

A student example.

The finished display--there's one class in here, I think.


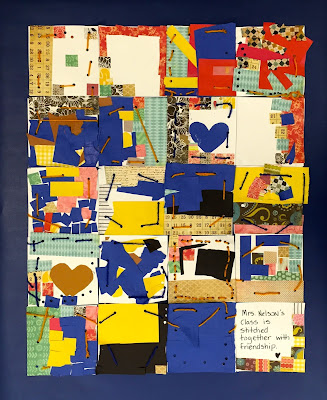
Inspired by the 19th and 20th Century Quilts from the Picturing America Series (Particularly the “Crazy Quilt” Image)
We reviewed the shapes we had been using the past few weeks and the art method they had used recently (collage). Students then used scissors, glue and a variety of papers to create individual quilt squares that had whatever colors and shapes they wanted. On day 2, the teacher used a hole punch to add holes to each quilt square (about 8 per square) and students used yarn to sew their quilt square. Individual student work was mounted together to create a whole-class composition displayed in the individual Kindergarten classrooms.

Each Kindergarten class made their own quilt for their classroom.

An example of a quilt square (they are 6" square).

I needed one more square and decided to create this piece--
the teachers LOVED the quote.
Week 7: Kandinsky group mural See post here
Inspired by Kandinsky’s color studies

Students used paint to create a composition of concentric rings based on the color studies by Kandinsky. Individual student work was displayed with other grade levels to create a multi-age group mural for the hallway.

A close-up of the individual 6" squares all glued together
onto the larger roll of paper using Elmer's glue (a dot in each corner).

The finished mural. Beautiful!!

Monday, March 7, 2016

Picasso's Hands With Bouquet With KINDERS


 I've been having a blast with the elementary students at the school I am working at temporarily. I've been having the Kinders explore art materials a bit and this week I thought they'd enjoy doing a project I originally posted back in 2013 as we continued our discussion about line and shape. This is not my idea, as you can read in the original post, but it's a great one that I'm sure I'll be doing again and again in the coming years!


The only thing I changed this time was to have the students draw all of their flowers first, then add the stems, and when they were done they could line up and they could make their hand print at the back of the room at a table by the sink (and near the drying rack). Other times I'd have them print their hand first and then add the flowers.

Again, it helps if you have a bucket or two of water ready for them to rinse their hands in and paper towels ready to go right near the sink (already ripped to single-serve sizes). This was a wonderful project that helped them explore some of the elements of art (shape, line, color) and explore a new material and technique or two. They have some really good observations and insight about Pablo Picasso's work and, it's a FUN project--I mean, who doesn't love to have their hand painted by the art teacher!!??

VOCAB: Pablo Picasso, bouquet, shape (circle, oval), line, color, drawing

CROSS-CURRICULAR CONNECTION: Science (flowers (petals, stems), spring), kindness/giving

MATERIALS: 12" x 18" white paper, oil pastels, black tempera paint, paint brush

Our inspiration!

ENJOY!


Friday, August 14, 2015

REPOST: Symmetrical Paper and Clay Butterflies

It's been a long summer here in New Hampshire--my kiddos have been on break since June 10th and don't start school again until September 8th--WOW! So, the long and lazy days of summer need some crafting with mom time. Here's a butterfly that Little Miss did today. This is a post from back in September of 2012, but it's a good one--very fun (and shhh....educational too!). ENJOY!


And here's the original post:

Do you know some students who are studying butterflies? This is a great project for children in Kindergarten and elementary school. You can work in so many great concepts with this project: parts of an insect, symmetry, pattern, and more.


I started by having my students cut out the wings and design them and then I walked them through the making of the butterfly body. We finished up by adding the details such as antennae and legs. I really enjoyed this project because it taught science and art concepts, but it also because it allowed the students some self expression; a win/win in my book!

Clay Butterfly With Paper Wings

Supplies Needed:

  • One 6" x 9" piece of construction paper for the wings (light color)
  • Pencil with eraser
  • Scissors
  • Assorted markers
  • Model Magic by Crayola (about the size of a chicken egg), whatever color you want
  • 3 pipe cleaners (chenille stems), whatever color you want

Directions:

1. Fold the construction paper in half the short way (hamburger or taco fold).

2. Arrange the construction paper so the fold is on the left. Draw a capital letter "B" on the paper extending it so the top and bottom of the "B" touch the top and bottom of the paper.

3. Cut out the "B" shape, but don't cut the middle line (in between the upper and bottom bumps). Write your name on the paper and open it up so your name is face down. These are your butterfly wings.

4. Decorate the wings with whatever designs you would like: big dots, little dots, lines, etc. I showed a couple of butterfly books to the children before they started drawing. I asked them to make their designs symmetrical, or the same on both wings.

5. I then gave each child a ball of Model Magic the size of a chicken egg. I had them pull off a piece and roll it into a 3/4-1" ball. This is the butterfly's head. Place this ball of dough at the top of your butterfly's wings and press down slightly.

6. Divide the remainder of the dough in half (two equal parts). Form he first into a ball. This is the thorax for your butterfly. Place this ball of dough below your butterfly's head on the wings and press down slightly.

7. Roll the remainder of the dough into a hot dog shape about 3" long or so. This is the abdomen of your butterfly. Place this ball of dough below your butterfly's thorax on the wings and press down slightly.

8. Use scissors to cut each pipe cleaner into three equal sections. Poke 2 pipe cleaner pieces into the butterfly's head as his antennae. Wrap another pipe cleaner piece into a coil and poke it into the head for the butterfly's proboscis.

9. Poke the remaining 6 pipe cleaner pieces into the butterfly's thorax (3 on one side, 3 on the other). These are the butterfly's legs.

You're done! Enjoy your colorful butterfly!

Thursday, November 13, 2014

Love printmaking? Try these lessons!

I've rediscovered printmaking over the last month or so. I love printmaking because it is easy and can be done on the cheap. Well, sort of. The process is always so fun for the students and the results are magical--I love to watch them "ooh" and "aah" over their prints!

Well, here's a round-up of some past printmaking lessons from my site that may have you rocking and rolling with your students!

Matching Mittens with Found Object "Snow" Prints

USING FOAM TRAYS:
Reduction Prints (Using Styrofoam trays and found objects)
Andy Warhol Self Portraits (Using Styrofoam trays and a pencil to "carve" an image)
Reduction Print Selfie (Using Styrofoam tray and gradually removing portions of it between inkings)

USING CRAFT FOAM:
Haunted Houses (Using sticky-backed foam shapes)
Fall Banner (Using foam shapes to make stamps--can be changed for any theme or season)

FOUND OBJECTS AS STAMPS:
Create Your Own Stamps (Using found objects and wine corks to make your own stamps)
Matching Mittens and Snowflakes (Cut paper mittens with found object "snow")
Focal Point Fruit Prints (Using an apple or pear to print--exploring focal point too).
Leaf Prints (This is mine, it's from Deep Space Sparkle, but it is my go-to early finisher activity in the fall).
Modern Day Adinkra Cloth (Using stamped symbols on sections of card stock that are joined together into one "cloth")
Spring Forsythia Still Life (Using pieces of sponge to make a lovely arrangement of forsythia blossoms)
Not-So-Scary Dancing Skeletons (Uses doggy bone treats for unique stamps)

USING YOUR HANDS:
Andy Warhol Hand Prints (Seriously one of my most popular posts, but not mine--from Artolazzi--so easy!).

And one of my all-time popular posts--
Quick Andy Warhol Hand Prints

Friday, October 24, 2014

Leaf Man Nature Collages

The beautiful fall colors are fading away up here in New Hampshire (since we've had days of rain and wind), but I wanted to share one of my favorite art projects to do with kids of all ages: "Leaf People (or Leaf Critters)" made with elements from a nature walk and inspired by Lois Ehlert's book, "Leaf Man."


My teacher followers might say, "YAWN. Seen it before." And you are right, but kiddos from Pre-K to 4th like doing this project and every time they do it, their pieces get more and more sophisticated. Also, their observations of the natural elements develop the older they get. What a great link to literature and science!

Here's the "Leaf Man"Book.
Another book by Ehlert that is also perfect
for this time of year is "Red Leaf, Yellow Leaf" as well...

My after-school kiddos were stuck inside due to rain, so I was responsible for gathering materials for this project. Ideally, I like to take students outside to gather/discuss leaves and seeds. Either way, it pays to have some teacher-supplied elements so that everyone isn't using the same shape leaf in their pieces. I collected about 15 different types of leaves, some twigs, acorns, and maple tree "helicopter" seeds, but I bet you could find even more than that given a little time. Collect the leaves right before you plan to use them since you want them to be pliable and not crispy.

Here's the abbreviated timeline for the project:

  1. Read the book "Leaf Man." How did the Illustrator, Ms. Ehlert, use natural materials such as leaves to make animals, insects, and people?
  2. Talk about background. Notice the backgrounds in the book--how are they made? Are they all the same?
  3. Show the students how to tear a piece of scrapbook paper in half in an interesting way. Now we have two pieces of paper. They can be layered this way (demonstrate) to create different types of backgrounds: a lake with mountains in the back, etc. Trade one of your pieces with someone in the classroom and practice making different backgrounds until you get one that you like.
  4. Glue down the background pieces onto a third piece of scrapbook paper using a glue stick.
  5. Create a leaf person, a leaf critter or both on your background. Don't glue the nature pieces down right away--try out different leaves and seeds. When you are happy, then glue it down using goopy glue (Elmer's glue). I had eyeball stickers on hand for them to add as well--the kids like that! But you could use googly eyes, draw the eyes using a Sharpie, or only use natural elements like Ehlert does.
  6. Let dry and enjoy!!
Here are some examples from class:


Did you know: The leaves used on the illustrations of "Leaf Man" were collected all over the U.S. by Ehlert and friends and color photocopied to retain their beautiful colors until she could create the illustrations for the book. What a great way to preserve the leaves--I wouldn't have thought of that!

Tuesday, June 24, 2014

A Project That Really ROCKS!

I'm a little behind with my postings, but I wanted to share this great project I did with my after school "Spring Into Art" class for Mother's Day. Not only is this a great project to show mom you care, it's great for pretty much anytime! I mean, who doesn't like painted rocks, wire sculpture and poetry?!? ;-)


This piece was made for me by my 4th grade son.
He enjoyed this project and liked writing the poem about me
(to read it, scroll down).

I linked this project to nature, of course, and Alexander Calder, since the wire portion reminded me of his stabiles and standing mobiles. Check out this one at his website, www.calder.org:


This project can take off in a variety of directions: you could skip the poem and focus on creating a mobile-like structure where students explore balance, or you could use wood or foam core for the base, or mount the poem or a famous quote to the base…it is really up to you! Although the poetry piece makes a great integrated arts project.

Here are the directions for the version we did…Enjoy!

Rockin' Stabiles

Supplies Needed:

  • A rock the size of a softball, or so…
  • Acrylic paints
  • Paint brushes, water buckets, paper plate palettes, newspaper
  • Medium gauge copper wire (I think ours was 24 gauge, but check to see what works for you)
  • Wire cutters
  • Poem/Thank You Note Worksheets
  • Pencils
  • Plain white index cards (we used 4"x 6" ones)
  • Fine point Sharpies
  • Pretty colored paper or card stock (optional)
  • Glue Sticks
  • Scissors
  • Craft foam scraps
  • Hole punch
Directions:

1. Select a nice rock for your base, brush it off and paint it with the acrylics. Let dry.

2. Choose a poem/thank you note worksheet to work with. I downloaded the Diamante template from www.ReadWriteThink.org for the students to use. I encouraged the older students (4th grade) to use those. For the younger students and ones who struggle with writing, I let them write a thank you note to their mom. I provided a template for the thank you note as well, to prompt them a bit. As a mom, either writing is appreciated! 

My son wrote this about me:
Brandie
Beautiful, Awesome
Cleaning, Cooking, Vacuuming
You are very awesome.
Resting, Eating, Playing
Cool, Calm
Mom

3. Once the students were done their writing, I proofread them (although I let some of the creative spelling go sometimes because it was just so darn cute!). Transfer the writing to the index cards using Sharpies to make a nice-looking final copy.

4. Glue the index cards with the final writing onto a pretty piece of paper to create a nice border around the poem.

5. Cut a piece of wire to about 36" long. Wrap the wire around the rock a couple of times and twist the ends. One end can be a spiral to hold the poem you've written, the other end can curl out and around like the arm on Calder's work. You can cut smaller pieces of wire to make a mobile-type structure at this time, but I had students cut a shape from craft foam, punch a hole in it, and hang the shape from the arm.

6. Place the poem/thank you note in the spiral portion of the stabile (you may need to secure the note on the back with a bit of tape).

Enjoy!

My other son, who is in first grade, was finding it hard to write that day,
so he painted the rock and created the wire heart sculpture instead.

Friday, June 20, 2014

Nature Walk Scavenger Hunt and Sketches

Are you heading outdoors with a bunch of kiddos to look around? How about a Nature Scavenger Hunt? A couple of years ago, I worked for the Nature Center in town, Peabody Mill Environmental Center, and they sent me off to a Kindergarten to do a class visit. I thought an outdoor exploration of the playground, discussion about plants and their parts, and a sensory nature walk/scavenger hunt would be great! I met with multiple classes that day and we had a blast!

This is a great project and can be adapted for an outing with a bunch of scouts,
a camp experience, an art classroom, general classroom, homeschooling field trip, etc.

Prepping For The Lesson:
This is a nice lesson that requires very little prep--although you may want to buzz around the playground before the kiddos join you, so you have an idea of what is out there that you might want to point out to them.

Also, you'll need to print out the scavenger hunt form--I used one from The Bird Feed NYC--they have a bunch of them there (and some other neat stuff too!). We would all be using the same form and filling it out as a class (each class got their own). I glued the scavenger hunt form to a large piece of construction paper, so I would have room to draw my diagram of a flower and its parts. I also wrote some good scientific words on the poster such as: look, listen, touch, smell, observe, identify, dissect, and collect (apparently I misspelled dissect the first time around!).

I also brought a bunch of star stickers, a sharpie for me, some pencils and sticky notes, too.

Starting Off:
I met the classes in the art room and told them that we'd be heading outside to do some exploring. We talked about using out senses to experience the world around them. However, we would not be using our sense of taste! No licking the trees! I then went over the rules for outside behavior and how we'd be working together to complete the scavenger hunt form.

Moving Outside:
We went out and sat down. We experienced the playground by using our senses and we discussed what we heard, saw, felt, and smelled. We checked off as many things from the scavenger hunt form that we could while sitting there--it was quite a bit!

Then I let the children move around and I pointed out a few things that I thought would interest them, such as a little mushroom I found, etc. We stopped and looked at a dandelion and we discussed the parts of a flower and I drew them on the poster and labeled the parts. They loved this part and they really enjoyed dissecting the dandelions and seeing up close the parts of the flower!

Wrapping It Up:
We took a couple of minutes to see if we could find anything else on the list, then I brought them over to the picnic tables and gave them each a pencil and a sticky note and invited them to draw a picture of something they saw, heard, touched, or smelled today on the walk. I them glued their sketches all around the edges of the poster and gave the finished piece to their teacher to display in the classroom.

In the future, I could make the poster a bit better, I think, but I really liked how this easy lesson came together and I loved the sketches the children drew--it was great to see what they took from their time outside.

Enjoy!


Saturday, April 5, 2014

Silly Seussical Hats at the PTA Fair!

Today I had a fun time at the second annual PTA Family Fun Fair making silly hats! I had a display about the Art of the Play explaining all of the different jobs or roles that people can do in a play (or behind the scenes) if they have an interest in dance, music, theater, building, drawing, painting, or playing an instrument! When putting on a play, there truly is something for everybody!


Yep, that's me in my silly hat--I wore it all day! I even saw a bunch of people
I went to high school with while wearing it! :-)
I had  originally wanted to have children create masks as a tie-in to the play and costume design. However, I didn't want the children to churn out the same masks or have it cost too much. But I wanted them to have fun and come away with something they designed to wear.

I decided to have the children create silly hats instead (or headbands if you want to be super-technical about it!). These are made from 1" and 2" strips of construction paper (12" long) and staples. That's it.

I toyed with the idea of bringing pom poms, pipe cleaners, feathers, hole punches, and peel and stick foam shapes, stickers, glue sticks, and tape. But I didn't. And it was great!

Some old friends stopped by to create and say "Hello!"
I did, however, make a few hats and pass them around for grown-ups who were working the fair to wear. And I was wearing the one in my pict above that demonstrated a few paper tricks (folding, twisting, linking, curling) and that got them going an showed them some options. I also had a poster showing some paper tricks (pretty much the same as above).

And then I crossed my fingers. Was it too simple? Would anyone want to make a silly hat? I did have a couple children look frightened at me when I asked them if they wanted to make one (kind of a deer in the headlights look!). Gradually, however, children (and some grown-ups) began to create and design.

I really suggest this easy, wonderful project if you have a little time and some paper strips (and a whole bunch of staplers!).

And thank you to the grown-ups who were such good sports!
This hat seriously went beyond anything I could have dreamed!

Some other projects that are like this, appear on these fabulous blogs, so check 'em out!

Seussical Landscapes from Mrs. Knight's Smartest Artists:
http://dolvinartknight.blogspot.com/2014/03/making-art-in-media-center.html

Cut Paper-Collage Hats from Art For Small Hands
http://www.artforsmallhands.com/2010/08/cut-paper-collage-hats.html

ENJOY!
Related Posts Plugin for WordPress, Blogger...