Showing posts with label line. Show all posts

Monday, August 12, 2024

Intro Drawing Unit: Line, Marks and Value, Oh My!


 Introduce your students to LINES, MARKS and VALUE in a fun a way that encourages exploration and play while being chock-full of information and skill builders!

There are FIVE sheets of skill builders that will get your students understanding LINE, MARK-MAKING and VALUE--each with mini activities for hands-on learning and to increase student engagement and understanding!

LINE:

  • Exploring different types of line in art
  • What is contour line?
  • Drawing with your eyes closed!

MARK-MAKING:

  • Exploring mark-making (ideas for using found objects or scratch art)
  • Mark-making value scale

VALUE:

  • What is a value scale?
  • Value scale practice and shading a sphere
  • Value challenge: Exploring the ways value can be made

This packet also contains a culminating actvity where students can explore different drawing materials and make Material Mark Cards. This activity is fun and allows students to practice what they've learned about LINE, MARK-MAKING and VALUE in a fun, low-stress way. I use stations for this, but you can set it up however you'd like.

All handouts are digitized for clarity and I've even included my tips and tricks to get you started.


Check out my Teachers Pay Teachers store for more info!


https://www.teacherspayteachers.com/Product/Intro-Drawing-Unit-Lines-Marks-and-Value-Oh-My-12018473


Friday, September 24, 2021

Sneak Peek: Tooled metal Line and Pattern Designs

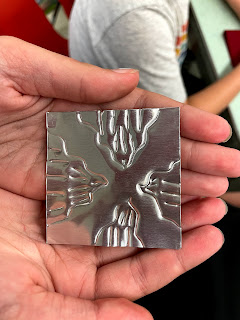
 We've started our first art project in grade 5 and it's one that the kids always love! We use tooling foil and create lines and patterns. We then attach them to mat board and extend the lines and patterns all over the board. 

I tie the work into our ARTifact of the week: Metal Ornaments from Mexico

Here's a sneak peek of what the kids are doing. I have them make three designs with pencil and paper before they start, but once they tool that first design, they have freedom to create three more of their choosing (I don't make them go back and plan--they can just go). 


I'm excited to see how these turn out and I'll post final pictures and a more complete write-up about the process later.

ENJOY!

5th Grade Experiments (LINE with Kwikstix)

This year calls for some outside of the box thinking! 

Don't they always?


I started out the year as I always do with a nametag project for the 5th graders art folders. This is a good way for me to:
  1. Get to know their names
  2. See what they can do
  3. Chat and connect with them in a low stress way
As I was doing this, I was noticing that some of my expectations needed to be adjusted. Our district had a remote option last year and some of the students hadn't been in school for 18 months. I did dive into our first "real project" but we have 90 minute blocks twice a week and those blocks can be looooooooong if you are a fifth grader (or their teacher) and it's been hot and sticky in the art room. 

So sweaty guys. So sweaty.

So once I got my bearings and had about two weekends in there to catch my breath and see this situation from some distance, I decided I needed to shake it up a bit. So things I'm doing this year:
  • Going outside for a walk during the 90 minute blocks (or a trip to the baseball field with the directions to "just run around for five minutes!")
  • Consciously incorporating movement into my lessons--having the kids come up to the board, have them act out directions, doing activities where they move instead of listen to me yap (like "four corners" activities for art room rules).
  • Doing big "experiments" with art supplies--even ones that seem a little "young" for middle school
  • When we have mask breaks, showing videos on youtube that are about different artists and non traditional art (they also like stop motion by PES, domino challenges and how things are made videos). 
  • Creating an outdoor classroom area right outside my door (so I don't have to schlep supplies and am more likely to go outside with them)
  • Going back to my Responsive Classroom training and asking LOTS of questions, modeling pretty much everything and stopping and retrying things if we need more practice with a procedure or task.
The kids don't know it yet, but our experiments are going to be used in these large scale animal collages (I'll post about those more later). Right now, we are relaxing, moving our bodies, playing with art supplies, working together and learning art room rules and procedures.

Here's our first "experiment." We were learning about line and pattern and making these great tooled metal creations but they started to lose steam during the 90 minute classes. I grabbed some large paper we have hanging around the room, taped it down and had the kids at each table take turns ("like you are playing aboard game") making different lines all over the paper. Once they'd filled up the paper from side to side, they could start to make more lines going perpendicular (and by this time all teammates were drawing together).


I LOVE kwikstix!! Like, a lot. They are so fun to use and the colors are vibrant. We also used the neon tempera sticks from Sargent Arts and those worked awesome too!

Yes, some students decided to go scribble-wild and I believe that is what they needed. I find that kids who tend to get into "the zone" and go scribble-wild or glue-wild or cutting-wild and just zone out and goooooooooo tend to need it. How do we know how much is too much if we never find out what too much is?


Anyway, high hopes for these changes in 5th grade and can't wait to see how our experiments become something AMAZING!!

Enjoy!

Monday, June 8, 2020

NEW OP ART VIDEO LESSON: Movement With Lines

Hello artists!

During distance learning I created a bunch of videos--I HAD to! Being an art teacher is sooo much easier when you can SHOW people what you are talking about! Some of the videos were just screen recordings I did in Zoom, and my philosophy, at first, was get the videos done to the best of my modest abilities so the students could connect with me and do the work. But towards the end, I started to get a little more fancy. 

Don't get me wrong. I didn't WANT TO learn how to do anything with video. OK, that's kind of a fib. I love to learn, but I had learned SO MUCH new stuff while being home for 10 weeks. So many new programs, so many new ways to get content out there to students (and did I mentione I was home with my four kids?). So many things in my brain!! I really didn't think I handle more or give more of my time.

But, I wanted the videos to be better. So I forced myself to try a video editing program. I chose to go free and online, so I tried out WeVideo. I really liked it! There was a 30 day free trial and I just sneaked this video in at the last minute. It's a how to for my most popular post ever--"Movement With Lines" this post has had almost 120,000 views since 2012.


I was looking back through the blog the other day, saw it, and noticed that in the comments someone had asked if I had a video for the lesson. Ummmm. No. BUT I COULD! I started planning the video out and, guys, I FORGOT HOW FUN THIS PROJECT IS!! Really, I ended up making a few just for fun.

I changed this up for students who were working at home--using index cards as the base for the art since I thought many people would have index cards on hand. I also scaled it down so that it could be done during one of my weekly hour-long Art-a-Long sessions I offered to students and families. If you want to go bigger (or smaller), please do! The original post has students use 8 1/2" x 11" paper and clever teachers photocopy the numbered lines on the back BEFORE having students do the work.

So, here's my quickly cobbled together video for "Movement With Lines." It's not going to win any video awards, but it's out there for the masses. I hope you can use it with your classes, your children and you try it yourself! I promise, it's fun and you can totally do it!

ENJOY!


Monday, April 25, 2016

Second Grade Projects From My Long-Term Sub Gig

 Here are some of the projects from my long-term sub gig that appear in the collage here so that you had a bit more info on them...ENJOY!! For the background about where I've been/what I've been doing lately, scroll to the end of the post...


OK, I just think this is the cleverest solution to the "Beautiful OOPS" project
described below--this tiger is just TOO cute!!
Check out the post below to see how it was made...
Second Grade Projects From My Long-Term Sub Gig:

Week 1: Winter Landscapes (1 day) Original Post here.
A getting-to-know-you project.
Students used crayons to draw a winter landscape focusing on foreground, background and atmospheric perspective. They then added watercolor to their work (watercolor resist) to add a colorful sky (sunset, nighttime, etc.).


Inspired by Vincent van Gogh’s Sunflowers
Students used Sharpies to create radial designed “sunflowers” and used oil pastels to add color to their work. Students then cut out their flowers and individual student work was mounted together to create a whole-class composition displayed in the hallway.
Oops, a little glare on the reproduction in the middle...
This display used two bulletin boards. This is display #1.
Display #2. Each second grade class had a vase of flowers.
My mentor teacher did this project with grade 1, this was done with grade 2,
but I think it could be done with a variety of grade levels.

A close up of one of the compositions.
The "table" is dollar store contact paper--easy!!

Week 3 and 4: Beautiful Oops! (2 day) 
This one was from my mentor teacher, Meagan Read, at Riddle Brook Elementary School
Inspired by the book, “Beautiful Oops!” by Barney Saltzberg
Students looked at the book, “Beautiful Oops!” by Barney Saltzberg and then moved through a series of stations where they made six “Oops!” on their papers.

  • Table 1: tear or cut a scrap of warm colored paper and glue to your background paper (up to 2 times).
  • Table 2: tear or cut a scrap of newspaper and glue to your background paper (up to 2 times).
  • Table 3: tear or cut a scrap of cool colored paper and glue to your background paper (up to 2 times).
  • Table 4: Dip the side of a cardboard scrap into paint and stamp onto paper to make a line (up to 6 times)
  • Table 5: Dip a mug into paint and stamp onto paper to make a ring (up to 3 times)
  • Table 6: Write your name on your background paper and then trace a circle tracer onto your background paper and cut it out (make a hole in your paper--1 time).

The next week, we looked at the book again and discussed how we could turn mistakes into masterpieces. Students then used markers and crayons (and imagination and innovation) to transform their mistakes into wonderful art.


The write-up that was part of the display.
A cute little guy!

"The Big Monster:"
This is me, the big monster.
I like to roar--it's fun.
I am roaring now.

"The Rainforest:"
The rain is in the trees and (dropping?) from the tree. 
"The Snowman Winter Clean-up"
The finished display got a TON of attention by staff and students alike.
It was colorful and creative and I often saw people stopping and reading
the captions written by the students about their work.
Note: If you are looking for cookie-cutter, pretty projects, this many not be
the project for you--but it is fun and creative!
Week 5 and 6: Juan Miro’s Fantastical Creatures! Check out my original post here.
Inspired by the work of Juan Miro that Mrs. Pettus saw on her trip to Chicago
Students looked at the work of Juan Miro and noticed the shapes and lines he used to create his images. Students then used dice to randomly select pieces and parts for their own creatures and fantasy compositions. Once the creatures, shapes and lines were drawn with oil pastel, students added a wash of watercolor (water resist) to the background to add mood. This was a wonderful project to follow the Beautiful Oops since students needed to adapt and use their imagination.


Week 7: Week 7: Kandinsky group mural Check out the original post here.
Inspired by Kandinsky’s color studies
Students used paint to create a composition of concentric rings based on the color studies by Kandinsky. Individual student work was displayed with other grade levels to create a multi-age group mural for the hallway.

A close-up of the individual 6" squares all glued together
onto the larger roll of paper using Elmer's glue (a dot in each corner).

The finished mural. Beautiful!!


----------------
Backstory for this post:

So, it's been a busy Spring for me since I finished student teacherin' in December--I subbed a bit in preschool, kindergarten, elementary and high school and then landed a wonderful 6 1/2 weeks long-term sub gig at an elementary school nearby teaching art to grades K-5. What a blast I had--the students and staff at Fairgrounds rock and I was sad to go (it's hard to stop doing something you love when your next big thing isn't settled upon yet). Since then, I haven't blogged much because I've been daily subbing and working on my dang art teacher portfolio (more on that in a future post or ten). Check the sidebar (over on the right side of the blog) for other posts in this series (k-5 at Fairgrounds Elementary School). ENJOY!!

Friday, April 22, 2016

First Grade Projects From My Long-Term Sub Gig

 Here are some of the projects from my long-term sub gig that appear in the collage here so that you had a bit more info on them...ENJOY!! For the background about where I've been/what I've been doing lately, scroll to the end of the post...
Here's lookin' at YOU! Check out the projects below for some
first grade ARTSY inspiration!
Grade 1 Art Projects From Fairgrounds Elementary School:

Week 1: Winter Windows (1 day)
A getting-to-know-you project.
We looked at the book, “Snowflake Bentley” by Jacqueline Briggs Martin. Students folded their paper to make four “window panes” and used crayons to draw four six-sided snowflakes (just like real snowflakes). They then added watercolor to their work (watercolor resist) to add a colorful sky (sunset, nighttime, etc.) and enhance the snowflake designs. The wet work was sprinkled with salt to add texture and interest to the work.

A close-up of one of the "Winter Windows"--
this light yellow crayon was easier to see than a white crayon on white paper.

Week 2: Aboriginal Bark Paintings (1 day)
A continuation of a project started prior to my arrival
Students used crayons to create mini circles within a photocopied Aboriginal design. They then added a black tempera paint wash to their work (watercolor resist) to enhance the designs. Finished pieces were mounted onto construction paper backgrounds.

No image of these--sorry!

Week 3, 4 and 5: Feathers For Lunch Collage (2-3 day) From Fine Lines
Inspired by the work of Mrs. Pettus--that's ME! (I've been doing collage work lately) and the collage artist Lois Elhert and her book, “Feathers For Lunch”
Students looked at the book, “Feathers For Lunch” by Lois Elhert and used different shapes and papers to create a collage composition of a cat and a bird. Details could be added using crayon and a real feather was attached to represent the one that got away—just like in the book!

Our inspiration!!
We talked about using shapes to make our cats and birds.
We used real feathers and oil pastels for fun details.

If a student wasn't in class the first week, they could make just the bird on week two.
This student was fascinated by the hole punches he found on the supply cart.

I love this cat's expression!


The finished display I copied from Fine Lines Blog--
it was perfect, so I just had to do it!

Here's the write-up that I displayed near the bulletin board-
it really helps everyone to see all of the details of this project
(as well as the National Common Core Standards in Art)

Week 6: Line Study With Pastels (1 day)
The attributes of line were discussed (length and direction) and then students took turns drawing different types of lines. Students then cut out a shape of their choice (emphasis on something that moves such as an animal or vehicle, etc.) and attached it to a piece of white paper. They used Sharpies to drew eight different types of lines coming from their shape and going off the edge(s) of their paper. Lastly, they used chalk pastels to trace their lines and smudged them to add the illusion of movement to their work.

Beautiful shooting star!

Some students chose to have a limited color palette, but they still turned out beautifully.

A flying airplane.


And this is a football flying back and forth between players--LOVE it!
We also had flying pigs, a giraffe or two, cars, superheros, a UFO, a couple of rockets,
LOTS of footballs, a unicorn, some cats and much more!
Week 7: Kandinsky group mural See post here
Inspired by Kandinsky’s color studies

Students used paint to create a composition of concentric rings based on the color studies by Kandinsky. Individual student work was displayed with other grade levels to create a multi-age group mural for the hallway.

A close-up of the individual 6" squares all glued together
onto the larger roll of paper using Elmer's glue (a dot in each corner).

The finished mural. Beautiful!!

----------------
Backstory for this post:

So, it's been a busy Spring for me since I finished student teacherin' in December--I subbed a bit in preschool, kindergarten, elementary and high school and then landed a wonderful 6 1/2 weeks long-term sub gig at an elementary school nearby teaching art to grades K-5. What a blast I had--the students and staff at Fairgrounds rock and I was sad to go (it's hard to stop doing something you love when your next big thing isn't settled upon yet). Since then, I haven't blogged much because I've been daily subbing and working on my dang art teacher portfolio (more on that in a future post or ten). Check the sidebar (over on the right side of the blog) for other posts in this series (k-5 at Fairgrounds Elementary School). ENJOY!!

Monday, March 7, 2016

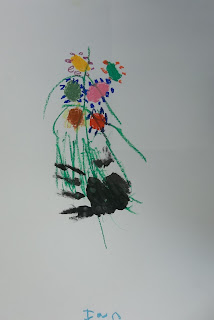
Picasso's Hands With Bouquet With KINDERS


 I've been having a blast with the elementary students at the school I am working at temporarily. I've been having the Kinders explore art materials a bit and this week I thought they'd enjoy doing a project I originally posted back in 2013 as we continued our discussion about line and shape. This is not my idea, as you can read in the original post, but it's a great one that I'm sure I'll be doing again and again in the coming years!


The only thing I changed this time was to have the students draw all of their flowers first, then add the stems, and when they were done they could line up and they could make their hand print at the back of the room at a table by the sink (and near the drying rack). Other times I'd have them print their hand first and then add the flowers.

Again, it helps if you have a bucket or two of water ready for them to rinse their hands in and paper towels ready to go right near the sink (already ripped to single-serve sizes). This was a wonderful project that helped them explore some of the elements of art (shape, line, color) and explore a new material and technique or two. They have some really good observations and insight about Pablo Picasso's work and, it's a FUN project--I mean, who doesn't love to have their hand painted by the art teacher!!??

VOCAB: Pablo Picasso, bouquet, shape (circle, oval), line, color, drawing

CROSS-CURRICULAR CONNECTION: Science (flowers (petals, stems), spring), kindness/giving

MATERIALS: 12" x 18" white paper, oil pastels, black tempera paint, paint brush

Our inspiration!

ENJOY!


Related Posts Plugin for WordPress, Blogger...