Showing posts with label bear. Show all posts

Friday, November 8, 2013

My Bear Mask With Plaster Gauze

I'm going to Grad School at Plymouth State University in NH to become certified to teach art. I'm having a great time and learning so much!

This is meant to have the face be vertical,
but my background wasn't big enough! Sorry!

The class I'm taking this semester is Art Methods and Materials For Elementary Education and it is SO FUN! We get to make art! Oh yeah, and write lesson plans and research papers...BUT, MAKE ART!

As a mom of four and doing all sorts of other things over the years, I don't make time for my own art--I'm not sure what my own art even is after all this time. But, I've been enjoying making art for this class. The last project we did was create a mask using plaster gauze. I had done this about a million years ago when I was in high school, so I was excited to think about possibilities for my grown-up mask.

We were challenged to create a mask that represents us in some way and it needed to have some sort of extension of some kind (we could use Cellu-clay, plaster gauze, cardboard, etc. to make the extensions).

Ahhh...the possibilities! I started to think about what I would be known for at the end of my life and I thought, "Well, people would say I was a mom." Of course, this is among other things, but I take my mom job very seriously :-)

I thought about creating a totem pole on my mask of all of the totem animals of my children, husband, and I, but as I designed it, I didn't really like how it was going. Then I focused on me. My totem animal, right now, is the bear. So here I am wearing a bear mask over a human mask, because there's always a part of me that I keep private.


I love constellations, so I have Ursa Major and Minor in the night sky. I love silhouettes too, so on the left, under Ursa Minor, you'll see my four little cubs. My daughter's the last cub scurrying to catch up to her brothers. My oldest son is turning back and watching over his siblings (just like in real life). And, on the right, there's mom, under the constellation of Ursa Major.


I'm happy with the way the mask came out--I had wanted to incorporate twigs and beads and such, but I stopped here to rest for a bit and think. I really enjoyed making this project and I could see making a series of masks: a marriage mask, a Mrs. P-only mask, an artist mask...I think it would be interesting to see all of the masks I wear.

So what are you making lately? Are you inspired by the projects you teach your students?

Thursday, December 8, 2011

Inuit Soap Carvings

I have been wanting to try this project for a long time! In my "Art Around the World" class we have a little extra time, so I thought it would be the perfect class to try an introduction to carving using soap and simple tools. I originally saw this project in the book "A Survival Kit for the Elementary/Middle School Art Teacher, " by Helen Hume. This is a wonderful book that has a number of great projects. I like how her projects have a "Teacher Page" with background info and alternative lesson plans as well as a "Student Page" that you could photocopy and hand to students to refer to as they work their way through the project.
Polar Bear, looking up.

I started class by flipping through the book "The Inuit: Ivory Carvers of the Far North," by Rachel A. Koestler-Grack. This book is full of great information and images that aided in my giving a brief background on the Inuit people and their beautiful carvings.

I then gave each student a copy of the Inuit Bear Carving Lesson plan from Dick Blick Art Supplies. That lesson is intended to be done by carving a foam block, but the diagrams easily translate to a bar of soap. The handout shows, step-by-step, how the child should carve the block to create a lovely 3D representation of a bear.

I really do encourage you to try this project with your child. It's wonderful to see them working and planning as they carve the soap away! Enjoy!

Supplies Needed:

  • Bar of soap (I used plain Ivory)
  • Newspaper (for working on and collecting soap chips)
  • Skewer or toothpick
  • Potato peeler, plastic knife and spoon
  • Plastic kitchen scrubber
  • Handout from www.dickblick.com (optional, but helpful)
Directions:

If you are creating a polar bear, you can follow the handout from Dick Blick. Some of my students decided to create turtles since I had brought in a carving of a turtle. I had them work from the figure and I walked them through carving the piece. 

I think older students could design their own carvings, but younger students or first-timers may have more success if they work from a plan. Or, if your student is comfortable "winging it," let them go for it and see what animal emerges from their carving!

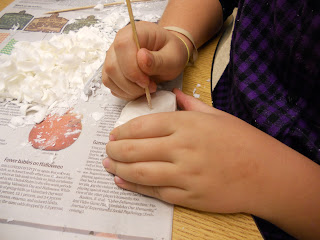
Carving the rough shape of the turtle with a vegetable peeler.

Adding the final details with the point of a skewer.


Another Polar Bear!

And a cute little turtle!

Related Posts Plugin for WordPress, Blogger...