Showing posts with label technique. Show all posts

Sunday, November 2, 2014

Fall Still-life With Glue and Pastels

Here are some pretty still-life creations my after school art class finished up this week. OK, I can use other, more "artsy" words like "dynamic" or "engaging" to describe these, but MAN, are they pretty, too! I've done this project before, and the students are always amazed at how the pieces come out (me too!). This group had students who are in first grade through fourth--so you can see it's pretty accessible to all with the right amount of scaffolding.


I made the mistake, this time, of using clear glue (gel and plain clear) since that's what other art teachers have said they used for this project with great success. I tried it because, in the past, I had found the regular  Elmer's glue can dry a bit cloudy. Anyway, I WAS NOT happy with the results. The clear glue soaked into the paper and ran off as the students were moving them to the drying space leaving drips and blops all offer the classroom and my car (a.k.a. the mobile art studio). It also soaked through the paper and glued the pieces to tables and the seats of my car...(big unhappy face for Mrs. Pettus) ;-)

So, if you do this project--which a HIGHLY suggest you try--use plain old Elmer's. It's fine for this project. So fun and magical (and "pretty")! Check out my previous post about this technique here.

ENJOY!

Thursday, October 24, 2013

Fall Compositions With Elmer's & Pastels

Fall is my favorite season and I have been LOVING driving my hour-an-a-half drive up to my Grad School twice (sometimes three times) a week...I pop in a book on tape and enjoy the beautiful fall folliage that New Hampshire has to offer! Ahhhh!


The focus of my after school art class for my 1st-4th graders is "Fall Into Art"--fall-themed art activities...last week, we drew apple still lifes inspired by Cezanne, and this week we took advantage of the nice weather and beautiful fall displays outside the school that had been donated by the Amherst Garden Center in Amherst, NH. The Garden Center had flanked the entrance of the school with pumpkins and gourds, hay bales, scarecrows, and beautiful mums! I couldn't ignore all of the visual stimuli out there ready to draw!

We spent some time looking and touching the displays, then we sketched them. We moved inside and selected one the things from our sketches to "draw" on black paper with Elmer's glue. The students were VERY skeptical when I told them we'd be drawing with Elmer's and you should have seen the surprised looks when I did my demo and piped glue along the lines of my drawing!

I had seen this Elmer's glue/pastel combination online before but had never tried it. I think it would be great for winter snowmen as well...

Anyway, we let the Elmer's glue dry (they rode around for a week in the back of my minivan--the mobile art studio.

The next week, I showed the students how to color in the non-Elmer's areas--the negative space--with the chalk pastels, encouraging them to add highlights and shadows to make their pictures really "pop" and look more realistic. I suggested using my "use at least three colors in each section" rule...

The students were VERY pleased with this new "technique" and, at the end of class, we discussed some other compositions they could use this technique on. The fourth-graders were very specific with their questions about materials: where I purchased the materials, what they are called, how much they cost. They want to make sure the next time they go to Michael's Crafts Store they purchase the proper things so they can do this technique again--THAT (to me) is a sign of a successful art lesson--my students wanted to take something they learned in class and go with it.

Enjoy!


Monday, August 26, 2013

Three Sisters Pottery Lesson

This pottery lesson is perfect for introducing Native American heritage and basic pottery techniques to children.

In this activity, children will learn how to make a pinch pot, a coil pot, and a slab pot.


Because of the complexities of the later clay techniques, this lesson is best for students in grade 3 or so. Of course, if you are working one-on-one, younger children may be able to complete all three pots. This would also be a nice project to spread across grades: have a first-grader do the pinch pot, a second-grader create the coil pot, and a third-grader complete the slab pot--THAT would be great!

Begin by reading the Legend of the Three Sisters to the children. With this legend, students are introduced to the foods, customs, and stories that evolved from the planting of corn, beans, and squash--the three sisters. This is a tradition of several Native American tribes from the northeastern United States.

For this art activity, students will create a pinch pot to represent a squash (mine looks like a pumpkin), a coil pot to represent a string bean (mine is open slightly so you can see the "seeds" or beans inside), and a slab pot to represent an ear of corn and the husk. I chose those particular clay handbuilding techniques for each vegetable since they shared similar attributes: the pinch pot is round and simple like a squash, the coil pot reminds me of the tendrils that allow the bean plant to clim way up high, and when I am shucking corn, the husks come off in sort of flat planes that remind me of the slab technique.

Here's the project! Enjoy!

3 Sisters Pottery

Supplies Needed:
  • Legend to read aloud
  • Real examples of pumpkins, green beans and corn in its husk to look at (or really great pictures)
  • Clay (we used Crayola air dry clay since I don't have a kiln)
  • Plastic knife, optional
  • Paint (we used tempera)
  • Paintbrushes, water bucket, paper towels
  • Newspapers to work on
Directions to make the SQUASH SISTER:
1. Take a bit of clay about the size of an egg and gently press your thumb into the clay squeezing the wall of your pinch pot between your thumb and pointer finger, moving around the wall of the pot, enlarging the opening. You're making a little bowl. Make sure the sides of the bowl don't flare out too much, since you are creating a pumpkin-looking squash. 

2. Once you are happy with your pinch pot, gently turn it over and use a plastic knife to gently make the indents you see in the sides of a pumpkin. Don't press too hard or saw through the dough, you are just adding a little interest to the pot. 

3. Use a pea-sized amount of clay for a stem and gently attach it to the center of the pot.

4. Let dry and use at least two colors to color the pumpkin and the stem of your piece. Let dry.


Directions to make the BEAN SISTER:
1. Take a piece of clay the size of an egg and pinch off a bit the size of a grape, set aside.

2. Take the larger portion of clay and roll it out into a big, long, "snake" of clay. 

3. Starting at one end, coil the clay around and around in an oval shape, gradually stacking the coil upon itself to make the outer portion of the bean. 

4. Divide the small portion of clay into three or four bits and create the bean "seeds" that are inside a green bean. They are kidney-shaped. Place them inside your coil pot bean. 

5. Let dry and use at least two colors to color the bean. Let dry.


Directions to make the CORN SISTER:
1. Take a piece of clay about the size of a baseball and roll it out on the table to 1/4" thickness. Make sure it is nice and even. For this part, I created a template out of cardstock that was a slightly curved,  elongated triangle. I had my children cut five of those triangles from the clay using the knife. Three will be the corn cob: before assembling, use the end of a marker or your knife to gently press corn kernel texture onto those three pieces. 

2. Gently pinch the edges of the three corn cob sections together to make a 3D corn cob.

3. Take the other two triangle sections and "scratch and attach" them to your corn cob--these are the leaves of the corn husk. Gently fold the corn husk portions down and out a bit.

4. Let dry and use at least two colors to color the corn cob and the husk of your piece. Let dry.


I printed out a copy of the legend, glued it to a scrap of mat board
and then hot-glued the three pots on there so the 3 Sisters can be displayed together.


-------------

NOTES: You may be able to use Model Magic for this project, I didn't have any to experiment with. In that case, you could use colored Model Magic and you'd be done quicker.

If you use air dry clay and some bits fall of during the drying precess, just attach with hot glue or tacky glue.

There are many follow-up activities to a project like this. You could have students write about their work, plant the vegetables mentioned in the legend, cook a recipe containing all three of these vegetables (search for Three Sisters Stew on the internet), act out the legend, and much more!

Here are two nice links to get you started:

Cornel University:
http://blogs.cornell.edu/garden/get-activities/signature-projects/the-three-sisters-exploring-an-iroquois-garden/

The Michigan Land Use Institute:
Has this wonderful lesson by FoodCorps Service Member Kirsten Gerbatsch from Michigan. This file is a pdf.

Thursday, August 25, 2011

Artist Trading Cards

Ahhhh...the internet. I need to set limits because there are just WAY too many good sites out there with WAY too many great art ideas and I get lost in a world of links! But, on the bright side, I get so many wonderful ideas and learn so much! One thing I see that intrigued me is something called Artist Trading Cards (or ATCs).
Some of the ATCs made by my boys (the "Make More Art" one is by me).

Artist Trading Cards are awesome! Started in 1997 by an artist in Munich, they are a great way for artists to showcase their style or ideas, but they aren't just for professional artists! Anyone can create ATCs--children, teens, or grown-ups! There are very few rules for ATCs: 1. They must be 2 1/2" x 3 1/2" and, 2. You cannot sell them--they must be given away or traded. This is a wonderful way for children (and grown-ups) to learn new art techniques and express themselves! It is also a wonderful way to spend time together as a family--grab some art supplies and sit down and let your creativity go!

For Me: Personally, I am embracing the ATC idea! I'm an artist but I am also a mother of four and an art teacher trying to grow my business--I don't get to do huge masterpieces right now. I'm OK with it, but sometimes I get an art idea and need to explore that. ATCs are just right for me!

For my children: I am also encouraging my children to do ATCs. My children love to collect and trade things, but I seriously WILL NOT pay lots of money for cheap trading cards whose sole purpose in life is to get children to spend money (oops, getting off the soapbox now...). Anyhow, ATCs allow children to create & explore and gives them something they are excited to trade and are actually connected to. Learning and fun--I'm all in!

Supplies Needed:

ATCs are easy and require no special supplies, unless you want to try different techniques. Here are some supplies to begin with:

  • Posterboard cut to 2 1/2" x 3 1/2" to use as "blanks"
  • Glue sticks
  • Scissors
  • Pencil and eraser
  • Markers, colored pencils, crayons, etc.
  • Stickers
  • Stamping materials
  • Neat papers (I have a scrap paper bin I brought out and I save neat papers from junk mail, etc).
  • Old magazines
  • Paint (tempura or watercolor) & paintbrushes
  • Old photos
  • Needle & embroidery thread
  • The list is truly endless!
Instructions:

1. Cut a whole bunch of blanks from posterboard. You'll need about 8 or so per person to get started. Once you get going--it is hard to stop!

2. Start creating! Think about the different ways you can create:

Drawing
Painting
Collage
Stamping
Ripped paper
Sewing (by hand or machine)

There is no right or wrong way to do these. Relax and have fun. Send me pictures of your ATCs--I'd love to see your creations! ENJOY!

Need more inspiration? Here are a couple of links to check out:
This month's Family Fun Magazine
A great mini tutorial on ATCs from http://www.cedarseed.com/ 

My disclaimer: While I do look at all references before sharing, I cannot look at every page of every reference. Please check out these references before sharing with your children, to verify that the content and images are appropriate for your child's age level and the content is acceptable for your family.


Friday, April 15, 2011

Medieval Metalwork

This week, in my art class, I showed the children how to do a simple technique that looks like aged metal. The children created frames and crosses and then added faux gemstones for a little sparkle!

Jewel-encrusted antique metalwork frame.

This year's art classes are all about Medieval times. We've done shields with coat-of-arms, marionettes of kings and princesses, stained glass dragons, and many other projects you'll soon be seeing in this blog (one day at a time!!). This week, I decided to have the children do a project that simulates metalwork. I was thinking of those large, heavy covers of illuminated manuscripts that were pieces of wood covered with tooled sheets of gold and inlaid with real gemstones (see below). Since my budget is a bit more limited than that--I thought we could use tin foil and plastic gems from a craft store.

Background Information:

Since medieval manuscripts would take many years to create and often were the life's work of many of the artists, the covers of these books were often just as elaborate. The covers were often a plank of wood covered with gold, jewels, enamelwork, precious metals, and ivory. One such example of this type of ornate work is the cover of the Lindau Gospels entitled, "Crucifixion with Angels and Mourning Figures." This piece is from The Pierpont Morgan Library in New York.

The cover from the Lindau Gospels uses a technique called repoussé "a technique by which metal reliefs are created. Thin sheets of metal are gently hammered from the back to create a protruding image. More elaborate reliefs are created with wooden forms against which the metal sheets are pressed (Art History: Volume 1, by Marilyn Stokstad, 1995)."

The project below is very similar to this technique. Enjoy!

Supplies Needed:
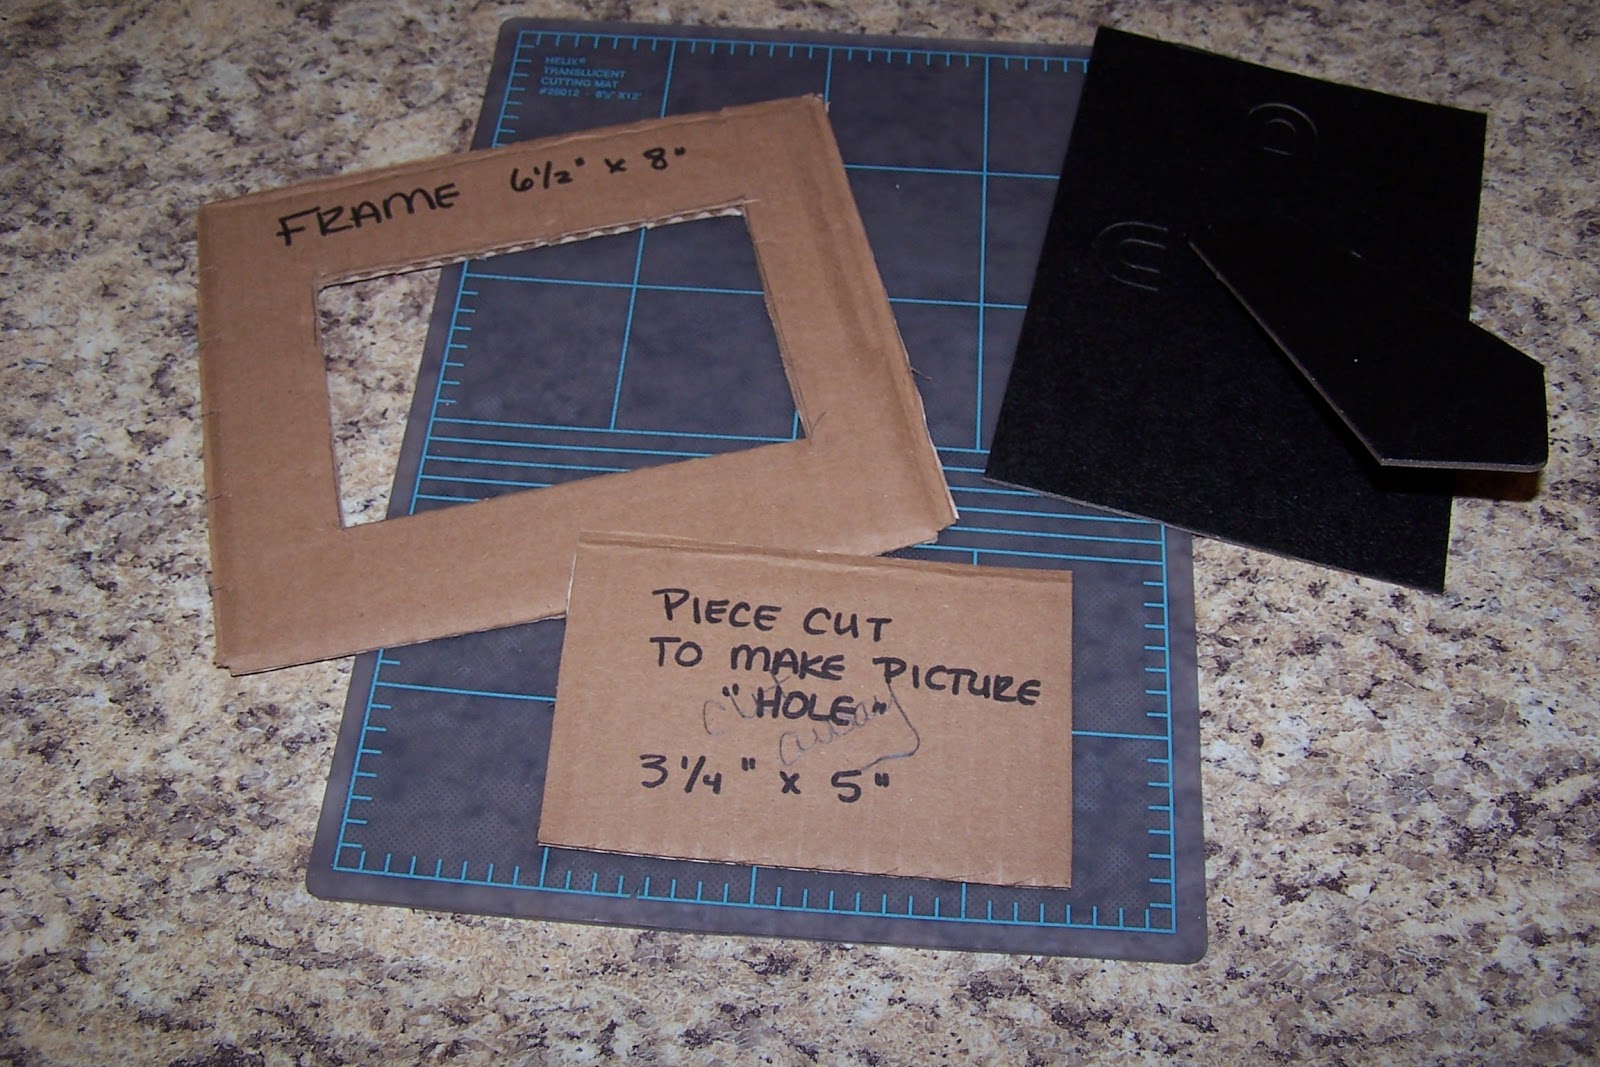
  • Corrugated cardboard cut into a frame shape (6 1/2" x 8') or a cross (a 3" x 7" piece of cardboard glued to a 3" x 11" piece of cardboard)
  • Self adhesive foam letters and shapes (optional)
  • Yarn
  • PVA glue (I use Elmer's glue)
  • Paintbrush
  • Water bowl and water
  • Scissors
  • Aluminum foil (standard household foil is fine)
  • Clear tape
  • Black tempura paint
  • Paper plate for a palette
  • Facial tissue
  • Glue gun and hot glue sticks (optional)
  • Plastic jewels (I bought mine at Michael's--they had a value pack of 1pound of "bling")
Directions:

1. If you are creating a frame, think about which way you'd like to have the picture displayed. This is important if you are doing lettering on your frame.
Here you can see the cardboard piece I'll be using for my frame as well as an easel-backed piece of cardboard from an old frame that I later glued onto the finished frame. That part is optional,

2. Create a design on the cardboard frame (or cross) using self adhesive letters and shapes. Words and phrases such as, "family," "best friends," "love," or your last name work well. You can also use yarn for the letters and shapes (and also for lines). Put a line of glue onto the cardboard and then gently press the yarn into it. Keep your design simple.


3. Once you have your design done, brush a thin coat of white glue all over frame. You can brush right over the foam shapes because the adhesive on the back of the shapes is nice and strong, but go gently over the yarn. You will want to go along the edges of the yarn you have glued down so that you don't mess up your design.
My design is done. Now I can brush white glue over the entire design.


4. Take a piece of foil that is slightly larger than your piece and gently crumple it--not too much or it will tear when you open it back up. Open the foil back up and smooth it a bit. Now lay it onto the frame over the glue on your design. Press gently all over your design, around the letter and shapes.
Gently smooth the foil over the design. Press gently around the yarn and foam shapes (if using). Be careful not to use your nails, since the foil will tear easily.


5. Flip the piece over and tape the extra foil to the back of the cardboard. If you are doing a frame, you'll need to gently cut an "x" in the foil in the center portion of the frame and fold back the foil there (and tape it to the back of the frame) so that you'll be able to see the picture in the center of your frame.


6. Now comes the messy part! Squeeze a bit of black tempera paint onto the paper plate. Dip your paintbrush into water and mix it in the paint to thin the paint a bit. Brush the thinned tempera paint over the entire front of your frame.


7. Now....wait! Leave your frame to dry for 10-15 minutes. While it is drying you can draw a picture to go in your frame. Will the picture be of your family? A pet? A medieval scene with a knight and a dragon?

8. Once the time is up and your paint is not quite dry, gently buff off the paint with a piece of facial tissue (it may take your piece a bit longer to be ready to buff--the paint should be "almost dry"). The more black you leave, the more "antique" the frame will look.


9. Use a hot glue gun, white glue, or tacky glue to attach jewels to the frame.
I live this tacky glue in a squeeze tube!

10. Attach your picture to the back--and you are ready to display your medieval work of art!

Variation: Easter is a wonderful time to do this project and create a cross! This technique makes a beautiful cross that looks unique. It is a nice project to do as a family--certainly a conversation-starter on many levels! Enjoy!
The same technique can be used to create a cross. I left a good amount of the paint on the edges to give this cross a very old feel. This picture doesn't do it justice--the jewels really shine and add sparkle. This would also be a nice gift idea.

Sunday, April 3, 2011

Watercolor Creatures

This project is a natural progression of last week's technical watercolor demonstration. Children can use a variety of techniques they learned in the demo. I originally envisioned fantastical sea monsters, but the majority of the children in my art class painted turtles (they are a favorite of the children). We also had a shark, a really large whale engulfing a fishing ship, and a jellyfish. (For the demo below, I painted a turtle since one of my sons loves them!). Whatever creature you decide to paint--have fun!


Supplies Needed (for each painter):

  • 1 piece of watercolor paper (I used 9"x12" Strathmore cold press watercolor paper from a pad)
  • 1 piece of heavy cardboard or foamcore board slightly larger than your watercolor paper
  • Masking tape
  • Pencil and eraser
  • 1 tray watercolors (I use Prang brand watercolors with my students--the colors are better quality than the dollar store/kid brands, 2 children can share a tray if necessary)
  • Water cup with water
  • Watercolor brush (The one that comes with the Prang set is fine, but don't use one from a cheap set, they are made of nylon and the results will be poor).
  • Ruler
  • Sharpie or other permanent marker (optional)
  • A drinking straw (optional)
  • Paper towels
  • Plastic wrap (optional)
  • Table salt in a cup or shaker (optional)
  • Crayons (I like Crayola brand)
  • Colored Pencils (Crayola brand or other good quality) (optional)
  • Reference books (Animals, Sea life, Shells, Dinosaurs, etc.)
Directions:

1. Tape the watercolors paper to the cardboard using masking tape.


2. Using a pencil, lightly sketch a real or imaginary water creature on the paper. Don't draw too small since it will be frustrating to color and paint all of that tiny detail. Also, think about the environment of your water creature: is there a water line? a ground line? are there plants or other animals in the picture too?

Don't forget to use your reference books if necessary. There is nothing wrong about having to look at a picture of a shark in order to draw one! Many of us cannot draw them from memory! Chances are, if you are using a photograph or a model, you will be less frustrated and your drawing will come out better.

3. Once your sketch is done, use crayons over your pencil lines. This is the wax (or crayon) resist technique we learned last week, so you will want to press firmly with the crayons. You can use a variety of crayon colors, but do all of your crayon work now.


4. Once the crayon is done, you can start painting in the areas of the painting. Remember, to let the paint dry before moving on to other areas so that the paint from different sections don't bleed into one another. In my turtle picture, I painted the sky first and then I painted the turtle. These two sections are far away from one another so I didn't have to worry about the paint bleeding between them as I work. I also suggest leaving the areas where you'll be using salt and/or plastic wrap until last since they can't be disturbed once they are done.
First I painted the sky and then the turtle.

Then I painted a wash for the top of the pond and applied plastic wrap.

I then used the wet on wet technique to add a few different colors for the pond water. While the pond water was still wet I sprinkled some salt on it to create "sparkles" in the water.
5. Leave your painting to dry overnight. Once it is completely dry, remove the plastic wrap and brush off the salt. At this time you can decide that your painting is finished, or you can use crayons and/or colored pencils to add a final bit of detail.
Once the painting was dry, I used crayons and colored pencils to add some texture to the sky, another lily pad to cover a mistake I had made, and to add some motion lines in the water around the turtle's legs.

What a masterpiece!! Enjoy!

Thursday, March 24, 2011

Technique: Watercolors

Everyone has used watercolors--it is usually the first paint that parents introduce to their children because it is inexpensive and so easy to clean up. Children are often content to mix and experiment on their own and churn out hundreds of watercolor paintings!

But if your little artist is looking for something new to try, check out the following tutorial for eight different ways to use watercolors. All of them are pretty basic, but can be combined to add textures and interest to a plain old painting!

An example of wax resist

Supplies Needed (for each painter):
  • 1 piece of watercolor paper (I used 9"x12" Strathmore cold press watercolor paper from a pad)
  • 1 piece of heavy cardboard or foamcore board slightly larger than your watercolor paper
  • Masking tape
  • Pencil and eraser
  • 1 tray watercolors (I use Prang brand watercolors with my students--the colors are better quality than the dollar store/kid brands, 2 children can share a tray if necessary)
  • Water cup with water
  • Watercolor brush (The one that comes with the Prang set is fine, but don't use one from a cheap set, they are made of nylon and the results will be poor).
  • Ruler
  • Sharpie or other permanent marker
  • A drinking straw
  • Paper towels
  • Plastic wrap
  • Table salt in a cup or shaker
  • Crayons (I like Crayola brand)
  • Colored Pencils (Crayola brand or other good quality)
 Basic Rules:

Read through the instructions BEFORE you start.
Gather all supplies BEFORE you start.
Be respectful & gentle. Good quality art supplies cost money, but they will last a long time if you treat them well.

I then give a quick talk about using the supplies properly. I show the children how to make paint by gently dipping their brushes and putting a small amount of water into the tray. I say, "we aren't making mashed potatoes or scrubbing a pot!" We have to be gentle with the brushes.

I also remind them what a paint tray looks like after a 2-year-old is done painting: all messy and black.  Between color changes, artists need to gently wash their paintbrushes in water (if it gets really dirty--get some fresh water!) and dab them on a paper towel.

OK, let's go!

Directions:

1. Begin by taping your watercolor paper onto the stiff cardboard. This will prevent your paper from curling and buckling. Use long strips to tape around all four edges, about 1/4" border.

2. With the ruler and pencil, divide your watercolor paper into eight sections. I like to leave a little space between the eight boxes because if you are working on one square and your wet paintbrush touches another wet square, the paint will bleed together.

DID YOU KNOW? You can lightly sketch on watercolor paper using a pencil and once the watercolor paint is dry you can erase without harming the painting! Just draw lightly and use a good quality eraser to gently remove the pencil lines once the paint is completely dry.

Eight rectangles separated by a little space so they don't bleed into one another while we work (no need to be too precise here, since this is just for practice).

DRY BRUSH:
In the first square, we'll be practicing dry brush technique. The paper should be dry. Wet your brush and take a bit of the water and put it in the watercolor tray so that it softens up the dried color and makes some paint for you to use. Rinse your brush and dab it off gently. Now you can dip your cleaned and dried brush in the paint tray and brush it on the dry paper. See how the color is concentrated? Notice how the bristles of the brush can sometimes be seen? If you want to use this brushstroke on top of a base layer of paint, you need to wait until the base layer is completely dry.


WET ON WET:
In the second square, we're going to have some fun! In this square you can use plain water on your brush and wet the whole square. While the square is wet, add some wet splotches of color. You can use one color if you'd like, but it is fun to add additional colors and watch them blend on their own. This is wonderful for making oceans and sunsets--they almost look like tie-dyed shirts or the fur of an animal! You can try dripping a drop of plain water onto the wet on wet painting you've created-notice how the plain water pushes aside the colors? Try dabbing a bit up with your paper towel--this removes the color. This way of removing some of the paint with a towel is great for making clouds (or if you make a mistake and you paint something too dark!).

Combining techniques: for this cloud-like painting, I painted the background using the wet on wet technique and dabbed the painting with my paper towel to remove some of the color making a cloud-like shape. Once dry, I used the dry brush technique to paint in rain (you could also use colored pencils for the rain lines).


INK & WATERCOLOR:
This is my favorite! In the third box, use your pencil to sketch a simple drawing. Then go over your pencil lines with a permanent marker. Now it looks like a cartoon or a coloring book page! Use watercolor to fill in the drawing. But watch out! If you touch an area with your paintbrush that is still wet, your sections could bleed into one another and that might not be what you want. When you are filling in the areas of a piece done this way, you can take breaks to let each section dry before you paint the ones next to it.


COLORED PENCIL & WATERCOLOR:
OK, also one of my favorites! In this box, you'll want to do a simple shape with watercolor: I chose to make a leaf shape. Once that is dry, add details and texture with colored pencils. I use this technique all the time in my own work. In my example, I painted two leaves and then finished one so that you could see what the colored pencil does. I also added the background in colored pencil. This technique also takes some patience. You must let the paint dry thoroughly before you do the pencil or it will scrape the paint and damage the paper.

The leaf on the right is what I started with. The leaf on the left shows the addition of pencil lines.

WAX RESIST:
In this square, you can make magic! Using crayons, draw some simple shapes in this square. You should use firm pressure, but don't push so hard you break the crayon! Experiment with different colors of crayon: white, blue, red, etc. Once you've finished your shapes, paint a nice wet, watercolor wash in the square-even over the crayon marks! The paint won't stick to the crayon marks! This is wonderful for stars and bubbles and all sorts of great pictures! Experiment with different colors of crayon as well as different colors and values of paint. What happens with a light color of paint? What about a dark color?


SALT:
Fill the entire square with paint just like you did with the wet on wet square. While it is still wet, sprinkle the paint with table salt. Don't touch! You'll need to leave this overnight until it is completely dry. This makes little sparkles or stars in the paint. It's a great technique to use when painting water or sky. When it's dry, the salt just brushes off.


PLASTIC WRAP:
Fill the entire square with paint just like you did with the wet on wet square. While it is still wet, place a piece of plastic wrap on the square, crumpling it slightly and pressing it gently into the paint. Don't touch! You'll need to leave this overnight until it is completely dry. This makes little sections of color in the paint. The texture of this is interesting and could be used for rocks or in when painting water. Once dry, the plastic wrap peels off and you can throw it away or wash it and reuse it for another painting.


BLOW PAINTING:
This one is fun! Get your paint brush very wet with paint and touch the tip of the brush very gently to the dry paper. There should be a rounded drop of paint on the paper. If not, use more water. Once you get a rounded drop on the paper, gently blow through a drinking straw to move the drop around. It's fun to try to control where the paint will go! In one book I have, the artists use this technique to make trees. They look like craggly apple trees! When you are blowing through the straw, take your time and don't blow too hard. Take a break so you don't get dizzy!


To illustrate these techniques, I first did this project at home then did the project along with the students. It seemed to help the children to understand what we were doing if I said, "next we'll be doing this square." Then I showed them how to do it.

While they were practicing a technique, we would talk about what we could use that technique for (such as, "this would make a good rock wall" or "that would look really nice if you were making a starry night sky").

I had the following book on hand: "The Usborne Book of Art Skills" is a wonderful resource for older students (maybe middle school age) and showcases a variety of techniques. I was able to point out many of the things we were practicing. It was helpful for the children to actually see these techniques in use.

This lesson took the entire hour with my class, so the children and I have decided to have a second watercolor class where we will use these techniques to create underwater creatures in their habitats (maybe like the Loch Ness Monster?). They are all very excited about it--I think I need to run out and get more watercolor paper!
Related Posts Plugin for WordPress, Blogger...