Showing posts with label frame. Show all posts

Monday, April 9, 2012

Frank Lloyd Wright Faux Stained Glass

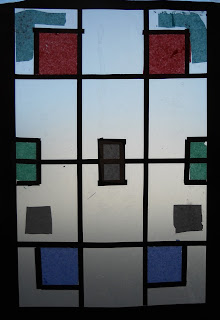
Last week my after school class created Frank Lloyd Wright-inspired stained glass windows. I showed them a variety of his stained glass designs and then let them explore line, shape and pattern to create their own stained glass designs. They looked wonderful on the windows with the bright spring sun shining through!


Frank Lloyd Wright-Inspired Stained Glass Windows

Supplies Needed:

  • 1" Grid template, optional (more info below)
  • Clear Contact paper (2 sheets 18" x 12")
  • Black construction paper strips, some 1" wide and some 1/4" wide, 18" long
  • Additional black construction paper for circles or other non-linear shapes
  • Scotch tape
  • Scissors
  • Ruler
  • Pencil and eraser
  • Tissue paper, various colors
Directions:

1. This piece is worked from the back. I created a grid template for my students to use that had 1" squares on it. I used two sheets of 8 1/2 x 11" paper taped together. This is a nice space to work on encouraging the students to use the grid for their pieces. Some disregarded it and others really utilized it for the creation of their designs. I had each student tape a template to their desk.

2. I then had the students remove the paper film from the Contact paper and lay that on the grid template sticky side up. This is the surface on which the window will be created.

3. I had the children place 1" wide black construction paper strips around the outside of the grid gently pressing them onto the Contact paper. This creates the frame for the window.

4. I then had the children create a Wright-inspired design over the grid using 1/4" wide strips of black construction paper. This is the leading of the stained glass window. I explained that the lines can be horizontal, vertical or diagonal. Also, the intersection of the lines can make shapes such as squares, rectangles, triangles and rhombi. Circles and portions of circles could also be added.

I told them that they did not need to fill the entire window with lines and shapes (look at Wright's work) . I also kept encouraging them to take their time and plan.

A look at the pieces in progress...messy but fun!

5. Once their leading was done, I took a quick look and then demonstrated how they could add color to their piece. Some of the more geometric shapes could easily be cut from tissue. They could use the grid to help: if they had a shape that was 2 squares by 3 squares on the grid, they could cut a 2" x 3" rectangle from tissue paper. For younger students or for shapes that were trickier to cut from tissue, I suggested the children tear off pieces and just fill in the section with "bits" of tissue. The tissue easily sticks to the Contact paper. I told the children it is OK if the tissue paper extends onto the black lines a bit since this is the back of their window and that won't be seen when it's done. I suggested that the children not fill the entire piece with color since Wright often left portions of his windows clear.

6. Once the children had added all the color they wanted I adhered a second piece of Contact paper over their work creating a sandwich to seal the tissue and construction paper inside. I've done a similar project to this using just one sheet of Contact paper and it doesn't hold up as well as the "sandwich" of two pieces of Contact paper).

7. The children could then use their scissors to cut the excess Contact paper from around the piece using the outer edge of the frame as a guide.

I placed these pieces on the windows immediately so we could all enjoy the bright colors and beautiful designs!



Saturday, December 31, 2011

Easy Silhouettes

I love the look of silhouettes! They can go with just about any decor: traditional, modern, eclectic--you name it! They are a great way of preserving your child's image at a certain point in time, and they are also a great example of positive and negative space. 


A silhouette of my oldest guy--so handsome!


Positive space is the space an object occupies (in this case, the head of the person whose silhouette is being done). Negative space is the area around the object. I chose white paper to highlight the negative space around my silhouettes. Although this craft is simple, it may be best for older children or a grownup to do the actual cutting of the silhouette so that facial features stay intact. This is an inexpensive craft that would be perfect for a gift (think grandparents).

Supplies Needed:

  • Camera
  • Ultra fine point marker
  • Small, sharp scissors (I used embroidery scissors)
  • Black acrylic paint (I used flat paint in "lamp black")
  • Paint brush
  • 3 1/2" x 5" rectangle white paper (I used scrap booking card stock)
  • 5" x 7" rectangle colored paper, your choice of color (I used scrap booking card stock)
  • Black 5" x 7" frame (I bought mine at the dollar store)
  • Glue stick

Directions:

1. Take a profile picture of the person whose silhouette you will be creating. Make sure they are looking straight ahead and that their hair is neat (girls with long hair can pull it to the side or have it fall down their backs).

2. Print out the picture onto plain white paper. Use the fine point marker to outline the features of the subject. Add a gradually sloping neckline. You may need to draw in the bottom edge of their hair if it went beyond the picture. I try to keep the bottom edge of the silhouette simple and neat, but I do have a little fun when I'm drawing in the ends of the hair. Just don't go too crazy--remember, you'll have to cut it all out!

3. Use a small, sharp pair of scissors to cut out the image.

4. Paint the cutout with a coat of black acrylic paint and let it dry for several hours or overnight. 

5. Glue the cutout to the white paper. Glue the white paper to the larger, colored, piece of card stock. Insert into the frame and you are done! These are so fast you may find that you'll want to do a whole series of silhouettes! ENJOY!

Friday, November 11, 2011

Fall-inspired Shoji Screens

The art from the 1500's-1700's is so wonderful and we really do begin to see the art of so many cultures starting to emerge since many nations were exploring the globe. I wanted to introduce my students to panel paintings and altarpieces this week. A couple of years ago I had my students create multi-paneled images of the saints and we used gold tissue paper to "gild" the images. The pieces were fantastic! But I felt that that was more of an advent-type of lesson, so I was hesitant to re-do that lesson (even though we had snow about 10 days ago!).
Is it a triptych? Is it a Shoji screen? Wait, it's both! And pretty, if I may say so!
This time, I wanted to get the concept of altarpieces across, but I wanted to do something a bit more Fall-inspired. I had a bucket of tissue paper squares I've been using for the past few years (I swear those pieces multiply in there by themselves!). So I thought about having students create a fall landscape, sort of like stained glass. I usually use Contact paper for my stained glass projects with the children, but didn't have any & experimented with waxed paper instead. The result was a muted Japanese-screen-looking creation. So, I was able to introduce the children to that art form as well.

This craft is inexpensive and little ones can do it with help from a grown-up and older students can customize the piece in their own way. I hope you try this craft with your family. Enjoy!

Fall Shoji Screens


Supplies Needed:

  • Black Construction Paper (Ours was 12"x18")
  • Pencils
  • Ruler
  • Scissors
  • Glue stick
  • Construction paper for trees (we used 9"x12" pieces in black, brown and white)
  • Crayons and/or colored pencils
  • 2 12"x18" pieces of waxed paper
  • Tissue paper squares (1" squares in whatever colors you wish)
  • Iron & Pressing cloth
Directions:

1. Create the frame for your triptych (3 paneled piece of artwork). Mine took up the entire 12'x18" piece of paper and had a 1" frame all around it.

2. Use the scissors to remove the "window" portions of the triptych, taking care to leave the frame intact.

3. Create your "trees." Rip black, brown and white construction paper into 1/2" strips. If you are having trouble ripping the paper, try ripping it in the other direction. Flip your frame over and use the glue sticks to attach the trees to the back of the frame. I suggested the children put a couple of trees in each of the three "windows." We used black for trees that were far away and then brown for pine trees and white for birch trees.

4. Once you are done glueing on the "trees," flip the frame over and add details to the front of your trees with the crayons and/or colored pencils. We discussed how tree bark can be bumpy or smooth and have knots on them, etc. I also reminded the students that tree trunks have shadows on them and explained that the shadows would be on the same side of all the trees.

5. Flip the frame over, so the back of the piece is facing up. Apply glue to the back of the frame and trees. Press a 12"x18" sheet of waxed paper onto the frame.

6. Working in one section at a time, apply a few lines of glue stick to the waxed paper and attach the tissue paper squares. You don't need to use a lot of glue, once you iron the waxed paper together, the tissue paper will be fused in place. Cover all of the spaces between your "trees" with the tissue paper squares.

7. Once all of your tissue paper squares are in place, place a piece of waxed paper on top of them. Using an iron set to the "polyester" setting (medium heat) and using a pressing cloth to protect your iron, gently press the piece so that the two pieces of waxed paper fuse together with the tissue paper squares in between them.

8. Use scissors to trim the excess waxed paper from around the frame. This piece looks nice in a window or with a battery-operated candle behind it. Keep it out of direct light so that the piece stays intact longer and the colors don't fade. ENJOY your fall scene!

Tuesday, October 11, 2011

Cave Drawings

On our first stop on "Art Around the World," we looked at the cave paintings from Lascaux, France. We saw how detailed and beautiful the drawings are while being so simple. I showed the students a great double-page spread from the book, "Art and Civilization: Prehistory," that shows the tools the ancient artists used and also shows a depiction of the scaffolding that they must have used in order to create the drawing so high up on the cave walls. I also had a series of posters of the Lascaux caves that I bought from Dick Blick Art Supply.


We then experimented with charcoals and pastels to create drawings of our own. The children could incorporate ancient or modern animals, symbols, weapons, etc. They were also encouraged to add their handprints as their "signatures." Once they had filled up their large paper, they could choose a portion, make a frame from twigs and lace their masterpiece to the frame. The finished piece has a tribal or even Native American feel to it.

Supplies Needed:

  • A large paper bag, crumpled, rinsed with water & then ironed until dry and flat (the wrinkles will make the bag look like a cave wall or an animal hide).
  • Charcoals, pastels, conté crayons, or vine charcoal
  • Packing tape
  • Hole Punch
  • Suede lacing (or brown yarn)
  • Four twigs for frame
  • Hot glue gun & glue sticks
Directions:

1. Spread out the brown paper bag and using the pastels, draw animals, figures, symbols and trace your hands onto the page. You can make the animals all sorts of sizes and make sure to show the detail of their coats. Are they striped, spotted, or have shaggy fur? Make sure you "sign" your work by tracing your hand.

2. Once you are done drawing, select a portion to frame. You can either rip the paper gently or cut it with scissors to crop the piece to size.

3. Flip the cropped section over and reinforce the edges of the back with packing tape (this will make edges more sturdy when you lace them later). Use the hole punch to create some holes around the edge of your piece about 2-3" apart.

4. Create a frame with four twigs. Hot glue the corners where the twigs overlap--this will help the frame be a bit more sturdy. Then take a 6" section of the cord and tie the corners of the twigs where they overlap. This will cover the hot glue and make the piece look more authentic.

5. Cut a piece of cording about as long as you are tall. Tie a knot in one and and thread it through the holes of the artwork and around the twig frame to secure. Keep sewing through the holes of the artwork and around the twig frame until done. Enjoy!

*Be aware that the piece is still sort of messy since it uses charcoal. You can spray the finished piece with a coat of hairspray to fix the dust.

Here are some other pictures of the project to enjoy:

"Take a picture of my hand!"


Another finished piece.

Thursday, September 22, 2011

Leaves are "FALL"-ing Picture

In honor of the first day of Fall which is tomorrow, I have this super craft. I saw it on display at a local library and had to try it at home with my preschooler who is four. It was a bit challenging for him, so I worked with him to do the tissue paper "puffs" so he didn't get too frustrated with them. My 9 yo was saying he just had to make one as well!

This project is a good way to explore a few different kinds of media and practice fine motor control. It also uses many items you may have on hand. I liked spending time with my little one and we had a wonderful discussion about fall and leaves. ENJOY!

Supplies Needed:

  • 8 1/2x11" piece of white card stock
  • pencil and eraser
  • scissors
  • black marker
  • crayons, colored pencils or markers to color in the tree trunks
  • tissue paper, various colors, cut into 1" squares
  • Elmer's glue in a little tray
  • zip-top plastic baggie
  • tape
  • hole punch
  • various paper scraps in leaf colors
Directions:
1. Fold the card stock about 4" up from the bottom. On the larger portion of the cardstock, draw two trees in a way that creates a frame. You can keep it simple. Make sure the area that is in the center of the trees (that you will be cutting away) is smaller than your zip-top bag, so that the edges of the baggie don't show. 

2. Once you have the drawing the way you want, outline the trees, trucks, roots, ground, etc. with a black marker, if desired.

3. Using the scissors, cut away the center portion of the drawing. 

4. Talk about the color of bark and grass. Have your child look outside for inspiration. My son noticed that bark is kind of gray sometimes, so he colored his tree trunks grey. Have your child color those in (a side note: I don't ever say something HAS to be a certain color. We may look at something in nature & talk about the colors we see, but the artist gets to choose what color s/he wants).

5. Pour a bit of Elmer's glue (white school glue) in a tray. Take a square of tissue paper and cover the end of a pencil eraser with it. Dip the tissue-covered end of the pencil into the glue and then touch it to the paper in the leaf section. Pull the pencil away and the tissue "puff" will be left behind. Continue doing this until the entire leaf section is full of puffs.
Working on his tissue paper "leaves," he says "Mom, I'm excited about this picture!"

6. Now, to make the falling leaves: use a hole punch to punch different colors of paper. Gather all of the little dots you've punched out and add them to the zip-top bag. Seal the baggie and attach the baggie to the back of your frame with clear tape. We folded the bottom portion of the card stock around and stapled the layers together at the edges.

Once the piece is dry, your child can shake the picture and show the autumn leaves falling to the ground! ENJOY!

Saturday, July 16, 2011

Memory Pillow and Artist Talk

I visited my son's first grade classroom a few weeks ago and gave a talk about being an artist. It was so much fun talking with the children about ways to make art as well as the different careers an artist can have. We then did a project where the children made memory pillows. It was a wonderful way for them to remember the school year and all of the friends they made this year!

The Memory Pillow--what a masterpiece!

What is an Artist?

In preparation for this project I looked in the dictionary to see what being an artist meant. It said that an artist is someone who creates art. Well, that didn't seem like a very good explanation!

We discussed different kinds of art/ways of making art and we came up with this list:

Drawing
Painting
Photography
Sculpture
Fabric Arts (like knitting embroidery, quilting)
Computer Arts (like web design)
Mosaics
Cartooning/Animation (like cartoons on TV & movies as well as in newspapers and in books)

(I'm sure this list isn't complete! I also added that people can be artists if they create music, dance, perform in the theater and write).

Many works of art like paintings and drawings are found in museums and in galleries, but art is all around us every day. We discussed different art careers that are out there such as:

Architect: If you like to draw houses and create buildings with Legos then maybe you could be an architect!

Illustrator/Cartoonist: I told the children they were already illustrators since they all published books for the school's writing festival! If you like to draw pictures to go along with stories you could be an illustrator!

Sculptor/Potter: Do you like to work in clay? Do you like to make sculptures or bowls and cups? Maybe this job is for you!

Graphic Designer: Do you like to make books with words and pictures? Do you like to look at cool websites? Those are made by graphic designers!

Actor/Actress/Dancer: If you love to perform and put on shows--this is for you!

Art Teacher: If you love to talk about art and share different projects with children, then this job is for you! This is what I do and I love it! :-)

Memory Pillow:

This is a wonderful project for a teacher gift, a class project, a birthday party and more! After our talk we worked on this craft.

Supplies Needed:

1 square of white 100% cotton fabric (ours was about 12 x 12")
1 square of printed fabric for backing that is the same size as the front piece (ours was 12 x 12")
Gold acrylic paint
1 4"x 8" piece of craft foam
Scissors
Paintbrush
Paper plate for palette
Newspapers or other work surface covering
Fabric markers (I use Crayola brand)
Sewing machine
Pins
Needle and matching thread
Pillow stuffing

Directions:

1. Wash the fabric to remove sizing, dry and cut to size.

2. Cover your work area with newspaper. Cut a frame shape from the foam. Put some gold paint onto the palette and, using a brush, apply a thick coat of paint to the foam. Stamp the foam shape onto the center of the white square. Let dry.
Choose a metallic gold paint for a little sparkle. The children asked,  "Is this REAL gold?"

3. Trace around the edge of the gold frame with a black fabric marker, if desired, to make the frame's edges a little more crisp and interesting. You don't have to be neat about it--it looks more interesting if the edges are off a bit (I completed up to this part at home so all the children had to do was draw with markers).

4. Using fabric markers, draw a picture inside the frame. If you are doing this with a group, you may want to have the artist sign inside the frame as well.
A dragon being stopped by a super hero

A horse and rider in a woodland scene. Love those woodland critters!

5. Now's the time to have everyone sign each other's pillows. Do not sign inside someone's frame or on their picture. Leave about 1/2" border all around the edge of the white square for a seam allowance.


6. Once the marker work is done, pin the white square to the backing material with the right sides facing each other. Sew around the pillow, leaving a 3-4" opening on one side.
Older children can use the sewing machine with adult supervision, to sew their pillows on their own. My 9-year-old was able to sew his pillow.

7. When done, turn the pillow right side out and gently stuff with pillow stuffing.

8. Pin the opening of the pillow closed, thread a needle with matching thread and sew the opening closed.


Ta-da! A masterpiece (and a memory) has been created! Enjoy!!

Friday, April 15, 2011

Medieval Metalwork

This week, in my art class, I showed the children how to do a simple technique that looks like aged metal. The children created frames and crosses and then added faux gemstones for a little sparkle!

Jewel-encrusted antique metalwork frame.

This year's art classes are all about Medieval times. We've done shields with coat-of-arms, marionettes of kings and princesses, stained glass dragons, and many other projects you'll soon be seeing in this blog (one day at a time!!). This week, I decided to have the children do a project that simulates metalwork. I was thinking of those large, heavy covers of illuminated manuscripts that were pieces of wood covered with tooled sheets of gold and inlaid with real gemstones (see below). Since my budget is a bit more limited than that--I thought we could use tin foil and plastic gems from a craft store.

Background Information:

Since medieval manuscripts would take many years to create and often were the life's work of many of the artists, the covers of these books were often just as elaborate. The covers were often a plank of wood covered with gold, jewels, enamelwork, precious metals, and ivory. One such example of this type of ornate work is the cover of the Lindau Gospels entitled, "Crucifixion with Angels and Mourning Figures." This piece is from The Pierpont Morgan Library in New York.

The cover from the Lindau Gospels uses a technique called repoussé "a technique by which metal reliefs are created. Thin sheets of metal are gently hammered from the back to create a protruding image. More elaborate reliefs are created with wooden forms against which the metal sheets are pressed (Art History: Volume 1, by Marilyn Stokstad, 1995)."

The project below is very similar to this technique. Enjoy!

Supplies Needed:
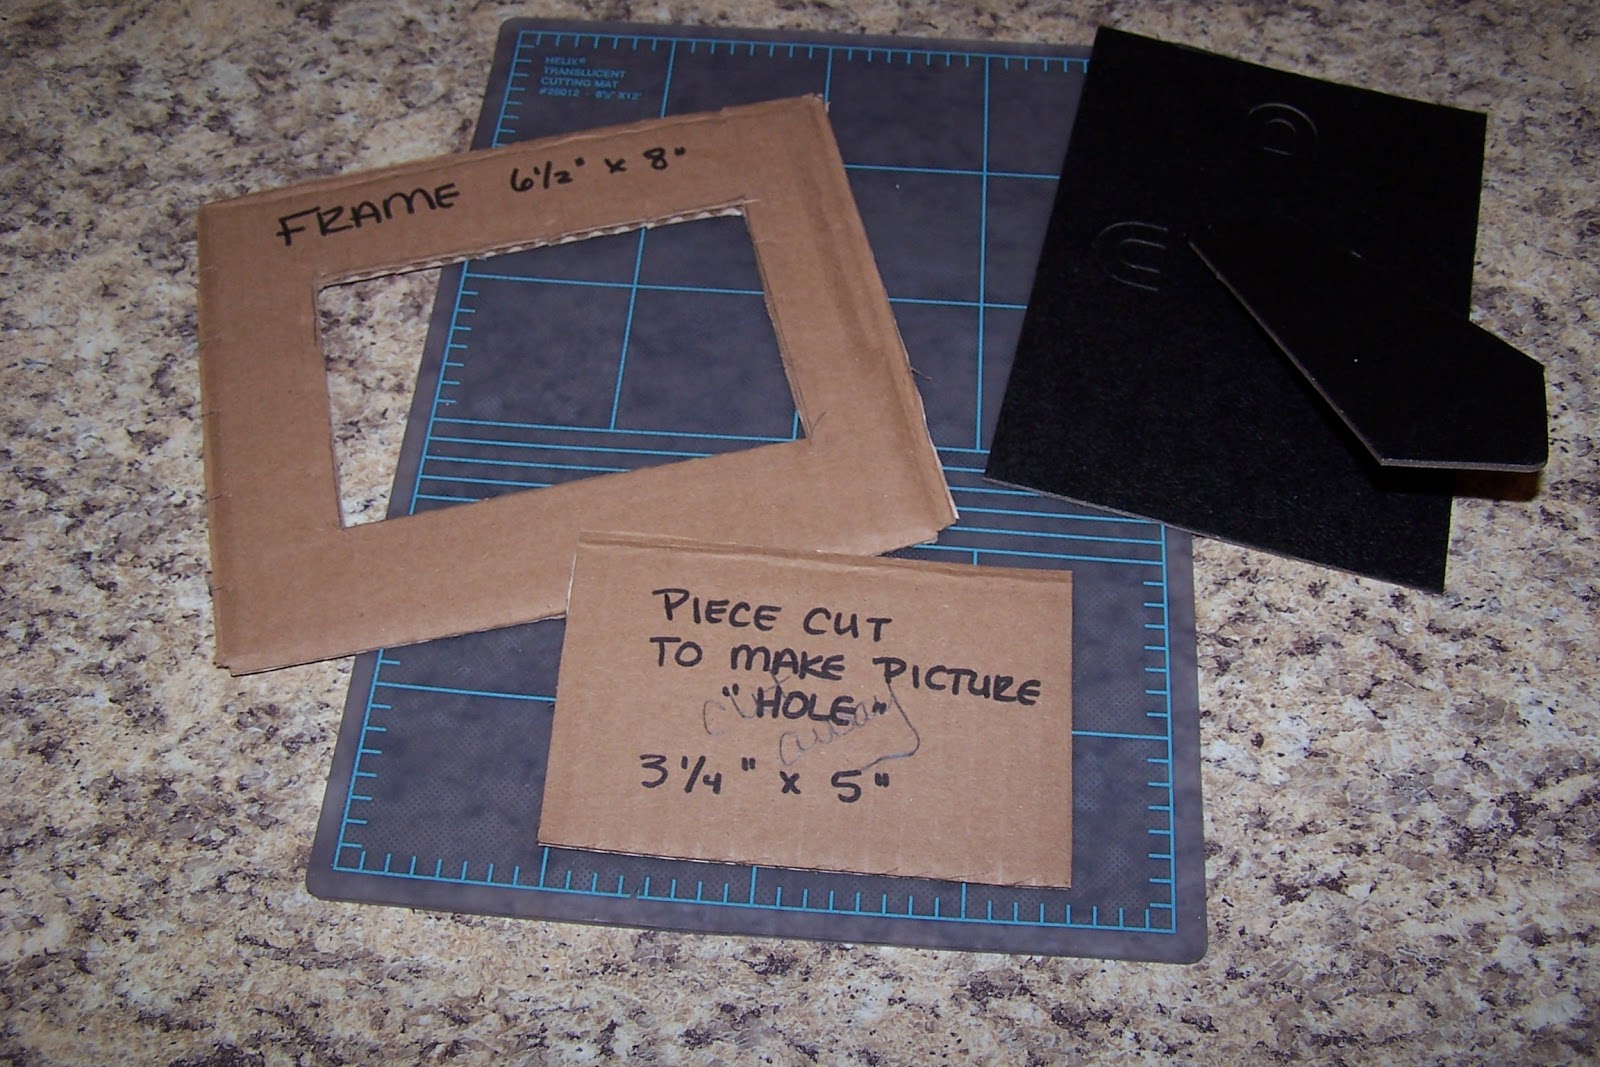
  • Corrugated cardboard cut into a frame shape (6 1/2" x 8') or a cross (a 3" x 7" piece of cardboard glued to a 3" x 11" piece of cardboard)
  • Self adhesive foam letters and shapes (optional)
  • Yarn
  • PVA glue (I use Elmer's glue)
  • Paintbrush
  • Water bowl and water
  • Scissors
  • Aluminum foil (standard household foil is fine)
  • Clear tape
  • Black tempura paint
  • Paper plate for a palette
  • Facial tissue
  • Glue gun and hot glue sticks (optional)
  • Plastic jewels (I bought mine at Michael's--they had a value pack of 1pound of "bling")
Directions:

1. If you are creating a frame, think about which way you'd like to have the picture displayed. This is important if you are doing lettering on your frame.
Here you can see the cardboard piece I'll be using for my frame as well as an easel-backed piece of cardboard from an old frame that I later glued onto the finished frame. That part is optional,

2. Create a design on the cardboard frame (or cross) using self adhesive letters and shapes. Words and phrases such as, "family," "best friends," "love," or your last name work well. You can also use yarn for the letters and shapes (and also for lines). Put a line of glue onto the cardboard and then gently press the yarn into it. Keep your design simple.


3. Once you have your design done, brush a thin coat of white glue all over frame. You can brush right over the foam shapes because the adhesive on the back of the shapes is nice and strong, but go gently over the yarn. You will want to go along the edges of the yarn you have glued down so that you don't mess up your design.
My design is done. Now I can brush white glue over the entire design.


4. Take a piece of foil that is slightly larger than your piece and gently crumple it--not too much or it will tear when you open it back up. Open the foil back up and smooth it a bit. Now lay it onto the frame over the glue on your design. Press gently all over your design, around the letter and shapes.
Gently smooth the foil over the design. Press gently around the yarn and foam shapes (if using). Be careful not to use your nails, since the foil will tear easily.


5. Flip the piece over and tape the extra foil to the back of the cardboard. If you are doing a frame, you'll need to gently cut an "x" in the foil in the center portion of the frame and fold back the foil there (and tape it to the back of the frame) so that you'll be able to see the picture in the center of your frame.


6. Now comes the messy part! Squeeze a bit of black tempera paint onto the paper plate. Dip your paintbrush into water and mix it in the paint to thin the paint a bit. Brush the thinned tempera paint over the entire front of your frame.


7. Now....wait! Leave your frame to dry for 10-15 minutes. While it is drying you can draw a picture to go in your frame. Will the picture be of your family? A pet? A medieval scene with a knight and a dragon?

8. Once the time is up and your paint is not quite dry, gently buff off the paint with a piece of facial tissue (it may take your piece a bit longer to be ready to buff--the paint should be "almost dry"). The more black you leave, the more "antique" the frame will look.


9. Use a hot glue gun, white glue, or tacky glue to attach jewels to the frame.
I live this tacky glue in a squeeze tube!

10. Attach your picture to the back--and you are ready to display your medieval work of art!

Variation: Easter is a wonderful time to do this project and create a cross! This technique makes a beautiful cross that looks unique. It is a nice project to do as a family--certainly a conversation-starter on many levels! Enjoy!
The same technique can be used to create a cross. I left a good amount of the paint on the edges to give this cross a very old feel. This picture doesn't do it justice--the jewels really shine and add sparkle. This would also be a nice gift idea.
Related Posts Plugin for WordPress, Blogger...