Showing posts with label Elmer's. Show all posts

Wednesday, August 10, 2022

New Demo Video: How To Use Elmer's Glue/How To Use PVA Glue

Hi friends and enemies!

The past couple of days I've spent trying to build some videos for demo purposes. I'm trying to be able to allow my students more independence and autonomy with art room techniques and materials.

Guys. Last year was brutal in terms of kids using glue. Many kids hadn't had art class in person for a couple of years and Elmer's glue is not something everyone has at home. I get it. Liquid glue is messy.

Flashback to my own kids chanting "Glue! Glue!" as they slowly emptied entire bottles onto their projects. True story. 

I had never really used lots of Elmer's with my upper middle schoolers in the past, but now that I am teaching more fifth grade and we are doing projects like collage, Elmer's glue is a big deal. Last year, I had students who didn't know how to open the glue bottles. II'm telling you, they DESTROYED the bottle trying to open them. I even had one class where FOUR STUDENTS completely took the tops off the bottles and just poured the glue onto their projects. Ummmm... Nope!

Ok, I admit, I may have failed to give a complete demo on how to use Elmer's glue, but come on!

Hence my glue slide I project now during collage projects. It helps.
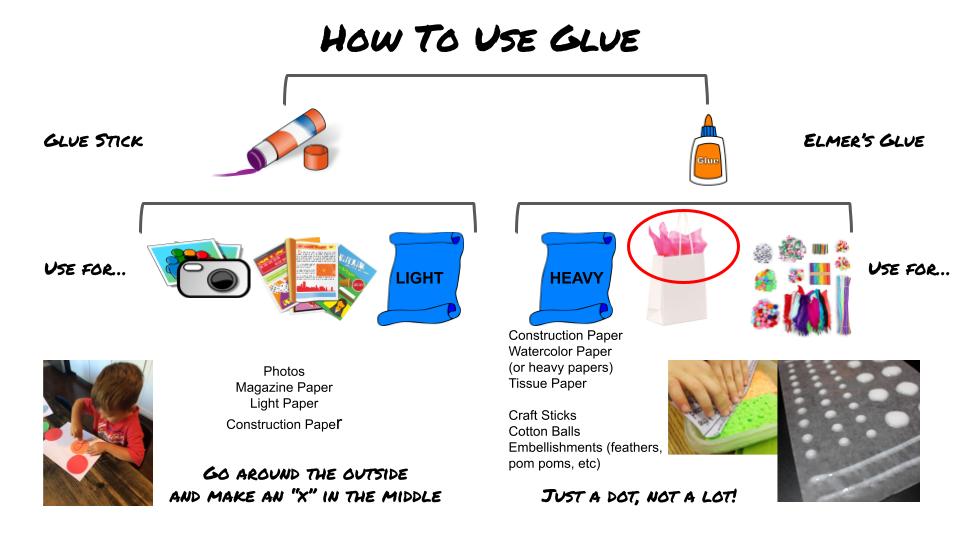
My GLUE Google slide that is projected during times of duress, I mean, gluing. :-)

And my live gluing demos. And these videos. 

Dude, I'm covering all the bases when it comes to glue!

Last year I used a variety of Elmer's glue techniques with the students (both my fifth grade and adaptive art students) and we use glue the following ways:

  • Straight outta the bottle: dots and lines
  • Glue sponges
  • Applied with paintbrushes
They all have their merits. See the video for how each is used.


Here's the link for the video on my Youtube channel.

Enjoy!

New Demo Video: How To Use a Glue Stick

 Hi friends and enemies!

The past couple of days I've spent trying to build some videos for demo purposes. I'm trying to be able to allow my students more independence and autonomy with art room techniques and materials.

I usually demo how to use a glue stick and even though I teach middle school,  there are still students who struggle with it. I'm not sure I would make a student sit through the entire video without me jumping in to point something out or show in real life, but it's good to know that I have this video as backup.

Side note: mine is not the first video on youtube that shows how to use a glue stick, so someone else thought a video like this was necessary. Mine is meant for an older student, so no baby talk here. 


Here's the link to the video on my Youtube channel.

Enjoy!

Tuesday, August 18, 2015

Sculpture with Grade 5? It's a piece of cake!

The school I was substitute teaching at was celebrating its 40th birthday while I was there. Naturally, I had to have the students create some yummy cake-themed art in celebration! I decided on a Wayne Thiebaud theme for two of the grades. Grade 5 made these awesome 3D papier mache and collage cakes frosted with (get ready) shaving cream mixed with Elmer's glue. Yeah, I know, kind of crazy--but it was AWESOME!!!


Let's get ready to PARTY! Cakes, cakes & more cakes!! YUM!

I got the idea for these cakes from Mrs. Hahn at Mini Matisse and the students had a blast creating these. This was a great project because it used up lots of little bits of paper, sequins, beads and more and allowed the students TONS of creativity. We received so many compliments on them and they truly looked good enough to eat! Definitely a keeper!

ENJOY!!


Sunday, November 2, 2014

Fall Still-life With Glue and Pastels

Here are some pretty still-life creations my after school art class finished up this week. OK, I can use other, more "artsy" words like "dynamic" or "engaging" to describe these, but MAN, are they pretty, too! I've done this project before, and the students are always amazed at how the pieces come out (me too!). This group had students who are in first grade through fourth--so you can see it's pretty accessible to all with the right amount of scaffolding.


I made the mistake, this time, of using clear glue (gel and plain clear) since that's what other art teachers have said they used for this project with great success. I tried it because, in the past, I had found the regular  Elmer's glue can dry a bit cloudy. Anyway, I WAS NOT happy with the results. The clear glue soaked into the paper and ran off as the students were moving them to the drying space leaving drips and blops all offer the classroom and my car (a.k.a. the mobile art studio). It also soaked through the paper and glued the pieces to tables and the seats of my car...(big unhappy face for Mrs. Pettus) ;-)

So, if you do this project--which a HIGHLY suggest you try--use plain old Elmer's. It's fine for this project. So fun and magical (and "pretty")! Check out my previous post about this technique here.

ENJOY!

Thursday, October 24, 2013

Fall Compositions With Elmer's & Pastels

Fall is my favorite season and I have been LOVING driving my hour-an-a-half drive up to my Grad School twice (sometimes three times) a week...I pop in a book on tape and enjoy the beautiful fall folliage that New Hampshire has to offer! Ahhhh!


The focus of my after school art class for my 1st-4th graders is "Fall Into Art"--fall-themed art activities...last week, we drew apple still lifes inspired by Cezanne, and this week we took advantage of the nice weather and beautiful fall displays outside the school that had been donated by the Amherst Garden Center in Amherst, NH. The Garden Center had flanked the entrance of the school with pumpkins and gourds, hay bales, scarecrows, and beautiful mums! I couldn't ignore all of the visual stimuli out there ready to draw!

We spent some time looking and touching the displays, then we sketched them. We moved inside and selected one the things from our sketches to "draw" on black paper with Elmer's glue. The students were VERY skeptical when I told them we'd be drawing with Elmer's and you should have seen the surprised looks when I did my demo and piped glue along the lines of my drawing!

I had seen this Elmer's glue/pastel combination online before but had never tried it. I think it would be great for winter snowmen as well...

Anyway, we let the Elmer's glue dry (they rode around for a week in the back of my minivan--the mobile art studio.

The next week, I showed the students how to color in the non-Elmer's areas--the negative space--with the chalk pastels, encouraging them to add highlights and shadows to make their pictures really "pop" and look more realistic. I suggested using my "use at least three colors in each section" rule...

The students were VERY pleased with this new "technique" and, at the end of class, we discussed some other compositions they could use this technique on. The fourth-graders were very specific with their questions about materials: where I purchased the materials, what they are called, how much they cost. They want to make sure the next time they go to Michael's Crafts Store they purchase the proper things so they can do this technique again--THAT (to me) is a sign of a successful art lesson--my students wanted to take something they learned in class and go with it.

Enjoy!


Tuesday, March 27, 2012

Origami Butterfly Wreath for Easter or Spring

My family loves origami! So when I saw the directions for an origami butterfly on Pinterest, I knew I had to create a project that used them! So, here 'tis! This is a relatively simple and VERY inexpensive project that would be suitable for children grade 2 and up (the origami may be a bit challenging for a young one and the tissue paper can be time consuming).


The butterfly origami directions are from Go Origami. Many of the gorgeous projects on this site are too advanced for me, but the butterfly is easy enough.

Enjoy making this lovely wreath and bringing a bit of Spring into your home!

Origami Butterfly Wreath for Easter or Spring

Supplies Needed:

  • One paper plate
  • Pencil
  • Scissors
  • Elmer's glue
  • Glue tray (I used the lid of a yogurt tub)
  • Tissue paper in green (I used three colors of green for interest)
  • Three pieces of origami paper (or thin colored paper), assorted colors
  • Hole punch
  • Ribbon
Directions:

1. Trace a 5" circle in the center of the paper plate. Use the scissors to poke a hole in the center circle and then cut and remove the center circle so you are left with an outer ring of a paper plate. This is the base of your wreath.

2. Cut the tissue paper into 1" squares. I can't tell you how many squares you'll need, but you'll probably end up cutting WAY more than you need.

3. Pour a bit of glue into the tray. Take a 1" square of tissue paper and CENTER it over the eraser end of the pencil, smoothing the edges of the tissue paper around the eraser and pencil. Use your fingertips to HOLD the tissue in place and then dip the covered end of the eraser into the glue. Gently touch the tissue-covered eraser to the plate, and remove the pencil. The tuft of tissue paper should remain. You'll be attaching the tufts of tissue paper to the underside of the plate--not the side you'd eat on.


4. Repeat with additional tissue paper squares until the surface of the plate ring is covered. It helps to place the tissue paper tufts next to each other as you go--this will ensure that the wreath is nice and full and doesn't have any bald spots! If you are working with a younger child, you can work with him/her on this part. Many children won't mind the help and it's a wonderful time to sit and chat quietly with your child. 

5. Once the front surface of the wreath ring is covered with tissue paper tufts, use a hole punch to make two holes about 5" apart on the top edge of the wreath. This will allow you to hang the wreath up later. Set the wreath aside to dry.

6. Trim the origami paper so that one piece is 6 inches square, another is five inches square, and the third is four inches square. Fold into butterflies. Directions can be found here.

7. Attach ribbon to the wreath. Trim if necessary.

8. Use glue to attach butterflies in a pleasing arrangement. 


You're done! Welcome Spring!

**Another option to make this much easier for little ones is to reduce the size of the plate wreath. Making the wreath ring 5-6" across will be much easier for a single child to do on his/her own. Then adjust the size of the butterflies accordingly, maybe a butterfly made from a 5" square flanked by butterflies made from 4" squares. 

Wednesday, November 23, 2011

Mosaic Snowglobes

So, using paper to make mosaics is not new, but using a grid with my students has really helped them "get" the idea of mosaics. This week, I had my after school art class create plaques with a mosaic snow globe scene inspired by a quilt I saw. This project has enough direction so that the children could understand the concept of mosaics and create a piece that they could be proud of in a short amount of time. It also allowed for creativity: the children could choose the colors they wanted and if it was night or day, etc. The projects came out great and were very gift-worthy!

 Supplies Needed:

  • Pattern on graph paper (see below)
  • Tracing paper
  • Tape
  • Glue stick
  • Small amounts of scrapbook paper cut into 1/2" squares. Use whatever colors will work for your piece. I had the following colors available for the students:
    • Pale Blue (for a daytime sky)
    • Royal Blue (for a nighttime sky)
    • White
    • Brown
    • Orange
    • Yellow
    • Red
    • Teal Green
    • Lime Green
    • Pine Green
  • Glue stick
  • Scissors
  • Modge Podge
  • Brushes/water bucket
  • Wooden plaque large enough for your design to fit on (I bought mine at the dollar store)
  • Hole punches (I had 1/8" circle, 1/4" circle, 1/4" heart and 1/4" star on hand for the children to use).
  • Newspapers
  • Ribbon to hang the piece with (ours came with ribbon attached)
Directions:


1. Using graph paper and a pencil, design your image. Darken the grid and image with Sharpie markers to make it easier to see. For this project, I used 1/2" squares of paper so I divided the graph paper into 1/2" squares (rather than the 1/4" squares that are standard). I used a fine tip Sharpie to mark the grid and a fatter-tipped Sharpie to outline the image of the house and snow globe. I also labeled each of the cells with a letter and had a key on hand in case the children got confused ("A" is the Background behind the snow globe, etc.). This helps the children be able to place the paper squares easily.
My original design was 5" square. This is a basic design for younger children or first-time mosaic artists.

Add I modified the design for my after-school art class since the plaques I bought were oval.


2. Once your image has been designed, decide on the colors of paper you will need and cut them into 1/2" squares. I needed lots of squares so I used a combination of Xacto knife and mini paper cutter to cut my squares quickly. If you are doing just one piece, you can use scissors to cut your squares. Don't worry if they aren't perfect!

3. You are ready to go! Tape a piece of tracing paper over the image on the graph paper. Using the glue stick, glue to squares onto the tracing paper using your image as a guide. You don't need much glue, so go easy! Don't worry about the snow or stars right now, we'll put those on later.
 I keep the little paper tiles in an ice cube tray or muffin tins.

Gluing the paper mosaic pieces to the tracing paper.
4. Once you've glued all of your paper pieces onto the tracing paper, trim off the excess tracing paper from around your piece. Go right up along the edges of your paper mosaic tiles.

5. Brush a nice coat of Modge Podge onto your wooden plaque. While it is still wet, place your mosaic (glued to the tracing paper) onto the plaque. Press down gently and then brush a nice coat of Modge Podge over the entire piece. These two coats of Modge Podge will secure the piece to the plaque. While the piece is wet, you can add the details to your design: stars if it is nighttime in your snow globe, snow,  details to the door, etc. We used hole punches to make these details. Just sprinkle them on or gently place them into the wet Modge Podge for now. Let the piece dry.

6. Brush the entire piece with another generous coat of Modge Podge. This will further protect the piece as well as secure the snow and/or stars you added. Let the piece dry.

7. It's done! Attach any hardware or ribbon to the back of the plaque if you'd like to hang the piece on the wall. The piece should be displayed away from direct sunlight and if you need to clean it, use a damp cloth (getting the piece wet will ruin it). 

I hope you try this project! It is fun for the kiddos (and grownups too!) and comes out so beautifully! ENJOY!
Another version of the project. Instead of a snow globe, make a winter scene.

Thursday, September 22, 2011

Leaves are "FALL"-ing Picture

In honor of the first day of Fall which is tomorrow, I have this super craft. I saw it on display at a local library and had to try it at home with my preschooler who is four. It was a bit challenging for him, so I worked with him to do the tissue paper "puffs" so he didn't get too frustrated with them. My 9 yo was saying he just had to make one as well!

This project is a good way to explore a few different kinds of media and practice fine motor control. It also uses many items you may have on hand. I liked spending time with my little one and we had a wonderful discussion about fall and leaves. ENJOY!

Supplies Needed:

  • 8 1/2x11" piece of white card stock
  • pencil and eraser
  • scissors
  • black marker
  • crayons, colored pencils or markers to color in the tree trunks
  • tissue paper, various colors, cut into 1" squares
  • Elmer's glue in a little tray
  • zip-top plastic baggie
  • tape
  • hole punch
  • various paper scraps in leaf colors
Directions:
1. Fold the card stock about 4" up from the bottom. On the larger portion of the cardstock, draw two trees in a way that creates a frame. You can keep it simple. Make sure the area that is in the center of the trees (that you will be cutting away) is smaller than your zip-top bag, so that the edges of the baggie don't show. 

2. Once you have the drawing the way you want, outline the trees, trucks, roots, ground, etc. with a black marker, if desired.

3. Using the scissors, cut away the center portion of the drawing. 

4. Talk about the color of bark and grass. Have your child look outside for inspiration. My son noticed that bark is kind of gray sometimes, so he colored his tree trunks grey. Have your child color those in (a side note: I don't ever say something HAS to be a certain color. We may look at something in nature & talk about the colors we see, but the artist gets to choose what color s/he wants).

5. Pour a bit of Elmer's glue (white school glue) in a tray. Take a square of tissue paper and cover the end of a pencil eraser with it. Dip the tissue-covered end of the pencil into the glue and then touch it to the paper in the leaf section. Pull the pencil away and the tissue "puff" will be left behind. Continue doing this until the entire leaf section is full of puffs.
Working on his tissue paper "leaves," he says "Mom, I'm excited about this picture!"

6. Now, to make the falling leaves: use a hole punch to punch different colors of paper. Gather all of the little dots you've punched out and add them to the zip-top bag. Seal the baggie and attach the baggie to the back of your frame with clear tape. We folded the bottom portion of the card stock around and stapled the layers together at the edges.

Once the piece is dry, your child can shake the picture and show the autumn leaves falling to the ground! ENJOY!
Related Posts Plugin for WordPress, Blogger...