Friday, October 26, 2012

Foil Giacometti Figures

This week, I had my students create sculptures with foil similar to Giacometti. Foil is inexpensive and easy to mold (and pretty addicting when you get twisting and turning). I also wanted to give the children an opportunity to learn the proportions of the human figure and practice gesture drawing.


Look at those muscles!
We were also able to talk about 3D versus relief and then I introduced Giacometti's work. We had an interesting discussion about how his pieces LOOKED (skinny, stick-like, like a zombie, like they had been burned up like a match-stick) and how they made us FEEL (sad, not sad, scared, uncomfortable).

I saw that another blogger, mccann at Doodles & Noodles, added another dimension to this project by having the children include the shadows of their figures. I thought that was an interesting idea. Not only does it look great visually, but it is interesting to compare the original gesture drawing of the figure to the 3D sculpture and the contour of the shadow.

Giacometti Figure Study

Supplies Needed:

  • A few sheets of 8 1/2" x 11" copy paper
  • Pencil
  • A manikin, if possible (I bought mine at IKEA for $5) and a friend to draw
  • 3-4' section of aluminum foil (I buy mine at the Dollar Store)
  • Hot glue gun and glue sticks
  • Matte board or thick cardboard
  • One 9" x 12" piece of black construction paper
  • Stapler
  • Scissors
  • Glue stick
  • Lamp (we used a flashlight but that moved too much)
Directions:

1. Warm up by drawing a few gesture drawings of the figure in different poses. I talked briefly about the shapes that make up the human figure and how to draw the figure step-by-step. As the students posed, I posed Manny, the manikin, into the same pose so we could talk about the parts of the body and how they were arranged in each pose. I pointed out how the parts of the body joined and how they bent. Many times, young students will add too many joints or make knees bend the wrong way (OUCH!). One of my students asked, "When did this become a science lesson?" And it's true, learning to draw from life forces us to study and learn the structure of objects and beings.

2. Choose a pose to use as inspiration for your sculpture. I gave each student a 3'-4' piece of foil. I demonstrated how to shape a figure from the foil. I suggest scrunching the foil lightly at first to get the overall shape of your figure down and then squishing the foil to be more compact once you have all of the parts figured out. I really encouraged the students to create the figure from the one piece of foil and not pull off bits of foil, make parts, and then try to join them into a figure. Once you have your figure, pose it in the way it should be, using your drawing as a guide.

3. Use the hot glue to tack the figure's feet to the matte board. 

4. Slip a piece of white copy paper under the foil figure's feet in the direction you want your shadow to fall. Place the entire sculpture in front of a lamp or bright light source so that a shadow comes from the foil figure and goes across the white copy paper. Trace the shadow onto the copy paper using pencil. 

5. Compare the contour of the shadow to the gesture drawing you originally made--how are they different? How are they the same?

The elements of the Giacometti Figure Study (clockwise from top):
Manny the manikin, the gesture sketch, the shadow tracing,
 and the completed foil figure.
6. Staple the white copy paper with the shadow on it to a piece of black construction paper. Using your pencil line as a guide, cut through both layers to create a shadow from the black paper. Remove the staples and glue the shadow to the matte board using a glue stick. Note: Make sure you glue your shadow down facing the proper way--some kids tried to glue their shadows on upside down! Also, make sure that you slip a bit of your shadow under the foil figure's feet--shadows start UNDER our feet.

And Yet ANOTHER Science Link: If you had the luxury of time and patience, you could trace your foil figure's shadow throughout the day (say three times?) and cut each shadow from a different color of construction paper and then layer them on the matte board to show the passage of time or how our shadows change as the sun's position changes...just sayin'. That would be pretty awesome! ENJOY!


"Running To A Friend By The Sea"

Wednesday, October 24, 2012

Big Mouth Gargoyles

This past week, in Medieval Art, we explored the 3D art of gargoyles and chimeras. We learned some neat facts such as the name gargoyle means "water spitter" or "water vomiter" which is quite accurate since gargoyles have a gutter where rain is funneled through and then exits their mouths (sometimes the water exits the nose or, ahem, other places). Sculptures that do not have holes for water to travel through are actually called chimera (ki-mare-ah). Gargoyles and chimeras do not have to be scary--we saw some that looked like elephants, sea turtles and even Darth Vader! This art form is a great way for children to explore clay modeling techniques while experimenting with telling a story and expressing emotion in their work.

Love the fangs and curly tail!

We used a technique where the children created a pinch pot with clay first and then flipped it on its side to create the mouth of their gargoyle. This created a large caricature mouth and immediately made their sculpture more expressive. The children then utilized the "scratch and attach" method of using slip (watered down clay) to attach their features to the gargoyles. Since these are made from air dry clay, I took them home to dry and my husband sprayed them with a metallic faux-stone paint to make them look as though they truly are gargoyles carved from stone.


Thus technique of using a pinch pot to make a gargoyle is different than my previous approach. I thought the pinch pot gargoyles were very expressive, and great for a younger group. 

And a big "Thank you" to one of my students who brought in a few gargoyles from his personal collection for us to see firsthand. Seeing gargoyles and chimeras in 3D really helped facilitate the discussion.

Big Mouth Gargoyles

Supplies Needed:
  • Air dry clay (we used Crayola), about the size of a baseball
  • Newspapers and a paper plate for work surface
  • Little cup (for slip)
  • Plastic knife
  • Crayola Marker (one of the thick ones), color not important
  • Toothpick
  • Paint (acrylics, or faux stone spray paint), optional
Directions:

1. Knead the dough to get it more pliable. If it is too dry, dip your fingers in a bit of water. The dough shouldn't be goopy, but it shouldn't crack when you mold it either. Divide the dough in half and put one half aside for now. The ball of dough you are working with should be about the size of a golf ball or an egg. 

2. Using your thumb and pointer finger, gently squeeze the dough to create a pinch pot. The walls of the pinch pot should be thick enough to support its weight, but thin enough so that the piece dries properly (about 1/4" thick is good).

3. Place the pinch pot on its side on the paper plate. This is the mouth of your gargoyle. Feel free to gently manipulate the pinch pot so that the mouth is expressive: a smile, a grimace, a frown. 

4. From your excess clay, pinch off a bit, about the size of a large blueberry. Place it in your little cup with a couple Tablespoons of water. Stir the clay around in the water until it dissolves and makes mud. This is slip and it will help the clay pieces stick together better.

5. Use the rest of your excess clay to form the features and appendages of your gargoyle. Gargoyle parts you may need are: eye(s), ears, a nose (with crazy nostrils), horns, scales down the back, arms, legs, claws, fangs, teeth, tail, and/or wings. The list is endless! Some things to keep in mind when creating your gargoyle parts:
  • Don't make any piece too thin--it will crack as it dries.
  • Legs, arms, wings and tails should touch the pinch pot and/or rest up against each other for support. Parts that stick off the pinch pot too much will get damaged. Have the legs and arms fold up like your gargoyle is crouching and make the tail wrap around the body. Look at pictures of real gargoyles to see how the sculptors handled this challenge.
  • All "parts" need to be attached with slip. To do this, scratch the area you'd like to attach the "part" to the pinch pot, add a dab of slip, and then press the part onto the pinch pot. This will form a nice bond between the pieces of clay. I'm not sure if there is a formal name for this technique, but I use "scratch and attach."
I have my students use the tools they have to create all of the pieces for their gargoyles. The plastic knives are helpful to some students, the toothpick is great for scoring and poking little holes such as the pupils and drawing scales or adding a furry texture to the piece. The Crayola markers are good for rollers (the outside of the marker shaft) or to create circles for eyeballs (the end of the cap). I remind my students to add all of the parts they want to during this session, and when they think they are done I remind them to take a look again and make sure they've added details in the mouth (teeth & tongue), the top of the head (horns and hair) and the back (scales and texture). They can choose what they want to add/disregard, but I want to encourage them to add detail.

6. Once the piece has all of its "parts" on it, put it aside to dry for a few days. 

7. You can leave the sculptures as they are, or paint them. Before painting, I do a once over and hot glue any bits that seem to be falling off. Acrylic paint works well on the dry clay and you could always use a limited palette such as grey, black and white and have the students create their own faux stone look. I had a 50% off coupon for Michael's craft store and wanted to try the faux stone spray paint, so I picked that up. My husband is the spray paint guy, so I had him spray the gargoyles for me.

Note: One can of stone spray paint covered eight sculptures. I think the color we chose (a metallic stone) looked more silver than anything else. I would have liked a more "plain stone" look. Also, this paint is expensive. $5.00 for 8 sculptures is probably a bit much if you were doing this with a large group, but worked with my smaller group.


Great expression--love the two teeth in front!

Cyclops with big claws on the toes. The wings are resting against
the gargoyle's haunches so they are supported.

This student was inspired by some of the animal gargoyles we looked at.
This elephant has lovely ears. It has a trunk and tusks, too
(sorry the picture is kind of blurry).

Monday, October 22, 2012

What a Relief! Monet Waterlilies

Last week my Modern Art class created pictures based on van Gogh's "Starry Night" painting. The focus was on little strokes of color and using MANY colors in each section. It seemed to me that a natural next step would be to learn about Monet. With this project, the students could, again, work from a reproduction in order to increase their awareness of the artist's technique and color choices, and build on what they learned last week.


Monet also used little dashes of color in his work. We used oil pastels to create our dashes of color. I told the children that we weren't doing to connect these dashes with watercolor paint like we did last week in our van Gogh pieces--this week they needed to cover the entire surface of their piece with dashes of color. To make this less daunting, I reduced the size of the paper. I also used a nice blue color of matte board as their "base." This way, if a bit of blue poke through between the dashes, it still looked like water.

Monet also used MANY colors in his work. We listed all the colors we saw in the reproductions in front of us and pretty much determined that we could use all of the oil pastels in our kits (they are a collection of 12 colors). I asked them to try to use every color at least once in their backgrounds. This wasn't a set rule (like my three-colors-in-each-section rule of last week), but I wanted them to try MANY colors.

We then created the lily pads and lilies separately and attached them. The children were open to working in this way since the "collage technique" was similar to the van Gogh pieces they had made the week before. The lilies are created using tissue paper "puffs" and stick out from the background. This is not 3D, since we can't completely walk around the piece and see it from all sides, but is called a relief.

I had never done a lesson like this before, but I was VERY happy with it. I love the dashes of color and the bright hues of the oil pastels!

Monet Water Lily Relief

Supplies Needed:
  • Reproduction of one of Monet's Water Lily Paintings
  • Matte Board scrap in a medium blue (or other watery color), ours were 8" x 10"
  • Ruler
  • Pencil
  • Masking tape
  • Oil pastels (ours were "Cray•pas" brand, a set of 16)
  • Scrap pieces of poster board or white card stock (for lily pads)
  • Scissors
  • Scrap bits of tissues paper in a variety of peach, pink, white, yellow colors (three colors at least)
  • Clear tape
  • Tacky glue
Directions:

1. Use the ruler to create a 1" border around the edge of your matte board--all four sides.

2. Attach pieces of masking tape to the matter board, using your pencil lines as a guide, to create a nice taped "frame" around the edge of the matte board. When you are done, you'll be removing the tape and this will leave a nice clean edge around your piece. **TIP: stick the masking tape strips to your shirt before placing them on the matte board so they loose some of their stickiness and are easier to remove later on.**

3. Begin filling in the background of your piece using the oil pastels. You will want to use little dashes of color--using the end of the oil pastel will give you a nice thick dash. You can change colors and layer dashes over one another. Make sure you aren't scribbling like you do with a crayon--dash, dash, dash...filling in the water and the plants on the edge of the water.

4. Once the background is done, draw three ovals with pencil onto the white card stock. The ovals should be about 1 1/2" wide. These are your lily pads. Fill in the lily pads using at least three colors (ha! I had to say it!). Cut the ovals out and put a little slit in each one coming from one edge into the center. Put aside.

5. Cut or rip three tissue paper squares. They should be of a couple different colors and be around 1 1/2" square. Layer them and pinch the center and give them a twist to make a little "pouf" of tissue paper. This will be your water lily. Insert the twisted tip of the water lily into the slit of the lily pad you created. Tape the point of the tip to the backside of the lily pad with clear tape to secure them together. Repeat with the other lily pads you have created.

6. Put a dab of glue on the back of each lily pad and place them onto the background. If you'd like, you can add some lily pads to the background with oil pastels. This gives the illusion of depth in your picture, but it is not necessary.


Sunday, October 21, 2012

Starry Night, Step-By-Step

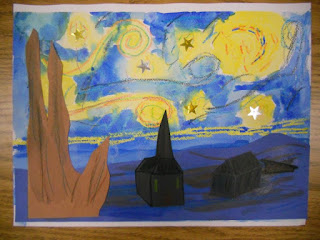
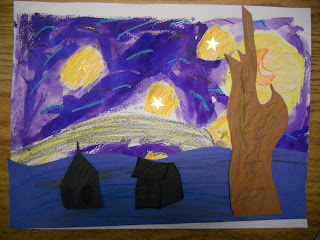
Van Gogh is one of the world's most famous artists and it seems that every art educator has his/her own projects already with which they introduce this fabulous artist. There are so many great projects out there and van Gogh's body of work is so large that it was hard for me to choose just one van Gogh-inspired project to do with my Modern Art class. I finally chose van Gogh's "Starry Night." While this is by no means a new and innovative project, I thought it was great. This is how I tackled it with my students:


The basic elements of a Starry Night: sky, buildings, hill, and tree.
We looked at a couple of books about the artist and noticed all of the colors he used in his paintings. We noted that sometimes his color choices didn't even make sense, like when he painted a sky pink! How unusual! We also noticed how he used little dashes or short brush strokes to add color and that our eyes mixed the colors in these areas. These short brush strokes also created movement in his work (similar to how the repetitive lines in our Degas pieces created movement). We also saw that he used VERY thick application of paint in his work--sometimes spreading the paint with a little spatula called a palette knife. WOW!

Poor Vincent sold very few paintings and drawings during his lifetime, because people of the 1890's didn't quite appreciate his vibrant colors. Today his paintings are some of the most famous and most beloved in the world (and sell for millions).

We looked closely at van Gogh's Starry Night and talked about our observations. We then had reproductions of the painting in front of us so we could see how van Gogh would create each section: sky, hill, tree, and buildings. Using the real painting as a guide allows the children to really see the work and bring their own pieces to another level. The children were required to use AT LEAST THREE COLORS in every section they were creating. That pushed them to think of color combos that would work for each section. Some of their color choices were amazing and inspiring.


Van Gogh-Inspired Starry Night

Supplies:
  • Reproduction of van Gogh's "Starry Night"
  • One 9" x 12" piece of watercolor paper
  • Masking Tape
  • Cardboard to tape the watercolor paper to
  • Gold and silver star stickers
  • Crayons 
  • Watercolor paints & brush
  • Water bucket & paper towels
  • Construction paper rectangles: Dark blue, 4 1/2" x 12"; Brown, 4" x 9"; Black, 4 1/2" x 6"
  • Scissors
  • Glue stick
Directions:

1. Tape the watercolor paper to the cardboard on all sides so that the paper doesn't buckle when wet.

2. Use the crayon to draw a moon on the watercolor paper. Make sure your crayon marks are nice a heavy because we'll be adding washes of watercolor and you want them to show up through the watercolor paint.

3. Put 5-6 silver and gold stars on the watercolor paper in the sky area. 

4. Use your crayons to add swirls and dashes all around the moon and stars. Use "Starry Night" as reference. Use at least three colors in these light areas.

5. Use dashes in the dark "blue" area of the sky. Use at least three colors in this sky area. Don't color in the entire sky area with crayon, you'll be filling in the sky in the next step. Keep pressing firmly with the crayon.

6. Once your entire sky has all of the dashes and swirls you want on it, use watercolors to add a yellow glow around the stars and moon. If the yellow is too much for you, dab the paint on the paper with a piece of paper towel. Then add blue paint to the rest of the sky. You can blend the yellow and blue areas of the sky to make a bit of green (that seems to happen in van Gogh's piece). Cover the entire paper with watercolor. The bottom couple of inches will be covered by your construction paper hills, but you don't want to have a gap where the sky ends and your hills begin. Set the sky aside to dry.

7. Create the ground: grab your dark blue construction paper rectangle (4 1/2" x 12"). Use a dark crayon to draw the hills for your painting. Using additional crayons, add dashes of color (at least three colors!) to the hills. You can use a bit of watercolor in streaks as well, but don't soak the paper. Cut the hills out and set aside.

8. Create the cypress tree: grab your brown construction paper rectangle (4" x 9"). Use a dark crayon to draw the tree for your painting. Using additional crayons, add dashes of color (at least three colors!) to the tree. You can use a bit of watercolor in streaks as well, but don't soak the paper. Cut the tree out and set aside.

9. Create the buildings: same deal as steps 7 & 8 above, but use the black paper rectangle (4 1/2" x 6"). You can use at least three colors here as well. The watercolor streaks and crayon will show up on the back paper. I had the children do at least two buildings. Cut them out and set aside.

10. Once your background is dry, glue the hill, tree, and buildings to it.

WOW! You're done! Great job!


Friday, October 19, 2012

Last Minute Fall Projects For Older Children

I've been traveling all over these last couple of weeks enjoying some time with kids of all ages! I have been carrying around a couple of projects for my older students to do once their class projects have been completed. Two of these projects are self-directed and able to be set-up, executed, and cleaned-up by the children themselves. Love that!

Both projects are VERY much worth trying. Take a few minutes and try them out yourself!

Leaf prints: a great project I saw online and tried with my older kids this week was one I saw on the blog Deep Space Sparkle. Paint leaves white and print on black paper. Use a sponge to print colors such as red, green, brown, yellow and orange in the negative space around the leaves. This is an easy, but striking, piece. For more info, check out her post here.

Here are some of my students working on the Leaf Print project
from Deep Space Sparkle--they all loved how they came out. Me too!

Symmetrical Leaves: I had a big bag of leaves I carried around with me these last two weeks. I used them for the preschoolers to observe and match, the Kinders made leaf rubbings from them, the Elementary students used them in the leaf printing project above, and my private art students drew them. We cut the leaves down the middle using scissors, glued the half leaves to paper and drew the missing half back in with pencil. This is harder than it looks! It was a great project to do during that transition time between projects or while another project dried.

The drawing on the right were done by my 9-year-old student.

Enjoy these easy projects that celebrate Autumn!

Thursday, October 18, 2012

Preschool Leaf Exploration

The other day I had a lovely class with a bunch of preschoolers at Peabody Mill Environmental Center. They stop by once a month to learn about science and nature and this month I was asked to teach them about leaves. This is what we did:

Outdoor Activity
We discussed how trees change throughout the seasons. Right now the leaves are very colorful and are falling to the ground since it is Autumn. We went on a leaf hunt and collected interesting leaves. We noticed how leaves can come in different shapes, colors, and sizes. A nice book that tied in with our walk was "Leaf Jumpers," by Carole Gerber. I quickly skimmed the book showing them the different leaf shapes and pointing out the ones that matched the leaves we had collected. We were able to collect red maple, birch, burr oak and regular oak leaves (as well as a couple I could not identify).

Indoor Time:
We discussed the seasons and talked about how trees look different in each season. I read the book "Leaves!" by David Ezra Stein and pointed out the trees depicted in each season. This is a cute book about a little bear who doesn't understand why the leaves are falling off of the tree, but is VERY happy (and reassured) when he sees new leaves in the spring. We were able to tell what season it was in the pictures by looking at the details in the illustrations.

Leaf Critters:
Once we came back inside with our leaves, we glued them to paper. We then added eyeball stickers to them and used a marker to add details such as arms, legs, wings, and/or antennae to make Leaf Critters. A good book that ties in with this craft would be "Leaf Man," by Lois Elhert.


Making Trees of Our Own:
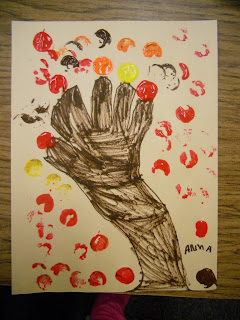
The children also created autumn trees using simple art supplies. This was similar to the project I did the other day with the Kinders at Clark, but I used smaller paper (9" x 12") and traced their hands and had them color the "trunk" and "branches" with crayons. Then they were able to use wine corks to stamp paint "leaves"onto their pictures. They came out very cute and this gave us an opportunity to try some new stuff (stamping/printmaking, tracing, coloring) while learning the parts of the tree and noticing all of those beautiful fall colors.


Additional Activities:
Leaf collecting is fun for little ones--it is nice to see how many different kinds they can find! You can keep the leaves as they are or glue them to pieces of paper to make a leaf book.

Leaf rubbing may be overdone in some people's eyes, but it is fun! One thing I've done (that I saw on Pinterest) is to take a big long piece of paper (from a roll--maybe the piece is about 6' long) and tape it down to the floor or on a long table with various leaves scattered underneath. Show the children how to use the side of a crayon to make a leaf rubbing and the leaves magically appear on the paper. I used newsprint on a roll with great results.

Additional Fall Books: "Why Do Leaves Change Color," by Betsy Maestro is a great book for older children (and for parents to read so that we can answer all of those questions about Autumn!). It is one of the Let's Read And Find Out series of science books. "Red Leaf, Yellow Leaf," by Lois Ehlert is also a good one, as is "When The Leaf Blew In," by Steve Metzger (this one is great for cause and effect and a bit of silliness!).

Sing a Song of Autumn: many sites have great songs to get children up and moving. One site I like is  Perpetual Preschool. What a wonderful way to end the day with a song!


Monday, October 15, 2012

Paper Mosaic Skull

Here's a quick little project that can be used in a variety of ways. These are 1/2" paper squares, but you could scale the pattern down to use 1/4" squares for a smaller skull. Mosaics have a definite art history link, but also tie in with math. This might be a good project to create when you have a couple of free minutes of downtime in your classroom or in your day (pack a less messy version of the project for your child to do at the doctor's office or in the car).

This skull was cut out and glued to two pieces of background paper--
a torn-edged orange and a black for a bit of contrast.
Here are the basic instructions followed by a couple of variations.

Skull Mosaic

Supplies Needed (for very basic version):
  • Graph paper
  • Pencil
  • Sharpie
  • Paper grid/pattern printed on copy paper
  • 1/2" construction paper squares in white and black
  • 1/4" strip of white construction paper
  • Glue stick
  • Scissors
  • Piece of construction paper (or patterned paper) for background (your choice of color(s))
Directions:

1. Using my example as a guide, create the skull "pattern" on graph paper. I made my squares 1/2" for my 5-year-old. Darken the grid lines with Sharpie so they will reproduce well. I used an ultra fine tip to show the division of the squares, but then a regular sharpie to bold the edges of the different sections of the design (edge of skull, eyes, nose, and mouth). Slightly shade the areas of your design that you would like to be black, so the children know to place black squares on those areas. I cut the skull pattern out and glued it to black construction paper so the children would know where the edge of the skull was and disregard the background.

The larger image in this photo is the pattern I made on graph paper,
cut out and glued on a plain black background so I could photocopy
it for the children. This keeps the background plain so they can focus on the skull.
The smaller image is a copy of my skull pattern, copied at 50% to make 1/4" squares
in the mosaic (good for bookmarks or a pin or something).
2. Photocopy the grid onto plain white copy paper.

3. Use glue stick to glue construction paper squares directly onto the photocopy paper. Light areas of the grid get white construction paper squares glued to them and shaded areas get black squares glued to them. Cover the entire skull pattern on the copy paper, but leave the negative space (background) around the skull blank.

4. When all of the squares of the skull are glued down, you can use the 1/4" strip of white paper to divide up the mouth area so that it looks like the skull has teeth. We just eyeballed this part. Attach the pieces with glue stick.

5. When all of your gluing is done, use the scissors to cut around the outside of the skull, cutting away the extra copy paper. Flip the skull over and put glue on the back. Place the finished skull on the background paper (this gives the piece a more finished look).

Other variations:

I used 1/2" squares for my 5-year-old to do this project, but you could use 1" squares and make a bigger skull (or increase the square size even LARGER and make one for the wall). Another option for older children, is to decrease the size of the squares to 1/4" to make smaller skulls to create a pin, bookmark, or to use as a decoration for a candle. 

If you want to create the mosaic to Mod Podge on a clear glass object (for a candle holder, etc.). Use your paper grid pattern as a guide, but layer some tracing paper on top of it and glue the paper pieces to the tracing paper. Then trim the excess tracing paper and Mod Podge the tracing paper (with attached paper mosaic glued to it) to the glass object you want. This is a process I've used a lot in my teaching, you can check out a similar post where we use tracing paper as a substrate for the paper mosaic pieces but we Mod Podge it to wood.

I hope you enjoy this quick little project with its many variations! If you use this project, be sure to send me your thoughts and photos so I can post them here--I'd love to see how YOU used this idea!

Friday, October 12, 2012

Wandering and Collecting

I once read somewhere that art teachers are like the scavengers of the school: we are constantly rummaging through the trash "saving" pieces of this and that to be refashioned into art projects. Art teachers have been known to stare off into space when inspiration for a lesson strikes, immediately sketching an idea onto a scrap of paper and stuffing it into our apron pockets for later. We accept all sorts of wonderful donations that get squirreled away and make us worried that one day the people from the show "Hoarders: Buried Alive" will come knocking asking to see the supply closet! Some of us even push carts filled to the brim with magical art supplies around school buildings with bits and pieces falling off along the way, leaving a trail of broken crayons and tissue paper bits in our wake. 

Bright colors! Fall is so inspiring to me.

You can see how I operate, huh?

What I am getting at (and I swear I'm not just writing this post as an excuse for my "habit" of collecting!), is that you never know when inspiration will strike. I live in New England and right now the trees are crazy with color. You can see my minivan swerving all over the road as I exclaim to my children (who may or may not actually be in the car with me), "Look at those leaves! Beautiful!" And, "OH! That sky!" And last night: "Look at those trees in the fog! WOW!"

This week has been VERY rainy here, which makes the colors of the leaves even more spectacular. I have pulled the car over at least four times in the last two days to pick flowers and pick up interesting shaped and colored leaves. The neighbors worry. My kids are embarrassed. The townsfolk must wonder who this woman is wandering about the town, staring at trees and asking random landscapers what type of leaf this is exactly....Yes, I did. And it was a silver maple leaf.

Yesterday I couldn't help myself. I was headed home to teach a private lesson where one of my students is creating a piece inspired by Georgia O'Keefe of a close up of a sunflower made with tissue paper on canvas using Elmer's glue (I'll post those picts soon) and I saw some beautiful flowers in the rain. They were golden yellow and pinky-red. At the same time! I drove by...I went back...and picked some. I then went home and created the piece in this post.

The minivan-stopping culprit. Gorgeous!
I don't know what type of flower it is, but the colors are fantastic!
Inspired.

Fall, I love you!

Thursday, October 11, 2012

Monster Sketchbooks

Last fall, my (then) four-year-old son and I came up with these cute Monster Sketchbooks. He was able to make a few of them and then he happily drew and wrote his name in them while I worked next to him on some other projects.


These would be great for giveaways in lieu of candy (if you want to be "that house"-hee hee!) or a neat party or classroom craft. The matchbook case-style notebook is easy and quick to do. You don't have to do a monster-theme. This would also be a nice notebook to create before heading out on a hike. Bring your notebook with you and do leaf rubbings and draw from nature!

Monster Sketchbooks

Materials Needed:
  • 1 piece of colored construction paper (9x12") for the cover (you could use orange for a pumpkin, green for a monster, purple for a vampire, white for a ghost or mummy, etc.)
  • 3 sheets of white construction paper (9x12") for the drawing paper inside
  • Scissors
  • A ruler and pencil
  • Stapler
  • Markers and crayons
Directions:

1. Cut the piece of construction paper you'll be using for the cover in half lengthwise. You will have two pieces, each 4 1/2"x 12." You only need one per booklet, so put one aside for another use.

2. Cut each sheet of white construction paper into three 4"x9" pieces. Stack all nine pieces together and fold them in half. This will make the bundle of drawing paper inside your notebook.

3. Mark the cover and begin folding: Using the picture, above, as a guide, divide the cover rectangle into three sections: the first should be 1" wide. The next section should be 5 3/4" wide, and the last should be 5 1/4" wide.

4. Fold the cover at the 1" tab. Insert the folded edge of the stack of white paper into the cover at the 1" tab and staple. You can then close the cover and tuck it into this flap--like an oversize matchbook.

5. Use construction paper scraps and/or markers to decorate the covers of the sketchbooks like your favorite monster!

Happy Halloween!

Wednesday, October 10, 2012

More Illuminated Names

My after school art class is focusing on Medieval Art and this week we learned about illuminated manuscripts and hand lettering. The original post on my blog appears here. This was a nice way for the children to get to know one another and create a personalized keepsake. This project really is easy and requires very few supplies.

Here are some of the results:

Katie enjoyed using the gold pen.

Paige said that the critter the makes up the letter "e" in her name
is meant to show that she likes weird, scary, animals.

Love the cactus!

Alex likes money, math, candy, and super heros. Oh, and that
is a Ninja peeking out from behind the "A."

Tuesday, October 9, 2012

Fall Trees With Cork-Stamped Leaves

I had the best time today with about 60 kindergardeners! I was asked to do an art project with them as part of a Fall-themed day their teachers had created for them. It was wonderful--the children were so happy and they were able to explore outside, do some fun movement activities (I joined in too!) and they also did leaf rubbings and this stamping project with me. Thank you so much to the Kindergarten teachers at Clark Elementary School for allowing me to come in for the afternoon.


This picture has a flurry of fall leaves
flying wildly all over--and note the piles on the ground.
I'm so glad I'm not raking all of those leaves up!

I shared a nice little book called "Leaf Jumpers," by Carole Gerber with the children. This book was different than I expected--it's a fiction book. It described the sound, shapes and colors of leaves and identifies eight different kinds of leaf shapes within its pages. This would be a great book to read before going on a leaf hunt! It got us thinking about the colors and shapes of leaves. It also had some very poetic ways of describing the colors of the leaves: "...flame bright and vivid like a match." The back of the book has a little page on the science of leaves and why they change color.

I had the children listen carefully since this project had tracing, cutting, gluing and stamping. We need to listen when doing so much stuff with our art.  I then gave them a quick demo on how to stamp using the corks: dip in paint then stamp gently on paper--no smooshing the cork around! We aren't painting with a brush. It's up and down only.

Next we went over to our tables and began to work. What a great time and a lovely lesson on color and printmaking. Enjoy!

Fall Cork-stamped Trees

Supplies Needed:
  • One 12" x 18" piece of construction paper for background (light blue or whatever color you'd like)
  • One 9" x 12" piece of brown construction paper for tree trunk and branches
  • Pencil
  • Scissors
  • Glue stick
  • Wine Corks
  • Paper plates for paint palettes
  • Red, Orange, Yellow, and Brown Tempera Paint
  • Newspapers to cover work surface
Directions:

1. Trace the child's hand and part of his/her forearm onto the brown paper. This will be the trunk and branches of the tree. Cut the tracing out (most of the children were fine with this--we only lost a couple paper fingers, er, I mean, branches. Glue the trunk and branches to the background paper, making sure the base of your tree trunk is at the bottom of the page.

2. Dip the cork into the paint and stamp leaves all over the paper, filling your tree with beautiful colored leaves!  It's important to have the children fill the ENTIRE top of the tree with leaves--not just a couple along the edges of the branches! No naked trees--this isn't winter. Make sure you get all four colors of paint on your tree.

That's it! A beautiful fall keepsake!

Fall Leaf Rubbings:

When the children were done, they could move over to a couple tables where I had long sheets of newsprint from a roll, taped down. Under the paper, I had placed different types of leaves. They then could use flat-sided crayons to do rubbings and discover the different leaves I had "hidden" under the paper. This was a nice project to keep little hands busy for the last five minutes of class.

Wednesday, October 3, 2012

Dragon (Faux) Stained Glass

Yesterday was the first session in my after school Medieval Art Class! What a blast! I have a great group of kids and a nice mix of boys and girls!


Aren't these fabulous?!
We did a variation on a project I saw in the book, "Medieval Projects You Can Do" by Marsha Groves. The image is pretty much the one Groves uses, but I used the Contact paper technique that I've developed with my students over the last couple years.

I showed the children pictures of stained glass from medieval times, making sure that I had examples of traditional stained glass (tall and rectangular), some details showing the brushed-on enamel details, and an example of a rose window with its circular design.

I then provided them with a guide that had the dragon image on it with all of the sections labeled so the children would know what was fire, what was dragon and what was background (sometimes that gets confusing). Using a template like this is actually very traditional. In medieval times artisans would sketch the designs for windows onto wooden panels and the artisans would fabricate the windows on top of the wooden templates.

The end results of this project were gorgeous! It is funny how different the pieces can be even thought they are all the same subject.

One bit of warning, using tissue paper squares with children can be, um...tricky. This group wasn't bad at all: I had the tissue paper squares in a tray in the center of each table and I warned that crazy movements can cause the squares can fly up and get on other people's work (not cool!). Once the tissue paper is on the Contact paper, it cannot be removed, so the children need to be mindful of their neighbors' pieces and move slowly and carefully.

I do hope you try this project, it really is a cool one!

Here's the method:

Dragon (Faux) Stained Glass

Supplies Needed:
  • Template (I copied mine on 8 1/2" x 11" paper)
  • Pencils, Ruler & Sharpie to create your template
  • Piece of clear Contact paper slightly larger than your paper guide
  • Clear tape
  • Four 3/4" x 12" strips black construction paper "(for frame)
  • About four 1/4" x 12" strips black construction paper "(for leading)
  • Many 1" squares of tissue paper, assorted colors
  • Scissors
  • 1 clear sheet protector, optional
Directions:

1. Make your template: Draw a border around the copy paper that is about 1/2" wide. Use the pencil & ruler to create a simple, bold image made up of straight lines. Don't make anything too detailed! You can use the dragon image for inspiration. Once you have your design down, use the Sharpie to go over the lines. These will be the guide lines you will use when placing your construction paper leading. You may want younger children to work from a template image you've created, but older children could create their own over a period of classes.

2. Tape the template to the table using clear tape.

3. Remove the paper backing from the Contact paper and place it on top of the template sticky side up. You will be doing all of the work on the sticky side of the Contact paper. Tape the Contact paper to the table using a couple pieces of clear tape to hold it in place while you work.

4. Place the 3/4" pieces of black construction paper over the areas of the template designated as your border. Place the paper strips directly onto the sticky side of the Contact paper and press lightly. It is OK if the strips extend beyond your template--you'll be trimming the piece later.

5. Using your template as a guide, place the 1/4" strips of construction paper over the leading lines on the image you drew. Simply rip (or cut) the construction paper strips to the proper length to cover your leading lines. Cover all of the lines in your drawing.

6. Once you have the border and all of the leading lines covered in construction paper, start filling in the remaining sections with colorful pieces of tissue paper. The squares can overlap each other and can overlap the black construction paper lines a bit (you are actually working on the piece from behind). But take care to make sure the tissue paper goes where you want it to. It is almost impossible to remove the tissue paper from the Contact paper once it gets on there. 

7. Once all of the sections are filled in with color, trim the piece down to 8 1/2" x 11" and slip it into a clear sheet protector to protect it. Other options would be to use another sheet of Contact paper on the other side of the piece to seal the tissue paper and construction paper safely inside. Or you could run the piece through a laminator (maybe), I don't have one at my disposal, so I'm not sure of that, but it may work. 

Place in a sunny window and enjoy!

Working on our dragon (faux) stained glass windows.
Everything is taped down with clear tape and the tissue paper
squares are in the center of the table in cardboard trays.

Related Posts Plugin for WordPress, Blogger...