Showing posts with label aluminum. Show all posts

Wednesday, February 20, 2013

More Giacometti Figures

Last fall I did a foil project with my homeschool kiddos where they learned about Giacommetti, figure drawing and sculpture and they created figures out of aluminum foil. Here's the original post.

"I'm thinking...I'm thinking..."
They came out great! So, I thought my after school Modern Art kiddos would also enjoy making the project. I was really surprised when most of the kids DID NOT dig this project. I presented the same way, but that day, my after school kids had a case of spring fever and this project wasn't able to hold their attention (even with a bit of charades, gesture drawing and squishing foil). One longtime student said, "I hate this project, can I throw it away?"

Despite the bad reviews, the children created some really interesting pieces. One student worked and reworked his figure and finally got the idea to recreate Rodin's "The Thinker." WOW!

Here are the results, enjoy!


Friday, October 26, 2012

Foil Giacometti Figures

This week, I had my students create sculptures with foil similar to Giacometti. Foil is inexpensive and easy to mold (and pretty addicting when you get twisting and turning). I also wanted to give the children an opportunity to learn the proportions of the human figure and practice gesture drawing.


Look at those muscles!
We were also able to talk about 3D versus relief and then I introduced Giacometti's work. We had an interesting discussion about how his pieces LOOKED (skinny, stick-like, like a zombie, like they had been burned up like a match-stick) and how they made us FEEL (sad, not sad, scared, uncomfortable).

I saw that another blogger, mccann at Doodles & Noodles, added another dimension to this project by having the children include the shadows of their figures. I thought that was an interesting idea. Not only does it look great visually, but it is interesting to compare the original gesture drawing of the figure to the 3D sculpture and the contour of the shadow.

Giacometti Figure Study

Supplies Needed:

  • A few sheets of 8 1/2" x 11" copy paper
  • Pencil
  • A manikin, if possible (I bought mine at IKEA for $5) and a friend to draw
  • 3-4' section of aluminum foil (I buy mine at the Dollar Store)
  • Hot glue gun and glue sticks
  • Matte board or thick cardboard
  • One 9" x 12" piece of black construction paper
  • Stapler
  • Scissors
  • Glue stick
  • Lamp (we used a flashlight but that moved too much)
Directions:

1. Warm up by drawing a few gesture drawings of the figure in different poses. I talked briefly about the shapes that make up the human figure and how to draw the figure step-by-step. As the students posed, I posed Manny, the manikin, into the same pose so we could talk about the parts of the body and how they were arranged in each pose. I pointed out how the parts of the body joined and how they bent. Many times, young students will add too many joints or make knees bend the wrong way (OUCH!). One of my students asked, "When did this become a science lesson?" And it's true, learning to draw from life forces us to study and learn the structure of objects and beings.

2. Choose a pose to use as inspiration for your sculpture. I gave each student a 3'-4' piece of foil. I demonstrated how to shape a figure from the foil. I suggest scrunching the foil lightly at first to get the overall shape of your figure down and then squishing the foil to be more compact once you have all of the parts figured out. I really encouraged the students to create the figure from the one piece of foil and not pull off bits of foil, make parts, and then try to join them into a figure. Once you have your figure, pose it in the way it should be, using your drawing as a guide.

3. Use the hot glue to tack the figure's feet to the matte board. 

4. Slip a piece of white copy paper under the foil figure's feet in the direction you want your shadow to fall. Place the entire sculpture in front of a lamp or bright light source so that a shadow comes from the foil figure and goes across the white copy paper. Trace the shadow onto the copy paper using pencil. 

5. Compare the contour of the shadow to the gesture drawing you originally made--how are they different? How are they the same?

The elements of the Giacometti Figure Study (clockwise from top):
Manny the manikin, the gesture sketch, the shadow tracing,
 and the completed foil figure.
6. Staple the white copy paper with the shadow on it to a piece of black construction paper. Using your pencil line as a guide, cut through both layers to create a shadow from the black paper. Remove the staples and glue the shadow to the matte board using a glue stick. Note: Make sure you glue your shadow down facing the proper way--some kids tried to glue their shadows on upside down! Also, make sure that you slip a bit of your shadow under the foil figure's feet--shadows start UNDER our feet.

And Yet ANOTHER Science Link: If you had the luxury of time and patience, you could trace your foil figure's shadow throughout the day (say three times?) and cut each shadow from a different color of construction paper and then layer them on the matte board to show the passage of time or how our shadows change as the sun's position changes...just sayin'. That would be pretty awesome! ENJOY!


"Running To A Friend By The Sea"

Tuesday, March 13, 2012

Mexican Folk Art Trinket Boxes

The final project that I did with my after school art class, Art Around the World 2, needed to be quick and easy since they were also finishing up their Oaxacan snakes. I had such wonderful success at Christmastime having students make Mexican Folk Art Tooled Metal Ornaments, so I had them use that process to make metalwork tops for wooden trinket boxes. They came out great! The boys in the class had just as much fun creating these as the girls did.


Mexican Folk Art Trinket Boxes:

Supplies Needed:

  • Tooling aluminum from www.dickblick.com
  • Newspapers
  • Dull pencil
  • Sharpies or other permanent markers
  • Wooden box (I bought ours at AC Moore for $1.00 each, I think)
  • Acrylic paints, assorted colors
  • Paintbrush
  • Paper plate for palette, water & paper towels
  • Hot glue & glue gun
  • Mod Podge (glossy) or spray varnish, optional

Directions:

1. Cut a circle from tooling aluminum slightly smaller that the top of the wooden box.

2. Place the aluminum onto a stack of newspapers and use the dull pencil to press the design into the aluminum.

3. Flip the aluminum over and use the Sharpies to add color to the raised design. Set aside.

4. Choose a color for your wooden box. Put a bit of paint onto the palette and add a couple of drops of water to it to thin the paint slightly. Use your paintbrush to work quickly and paint the outside & inside of the box. While the paint is still wet, use a paper towel to wipe off the excess. This technique creates a stained effect on the wood of the box, allowing the wood grain to show through. You may need to work in sections to be able to wipe the paint off while it is still wet. Let the box dry completely.

5. You can now add a decorative pattern to the box. Choose 1-2 colors that coordinate with your design and squeeze a bit of each color onto your palette (about a pea-sized amount of each). Dip the wooden end if the paintbrush into the paint and touch it to the surface of the box to make a dot. Continue around the edge of the cover or around the base of the box, as you like.

6. Once all the paint is dry, you can seal the wood with 1-2 coats of Mod Podge, if desired.


7. Once the sealant is dry, attach the tooled metal piece to the top of the box using hot glue (a grown-ups job). 


Thursday, December 15, 2011

Mexican Folk Art Ornaments

Ooooh, I have a special treat for you today! Tooled metal ornaments inspired by Mexican folk art! They are so bright and shiny, the children just loved making them!
Mexican Folk Art Ornament

When I am looking for inspiration for art projects, I look pretty much everywhere: my Art History books, gift catalogs, and magazines to name a few of my sources. My grandmother loves to bring me magazines that she's done with. No matter how old the magazine is, I love to look through them for techniques and inspiration. This craft was originally published in "Crafts" magazine in 1984. I loved the look of these ornaments and thought my art kids would love to make them. I was right! They LOVED making these. I had them make little cards to put them in so they could give them to a loved one as a gift.

The tooling aluminum needed to be ordered online from www.dickblick.com, but it was so worth it! I ordered a roll for just under $6 and combined with a couple of other things, shipping was only $7. I know that seems like a bit much, but I did have a few things in my order and the tooling aluminum is a roll of 15' or so, enough for plenty of ornaments! Plus, it is a medium that is unusual for the children to work in. I highly recommend it! So, let's get started!

Supplies Needed:

  • Tooling aluminum, available from www.dickblick.com
  • Newspaper
  • Dull pencil or blunt stick for tooling the design
  • Sharpie markers or other permanent felt tipped markers in a variety of colors (I had an eight color assortment available, but so many beautiful colors are available!)
  • Hole punch
  • 8" piece of ribbon for hanging
If you would like to make this as part of a card, see the end of this post.

Directions:

1. Choose a design for your ornament, we used the full size ornament patterns that were published in "Crafts" magazine, but I also had a few blank ornament shapes available for children to design their own. I encouraged the children to design bold designs with clear, large shapes. I also told them to fill up the entire ornament shape and add some details to their design (tons of little details may get lost, but I didn't want them to just draw one little shape in the middle of the ornament and say they were done). Just to be sure they created designs that would work, I had them show me their drawings "for approval" before they started tooling.

2. Using scissors, cut a piece of the aluminum roughly the size of your ornament. We used 4 1/2" x 6" rectangles. Tape the paper with your ornament design to the aluminum to hold it in place while you work.

3. Place the aluminum onto a pad of newspaper. This will create a soft surface for the metal. Using a dull pencil and firm pressure, trace over all of the lines of your design.

4. Once your design is done, use scissors to cut out the shape of the ornament. I found that younger children had trouble with this part and sometimes the ornament would get all bent up or the outer shape would become distorted. So if you are working with younger children, you may want to cut the ornaments out yourself.

5. Flip the ornament over and gently color the raised surfaces with permanent markers. The children can create large areas of color and then add details with a darker color on top. Encourage doing one's best work, taking one's time and adding details and pattern.

6. Once done, have the child add his/her name and date to the back.

7. Use a hole punch to create a hole for hanging and add ribbon to hang the ornament.

8. Attach to a card if desired. See my card directions, below. Feliz Navidad (Merry Christmas)!

Some of the ornaments done my my students

----------------------------


To make this project into a card:

Additional Supplies Needed: you'll need construction paper for the card, an envelope, tape to adhere the ornament to the card and the optional information for inside the card (see the info later on in the post).

Cut a piece of construction paper so that it fits inside the envelope you have. Inside the card, glue the greeting and the information about the project. Have the child sign the card.

The greeting I used was:

Feliz Navidad, próspero año y felicidad!

(Merry Christmas, a prosperous year and happiness)

 May the Spirit of the season bring you joy and peace.


I also included this information on the card: 

Tooled Metal Ornaments


Congratulations! You are the proud recipient of a hand-tooled and hand-colored metal ornament. These ornaments are done in the style of Mexican folk art with markers standing in for the traditional paint. The children used tooling aluminum from www.dickblick.com, pressing their designs into the metal with a dull pencil, then added color with permanent Sharpie markers.

Care of your ornament: the tin is bendable, so care should be taken to keep it from being crushed. It should also be hung up away from little ones since the marker could come off if the ornament is chewed on and the edges are a bit sharp for delicate fingers.


Use tape to attach the ornament to the front of the card and draw a "frame" around the ornament with a felt tip marker to fancy up the front of the card. Done!

Note: if you are going to write a name on the front of the envelope, do so before you put the ornament in the envelope or you will ruin the ornament. Also, take care not to fold or bend the ornament--the metal is pretty thin and will crush and/or bend easily. If you want to mail this card, you'll have to put it in a crush- and bend- proof package.

Friday, April 15, 2011

Medieval Metalwork

This week, in my art class, I showed the children how to do a simple technique that looks like aged metal. The children created frames and crosses and then added faux gemstones for a little sparkle!

Jewel-encrusted antique metalwork frame.

This year's art classes are all about Medieval times. We've done shields with coat-of-arms, marionettes of kings and princesses, stained glass dragons, and many other projects you'll soon be seeing in this blog (one day at a time!!). This week, I decided to have the children do a project that simulates metalwork. I was thinking of those large, heavy covers of illuminated manuscripts that were pieces of wood covered with tooled sheets of gold and inlaid with real gemstones (see below). Since my budget is a bit more limited than that--I thought we could use tin foil and plastic gems from a craft store.

Background Information:

Since medieval manuscripts would take many years to create and often were the life's work of many of the artists, the covers of these books were often just as elaborate. The covers were often a plank of wood covered with gold, jewels, enamelwork, precious metals, and ivory. One such example of this type of ornate work is the cover of the Lindau Gospels entitled, "Crucifixion with Angels and Mourning Figures." This piece is from The Pierpont Morgan Library in New York.

The cover from the Lindau Gospels uses a technique called repoussé "a technique by which metal reliefs are created. Thin sheets of metal are gently hammered from the back to create a protruding image. More elaborate reliefs are created with wooden forms against which the metal sheets are pressed (Art History: Volume 1, by Marilyn Stokstad, 1995)."

The project below is very similar to this technique. Enjoy!

Supplies Needed:
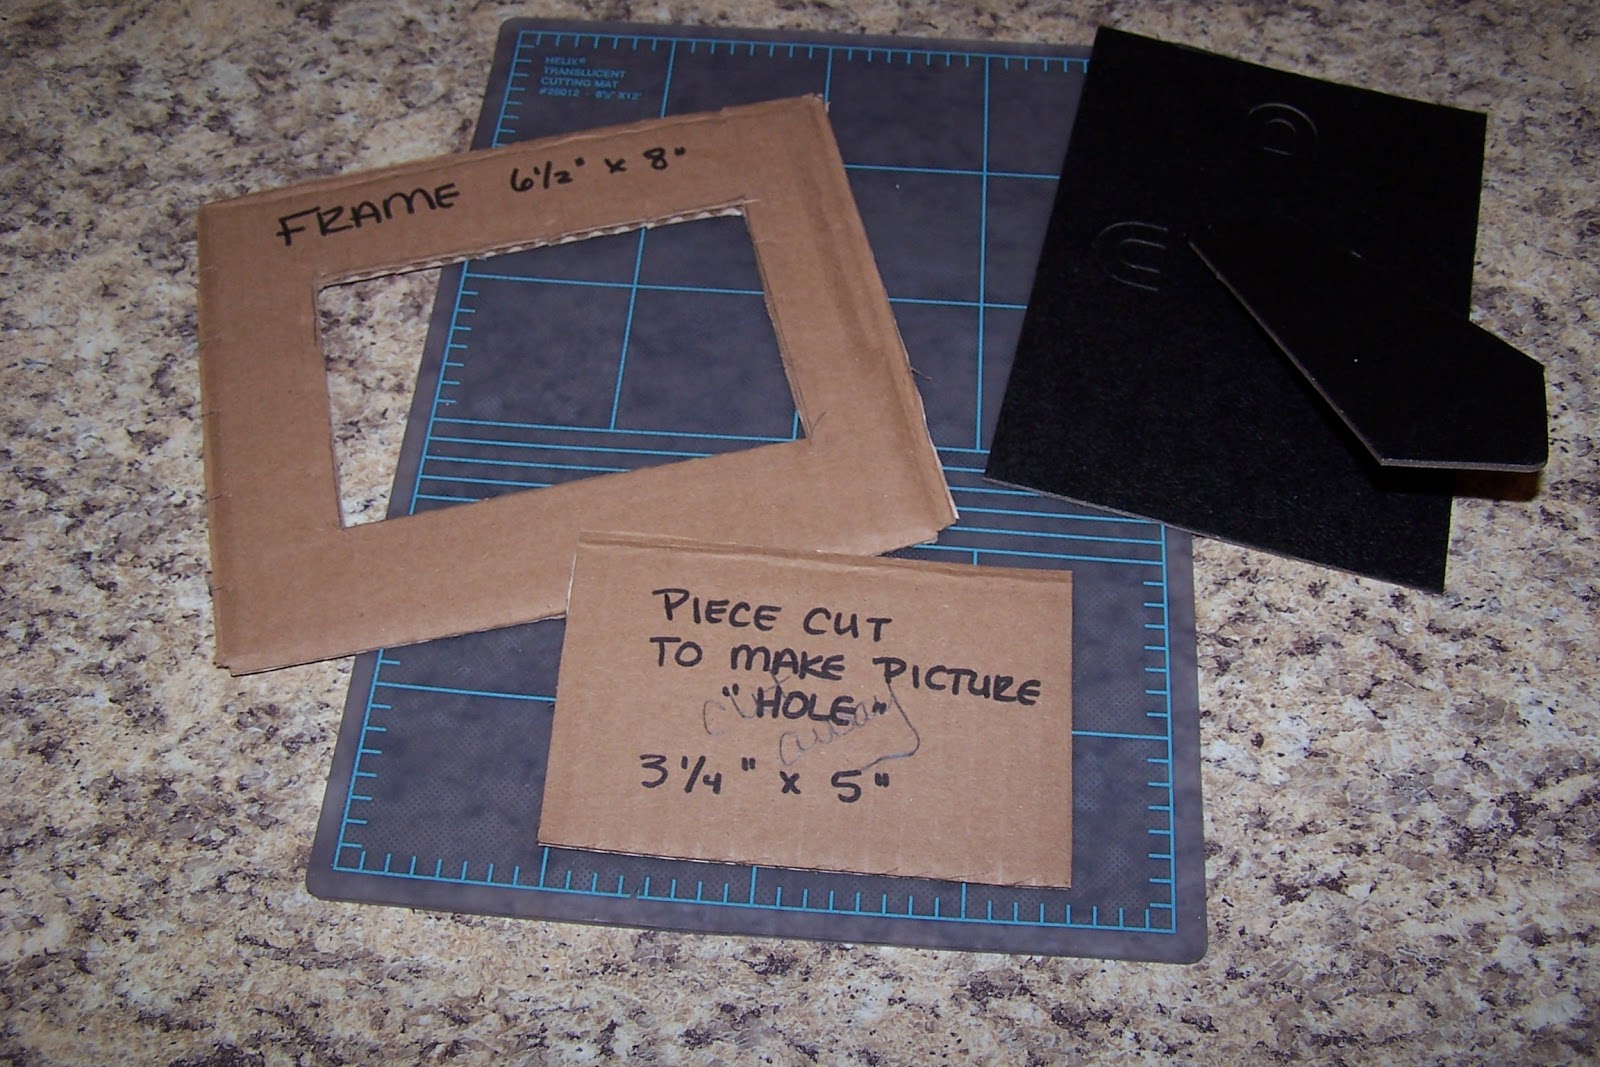
  • Corrugated cardboard cut into a frame shape (6 1/2" x 8') or a cross (a 3" x 7" piece of cardboard glued to a 3" x 11" piece of cardboard)
  • Self adhesive foam letters and shapes (optional)
  • Yarn
  • PVA glue (I use Elmer's glue)
  • Paintbrush
  • Water bowl and water
  • Scissors
  • Aluminum foil (standard household foil is fine)
  • Clear tape
  • Black tempura paint
  • Paper plate for a palette
  • Facial tissue
  • Glue gun and hot glue sticks (optional)
  • Plastic jewels (I bought mine at Michael's--they had a value pack of 1pound of "bling")
Directions:

1. If you are creating a frame, think about which way you'd like to have the picture displayed. This is important if you are doing lettering on your frame.
Here you can see the cardboard piece I'll be using for my frame as well as an easel-backed piece of cardboard from an old frame that I later glued onto the finished frame. That part is optional,

2. Create a design on the cardboard frame (or cross) using self adhesive letters and shapes. Words and phrases such as, "family," "best friends," "love," or your last name work well. You can also use yarn for the letters and shapes (and also for lines). Put a line of glue onto the cardboard and then gently press the yarn into it. Keep your design simple.


3. Once you have your design done, brush a thin coat of white glue all over frame. You can brush right over the foam shapes because the adhesive on the back of the shapes is nice and strong, but go gently over the yarn. You will want to go along the edges of the yarn you have glued down so that you don't mess up your design.
My design is done. Now I can brush white glue over the entire design.


4. Take a piece of foil that is slightly larger than your piece and gently crumple it--not too much or it will tear when you open it back up. Open the foil back up and smooth it a bit. Now lay it onto the frame over the glue on your design. Press gently all over your design, around the letter and shapes.
Gently smooth the foil over the design. Press gently around the yarn and foam shapes (if using). Be careful not to use your nails, since the foil will tear easily.


5. Flip the piece over and tape the extra foil to the back of the cardboard. If you are doing a frame, you'll need to gently cut an "x" in the foil in the center portion of the frame and fold back the foil there (and tape it to the back of the frame) so that you'll be able to see the picture in the center of your frame.


6. Now comes the messy part! Squeeze a bit of black tempera paint onto the paper plate. Dip your paintbrush into water and mix it in the paint to thin the paint a bit. Brush the thinned tempera paint over the entire front of your frame.


7. Now....wait! Leave your frame to dry for 10-15 minutes. While it is drying you can draw a picture to go in your frame. Will the picture be of your family? A pet? A medieval scene with a knight and a dragon?

8. Once the time is up and your paint is not quite dry, gently buff off the paint with a piece of facial tissue (it may take your piece a bit longer to be ready to buff--the paint should be "almost dry"). The more black you leave, the more "antique" the frame will look.


9. Use a hot glue gun, white glue, or tacky glue to attach jewels to the frame.
I live this tacky glue in a squeeze tube!

10. Attach your picture to the back--and you are ready to display your medieval work of art!

Variation: Easter is a wonderful time to do this project and create a cross! This technique makes a beautiful cross that looks unique. It is a nice project to do as a family--certainly a conversation-starter on many levels! Enjoy!
The same technique can be used to create a cross. I left a good amount of the paint on the edges to give this cross a very old feel. This picture doesn't do it justice--the jewels really shine and add sparkle. This would also be a nice gift idea.
Related Posts Plugin for WordPress, Blogger...