Showing posts with label picture. Show all posts

Tuesday, December 18, 2012

Artsonia Ornament Picture How-To

I saw this project on Artsonia and thought my students would love to make this, and guess what? I did too! I made this along side one of my private art students and it was fun and easy and I love the contrast and graphic look of the piece.


Ornaments and Evergreen Picture

Supplies Needed:

  • Scraps of watercolor paper 
  • A circular object to trace--I used a glass (our circles are about 2 1/2" in diameter)
  • Pencil
  • Watercolor paints and brushes
  • White watercolor pencil or crayon
  • Water bucket and paper towels
  • Black mat board
  • Oil Pastels
  • Tacky glue
  • Gold and silver Prismacolor colored pencils
Directions:

1. Use the pencil to trace the circular object onto your watercolor paper about four to five times. Trace lightly. It is better to have a couple more circles than you'll use, just in case.

2. Use the watercolor crayon to add the highlights to each of the ornaments.

3. Wet the entire circle of an ornament. Use the watercolors to create juicy, saturated colors on the ornaments, letting the water blend the colors (wet on wet technique). Use your brush to blend the colors into the highlight a bit to soften the edges. Try to use three colors per ornament--choosing colors that are next to each other on the color wheel (analogous) so that they blend nicely. Repeat with all of the ornaments. Let dry.

4. Use the oil pastels to create the branches of the evergreens. I had my student start with the brown part of the branches. Use a chocolate brown first and rough in the branch. Then go over the branch with a lighter brown (like a yellow ochre) for the highlights. 

5. Use the oil pastels to create the needles of the evergreen. Start with a dark emerald green and rough in some of the needles. Then layer on the medium kelly green color for the bulk of the needles. Finally, use a light moss green for the highlights. Remember to make the needles start at the branch and curve toward the tip of the branch, the way real evergreen needles do.

6. Glue the ornaments onto the background. you may need to place a book on top of them to keep them from curling.

7. Use the gold colored pencil to add the top of the ornament (the finial?) and the hook. Use the silver to create a bit of highlight on the gold.

Merry Christmas!

Monday, December 3, 2012

Story-Telling Animal Pelts

For week three of my Tribal Art of North America after school art class, I thought we'd do a project I saw over at Sleepyhead Design Studio. This is similar to my cave painting project, but easier to do with a larger group (no lacing the piece to a twig frame) and A LOT LESS MESSY! Yee haw!


We followed Sleepyhead's project instructions and prepped our pelts (crumpling and rubbing the paper bag to create a fuzzy, wrinkled texture) and then the children used Sharpies to cover the pelts with symbols (I had printed out some symbol sheets for them to refer to). They were encouraged to create their own symbols, too--I just had them add their symbols to the sheet and label their symbols with the meaning.

When doing a test run at home, my children just placed random symbols all over their pelts, but my students chose to use the symbols to tell a story or talk about the things they like (animals, nature, nice weather, etc.). If I were to create one of these, I think I would talk about when my family and I went camping this summer since many of the symbols on the "Picture Dictionary" sheet could be transferred to a story of a camping trip.

Once the children were done creating the symbols on their pelts, I had them use acrylic craft paints and tiny paintbrushes to add color to their pieces. We used a limited color palette: black, brown, ochre, white and turquoise. My art students argued that green and red could also be made from natural ingredients, so I let them have those too. Sleepyhead used oil pastels to add color in her project--that works well, too (I tried both in my samples). Then we mounted the pelts to a 12" x 18" piece of construction paper using a few staples (probably not authentic) and glued the "Picture Dictionary" page of symbols onto the back of the piece using a glue stick. This way, the children wouldn't have to worry if they forgot the meaning for some of the symbols.

I did this project with children in Kindergarten through grade 4 and they all enjoyed it. It's a keeper!

Tuesday, August 28, 2012

Cloud Pictures and Book: "It Looked Like Spilt Milk"

Ah...the lazy days of summer are coming to an end, but you can still enjoy the lovely weather and make some great art inspired by blue skies and fluffy clouds!


I see a dragonfly!
A great book to get your creative juices flowing is "It Looked Like Spilt Milk" by Charles G. Shaw. This book is simple but inspiring! Don't give away the ending--have the children look at the shapes in the book and guess what they are and THEN discover that they've been looking at cloud shapes! I have read it to children in Kindergarten through grade 3 and everyone enjoys guessing what the shapes are and then creating their own cloud shapes.

This is a great activity to learn about art concepts such as contour drawing and positive and negative space. It is quick and a good project to have on hand for a last minute fun project. Combine this with a trip outside on a sunny day to do some real cloud-spotting and you have an awesome time!

Cloud Pictures

Supplies Needed:

  • Blue construction paper
  • Pencil with eraser
  • Elmer's glue 
  • Cotton balls (large, fluffy ones work better than the tiny ones)

Directions:

1. Draw the outline of a simple item onto a piece of paper. Some ideas include a car, flower, butterfly or dragonfly. The sky's the limit (pun intended!!). Remember to keep it simple--don't include any inside details or make any of the parts too small.

2. Fill in the interior of your shape with glue. Liquid white school glue will work better than a glue stick.

3. Attach cotton balls to fill in the shape you made.

You are done! I told you it was super-easy!!

Flower, tree?

Airplane, butterfly, stingray?

Saturday, February 25, 2012

Mosaic Snowglobe Project Results

This past week I had the pleasure of visiting Mrs. Bevilacqua's second grade class at Wilkin's Elementary School in Amherst, NH. Mrs. Bevilacqua usually does a themed unit that involves snow globes and I thought the children would also enjoy doing the snow globe mosaics from my blog.

All 17 snow globes! Beautiful!
The second graders were very enthusiastic and creative! I started with a revised worksheet and had the students use a limited color palette (10 crayons) so that they could easily match up the paper squares with the colors they chose for their pieces. It was a two-session project, but it went quickly and the children were very happy with the results (me too!).

The revised worksheet has different labels than before.
 It is a bit easier for the children to understand: S = Sky, R = Roof, G = Ground, etc.
They use this worksheet to plan before moving onto the actual gluing.
See the original post for "how-to" info.
A detailed look at one of the mosaic pieces.
This project was a great way for the children to explore math concepts relating to a grid (each child had 100 squares on his/her piece!) as well as exploring color choices and value (in order for the sections of the picture to be easily read, the student needs to vary his/her value and color choices), learn the art of mosaics and, even within the set parameters, there was a chance for choice and creative expression.

What a fun way to spend the afternoon! Thank you, again, to Mrs. Bevilacqua and her students for all of their hard work and energy!

NOTE: I used 5" x 7" canvas boards from www.dickblick.com to mount the finished pieces on (24 for $7 or so). I then added a border above and below the mosaics with navy grosgrain ribbon glued on with hot glue. When done, I attached a paper label with the child's name. I justified the expense because these are "keepsakes." 

If you had less time and a limited budget, you could enlarge the project to 10" square (each square of the grid is 1") and have students do this project on thin white paper paper using 1" construction paper squares and glue sticks. Skip the Mod Podge and mount the finished mosaic onto a piece of construction paper. Very inexpensive, but still great!


Saturday, December 31, 2011

Easy Silhouettes

I love the look of silhouettes! They can go with just about any decor: traditional, modern, eclectic--you name it! They are a great way of preserving your child's image at a certain point in time, and they are also a great example of positive and negative space. 


A silhouette of my oldest guy--so handsome!


Positive space is the space an object occupies (in this case, the head of the person whose silhouette is being done). Negative space is the area around the object. I chose white paper to highlight the negative space around my silhouettes. Although this craft is simple, it may be best for older children or a grownup to do the actual cutting of the silhouette so that facial features stay intact. This is an inexpensive craft that would be perfect for a gift (think grandparents).

Supplies Needed:

  • Camera
  • Ultra fine point marker
  • Small, sharp scissors (I used embroidery scissors)
  • Black acrylic paint (I used flat paint in "lamp black")
  • Paint brush
  • 3 1/2" x 5" rectangle white paper (I used scrap booking card stock)
  • 5" x 7" rectangle colored paper, your choice of color (I used scrap booking card stock)
  • Black 5" x 7" frame (I bought mine at the dollar store)
  • Glue stick

Directions:

1. Take a profile picture of the person whose silhouette you will be creating. Make sure they are looking straight ahead and that their hair is neat (girls with long hair can pull it to the side or have it fall down their backs).

2. Print out the picture onto plain white paper. Use the fine point marker to outline the features of the subject. Add a gradually sloping neckline. You may need to draw in the bottom edge of their hair if it went beyond the picture. I try to keep the bottom edge of the silhouette simple and neat, but I do have a little fun when I'm drawing in the ends of the hair. Just don't go too crazy--remember, you'll have to cut it all out!

3. Use a small, sharp pair of scissors to cut out the image.

4. Paint the cutout with a coat of black acrylic paint and let it dry for several hours or overnight. 

5. Glue the cutout to the white paper. Glue the white paper to the larger, colored, piece of card stock. Insert into the frame and you are done! These are so fast you may find that you'll want to do a whole series of silhouettes! ENJOY!

Saturday, July 16, 2011

Memory Pillow and Artist Talk

I visited my son's first grade classroom a few weeks ago and gave a talk about being an artist. It was so much fun talking with the children about ways to make art as well as the different careers an artist can have. We then did a project where the children made memory pillows. It was a wonderful way for them to remember the school year and all of the friends they made this year!

The Memory Pillow--what a masterpiece!

What is an Artist?

In preparation for this project I looked in the dictionary to see what being an artist meant. It said that an artist is someone who creates art. Well, that didn't seem like a very good explanation!

We discussed different kinds of art/ways of making art and we came up with this list:

Drawing
Painting
Photography
Sculpture
Fabric Arts (like knitting embroidery, quilting)
Computer Arts (like web design)
Mosaics
Cartooning/Animation (like cartoons on TV & movies as well as in newspapers and in books)

(I'm sure this list isn't complete! I also added that people can be artists if they create music, dance, perform in the theater and write).

Many works of art like paintings and drawings are found in museums and in galleries, but art is all around us every day. We discussed different art careers that are out there such as:

Architect: If you like to draw houses and create buildings with Legos then maybe you could be an architect!

Illustrator/Cartoonist: I told the children they were already illustrators since they all published books for the school's writing festival! If you like to draw pictures to go along with stories you could be an illustrator!

Sculptor/Potter: Do you like to work in clay? Do you like to make sculptures or bowls and cups? Maybe this job is for you!

Graphic Designer: Do you like to make books with words and pictures? Do you like to look at cool websites? Those are made by graphic designers!

Actor/Actress/Dancer: If you love to perform and put on shows--this is for you!

Art Teacher: If you love to talk about art and share different projects with children, then this job is for you! This is what I do and I love it! :-)

Memory Pillow:

This is a wonderful project for a teacher gift, a class project, a birthday party and more! After our talk we worked on this craft.

Supplies Needed:

1 square of white 100% cotton fabric (ours was about 12 x 12")
1 square of printed fabric for backing that is the same size as the front piece (ours was 12 x 12")
Gold acrylic paint
1 4"x 8" piece of craft foam
Scissors
Paintbrush
Paper plate for palette
Newspapers or other work surface covering
Fabric markers (I use Crayola brand)
Sewing machine
Pins
Needle and matching thread
Pillow stuffing

Directions:

1. Wash the fabric to remove sizing, dry and cut to size.

2. Cover your work area with newspaper. Cut a frame shape from the foam. Put some gold paint onto the palette and, using a brush, apply a thick coat of paint to the foam. Stamp the foam shape onto the center of the white square. Let dry.
Choose a metallic gold paint for a little sparkle. The children asked,  "Is this REAL gold?"

3. Trace around the edge of the gold frame with a black fabric marker, if desired, to make the frame's edges a little more crisp and interesting. You don't have to be neat about it--it looks more interesting if the edges are off a bit (I completed up to this part at home so all the children had to do was draw with markers).

4. Using fabric markers, draw a picture inside the frame. If you are doing this with a group, you may want to have the artist sign inside the frame as well.
A dragon being stopped by a super hero

A horse and rider in a woodland scene. Love those woodland critters!

5. Now's the time to have everyone sign each other's pillows. Do not sign inside someone's frame or on their picture. Leave about 1/2" border all around the edge of the white square for a seam allowance.


6. Once the marker work is done, pin the white square to the backing material with the right sides facing each other. Sew around the pillow, leaving a 3-4" opening on one side.
Older children can use the sewing machine with adult supervision, to sew their pillows on their own. My 9-year-old was able to sew his pillow.

7. When done, turn the pillow right side out and gently stuff with pillow stuffing.

8. Pin the opening of the pillow closed, thread a needle with matching thread and sew the opening closed.


Ta-da! A masterpiece (and a memory) has been created! Enjoy!!

Monday, May 16, 2011

Springtime Still life

Whew! It's been a busy couple of weeks for me! I've been applying for a teaching job for next year and finishing up my current art class with the home school cooperative. In just a couple of days the co-op will have its Grand Finale and the children from my art class will showcase their artwork! I can't wait! I am so proud of them!


I thought that I'd put a project on here from last year's art class that is perfect for celebrating Spring and Mother's Day: Spring Still life pictures featuring forsythia blossoms. This project can be done by a variety of ages, although little ones might need some grown-up help. This project is from the book, "Kids Art Works," by Sandi Henry--an awesome book. Enjoy!

Just one example of a beautiful forsythia still life!

Background Info:
When I teach this class, I start by having a beautiful arrangement of forsythia blossoms in a vase available in the classroom for the children to look at and touch. I have the children notice how a forsythia blossom is constructed and how it looks up close and far way.

I also like to have a couple of postcards or pictures of still lifes from art history for us to look at and discuss what makes a still life--a type of painting that has as its subject inanimate objects such as fruit, flowers, dishes or food.

Materials Needed:

• 1 9x12" sheet of construction paper either white or light blue for background
• Scissors
• Pencil and eraser
• Glue stick
• Markers, brown for stems and other colors to decorate vase
• Small piece of construction paper for vase (maybe 4x6")
• Yellow tempura paint
• Paper Plate for palette
• Kitchen sponge cut to about 1" long by 1/4" wide

Directions:

1. Cut the vase out of the smaller piece of the construction paper (you can do this by folding the paper and cutting through 2 layers of the paper--good introduction to symmetry). Glue the vase to the along the bottom edge of the larger piece of construction paper so that you have lots of space above the vase for your blossoms.

2. Using the brown marker, draw some stems from your vase into the space above.

3. Place some yellow tempura paint on the tray. Dip your sponge piece into the paint and stamp it gently onto the paper along the stems, creating the forsythia blossoms.

4. If you'd like, use the markers to decorate the vase with designs such as lines, dots, etc.

Voila! A spring still life to brighten up a rainy spring day!

Friday, April 15, 2011

Medieval Metalwork

This week, in my art class, I showed the children how to do a simple technique that looks like aged metal. The children created frames and crosses and then added faux gemstones for a little sparkle!

Jewel-encrusted antique metalwork frame.

This year's art classes are all about Medieval times. We've done shields with coat-of-arms, marionettes of kings and princesses, stained glass dragons, and many other projects you'll soon be seeing in this blog (one day at a time!!). This week, I decided to have the children do a project that simulates metalwork. I was thinking of those large, heavy covers of illuminated manuscripts that were pieces of wood covered with tooled sheets of gold and inlaid with real gemstones (see below). Since my budget is a bit more limited than that--I thought we could use tin foil and plastic gems from a craft store.

Background Information:

Since medieval manuscripts would take many years to create and often were the life's work of many of the artists, the covers of these books were often just as elaborate. The covers were often a plank of wood covered with gold, jewels, enamelwork, precious metals, and ivory. One such example of this type of ornate work is the cover of the Lindau Gospels entitled, "Crucifixion with Angels and Mourning Figures." This piece is from The Pierpont Morgan Library in New York.

The cover from the Lindau Gospels uses a technique called repoussé "a technique by which metal reliefs are created. Thin sheets of metal are gently hammered from the back to create a protruding image. More elaborate reliefs are created with wooden forms against which the metal sheets are pressed (Art History: Volume 1, by Marilyn Stokstad, 1995)."

The project below is very similar to this technique. Enjoy!

Supplies Needed:
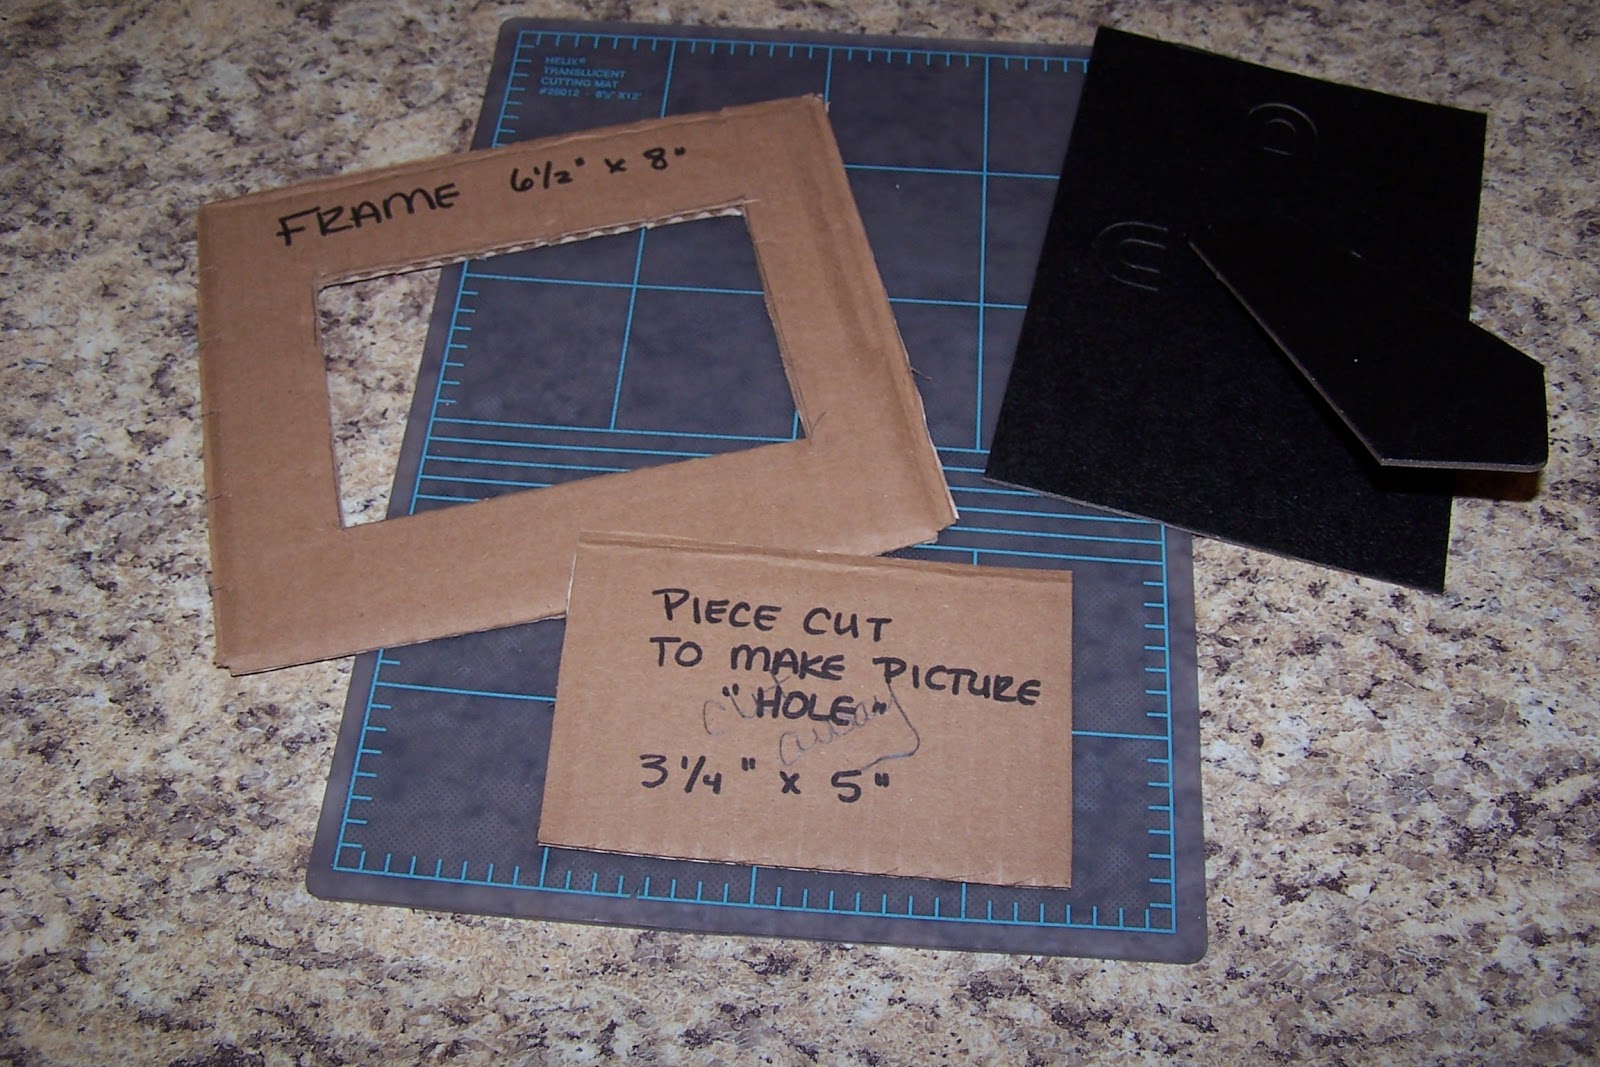
  • Corrugated cardboard cut into a frame shape (6 1/2" x 8') or a cross (a 3" x 7" piece of cardboard glued to a 3" x 11" piece of cardboard)
  • Self adhesive foam letters and shapes (optional)
  • Yarn
  • PVA glue (I use Elmer's glue)
  • Paintbrush
  • Water bowl and water
  • Scissors
  • Aluminum foil (standard household foil is fine)
  • Clear tape
  • Black tempura paint
  • Paper plate for a palette
  • Facial tissue
  • Glue gun and hot glue sticks (optional)
  • Plastic jewels (I bought mine at Michael's--they had a value pack of 1pound of "bling")
Directions:

1. If you are creating a frame, think about which way you'd like to have the picture displayed. This is important if you are doing lettering on your frame.
Here you can see the cardboard piece I'll be using for my frame as well as an easel-backed piece of cardboard from an old frame that I later glued onto the finished frame. That part is optional,

2. Create a design on the cardboard frame (or cross) using self adhesive letters and shapes. Words and phrases such as, "family," "best friends," "love," or your last name work well. You can also use yarn for the letters and shapes (and also for lines). Put a line of glue onto the cardboard and then gently press the yarn into it. Keep your design simple.


3. Once you have your design done, brush a thin coat of white glue all over frame. You can brush right over the foam shapes because the adhesive on the back of the shapes is nice and strong, but go gently over the yarn. You will want to go along the edges of the yarn you have glued down so that you don't mess up your design.
My design is done. Now I can brush white glue over the entire design.


4. Take a piece of foil that is slightly larger than your piece and gently crumple it--not too much or it will tear when you open it back up. Open the foil back up and smooth it a bit. Now lay it onto the frame over the glue on your design. Press gently all over your design, around the letter and shapes.
Gently smooth the foil over the design. Press gently around the yarn and foam shapes (if using). Be careful not to use your nails, since the foil will tear easily.


5. Flip the piece over and tape the extra foil to the back of the cardboard. If you are doing a frame, you'll need to gently cut an "x" in the foil in the center portion of the frame and fold back the foil there (and tape it to the back of the frame) so that you'll be able to see the picture in the center of your frame.


6. Now comes the messy part! Squeeze a bit of black tempera paint onto the paper plate. Dip your paintbrush into water and mix it in the paint to thin the paint a bit. Brush the thinned tempera paint over the entire front of your frame.


7. Now....wait! Leave your frame to dry for 10-15 minutes. While it is drying you can draw a picture to go in your frame. Will the picture be of your family? A pet? A medieval scene with a knight and a dragon?

8. Once the time is up and your paint is not quite dry, gently buff off the paint with a piece of facial tissue (it may take your piece a bit longer to be ready to buff--the paint should be "almost dry"). The more black you leave, the more "antique" the frame will look.


9. Use a hot glue gun, white glue, or tacky glue to attach jewels to the frame.
I live this tacky glue in a squeeze tube!

10. Attach your picture to the back--and you are ready to display your medieval work of art!

Variation: Easter is a wonderful time to do this project and create a cross! This technique makes a beautiful cross that looks unique. It is a nice project to do as a family--certainly a conversation-starter on many levels! Enjoy!
The same technique can be used to create a cross. I left a good amount of the paint on the edges to give this cross a very old feel. This picture doesn't do it justice--the jewels really shine and add sparkle. This would also be a nice gift idea.
Related Posts Plugin for WordPress, Blogger...