Showing posts with label children. Show all posts

Tuesday, November 18, 2014

Scenes from Jewelry-Making Artist's Workshop

Last Thursday I had the pleasure of hanging out and creating jewelry with a few lovely students at Amherst Middle School. We learned some basics of jewelry design and construction and students were able to go home with duct tape earrings, beaded earrings, a glass bead bracelet, and a shrink art necklace. While they were creating, they were learning how to use jewelry-making tools and jewelry findings.


While these pieces are easy to make, they form the foundation of basic jewelry-making skills students can use to make a number of fabulous pieces! Hopefully they are inspired to create some lovely pieces at home!

And here's the link to the tutorial we used as inspiration for our duct tape earrings--I'm now sporting a pair of rainbow tie-dyed feather earrings my son made me! :-) *LOVE*

Tuesday, September 2, 2014

Creativity Isn't Dead!

Thank you so much to all of the parents who came out the week before school to attend my workshop on creativity--Reimagining Creativity: Building Creative Confidence in Your Kids!


First off, all of these people are incredibly brave! I described what we would be doing in the emails I sent out, but I was deliberately vague--I didn't want to spoil the fun we'd be having or have people feel it was going to go a particular way since I wanted to leave a bit of wiggle room so that I could adapt the workshop to what the attendees needed.

All of the attendees knew me and knew I am an art teacher, so there was some intimidation that they'd be making art in front of me and others (whom they did not know). They were afraid they'd be judged! How scary is that!? But they showed up anyway!

We did create some art, but that is because sharing art is how I express myself creatively. The main goal was to get the grownups thinking about how THEY are creative (everyone is, you know!) and how THEY could apply that creativity in their lives and in their homes, jobs, etc.

It was a success, and I can't wait to hear how these parents use the insight they gained in their lives with their kiddos.

Here's what some attendees said:

"What a wonderful evening!  Thank you!  I know you think I came for you… & I did… but I came to learn too, because I know you have so much to offer.  As you know, I don't consider myself 'artsy,' but from you I learned that is not the same as 'creative.'  Thank you."--P.D., Merrimack, NH

"Tonight was so great! Thank you for putting this together!"--J.M., Pepperell, MA.

"Excellent job tonight! It was so much fun! I am so glad I know you. Thank you so much."--S.H., Amherst, NH

Thursday, March 20, 2014

Justifying ART and Art Education

SIGH. Challenging day today. I can't be frank because I will offend. Let's just say I am feeling like I am having to "sell" arts education and that is frustrating. So, I'm not going to grumble, or complain, or yell...I am going to advocate.

Here's a poster I made that talks about the benefits that art has on a child...


And here are some close-up images of the poster so you can read the info. The images aren't the best, but if I make them too "nice" then blogger grumbles about the file sizes.


Great references. Thank you to them for their info. This poster is not for money-making purposes, it was intended as an arts advocacy project for my grad school. Thanks!

Friday, March 29, 2013

Easy Art Activities For A Snow Day Or Any Day (Part 4)

This Part 4 in a multi-part series. Here are the previous posts you may have missed:
-------------

Here's The final installment of this series on encouraging artsy times when you and your children have a day off. I've encouraged you to gather supplies and ideas and let your children play with and explore the art supplies. I also shared a couple of art projects we've been doing in our house during our down times. Now, the final piece to the puzzle: YOU!

4. Stop Cleaning The House and DO ART WITH YOUR KIDS! Specifically: Origami!

I constantly struggle with this one. I have a to-do list a mile long and when the kids are home, it seems as if I clean even more! When they are home on a snow day, I am mopping up puddles of melted snow, picking up four sets of snow boots (again and again!), hanging up snow pants to dry, making cocoa, getting snacks (again?!?), etc. etc. As the day goes on, I find myself getting more and more frustrated as I try to "get stuff done" while the children vie for my attention. So, my advice for you: stop cleaning and play.

Play dominoes, build a snow fort, make a yummy treat, sit and do a craft. The dishes will wait, the laundry will be there later. You'll be spending time with your kids and, let me tell you a secret, after you spend some time with them they MAY even run off and play and you'll have time to fold the laundry. Maybe. If not, you'll relax ad have a good time for a few minutes which is better than yelling "go play!" and fuming while you do the dishes.

One type of art that is great for mommy and me time (with Kinders on up) is origami. I have done origami with all three of my boys and it is fun and addicting! You don't have to have any special paper (you can use copy paper cut into a square) and you can look up directions online for all sorts of awesome ideas! If you are interested in books on origami, your local library will probably have a few and we like the "Origami Kit" with three books from Dover Publications that I featured in this post.


I've seen this kit at AC Moore and Michael's. It is seriously the best!
So great for a holiday or birthday gift!

Here's Number 1 Son creating a sailboat and fish mobile.
Check out the post for that here.
And here's a lovely wreath that will get you thinking "Spring!"
even if it is still 20 degrees and snowing in your area!
Check out the post for this here.

I also picked up this great flipbook by Toshie Takahama called, "Quick and Easy Origami" that is absolutely great! My six-year-old can make many of the projects in the book himself, and we've spent lots of time making dozens of pieces from this book. The kit on Amazon comes with paper so you are ready-to-go when it arrives. Another lovely gift idea!

Toshie Takahama's book called, "Quick and Easy Origami"

Some ideas to go beyond just making random pieces of origami:
  • Make a scene with different pieces of origami glued to a background. Take the little doggie from Takahama's book and glue it to construction paper and add some grass, some origami flowers, an origami bird in the sky, an origami fish swimming in a paper pond--use your imagination to create an entire scene made from origami elements. How about making a spring scene? 
  • Make tiny origami, or HUGE origami. Origami is created from a square of paper. Once you find a project you like, try using different size squares of paper. We made a samurai hat from a traditional piece of origami paper and then used all different sizes of squares to see how big we could make the samurai hats--could we make one to fit our teddy bear? Yes! We used a 24" square to start with. Could we make a samurai hat to fit us? Yes! We used a square cut from a double-wide sheet of newspaper. Use newspaper or wrapping paper to create the largest squares you can and fold away! And how small ca you go? Can you make a piece of origami from a 2" square? How about a 1" square of paper? Have fun experimenting.
  • Make an origami gift. Some of your experiments from above, are great for gifts. Little origami creations make great decorations on cards (send one to grandma to let her know you are thinking about her) and super huge origami can be a gift in itself! Make a wearable samurai hat for your friend--just fold up a super-huge piece of paper into a hat and paint it with tempera paints. Awesome! For a more sophisticated gift, you can use beautifully patterned origami papers to make art that can be mounted on mat board and given to mom, dad, grandma, or a grad for a special occasion. How unique! Here are some great picts of how the samurai hats and shirts can be used to create great pieces of art. I'm planning on making the samurai hat one for my sister for her birthday--I think it looks just like a quilt and she's an avid quilter.
  • Amaze your children and make origami from money! Yep, there's nothing like grabbing a dollar bill from dad, folding it into a tiny button-down shirt, and then giving it to your kid. Not only are they amazed at your coolness of being able to make origami from money, they think it's great they tricked dad out of a dollar bill--hee hee! This kept my kiddos busy while we waited for dinner to be served at a restaurant and they had me leave the waitress' tip that way. Just do a search online and you'll see all sorts of ideas for making little creations from money.
Have fun and enjoy this time with your children! I hear this time goes by quickly--it's time to make memories...


Wednesday, March 13, 2013

Easy Art Activities For A Snow Day Or Any Day (Part 1)

I had originally wanted to call this post "Artsy Ways To Survive (Yet Another Snow Day) With Children" but it seemed a bit desperate-sounding...

We just came off of our Winter Break and then this past Friday the kids had a snow day. I'm a homebody (as are many of my kids) so when we have days off we hang around the house. But I'm trying to discourage the amount of screen time they have and I found out that yelling, "Go Play!" over and over at them doesn't usually work to encourage them to find something to do...so in this series of posts, I'll share some tips for days at home with kiddos, be it a snow day, a lazy weekend or a school break.

1. ENCOURAGE CREATIVITY (Also known as "Set Yourself Up For Success")

All of my children are creative, but in different ways. One of them MUST do art every day. I used to keep all of my personal art supplies, my classroom art supplies and my children's art supplies together in my office. Problem? Well, I was constantly running back and forth grabbing supplies for my children, they were always getting into my classroom supplies and using things I had set aside for an upcoming class, and after a creative binge, the cabinets looked like a tornado went through...so I finally figured it out. If I want my kids to be creative, they need access to supplies and they need to be able to put them away themselves. I want this to be 100% access all the time. So, where do they work? The dining room. Where are their art supplies? The dining room.

Our house is small and this set-up isn't going to earn us a spot in Better Homes & Gardens, but this works right now for us. I suggest setting up a temporary art center in a corner of your home and trying it out and making adjustments before buying fancy organization "stuff." See how your children work and do what works for your family.

Here's a tour of our ART CENTER:

LEFT DOOR: Restickable hooks hold regular scissors ad decorative scissors, the red thing is a apron.
TOP SHELF: Elmer's glue, glue sticks and tape such as masking, electrical, duct, and clear tape,
there's a bin for watercolors with brushes, watercolor paper and a water cup, old yogurt bins hold colored pencils and markers.
BOTTOM SHELF: a bin of assorted punches, Twistables, a sketchbook for each child, and a slot filled
construction paper, a bin of crayons with a crayon sharpener.
RIGHT DOOR: rulers hanging on restickable hooks
My kids usually prefer to work at our dining room table, but we're
trying out this table-turned-desk. There is a roll of IKEA paper on there
(which they actually never use)
This ain't pretty, but it is a repurposed bookcase with a place
for "How-to" books o drawing and origami and coloring books,  along with
bins for clay, recycling and interesting bits for sculptures, etc.
along with our scrap paper bins organized by color
(I know that seems a bit weird, but it actually works well so you
can find the paper color you need fast).

Other things that are not shown here but are available to them, on an as-needed (mom-involved) basis:

Tempera paints
Acrylic Paints
Hot glue gun and glue sticks
Higher quality watercolors and paper
Higher quality paint brushes
Craft stuff such as beads, pipe cleaners, craft sticks

I keep the above items high up on a shelf in another room. Every once in a while I take a handfull of crafty supplies and leave them in their art center as an invitation to create, but I wouldn't leave the whole box of craft stick or pom poms out--they'd be gone in a day (or more accurately strewn all over the house)...if they decide they need 100 craft sticks I can always bring the bin out and they can use however many they need.

I must say that I've tried MANY versions of an art center with my kids over the years and usually I have to pack most of it away once I have a new baby and they start walking (and putting the art supplies in their mouths), but at this moment, we are out of the baby phase so I can keep this stuff available all the time.

The addition of an art center to our home has increased creativity for all and I see the children choosing to "do art" more often and it is a cinch to clean up (for both the children and me) because everything has a place.

So, take the plunge and create an art center for your home today!

Wednesday, September 19, 2012

Art and the ABC's of Ecology

I was asked to spend some time with 4-year-olds and talk about ECOLOGY. I said "YES!" and then ran to my computer to look up what "Ecology" was!

Ecology is: 1. the branch of biology that deals with the relations of organisms to one another, and 2. The study of the interaction of people with their environment.


You'd "B" Crazy Not To Try This Recycling Craft! (GROAN!)

I started off having the children play with blocks. We talked about how we needed to share the blocks. If one person took all of the blocks, there wouldn't be enough for everyone. This is a good way to illustrate the concept of REDUCE. If you use less, everyone can have some. Then I talked a bit about how people and nature can be connected. If we go on a picnic and throw our trash on the ground it will dirty up the environment and outside is where animals live--it is their home! Imagine our homes filled with trash! YUCK!

So we went outside with a shopping bag and looked for trash. They were good at that game and found quite a bit! We also talked about biodegradable vs. non-biodegradable. Leaves will break down over time, but a plastic coffee cup will not.

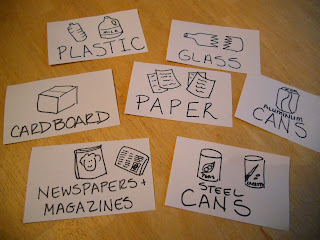
We went back inside and I introduced the next concept: RECYCLE. If we threw everything away or landfills will fill up quickly, and some of the stuff we throw away is still good or can be turned into something else. For example, water bottles can be turned into Polar Fleece fabric. I had a bunch of different recyclables on hand, in a pile, to show them. I had a ton of categories for them to sort the recyclables into (our town has a wonderful recycling center!). I had seven bins with labels such as:
  1. Paper
  2. Plastic
  3. Cardboard (Corrugated)
  4. Steel Cans
  5. Aluminum Cans (Soda cans)
  6. Newspaper/Magazines
  7. Glass (be careful with that!)
Here are my basic labels for the Recycling Bins

Then they sorted the recyclables into the appropriate bins. This went quite fast! I explained that other things can also be recycled: clothing, books and toys, by giving them away to someone who may need them.

On to the art project!

Recycled Letters

Supplies Needed:
  • Poster board (we used black)
  • Scraps of construction paper, magazines, newspapers, labels from cans, etc.
  • Glue stick
  • Scissors (young children can rip the paper if they aren't ready for scissors).
Directions:

1. Cut the first letter of the child's name from poster board. It should be about 10 inches tall and wide enough so that s/he has space to glue paper to the surface.

2. Have the child use the glue stick to attach bits of paper to the surface of the letter.

This project REUSES paper that normally would have been thrown away.

We then went back to the pond onsite and looked for trash and critters. We found water bugs and a frog and we also saw trash that we couldn't reach, floating in the pond, such as a tennis ball. This allowed me to reiterate the information I had talked about earlier about how humans and nature are connected and how our actions affect other living things.

Home Connections

To strengthen the learning this lesson at home, parents can do the following:
  • Discuss with children how they can be kind and not so kind to the environment.
  • Set up a recycling station at home and visit the Recycling Center in their town.
  • Look through outgrown toys, books and clothing and donate the items to those in need.
  • Go on a hike and/or picnic and be good stewards by staying on the paths and carrying out their trash and disposing of it properly.


Monday, August 20, 2012

Using Centers at Art Camp


I had read about using centers in the classroom and the idea intrigued me! However, many of my lessons for my 2nd-5th grade students fit comfortably within my one hour class (including discussion and cleanup). So, I filed the idea of using centers away for later.


Using dollar store foil to create sculptures
(You can also supply pipe cleaners to use for arms and legs if you'd like).

Then, I was asked to teach art camp at Peabody Mill Environmental Center in Amherst, NH. I had two sessions: the first week with 5- & 6-year-olds and the second week with 7- & 8-year-olds. There was no set curriculum, so I needed to design an art & nature camp that would fill the time (9:00 am to noon, Monday through Friday) in a way that would allow the children to create art and take advantage of the beautiful, natural surroundings, and allow for free play and exploration. After all, this is CAMP and it is supposed to be fun!

So, the idea of centers came back out of the files!

As you can see in my previously published post on my art camp schedule, we had center time after we did our main art project. I chose to have three centers each day. One center was located inside and was with me. At this indoor art center, students worked on a smaller art project relating to the day's theme such as making clay birds in nests, making a bug bookmark, or doing a craft about tree rings. The art project at the center was one that would take about 10-15 minutes or so.

The two other centers were located outside on a covered patio. They were (sometimes loosely) related to the day's theme as well, but were self-directed play and exploration. I had a helper outside making sure things didn't get out of hand and that no one ran off into the woods, but other than that, the children were free to play at whatever station they were at.

Rules of the Centers:
  1. Stay with your partner at your center
  2. Play quietly and respect the toys
  3. When you hear the bell ding once, it is time to clean up and stand quietly
  4. When the bell dings the second time, move to the next station with your partner


Ideas for Centers:

  • Blocks (mine were wood-look foam blocks)
  • Build-a-bug toy
  • Plastic Critters (One day I had a bin of insects and another day I had a bin of reptiles and amphibians) with a plastic bin of water for the critters to swim in
  • Cloud dough or moon dough with various molds and scooping toys (too messy for my liking)
  • Bubbles
  • A fishing game with little fishing poles and plastic fish that float in water for the students to "catch"
  • Dauber-type paint pens with large pieces of paper
  • Clay (make your own so you can reuse it and keep in plastic bags between sessions). You can have the clay "as is" or give them the plastic bugs to press into the clay or use as reference when making their own bugs from clay

Building with a toy called "Exobugs" allowed the students
to reinforce what we learned about insects and create
some really unique bugs of their own!

How it worked:

Before we started, I walked them briefly through each center, explaining how to clean-up each center. Then we practiced with the bell (the highlight of the day!). Once in a while, I needed to remind a child to stay in his/her center or to finish picking up, but all-in-all it went great! I was able to spend some focused time with the children doing the smaller art project (this was a great time to have the children do a project that might be hard to do as a group due to multiple steps or different paces within the group). Using centers also broke up the "work time" so that the children weren't standing there listening to me walk them through two art projects the whole time--that would have been boring for them and frustrating for me!). By scheduling in some play time this way, the children were able to take a break and play on their own and with their new friends (we also had hikes, played games, and exploration time outside as well).

It was a great experience and something I will definitely do again!

Building blocks was popular with the children and my helper!

Wednesday, May 9, 2012

A Quick Modern Art Project: Warhol

This past week's after school art class was great! We were able to get two art projects done in the allotted time and some children had a few minutes to sketch. Both of these projects are fun and colorful and easy to do. I've done them with preschoolers up through fourth graders and everyone seems to enjoy it! This time, I was able to show the children artwork from each artist and link the lessons to children's books about the artists. If you haven't checked out these books, please do! The first project is: Handy Andy's inspired by the blog Artolazzi.


For this project, I shared the book: "Uncle Andy's," by James Warhola. What a lovely book! This is written by a nephew of Andy Warhol and is told from the child's perspective. James Warhola talks about visiting his Uncle Andy at his studio and all of the interesting projects and people he sees there. I really like this book. It is interesting to look at the illustrations and see all of the fun details. The book also reminds me that children are like little sponges, soaking up info and inspiration from their environments. Warhola speaks about how inspiring it was to be surrounded by all of the art objects and artwork in his Uncle Andy's studio and being able to see the process his Uncle went through to create his art (note: I brought in one of the Marilyn Monroe series of paintings for the children to view--it had repetition and color that I wanted to highlight with the project below).

Handy Andys

I saw this project on the blog: Artolazzi and loved it. I changed it a bit to use bright papers instead of paint for the backgrounds to speed things up a bit. I used a bright pad of paper I bought at the local copy store (Staples) which was 50 sheets of 11" x 14" paper (5 bright colors) for about $5.

Supplies Needed:

  • 1 sheet of bright paper 11" x 14" for the background
  • 2 5.5"x 7" rectangles of bright paper (different colors than your background)
  • 4 5.5"x 7" rectangles of bright paper (assorted brights so that the hands cut from these papers are different than the backgrounds)
  • Pencil
  • Scissors
  • Glue stick
  • Black tempera paint
  • Paper plate for palette

Directions:

1. I had the students select one 11" x 14" piece of bright paper for their background. In the above image, my background piece is yellow.

2. I then had them select two rectangles (5.5" x 7" each) these needed to be different than their background paper. These were glued down to the background so that it appeared the background is divided into four sections. Use the photo as a guide. In my example, I used a blue and a green rectangle.

3. I then handed out stacks of four rectangles (each 5.5" x 7") of assorted colors that had been stapled together. I had the students trace their hands onto the stack and cut through all four at once with their scissors to create four identical hand shapes. Remove the staples, arrange onto the background and glue down using the glue stick. Glue the fingers down well so they don't curl off of the page.

4. Once everything was glued down well, I had the students come over to the printing station where they could dip their hands into the black tempera I had placed in foam plates and then print onto their backgrounds over each of the hand prints.

They came out great! The children had lots of fun with these and the bright colors really created an eye-popping display! These would be so nice for Mother's Day or Father's Day and they didn't take any time at all (maybe 30 minutes from start to finish).

Coming soon: Part two of this post...15 minute Jackson Pollock paintings!

Friday, April 27, 2012

Movement With Lines

June 2020--PLEASE NOTE--this project has been updated for distance learning to now include a HOW TO VIDEO! The updated post is here.


And the new video can be viewed below OR on youtube. ENJOY!


------------------------------------------------------------------------------

This is a great project that uses only a couple of supplies (and a bit of patience) to create a piece that transforms from "ho-hum" into "WOW!" This is a great way to illustrate how various lines can show movement. 


Horizontal lines are sleepy and calm. Vertical lines are strong and stand still, but diagonal lines seem to slide and move, bringing our eye from one side of the page to the other and then "whoosh!" off the page! We start off this exercise by using the ruler to create a series of diagonal lines and color them in with markers. Then, we cut the piece up and fan the strips out and create another type of line...a swirly, curving line that also shows movement! This is also a nice op-art activity. You can use complementary colors for your diagonal lines or a full rainbow of color. Experiment and enjoy the process!

Movement With Lines

Supplies Needed:
  • One sheet of white construction paper, 9"x12"
  • One sheet of black construction paper, 12"x18"
  • Ruler
  • Pencil and eraser
  • Markers, assorted colors
  • Glue sticks
Directions:

1. Draw a series of diagonal lines on the white construction paper. You can draw three smaller lines going across the page or fill the space with lines. Both look great, in my opinion.

2. Color in the diagonal lines using markers.

This is the "Before" Photo

3. Flip the page over and divide the page into twenty-four 1/2" wide strips. Use your ruler for this and try to be as precise as possible. BEFORE you cut the strips apart, number them on the back from 1-24 at one end (the same end of the strips for all numbers).

This photo is kind of hard to see, but it shows all of the strips
numbered on the back at the same end.
Now, this is where it gets a little bit tricky. I'm sure you can do this many ways, but I made three of these and I finally landed on this way of doing it.

4. Cut out the strip marked #12. Put glue on the back and glue it on your black construction paper background in the middle, like this:

Strip # 12 glued on in the center
of the black paper (hold the black
construction paper vertically)

5. Now you can cut strip #11 out and put glue on the back of it. Overlap the left edge of the strip over the left edge of the previous strip (in this case, strip #12), fanning the right edge out slightly (about 1/2"). Repeat with strips 10-1 (working away from you) until you get through strip #1, forming a nice curve with the strips. Use the photo as a guide.


7. Once you have finished gluing down strip #1. Place glue on the back of strip #13 and overlap the right edge of the strip over the right edge of strip #12, fanning the left edge down slightly (about 1/2").

8. Repeat with strips 14-24 until you get through all the strips, forming a nice curve in the opposite direction with the strips. Use the picture as a guide.


It is OK if the ends of the strips continue off the edge of the page. You can leave them that way or trim them to the edge of the black construction paper.

This project is good for the older child since they may be more tolerant of cuting up their artwork and transforming it into something else. Also, they are more capable of handling the precise measuring and cutting this project needs in order to be successful. It took me three times to get all the strips to fit on the black construction paper properly. But I really liked all of the other attempts I made too. It's an experiment, so don't get too stressed!

Enjoy!

Monday, April 9, 2012

Frank Lloyd Wright Faux Stained Glass

Last week my after school class created Frank Lloyd Wright-inspired stained glass windows. I showed them a variety of his stained glass designs and then let them explore line, shape and pattern to create their own stained glass designs. They looked wonderful on the windows with the bright spring sun shining through!


Frank Lloyd Wright-Inspired Stained Glass Windows

Supplies Needed:

  • 1" Grid template, optional (more info below)
  • Clear Contact paper (2 sheets 18" x 12")
  • Black construction paper strips, some 1" wide and some 1/4" wide, 18" long
  • Additional black construction paper for circles or other non-linear shapes
  • Scotch tape
  • Scissors
  • Ruler
  • Pencil and eraser
  • Tissue paper, various colors
Directions:

1. This piece is worked from the back. I created a grid template for my students to use that had 1" squares on it. I used two sheets of 8 1/2 x 11" paper taped together. This is a nice space to work on encouraging the students to use the grid for their pieces. Some disregarded it and others really utilized it for the creation of their designs. I had each student tape a template to their desk.

2. I then had the students remove the paper film from the Contact paper and lay that on the grid template sticky side up. This is the surface on which the window will be created.

3. I had the children place 1" wide black construction paper strips around the outside of the grid gently pressing them onto the Contact paper. This creates the frame for the window.

4. I then had the children create a Wright-inspired design over the grid using 1/4" wide strips of black construction paper. This is the leading of the stained glass window. I explained that the lines can be horizontal, vertical or diagonal. Also, the intersection of the lines can make shapes such as squares, rectangles, triangles and rhombi. Circles and portions of circles could also be added.

I told them that they did not need to fill the entire window with lines and shapes (look at Wright's work) . I also kept encouraging them to take their time and plan.

A look at the pieces in progress...messy but fun!

5. Once their leading was done, I took a quick look and then demonstrated how they could add color to their piece. Some of the more geometric shapes could easily be cut from tissue. They could use the grid to help: if they had a shape that was 2 squares by 3 squares on the grid, they could cut a 2" x 3" rectangle from tissue paper. For younger students or for shapes that were trickier to cut from tissue, I suggested the children tear off pieces and just fill in the section with "bits" of tissue. The tissue easily sticks to the Contact paper. I told the children it is OK if the tissue paper extends onto the black lines a bit since this is the back of their window and that won't be seen when it's done. I suggested that the children not fill the entire piece with color since Wright often left portions of his windows clear.

6. Once the children had added all the color they wanted I adhered a second piece of Contact paper over their work creating a sandwich to seal the tissue and construction paper inside. I've done a similar project to this using just one sheet of Contact paper and it doesn't hold up as well as the "sandwich" of two pieces of Contact paper).

7. The children could then use their scissors to cut the excess Contact paper from around the piece using the outer edge of the frame as a guide.

I placed these pieces on the windows immediately so we could all enjoy the bright colors and beautiful designs!


Tuesday, March 20, 2012

Complementary Color Crazy Quilts

This amazing "quilt" was done by some of the students in my home school art class. This past summer, I picked up a book called, "Using Color in Your Art!" by Sandi Henry. I LOVE her books--they are always full of wonderful, kid-friendly projects! One of the projects she calls, "Dancing Stripes," is really a  lesson in complementary colors and color mixing. It reminded me of a crazy quilt square so I thought my home school students would enjoy making these and then we could group them together at the final art show for an amazing art piece.


I began by showing my students some books I have on quilting (both traditional and "story quilts"). I also had a beautiful poster of crazy quilts that was perfect to show them. We then created the pieces using acrylic paints on canvas boards. One of the parents had donated three sets of acrylics to the class, so I was able to introduce "real" paint and canvases to the children. The children enjoyed mixing primary colors to achieve secondary colors and then mixing the complementary colors and watching an array of earth tones and neutrals appear.

I think the final pieces came out great and it allowed me to teach the children how to use acrylics  as well as color mixing and brush techniques, but I think that next time I may structure the class a little differently. Here are my tips:


  • If the children you are teaching are young, use tempera paints instead of acrylics. Color mixing can use A LOT of paint when kids are doing it. Ours were donated and grown-ups are in charge of dispensing paint in my classroom, so we could monitor it a bit.
  • Begin with a color wheel. I teach 2nd-5th graders in my class. The older kids had a good grasp of the color wheel, but the younger ones weren't as sure. Have the children do a color wheel before or along side their canvas. 
  • Sandi Henry suggests breaking the canvas into four sections: 1 for each primary color and one for black and white. I'd only stick to the primaries. My younger students got confused dividing up the canvas into so many sections.
  • Maybe work in some "hands-on" color mixing. I thought that next time I may break the students into groups and have them mix secondaries in plastic bags and then squirt the resulting color onto a palette for the group to use. It might pace the class better and the older students could help the younger ones. Plus, everyone loves squishing paint in a zip top bag!
  • Have better definitions of color terms as well as examples where artists have used complementary colors in their work. I want the students to understand WHY color mixing and color theory is important.
  • I may use different sized canvases next time. I had wanted to display these as a "quilt" all linked together. One idea I saw online for displaying artwork like this (that would have been perfect) was duct-taping zip-top bags together at the seams to create a quilt. Each baggie forms a reusable "pocket" for a child's artwork allowing the teacher to display the pieces together as a unit and change them out when s/he likes. HOWEVER, the 9x12" canvases I used won't fit in standard-size baggies. Maybe 8x10" canvases would work (gallon size freezer bags are roughly 10x10"). SIGH. 
I will certainly do this project again, but I'm going to try some tweaking to make the process easier and hopefully more understandable to the children. Ah...live and learn!

Saturday, February 25, 2012

Mosaic Snowglobe Project Results

This past week I had the pleasure of visiting Mrs. Bevilacqua's second grade class at Wilkin's Elementary School in Amherst, NH. Mrs. Bevilacqua usually does a themed unit that involves snow globes and I thought the children would also enjoy doing the snow globe mosaics from my blog.

All 17 snow globes! Beautiful!
The second graders were very enthusiastic and creative! I started with a revised worksheet and had the students use a limited color palette (10 crayons) so that they could easily match up the paper squares with the colors they chose for their pieces. It was a two-session project, but it went quickly and the children were very happy with the results (me too!).

The revised worksheet has different labels than before.
 It is a bit easier for the children to understand: S = Sky, R = Roof, G = Ground, etc.
They use this worksheet to plan before moving onto the actual gluing.
See the original post for "how-to" info.
A detailed look at one of the mosaic pieces.
This project was a great way for the children to explore math concepts relating to a grid (each child had 100 squares on his/her piece!) as well as exploring color choices and value (in order for the sections of the picture to be easily read, the student needs to vary his/her value and color choices), learn the art of mosaics and, even within the set parameters, there was a chance for choice and creative expression.

What a fun way to spend the afternoon! Thank you, again, to Mrs. Bevilacqua and her students for all of their hard work and energy!

NOTE: I used 5" x 7" canvas boards from www.dickblick.com to mount the finished pieces on (24 for $7 or so). I then added a border above and below the mosaics with navy grosgrain ribbon glued on with hot glue. When done, I attached a paper label with the child's name. I justified the expense because these are "keepsakes." 

If you had less time and a limited budget, you could enlarge the project to 10" square (each square of the grid is 1") and have students do this project on thin white paper paper using 1" construction paper squares and glue sticks. Skip the Mod Podge and mount the finished mosaic onto a piece of construction paper. Very inexpensive, but still great!


Friday, February 24, 2012

Homemade Stamps for Printmaking

Here's a great way for you to explore stamping and printmaking. And, it's inexpensive, fast and fun!


This past fall, at the NH Art Educators Association Conference, I went to a printmaking talk given by Liam Sullivan from the NH Institute of Art. One of the ideas he had for younger students was to make a bunch of stamps using wine corks as the handle. He suggested using bottle caps and such and gave us all sorts of interesting ideas for making stamps. Well, I asked around and someone gave me a big bucket of wine corks and then I started collecting bottle caps, caps from glue sticks, foam shapes, buttons, etc. Once I had a sizable stash, I heated up the glue gun and glued my "findings" to the wine corks.

We used some of the stamps to make Modern-dayAdinkra Cloths, but we also did this simple project that I got from Liam's slideshow. The children had fun digging through the box of stamps I brought in trying out all of the different ones and were very impressed with their finished pieces. This project not only showcases printmaking, but is great for explaining patternline, and repetition.

Stamping Sampler (Or "Stampler")

Supplies Needed:
  • Stamps (see above description)
  • Tempera paint, assorted colors
  • One 8 1/2" x 11" piece of yellow paper
  • One 9" x 12" piece of construction paper for backing/matte
  • Pencil
  • Newspapers
  • Glue stick
Directions:

1. Make the stamps according to the description above. Some good ideas for stamps are shapes cut from craft foam, milk jug caps, glue stick caps, and wooden shapes (I even cut a few NERF bullets crosswise and made some interesting stamps).

The possibilities for homemade stamps are endless!

2. Draw a line on your paper going from one side to the opposite side. The line can be horizontal, vertical, diagonal, wavy, curved, zigzag, etc. 

3. Select a stamp, dip it into the paint and stamp it repeatedly along the line you drew.

4. Choose another stamp and another color and stamp another row of stamps parallel to your first line of stamps. Continue until the entire page is filled with rows and rows of multi-colored stamps!
A work in progress. This piece uses a large sheet of construction paper (12" x 18").

5. Mount your finished paper onto a coordinating color of construction paper using a glue stick.

ENJOY!
Some examples from my home school class.

Monday, February 13, 2012

Last Minute Valentine: "I Love U"

This is a nice project to teach positive and negative space and symmetry and makes a cute last-minute Valentine for the wall or as a bookmark. It is super-inexpensive and pretty darn easy. Make one of these for your Valentine today!


Positive/Negative "I Love U" Valentine

Supplies Needed For The Wall Art:

  • Piece of black construction paper (9" x 12") in black
  • Pieces of red and pink construction paper (the red sections are 3" tall and the pink sections are 2 1/4" tall)
  • Pencil
  • Glue stick
  • Scissors
Supplies Needed For The Bookmark: 
  • Piece of white posterboard (2" x 5") in white
  • Pieces of red and pink construction paper (1" square)
  • Pencil
  • Glue stick
  • Scissors
  • Clear packing tape (2" wide)
  • Hole punch
  • 8" of ribbon
Directions:

1. Decide on the order of your colored paper pieces.

2. For the first section, the heart, draw a half a heart shape onto the first piece of colored paper. Cut it out. Glue the outside of the heart shape onto the backing of your piece (either the posterboard if you are making a bookmark or the black construction paper if you are making a larger piece). Line up the cut edge the square with the center of your backing paper.

3. Glue the corresponding half heart shape along the center line, "flipped out" from the square it came from. Hmmm....sounds confusing, but look at the picture for a guide.

4. Continue down the column, cutting out half an uppercase "I" another half heart and half an uppercase "U." Finish with another heart, if desired.

5. If you are making the wall art, you are done! If you are making a bookmark, put a strip of clear of packing tape over your design to protect it. Punch a hole in the top edge of the bookmark and add a ribbon, if desired.

Sealed with a kiss! ENJOY!

Friday, February 10, 2012

Modern-Day Adinkra Cloth

Last time I taught a lesson on African textiles I did the traditional woven paper Kente cloth. This time I wanted the children to explore a type of stamped textile that comes from Ghana: Adinkra. "Adinkra" means "goodbye" and his beautiful fabric was traditionally part of funeral preparations.


To make Adinkra cloth, long strips of cloth are pegged to the ground, then an artisan uses ink and a broad-toothed comb to divide the cloth into sections. Each section is then printed with stamps carved from the calabash gourd. These symbols are sacred and many of the symbols are inspired by nature or from important parables. Many have been used for generations, but some are new such as the Mercedes-Benz emblem, which appears on some cloths and seems to symbolize wealth. The ink used to make Adinkra cloth comes from boiling the bark of the Badee plant.

When the strips of cloth have been stamped and are dry, they are joined with decorative embroidery. I have tried lacing the sections together with yarn, but it was very frustrating for the children. I was recently looking through the book, "Kid Made Modern," by Todd Oldham and he made a screen of little circles joined by paper clips--that's when I knew I had found a way to link the sections of our Adinkra cloths. I found 1000 colored paper clips on sale at Staples for $3--what a bargain!

Modern-Day Adinkra Cloths

Supplies Needed:

  • 4 5" squares of white poster board
  • 6" piece of corrugated cardboard
  • Bits of craft foam for stamps
  • A few wine corks
  • Hot glue gun and glue sticks
  • Tempera paint, assorted colors (we used green, red, blue, yellow, brown and black)
  • Paper plate for palette
  • A pushpin
  • 9 paper clips, assorted colors
Directions:

1. Make your stamps. I made a few of four common symbols: heart which means love, paddle (looks like a plus sign) which means strength, drum (looks kind of like an uppercase letter "I") which means rhythm, and a crescent moon which means patience. I cut the symbols out of craft foam and hot glued them to wine corks. These are pretty permanent, but you could just cut them from a new kitchen sponge.

2. Put some black paint on the palette and dip the 6" end of the corrugated cardboard into the paint. Use the cardboard to make borders on your 5" squares of poster board.

3. Put some colored paint onto your palette and use the stamps you made to fill the center of the squares with symbols. You can probably get about three rows of three symbols in each square. Check out the photos for inspiration. Stamp all of your squares. Let dry.

4. Decide on the order you want to have your squares in. Use the pushpin to create three holes on the bottom and top edge of each of your squares. The holes should be about 1/4" from the edge and be evenly spaced.

5. Insert paper clips into the holes on the bottom edges of the squares. Rotate through the hole two times. Connect all the squares together (this takes a bit of fiddling, but it is easier than it sounds!)

Detail view of the paper clips joining the squares. 
A few examples of Adinkra cloth from my home school class.

Monday, February 6, 2012

Wild Valentine Puppets

Yet another craft idea for your Valentine's Day card-giving needs OR for a classroom project: "Wild About You" Puppets! 
Research shows that 9 out of 10 people people prefer to be bitten
 with pom pom teeth vs. real dinosaur teeth.
I recently was killing time between my sons' basketball games and needed to keep my 4-year-old occupied. I dug into my totebag, folded a scrap piece of paper and "ta-da!" instant puppet. It sure kept him busy, but then I had two teams of boys crowded around me wanting them! Here's a version fancied up a bit for giving:

Easy Paper Puppets

Supplies Needed:

  • Colored piece of paper (your choice) for the puppet head
  • Scrap pieces of paper, optional
  • Embellishments such as googly eyes, pom poms, etc.
  • Tacky glue and glue stick
Directions:

1. Fold the piece of paper you are using for the puppet in thirds lengthwise. Secure the top flap with glue stick. You now have a sort of flat tube. This will make it easier for little hands to know where to put their fingers in the finished puppet.

2. Fold the tube in half and then fold each of the ends back to make an "M" shape. This is the puppet's head.
A detail of the "M" shape that you are creating.

3. Use tacky glue to attach embellishments such as googly eyes and pom pom teeth. If you would like to make features out of paper, the glue stick should work fine to attach them. 

4. Write your message such as: "I'm WILD About You!" or "You're DINO-mite!" on a strip of pink or red paper and glue it in the mouth like a tongue.

5. You can write the "To:" and "From:" info on the underside of the puppet, if desired.

This shows one of the puppets with its mouth opened wide
so you can see how the entire piece is decorated.

ENJOY your WILD puppet!
Related Posts Plugin for WordPress, Blogger...