Showing posts with label optical. Show all posts

Monday, June 8, 2020

NEW OP ART VIDEO LESSON: Movement With Lines

Hello artists!

During distance learning I created a bunch of videos--I HAD to! Being an art teacher is sooo much easier when you can SHOW people what you are talking about! Some of the videos were just screen recordings I did in Zoom, and my philosophy, at first, was get the videos done to the best of my modest abilities so the students could connect with me and do the work. But towards the end, I started to get a little more fancy. 

Don't get me wrong. I didn't WANT TO learn how to do anything with video. OK, that's kind of a fib. I love to learn, but I had learned SO MUCH new stuff while being home for 10 weeks. So many new programs, so many new ways to get content out there to students (and did I mentione I was home with my four kids?). So many things in my brain!! I really didn't think I handle more or give more of my time.

But, I wanted the videos to be better. So I forced myself to try a video editing program. I chose to go free and online, so I tried out WeVideo. I really liked it! There was a 30 day free trial and I just sneaked this video in at the last minute. It's a how to for my most popular post ever--"Movement With Lines" this post has had almost 120,000 views since 2012.


I was looking back through the blog the other day, saw it, and noticed that in the comments someone had asked if I had a video for the lesson. Ummmm. No. BUT I COULD! I started planning the video out and, guys, I FORGOT HOW FUN THIS PROJECT IS!! Really, I ended up making a few just for fun.

I changed this up for students who were working at home--using index cards as the base for the art since I thought many people would have index cards on hand. I also scaled it down so that it could be done during one of my weekly hour-long Art-a-Long sessions I offered to students and families. If you want to go bigger (or smaller), please do! The original post has students use 8 1/2" x 11" paper and clever teachers photocopy the numbered lines on the back BEFORE having students do the work.

So, here's my quickly cobbled together video for "Movement With Lines." It's not going to win any video awards, but it's out there for the masses. I hope you can use it with your classes, your children and you try it yourself! I promise, it's fun and you can totally do it!

ENJOY!


Monday, January 13, 2014

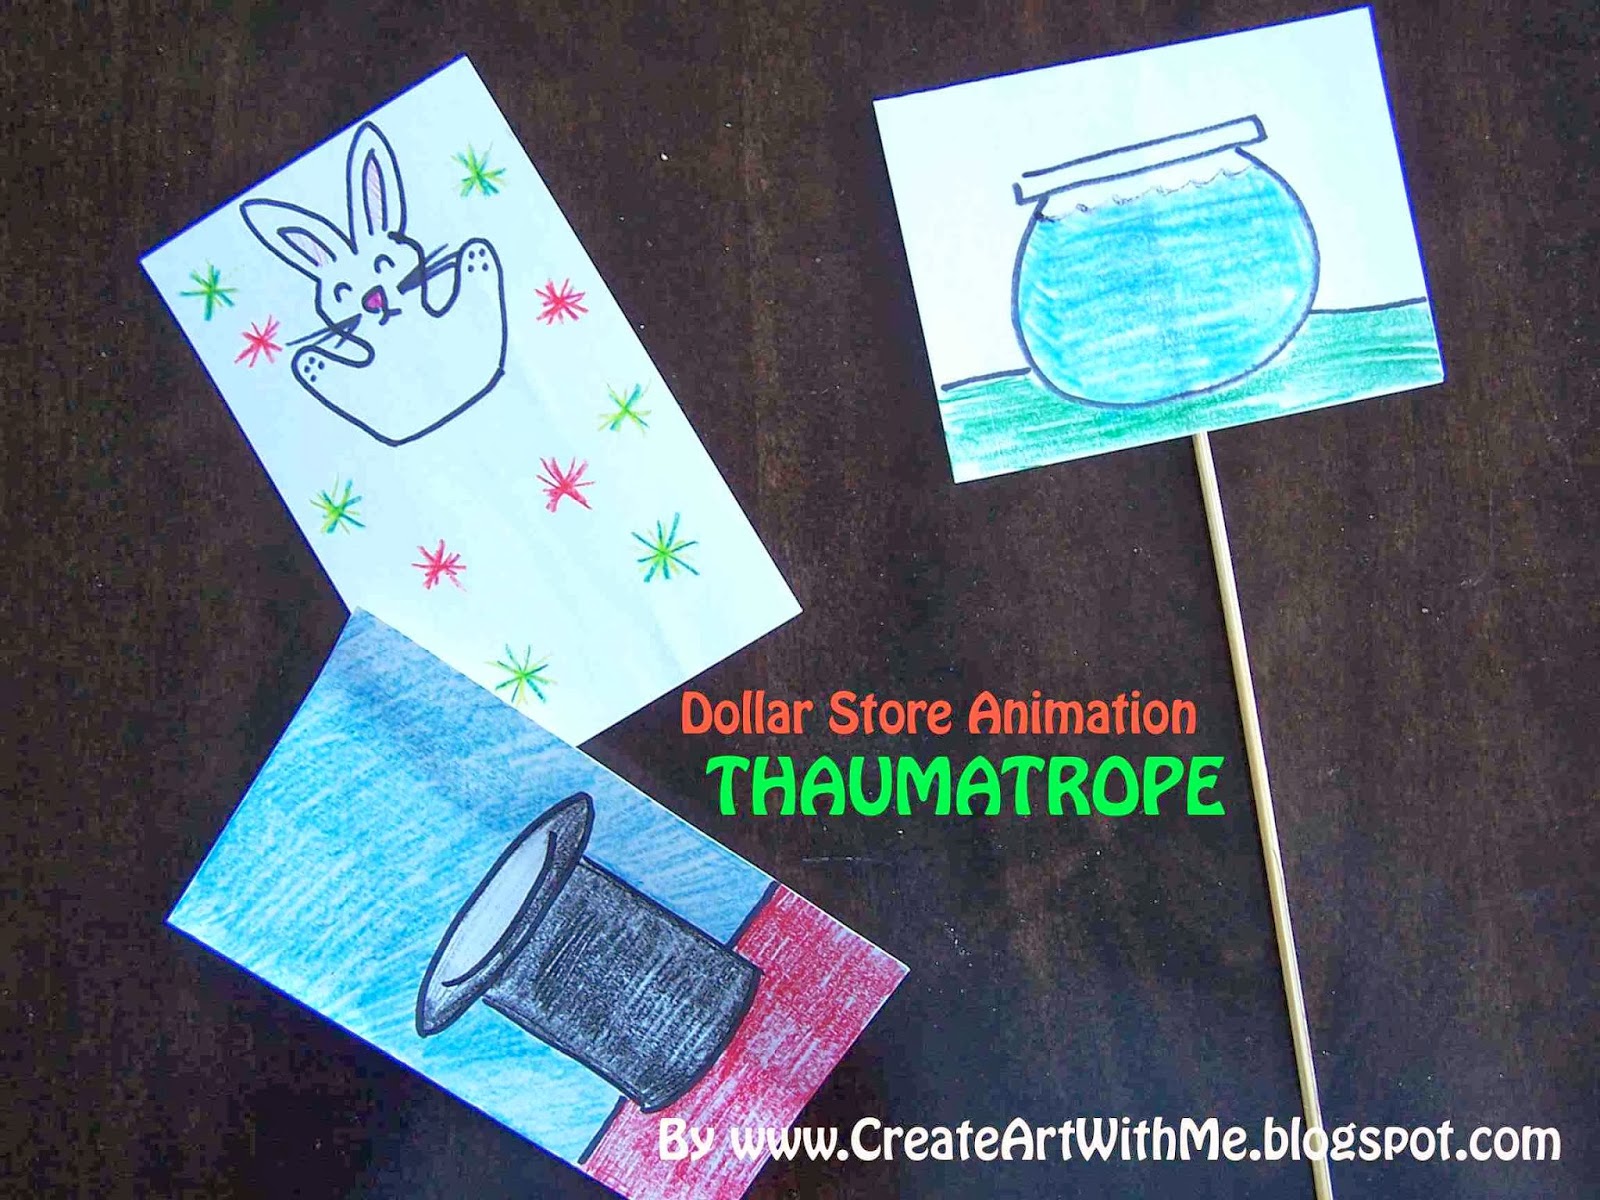
Dollar Store Animation Class: Thaumatropes

So you'd like to create a series of animation classes for your students, but don't have much $$? No problem! I taught a 3 week series of animation classes for middle school students this fall that was full of information and inspiration, and didn't cost too much.


On the left: a magical bunny who pops out of a magician's hat (both sides seen here).
On the right: The goldfish in the fishbowl (only one side shown).

The course was called: Animation, The Old-Fashoined Way--I wanted to start off showing students that they can create little movies from everyday items. I was able to show them all sorts of animation "machines" from the history of animation. We saw still and moving examples of each "machine" and then created our own.

I told the students that this course is mainly a workshop--lots of experimenting going on here! This was a bit different from my other art classes where they may come away with artwork for the fridge--many of the examples they made in animation class are meant to be held, spun, flipped, etc. and since I'm not telling them exactly what to animate (that wouldn't be fun!), they were going to learn-as-they-went, so they may make mistakes.

Class one, we watched a great video by MIT about the history of animation. This video has examples of many of the old-fashioned animation "machines" we were going to be creating!

http://video.mit.edu/watch/history-of-animation-3391/

First, we started off with the Thaumatrope--the easiest animation machine of all (I think).

What is a Thaumatrope?
The Thaumatrope is a great & quick way to illustrate to students the main magic about animation: persistence of vision. Students create two drawings and glue them back-to-back. As they spin the "machine" in their hands, both drawings will seem to appear at the same time.

History of the Thaumatrope:
The Thaumatrope is a simple toy that was used in the Victorian era (about 1824). Traditional examples use a string to spin the cards, but my example below uses a skewer, because I think that works better.

Examples of a Thaumatrope to check out:
The most common example of the Thaumatrope you'll see on the Internet is the goldfish in a fishbowl. I'm sure you can do better than that! But check these out for inspiration:


Make Your Own Thaumatrope!

Supplies Needed:
  • One 4"x6" white index card
  • Clear tape
  • Pencil with eraser
  • Glue Stick
  • One wooden skewer (I've also used plastic drinking straws)
  • Markers
  • Colored pencils and/or crayons
Directions:

1. Fold the index card in half widthwise (hamburger or taco fold).

2. Lightly sketch 2 images (one on each side of the index card) using the pencil. Make sure that your drawings line up when you flip back and forth between them: I had students fold the index card and then hold the card up to the light in a sunny window so they could see both pencil drawings through the paper. Make adjustments as necessary.

3. Outline the finished pencil lines with marker and color the drawings with colored pencil to make them nice and bold. Animations work best if you do your best coloring.

4. Tape the skewer to the center of the inside of the folded index card. Glue the inside of the index card with glue stick and fold the card closed over the skewer to secure (refer to the photos in this post).

5. Roll the stick of the Thaumatrope back and forth in your hands and enjoy!

----------------------

Other posts in the "Dollar Store Animation Class" Series:

• Thaumatrope (you're here!)

• Phenakistoscope

• Zoetrope
• Flip books
• Stop Motion (Part 1)
• Stop Motion (Part 2)

Friday, January 25, 2013

Optical Color Mixing With a Dollar Store Top

I love teaching art, but if I *had* to choose something else to teach, it would be science. Science and nature are just unlimited stimulation for a curious mind! Don't worry, I'm not changing my blog's focus! But the science of color kind of creeps in now and then in art and this time I decided to embrace it and surprise my students with a color theory lesson that was a bit, ahem, over the top (groan!)


When doing research on optical color mixing, I found a couple of neat mechanical devices used by scientists to test optical color mixing and immediately thought: TOPS! Could the simple tops I had on hand from the dollar store be used to make a version of Newton's Color Wheel (or Color Top) and teach the children about color mixing in art? Yep!

Pointillists such as George Seurat are frequently thought of when discussing optical color mixing, but many other artists use it too such as the Impressionists and modern artists such as Chuck Close and modern printing (such as in newspapers and magazines also use optical color mixing).

Here are some sites to get you started on your journey:

"Mixing in the Eye," From Drawing From Life by Fred Hatt
"Newton's Color Wheel," From The Department of Physics at Kenyon College
"Color Mixing Wheel-Sick Science," From Steve Spangler Science

I abolutely LOVE the article by Fred Hatt about color mixing in art! Talk about one-stop shopping in terms of info and images!

So, let's get started!

Optical Color Mixing With a Dollar Store Top

Supplies Needed:
  • Top (ours are from the dollar store and were packed two tops per package--what a deal!)
  • White card stock
  • Pencil
  • Ruler
  • Scissors
  • Hole punch
  • Tape, optionnal
  • Sharpies in Red, orange, yellow, green, blue, purple and black
Directions to prepare the tops:

1. Measure the diameter of the top. Ours were about 2 1/2." Create a series of circles that are the diameter of your top on the white card stock. 

2. Use the pencil and the ruler to divide up the circles into quarters, sixths, rings, etc. using the images below or from the links I've provided. It's good to do a few serious experiments first and then leave a few of the circles blank to create some wild tops using your imagination.

3. Color in the circles with various color combos, experimenting with the colors of the rainbow, or a the primaries, or just black and white. Use nice, bold colored markers and do a nice job coloring the sections in (no streaky coloring).

4. Cut out the colored circles and use the hole punch to make a circle in the center to fit over the "handle" of the top. You can secure the paper piece to your top with a rolled bit of tape, if desired.

5. Spin your top and observe what happens.

Some variations to try:

Use the primaries (Red/Yellow/Blue) to make
Secondary colors (Orange/Green/Purple) from the Color Wheel
Now try this one: divide the circle in sixths, color and spin.
What happens? How is this different than if you mixed
all of these colors of paint together?
(Spoiler alert: Pure White Light is created--
see below in the "How does this work?" section).
This experiment also works with value--try different combos
of white and black and see of you can get different tints and shades.
And now have some fun! Try your own color combinations
and see how they turn out! Which of your creations are your
favorites? Which creations surprised you?
How does this work?

When the wheel spins, your eye cannot keep up with the individual colors on the top, so the colors appear to blend. That is how you can create different shades of gray or secondary colors from the primaries. However, when you use the colors of the rainbow something interesting occurs (spoiler alert!). Instead of mixing together and forming black (that's what would happen if you mixed all those colors of paint together on your palette), a pale gray occurs (it is supposed to be white). Pure white light will be created if all of the colors in a rainbow are visually mixed together in perfect balance. Pure white light is a hard thing to create but your color wheel top with six colors will come very close.

Have fun with your experiments!

Friday, April 27, 2012

Movement With Lines

June 2020--PLEASE NOTE--this project has been updated for distance learning to now include a HOW TO VIDEO! The updated post is here.


And the new video can be viewed below OR on youtube. ENJOY!


------------------------------------------------------------------------------

This is a great project that uses only a couple of supplies (and a bit of patience) to create a piece that transforms from "ho-hum" into "WOW!" This is a great way to illustrate how various lines can show movement. 


Horizontal lines are sleepy and calm. Vertical lines are strong and stand still, but diagonal lines seem to slide and move, bringing our eye from one side of the page to the other and then "whoosh!" off the page! We start off this exercise by using the ruler to create a series of diagonal lines and color them in with markers. Then, we cut the piece up and fan the strips out and create another type of line...a swirly, curving line that also shows movement! This is also a nice op-art activity. You can use complementary colors for your diagonal lines or a full rainbow of color. Experiment and enjoy the process!

Movement With Lines

Supplies Needed:
  • One sheet of white construction paper, 9"x12"
  • One sheet of black construction paper, 12"x18"
  • Ruler
  • Pencil and eraser
  • Markers, assorted colors
  • Glue sticks
Directions:

1. Draw a series of diagonal lines on the white construction paper. You can draw three smaller lines going across the page or fill the space with lines. Both look great, in my opinion.

2. Color in the diagonal lines using markers.

This is the "Before" Photo

3. Flip the page over and divide the page into twenty-four 1/2" wide strips. Use your ruler for this and try to be as precise as possible. BEFORE you cut the strips apart, number them on the back from 1-24 at one end (the same end of the strips for all numbers).

This photo is kind of hard to see, but it shows all of the strips
numbered on the back at the same end.
Now, this is where it gets a little bit tricky. I'm sure you can do this many ways, but I made three of these and I finally landed on this way of doing it.

4. Cut out the strip marked #12. Put glue on the back and glue it on your black construction paper background in the middle, like this:

Strip # 12 glued on in the center
of the black paper (hold the black
construction paper vertically)

5. Now you can cut strip #11 out and put glue on the back of it. Overlap the left edge of the strip over the left edge of the previous strip (in this case, strip #12), fanning the right edge out slightly (about 1/2"). Repeat with strips 10-1 (working away from you) until you get through strip #1, forming a nice curve with the strips. Use the photo as a guide.


7. Once you have finished gluing down strip #1. Place glue on the back of strip #13 and overlap the right edge of the strip over the right edge of strip #12, fanning the left edge down slightly (about 1/2").

8. Repeat with strips 14-24 until you get through all the strips, forming a nice curve in the opposite direction with the strips. Use the picture as a guide.


It is OK if the ends of the strips continue off the edge of the page. You can leave them that way or trim them to the edge of the black construction paper.

This project is good for the older child since they may be more tolerant of cuting up their artwork and transforming it into something else. Also, they are more capable of handling the precise measuring and cutting this project needs in order to be successful. It took me three times to get all the strips to fit on the black construction paper properly. But I really liked all of the other attempts I made too. It's an experiment, so don't get too stressed!

Enjoy!

Monday, March 28, 2011

More References: Optical Illusions

Sometimes things just work out great! I love the fact that my children are absorbing all of the "stuff" I'm doing with my art class. While they refuse to actually sit down and try the projects I'm teaching (I think that might be a control thing on their part), they are inspired to use the materials and are very interested in the research I do for each project. As evidenced by my oldest son's library books last week: both about Optical Illusions (FYI: I taught a class on optical illusions just a couple of weeks ago). Both of my older boys have been fascinated by these books, as am I. I'm putting them in my notes for next year...

"Amazing Optical Illusions," by Illusionworks

"You Won't Believe Your Eyes!" by Catherine O'Neil, National Geographic Society

Both of them were awesome! The are full of traditional optical illusions as well as examples of modern-day illusions (newspaper printing, 3D graphics, illusions in nature) all in full color.  There is even a section in "You Won't Believe Your Eyes!" that discusses art techniques where illusion is used (trompe l'oeil, and Pointillism). Wonderful!

And one of the followers of this blog (Hi Scott!) mentioned another kind of optical illusion I hadn't thought of:  Lenticular printing and 3D techniques
 
Say what?!?! At first, I was puzzled--I was sure I didn't know what this was! But then I checked out the definition above and realized that I has seen this before. OK, remember those little novelty stickers from when you were a kid that had a picture of a person or something on it and if you tipped it to the side the guy winked or something like that? They seemed to be made from plastic and have little ridges on them? I used to love these as a kid and my children just received bookmarks that have this technique on them (think: a swimming, biting shark!!). This type of printing is mainly used in novelties (like in Cracker Jack boxes, bookmarks, on Valentine cards, etc.). These pieces can have a series of images that create a little animated movie (sometimes lasting about 1 second) that almost seems 3D (but without the glasses).

What a great way to blend science and art! Thanks, Scott, for making that connection!

Wednesday, March 9, 2011

Op Art: Magic Pictures

This project is a fun one for children! It can be used for a variety of themes and once the child understands how to do the project, s/he can create countless combinations! This idea is based on a project that I first did in middle school or high school. It explores optical illusions and has a nice "wow" factor for the children.
Magic Picture: A great lesson in Optical Illusion!


Class talk:

I began by defining the term "optical illusion." Optical meaning "eyes" or "sight" and illusions are "something that appears to exist, but does not." Magic tricks are a great example of optical illusions. I had a couple of magic books on hand to illustrate this point. I explained that one could read a book on magic and learn how to make something disappear. A child isn't learning "magic," but how to fool the viewer's eye. Optical illusions are like magic for your eyes.

I then showed a few examples of optical illusions from the Childcraft: The How and Why Library, Volume 12, "Look and Learn," by Worldbook (c. 1988). I found it helpful to have a ruler on hand since some of the children had never seen these particular illusions and wanted to measure the lines to verify they were the same length, etc.

Some other examples of everyday optical illusions that also appear in the Childcraft Book were camouflage and movie pictures (animation). I was able to "show" the children examples of those from the same book.

I also brought in a book from my own library entitled, "Masterpieces in 3-D: MC Escher and the Art of Illusion," by Catherine Gleason. This book has 40 images by Escher with built in spectacles so that viewers can see the works in 3-D. It also has brief descriptions of each of the pieces. While the 3-D element of the book is great, many standard examples of Escher's images will work for illustrating the concept of optical illusion.

So, in this class, we decided to create two pictures and put them together in a special way to create an optical illusion. While not technically a medieval-themed project, I explained that we could use medieval-inspired imagery such as a knights, castles, princesses, or shields. We thought that if we created optical illusions like this back in medieval times, people would have thought our art was truly magical!

(NOTE: Once a child learns this technique, s/he can use it to explore many different ideas such as opposites, seasons, transformations, etc. The pictures should be very different for the illusion to be dramatic and should fill the space).

Supplies Needed:

• Templates (while not necessary, I found it easier to have these templates on hand), One copy of all three for each child:
  • Template One: Image Page (this has two 4"x8 1/2" rectangles printed on an 8 1/2"x11" piece of white paper. Each rectangle should have guides to help the child divide the drawing into four 1" segments. On one rectangle, label the sections 1, 2, 3 & 4, on the other rectangle, label the sections A, B, C & D. See image below.)
  • Templete Two: Accordian Page (this is a 8 1/2"x9" rectangle with fold lines spaced every 1" across vertically and 1/2" tabs at either end. See image below.)
  • Template Three: Backing Page (this has a 7"x8 1/2" rectangle printed in the center of an 8 1/2"x11" piece of white paper. See image below.)
Template 1: Image Page
Template 2: Accordian Fold Page
Template 3: Backing Page

(Supplies, cont'd.)

• Construction paper for frame
• Stapler
• Pencils/erasers
• Black marker
• Crayons
• Ruler
• Scissors
• Glue stick

Directions:

1. Using pencil, draw two very different pictures on the Image Page, one in each rectangle. The rectangles should be held vertically. Make to fill up the space in each box and use images that are nice and big--little details will get lost in this kind of project.

Step 1: Draw two pictures

2. Once the the images are planned out, outline the pencil drawings with marker and color in with crayon.
Step 2: Color pictures in
3. When the two images are done, use a ruler and pencil to divide each drawing into four 1" strips from top to bottom. Leave the "1,2,3,4" and "A, B, C, D" marks on each strip for now to help with placement. Take your time and do a nice, neat job--it will help the optical illusion work better if you do a neat job.
Step 3: Cut pictures into 1" strips
4. Cut away the excess portion of the Accordian Page and fold the rectangle on the fold lines like you are folding a paper fan. Fold the 1/2" tabs at the edges so that they lay flat on the table (you'll be stapling them to another piece of paper later).
Step 4: Prepare Accordian Fold Page

5. Following the letter and numbers written on the Accordian Page, glue the strips of the two pictures you created onto the Accordian Page with a glue stick. Take your time and do a nice, neat job. Once you are done gluing all of the strips to the Accordian Page and you are sure the illusion is works, you can cut off the excess portions of the image strips (the parts labeled with the letters and numbers).
Step 5: Glue strips onto Accordian Page in alternating order
When done, it looks kind of confusing!


6. Staple the Accordian Page onto the Backing Page. Staple through the 1/2" tabs on the left and right side of your project. This will hold your project in the way that you need for the illusion to work.
Step 6: Staple project to Backing Page


7. Test your illusion out! Tilt your drawing one way and then the other--does your illusion work?
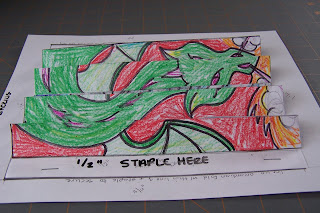
From the left: Fire-breathing Dragon!
From the right: A brave knight!


Is it not working? Try these tips:
• Refold the accordian page so that it looks like the one in the photos, if the folds are going the wrong way, the illusion won't work.
• Did you glue the pieces on in the wrong order? Or upside down? That happened to some of the kids in my class. You could try to peel off the strip that is positioned incorrectly, but glue sticks hold pretty strongly--you may need to cut the strips and reposition them onto another Accordian Page.

8. Once your optical illusion is done, you can create a frame for you Magic Picture. Fold a piece of construction paper in half lengthwise. Draw a 3"x8 1/2" square on the fold. Cut away the rectangle with scissors. Open up your frame. It should be the proper size for your Magic Picture. Glue it to the backing page with a glue stick. You can decorate it with crayons and markers if you'd like.
Step 8: Create a frame

Amaze your friends and family with your Magic Picture!
Related Posts Plugin for WordPress, Blogger...