Showing posts with label illustrations. Show all posts

Monday, August 22, 2011

Creativity Break: Cat Cards

I just got back from a camping vacation with the hubby and kiddos, and now I'm finalizing the curriculum "stuff" for this coming year (right before vacation, I was told I'm going to be teaching two more classes-YAY!!). So with all of this art stuff a-swirling in my head, I needed a break. I also needed two thank you cards to thank the two people who took care of our cat (and our bird and sea-monkeys). I knew I had some artsy papers so I did a bit of tearing and pasting and added a couple of stitches, and "ta-da!" instant thank you cards.


Torn Paper Cards

Supplies Needed:

  • Cardstock or greeting card blank
  • Envelope
  • Various papers (I used a good quality black paper, white rice paper and pink tissue paper)
  • Glue stick
  • Crayons, colored pencils or markers (optional)
  • Embroidery floss (I used two strands of burgundy)
  • Needle, needle threader
  • Scotch tape
  • Scissors
  • White construction paper for inside of the card
Directions:

Don't get too fussy with torn paper--it is meant to be fun and easy!

1. Cut the card stock to the size you want and fold in half. Decide if you want your card to be horizontal or vertical--this will help you plan your image on the front of the card.

2. Use the crayons, colored pencils or markers to create some texture on the front on the card, if you want. I used three different crayon colors and just did some light scribbling.

3. Rip the papers, a bit at a time, to create the image you want on the card. I started with the black and created the body of the cat. Then I ripped some white paper to make the white parts of his fur. I glued all of that to the card with glue stick. I took a bit of pink tissue paper and used that for his nose.

4. Once all of the torn paper portion was done, I threaded a sewing needle with two strands of embroidery floss (a piece of embroidery floss is made up of 6 strands, but that would be too thick for this project). I then sewed the eyes, mouth and whiskers of the kitties. Once done, I taped the floss from behind to secure it.

5. To hide the backside of my sewing, I applied glue stick to the backside of the sewing and attached a piece of white construction paper. I then refolded the card and trimmed the white construction paper even with the cardstock.

My cat-sitters are sure to enjoy these quick little images of their furry friend! ENJOY!

Saturday, July 16, 2011

Memory Pillow and Artist Talk

I visited my son's first grade classroom a few weeks ago and gave a talk about being an artist. It was so much fun talking with the children about ways to make art as well as the different careers an artist can have. We then did a project where the children made memory pillows. It was a wonderful way for them to remember the school year and all of the friends they made this year!

The Memory Pillow--what a masterpiece!

What is an Artist?

In preparation for this project I looked in the dictionary to see what being an artist meant. It said that an artist is someone who creates art. Well, that didn't seem like a very good explanation!

We discussed different kinds of art/ways of making art and we came up with this list:

Drawing
Painting
Photography
Sculpture
Fabric Arts (like knitting embroidery, quilting)
Computer Arts (like web design)
Mosaics
Cartooning/Animation (like cartoons on TV & movies as well as in newspapers and in books)

(I'm sure this list isn't complete! I also added that people can be artists if they create music, dance, perform in the theater and write).

Many works of art like paintings and drawings are found in museums and in galleries, but art is all around us every day. We discussed different art careers that are out there such as:

Architect: If you like to draw houses and create buildings with Legos then maybe you could be an architect!

Illustrator/Cartoonist: I told the children they were already illustrators since they all published books for the school's writing festival! If you like to draw pictures to go along with stories you could be an illustrator!

Sculptor/Potter: Do you like to work in clay? Do you like to make sculptures or bowls and cups? Maybe this job is for you!

Graphic Designer: Do you like to make books with words and pictures? Do you like to look at cool websites? Those are made by graphic designers!

Actor/Actress/Dancer: If you love to perform and put on shows--this is for you!

Art Teacher: If you love to talk about art and share different projects with children, then this job is for you! This is what I do and I love it! :-)

Memory Pillow:

This is a wonderful project for a teacher gift, a class project, a birthday party and more! After our talk we worked on this craft.

Supplies Needed:

1 square of white 100% cotton fabric (ours was about 12 x 12")
1 square of printed fabric for backing that is the same size as the front piece (ours was 12 x 12")
Gold acrylic paint
1 4"x 8" piece of craft foam
Scissors
Paintbrush
Paper plate for palette
Newspapers or other work surface covering
Fabric markers (I use Crayola brand)
Sewing machine
Pins
Needle and matching thread
Pillow stuffing

Directions:

1. Wash the fabric to remove sizing, dry and cut to size.

2. Cover your work area with newspaper. Cut a frame shape from the foam. Put some gold paint onto the palette and, using a brush, apply a thick coat of paint to the foam. Stamp the foam shape onto the center of the white square. Let dry.
Choose a metallic gold paint for a little sparkle. The children asked,  "Is this REAL gold?"

3. Trace around the edge of the gold frame with a black fabric marker, if desired, to make the frame's edges a little more crisp and interesting. You don't have to be neat about it--it looks more interesting if the edges are off a bit (I completed up to this part at home so all the children had to do was draw with markers).

4. Using fabric markers, draw a picture inside the frame. If you are doing this with a group, you may want to have the artist sign inside the frame as well.
A dragon being stopped by a super hero

A horse and rider in a woodland scene. Love those woodland critters!

5. Now's the time to have everyone sign each other's pillows. Do not sign inside someone's frame or on their picture. Leave about 1/2" border all around the edge of the white square for a seam allowance.


6. Once the marker work is done, pin the white square to the backing material with the right sides facing each other. Sew around the pillow, leaving a 3-4" opening on one side.
Older children can use the sewing machine with adult supervision, to sew their pillows on their own. My 9-year-old was able to sew his pillow.

7. When done, turn the pillow right side out and gently stuff with pillow stuffing.

8. Pin the opening of the pillow closed, thread a needle with matching thread and sew the opening closed.


Ta-da! A masterpiece (and a memory) has been created! Enjoy!!

Thursday, March 24, 2011

Technique: Watercolors

Everyone has used watercolors--it is usually the first paint that parents introduce to their children because it is inexpensive and so easy to clean up. Children are often content to mix and experiment on their own and churn out hundreds of watercolor paintings!

But if your little artist is looking for something new to try, check out the following tutorial for eight different ways to use watercolors. All of them are pretty basic, but can be combined to add textures and interest to a plain old painting!

An example of wax resist

Supplies Needed (for each painter):
  • 1 piece of watercolor paper (I used 9"x12" Strathmore cold press watercolor paper from a pad)
  • 1 piece of heavy cardboard or foamcore board slightly larger than your watercolor paper
  • Masking tape
  • Pencil and eraser
  • 1 tray watercolors (I use Prang brand watercolors with my students--the colors are better quality than the dollar store/kid brands, 2 children can share a tray if necessary)
  • Water cup with water
  • Watercolor brush (The one that comes with the Prang set is fine, but don't use one from a cheap set, they are made of nylon and the results will be poor).
  • Ruler
  • Sharpie or other permanent marker
  • A drinking straw
  • Paper towels
  • Plastic wrap
  • Table salt in a cup or shaker
  • Crayons (I like Crayola brand)
  • Colored Pencils (Crayola brand or other good quality)
 Basic Rules:

Read through the instructions BEFORE you start.
Gather all supplies BEFORE you start.
Be respectful & gentle. Good quality art supplies cost money, but they will last a long time if you treat them well.

I then give a quick talk about using the supplies properly. I show the children how to make paint by gently dipping their brushes and putting a small amount of water into the tray. I say, "we aren't making mashed potatoes or scrubbing a pot!" We have to be gentle with the brushes.

I also remind them what a paint tray looks like after a 2-year-old is done painting: all messy and black.  Between color changes, artists need to gently wash their paintbrushes in water (if it gets really dirty--get some fresh water!) and dab them on a paper towel.

OK, let's go!

Directions:

1. Begin by taping your watercolor paper onto the stiff cardboard. This will prevent your paper from curling and buckling. Use long strips to tape around all four edges, about 1/4" border.

2. With the ruler and pencil, divide your watercolor paper into eight sections. I like to leave a little space between the eight boxes because if you are working on one square and your wet paintbrush touches another wet square, the paint will bleed together.

DID YOU KNOW? You can lightly sketch on watercolor paper using a pencil and once the watercolor paint is dry you can erase without harming the painting! Just draw lightly and use a good quality eraser to gently remove the pencil lines once the paint is completely dry.

Eight rectangles separated by a little space so they don't bleed into one another while we work (no need to be too precise here, since this is just for practice).

DRY BRUSH:
In the first square, we'll be practicing dry brush technique. The paper should be dry. Wet your brush and take a bit of the water and put it in the watercolor tray so that it softens up the dried color and makes some paint for you to use. Rinse your brush and dab it off gently. Now you can dip your cleaned and dried brush in the paint tray and brush it on the dry paper. See how the color is concentrated? Notice how the bristles of the brush can sometimes be seen? If you want to use this brushstroke on top of a base layer of paint, you need to wait until the base layer is completely dry.


WET ON WET:
In the second square, we're going to have some fun! In this square you can use plain water on your brush and wet the whole square. While the square is wet, add some wet splotches of color. You can use one color if you'd like, but it is fun to add additional colors and watch them blend on their own. This is wonderful for making oceans and sunsets--they almost look like tie-dyed shirts or the fur of an animal! You can try dripping a drop of plain water onto the wet on wet painting you've created-notice how the plain water pushes aside the colors? Try dabbing a bit up with your paper towel--this removes the color. This way of removing some of the paint with a towel is great for making clouds (or if you make a mistake and you paint something too dark!).

Combining techniques: for this cloud-like painting, I painted the background using the wet on wet technique and dabbed the painting with my paper towel to remove some of the color making a cloud-like shape. Once dry, I used the dry brush technique to paint in rain (you could also use colored pencils for the rain lines).


INK & WATERCOLOR:
This is my favorite! In the third box, use your pencil to sketch a simple drawing. Then go over your pencil lines with a permanent marker. Now it looks like a cartoon or a coloring book page! Use watercolor to fill in the drawing. But watch out! If you touch an area with your paintbrush that is still wet, your sections could bleed into one another and that might not be what you want. When you are filling in the areas of a piece done this way, you can take breaks to let each section dry before you paint the ones next to it.


COLORED PENCIL & WATERCOLOR:
OK, also one of my favorites! In this box, you'll want to do a simple shape with watercolor: I chose to make a leaf shape. Once that is dry, add details and texture with colored pencils. I use this technique all the time in my own work. In my example, I painted two leaves and then finished one so that you could see what the colored pencil does. I also added the background in colored pencil. This technique also takes some patience. You must let the paint dry thoroughly before you do the pencil or it will scrape the paint and damage the paper.

The leaf on the right is what I started with. The leaf on the left shows the addition of pencil lines.

WAX RESIST:
In this square, you can make magic! Using crayons, draw some simple shapes in this square. You should use firm pressure, but don't push so hard you break the crayon! Experiment with different colors of crayon: white, blue, red, etc. Once you've finished your shapes, paint a nice wet, watercolor wash in the square-even over the crayon marks! The paint won't stick to the crayon marks! This is wonderful for stars and bubbles and all sorts of great pictures! Experiment with different colors of crayon as well as different colors and values of paint. What happens with a light color of paint? What about a dark color?


SALT:
Fill the entire square with paint just like you did with the wet on wet square. While it is still wet, sprinkle the paint with table salt. Don't touch! You'll need to leave this overnight until it is completely dry. This makes little sparkles or stars in the paint. It's a great technique to use when painting water or sky. When it's dry, the salt just brushes off.


PLASTIC WRAP:
Fill the entire square with paint just like you did with the wet on wet square. While it is still wet, place a piece of plastic wrap on the square, crumpling it slightly and pressing it gently into the paint. Don't touch! You'll need to leave this overnight until it is completely dry. This makes little sections of color in the paint. The texture of this is interesting and could be used for rocks or in when painting water. Once dry, the plastic wrap peels off and you can throw it away or wash it and reuse it for another painting.


BLOW PAINTING:
This one is fun! Get your paint brush very wet with paint and touch the tip of the brush very gently to the dry paper. There should be a rounded drop of paint on the paper. If not, use more water. Once you get a rounded drop on the paper, gently blow through a drinking straw to move the drop around. It's fun to try to control where the paint will go! In one book I have, the artists use this technique to make trees. They look like craggly apple trees! When you are blowing through the straw, take your time and don't blow too hard. Take a break so you don't get dizzy!


To illustrate these techniques, I first did this project at home then did the project along with the students. It seemed to help the children to understand what we were doing if I said, "next we'll be doing this square." Then I showed them how to do it.

While they were practicing a technique, we would talk about what we could use that technique for (such as, "this would make a good rock wall" or "that would look really nice if you were making a starry night sky").

I had the following book on hand: "The Usborne Book of Art Skills" is a wonderful resource for older students (maybe middle school age) and showcases a variety of techniques. I was able to point out many of the things we were practicing. It was helpful for the children to actually see these techniques in use.

This lesson took the entire hour with my class, so the children and I have decided to have a second watercolor class where we will use these techniques to create underwater creatures in their habitats (maybe like the Loch Ness Monster?). They are all very excited about it--I think I need to run out and get more watercolor paper!

Wednesday, March 9, 2011

Op Art: Magic Pictures

This project is a fun one for children! It can be used for a variety of themes and once the child understands how to do the project, s/he can create countless combinations! This idea is based on a project that I first did in middle school or high school. It explores optical illusions and has a nice "wow" factor for the children.
Magic Picture: A great lesson in Optical Illusion!


Class talk:

I began by defining the term "optical illusion." Optical meaning "eyes" or "sight" and illusions are "something that appears to exist, but does not." Magic tricks are a great example of optical illusions. I had a couple of magic books on hand to illustrate this point. I explained that one could read a book on magic and learn how to make something disappear. A child isn't learning "magic," but how to fool the viewer's eye. Optical illusions are like magic for your eyes.

I then showed a few examples of optical illusions from the Childcraft: The How and Why Library, Volume 12, "Look and Learn," by Worldbook (c. 1988). I found it helpful to have a ruler on hand since some of the children had never seen these particular illusions and wanted to measure the lines to verify they were the same length, etc.

Some other examples of everyday optical illusions that also appear in the Childcraft Book were camouflage and movie pictures (animation). I was able to "show" the children examples of those from the same book.

I also brought in a book from my own library entitled, "Masterpieces in 3-D: MC Escher and the Art of Illusion," by Catherine Gleason. This book has 40 images by Escher with built in spectacles so that viewers can see the works in 3-D. It also has brief descriptions of each of the pieces. While the 3-D element of the book is great, many standard examples of Escher's images will work for illustrating the concept of optical illusion.

So, in this class, we decided to create two pictures and put them together in a special way to create an optical illusion. While not technically a medieval-themed project, I explained that we could use medieval-inspired imagery such as a knights, castles, princesses, or shields. We thought that if we created optical illusions like this back in medieval times, people would have thought our art was truly magical!

(NOTE: Once a child learns this technique, s/he can use it to explore many different ideas such as opposites, seasons, transformations, etc. The pictures should be very different for the illusion to be dramatic and should fill the space).

Supplies Needed:

• Templates (while not necessary, I found it easier to have these templates on hand), One copy of all three for each child:
  • Template One: Image Page (this has two 4"x8 1/2" rectangles printed on an 8 1/2"x11" piece of white paper. Each rectangle should have guides to help the child divide the drawing into four 1" segments. On one rectangle, label the sections 1, 2, 3 & 4, on the other rectangle, label the sections A, B, C & D. See image below.)
  • Templete Two: Accordian Page (this is a 8 1/2"x9" rectangle with fold lines spaced every 1" across vertically and 1/2" tabs at either end. See image below.)
  • Template Three: Backing Page (this has a 7"x8 1/2" rectangle printed in the center of an 8 1/2"x11" piece of white paper. See image below.)
Template 1: Image Page
Template 2: Accordian Fold Page
Template 3: Backing Page

(Supplies, cont'd.)

• Construction paper for frame
• Stapler
• Pencils/erasers
• Black marker
• Crayons
• Ruler
• Scissors
• Glue stick

Directions:

1. Using pencil, draw two very different pictures on the Image Page, one in each rectangle. The rectangles should be held vertically. Make to fill up the space in each box and use images that are nice and big--little details will get lost in this kind of project.

Step 1: Draw two pictures

2. Once the the images are planned out, outline the pencil drawings with marker and color in with crayon.
Step 2: Color pictures in
3. When the two images are done, use a ruler and pencil to divide each drawing into four 1" strips from top to bottom. Leave the "1,2,3,4" and "A, B, C, D" marks on each strip for now to help with placement. Take your time and do a nice, neat job--it will help the optical illusion work better if you do a neat job.
Step 3: Cut pictures into 1" strips
4. Cut away the excess portion of the Accordian Page and fold the rectangle on the fold lines like you are folding a paper fan. Fold the 1/2" tabs at the edges so that they lay flat on the table (you'll be stapling them to another piece of paper later).
Step 4: Prepare Accordian Fold Page

5. Following the letter and numbers written on the Accordian Page, glue the strips of the two pictures you created onto the Accordian Page with a glue stick. Take your time and do a nice, neat job. Once you are done gluing all of the strips to the Accordian Page and you are sure the illusion is works, you can cut off the excess portions of the image strips (the parts labeled with the letters and numbers).
Step 5: Glue strips onto Accordian Page in alternating order
When done, it looks kind of confusing!


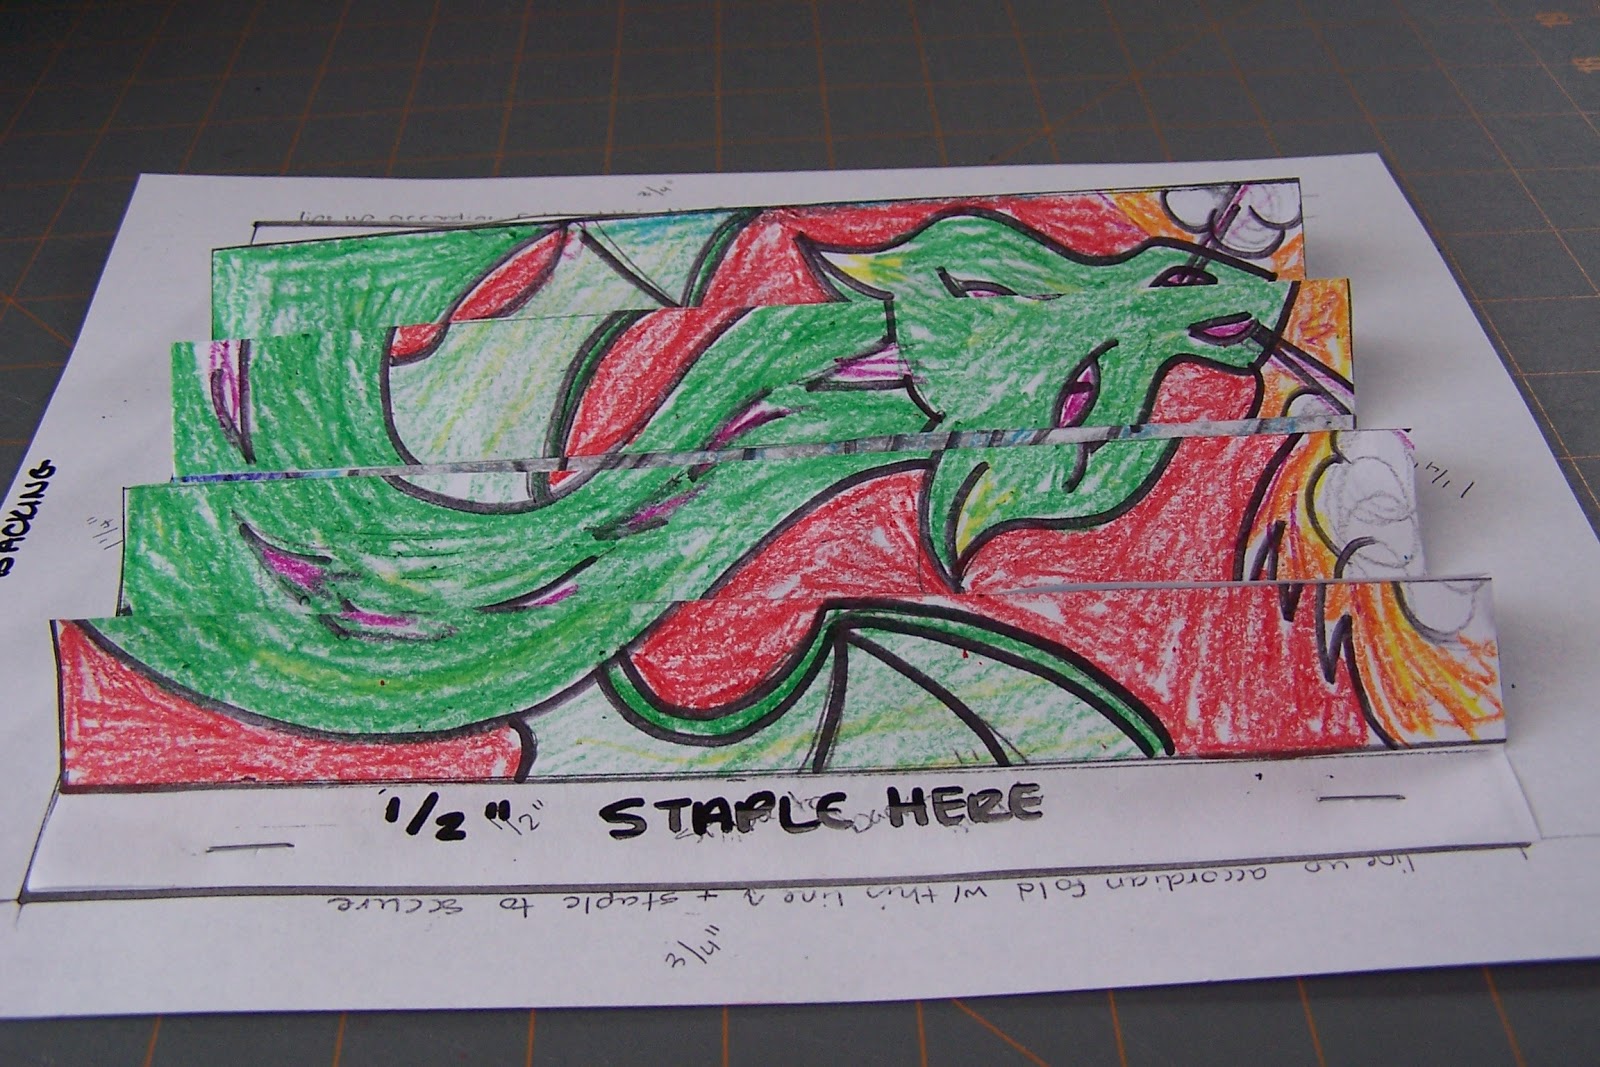
6. Staple the Accordian Page onto the Backing Page. Staple through the 1/2" tabs on the left and right side of your project. This will hold your project in the way that you need for the illusion to work.
Step 6: Staple project to Backing Page


7. Test your illusion out! Tilt your drawing one way and then the other--does your illusion work?
From the left: Fire-breathing Dragon!
From the right: A brave knight!


Is it not working? Try these tips:
• Refold the accordian page so that it looks like the one in the photos, if the folds are going the wrong way, the illusion won't work.
• Did you glue the pieces on in the wrong order? Or upside down? That happened to some of the kids in my class. You could try to peel off the strip that is positioned incorrectly, but glue sticks hold pretty strongly--you may need to cut the strips and reposition them onto another Accordian Page.

8. Once your optical illusion is done, you can create a frame for you Magic Picture. Fold a piece of construction paper in half lengthwise. Draw a 3"x8 1/2" square on the fold. Cut away the rectangle with scissors. Open up your frame. It should be the proper size for your Magic Picture. Glue it to the backing page with a glue stick. You can decorate it with crayons and markers if you'd like.
Step 8: Create a frame

Amaze your friends and family with your Magic Picture!

Sunday, March 6, 2011

Bayeux Tapestry Project: Part Two

Background: The first class day of this project, my students came prepared with their stories. The stories were great! The children wrote about getting a pet, a big move, a Christmas story, about being caught in a rip tide and one wrote about a child he had saved from a dangerous situation. We then divided the balance of the project (see all below) into the next two classes.

The completed tapestry
I started the class with a move indepth discussion of tapestries. Although not an actual tapestry (see Part One), I showed more of the Bayeux Tapestry. I used a wonderful book called, "The Bayeux Tapestry," Wolfgang Grape. While the text is suited for grown-ups, this book has wonderful full-color images of the entire tapestry (all 230 feet!). Pages show a portion of the tapestry and then have a paragraph below each image with the Latin phrase that appears on that section. It then translates the Latin and gives a short explanation of what is going on in that portion of the piece. Wonderful!!

Another great book with actual tapestries in it is: "The Unicorn Tapestries," by Margaret B. Freeman (ISBN 0-525-22643-5). This book has large, full-color pages of each of the 6 tapestries in this series as well as TONS of info in the text about the history of and symbolism in the tapestries. There is also a wonderful section on how tapestries are made with great diagrams and pictures that the children found fascinating.

And finally, I showed them an example of a modern-day take on the Bayeux Tapestry in, "Dia's Story Cloth: the Hmong People's Journey to Freedom," by Dia Cha. The Hmong people use story cloths to link the past and present and provide a visual element to their people's oral traditions and history. The visual elements of the cloth featured in this book as well as the background of how the cloth was made over time and sewn by many hands (by men and women), really reinforced many of the elements that I was trying to highlight with this project.

Information I presented about the Bayeux Tapestry:

Castles back in Medieval times were cold, dark places. They were heated by fireplaces and had few windows so that they could hold the heat in (and for protection). So, some people believe that artisans would create wall hangings, curtains, pillow covers, and banners to make their living areas more comfortable and colorful. It was believed by some that tapestries were used to stop drafts from coming through old castle walls, but now we believe that this may not have been true: many of the wall hangings were thin pieces of material and did not have layers of batting or fur that would truly work to keep cold out.

Tapestries are woven from silk or wool and showed very detailed scenes from the Bible, songs and legends. The threads were colored from handmade dyes that were made from herbs, berries or even crushed up bugs!

The Bayeux Tapestry tells how William of Normandy (William the Conqueror) became King of England and showcases the Battle of Hastings in 1066 AD. The Bayeux Tapestry was created about 1070 or so.


How to Make Your Own Story Cloth/Tapestry:

Supplies Needed:
  • Paper, pencil & eraser
  • Paper cut to the size of your fabric squares, ours were 8x8" (this helps children better design the pictures for the actual finished space they'll be using)
  • Fabric Markers (I use Crayola brand)
  • 8x8" squares white fabric (you'll need 4 per tapestry, but have extras on hand just in case)
  • 9x45" Backing Material (I used unbleached muslin)
  • Straight pins
  • Sewing Machine & thread
  • About 40" of ribbon (five 8" segments) (can be braided or embroidered)
  • Scissors
  • Glue gun & hot glue sticks
  • Ruler
  • Table cover
  • 11" long wooden dowel (optional)
Directions:

Once the child has written a short story from his/her life, s/he is ready to go! I had the children divide their stories into 3 parts. Then the child should think of a picture for each section of the story.
1. Creating the cartoon: medieval artisans would plan their tapestries by planning out the placement of the pictures and words of their tapestries. These sketches or drawings were called "cartoons." Using pencils and rulers, transfer the text of the story and then draw any images that will go in each square. Remember to make the images large and clear. Details should be kept to a minimum since the fabric markers are kind of wide and may bleed a bit. Try to think of ways to fill the space: remember to include a ground and maybe some elements that create a background like clouds, swirly lines that show wind, or sun and birds. I discourage coloring in the entire background a solid color because it seems to come out streaky and frustrates the children with the end result.
Step 1: Using a template helps children write in straight lines

2. Transfer the text and images to the fabric squares using fabric markers.
Step 2: Transfer the text and images to cloth

3. Using a fourth fabric square, create a title square with the name of the tapestry or story cloth as well as the author's name.
Step 3: Create a title panel (don't forget your name!)

4. Prepare the background: The background strip is 9" wide by 45" long. Fold the top edge over about 2 1/2" to create a casing to hang the banner by. Sew. Then fold the bottom corners of the backing inward to form a center point (just to make a decorative bottom edge). Sew.
Step 4: Prepare the backing material by making a casing and finishing the bottom edge

5. Then have the children arrange the four squares of their story onto the backing & pin in place. When arranging the squares, have their edges touch.
6. Sew down the left and right sides of the squares.
Step 5: Pin and sew squares onto backing. I just sew down the left and right sides and cover the top and bottom seams with ribbon (next step).

7. Hot glue 8" long strips of embroidered or braided ribbon to the top and bottom edges of the fabric squares for decoration and to hide the raw edges of the fabric squares.
Step 7: Attach ribbon with hot glue. This is both decorative and it covers the top and bottom seams of the fabric squares.

8. Insert a dowel into the casing of the tapestry, hang, and enjoy!

Note: Because portions of the banner are hot glued on, they are not washable. These could be made higher-quality if you had the time and money. They could also be made solely from paper if you are doing this on a very tight budget or with a large group of students.

    Thursday, February 17, 2011

    Bayeux Tapestry Project: Part One

    Background: I teach art to a group of homeschoolers in 3rd-5th grade. In previous semesters, I've taught grade levels 1st through 6th. My art ideas are geared toward the middle of that range--I use my oldest son, who is 8 and in third grade (in public school), as my test subject. I have a relatively small art class and I have 1-2 grown-up helpers per week.

    My art students and I just finished a wonderful project based on the Bayeux Tapestry.  The Bayeux Tapestry is one of the more famous textile pieces from Medieval times. Although it is called a tapestry, it is not really. A tapestry is woven on a loom--the design is actually woven into the fabric using different colored threads, but the Bayeux Tapestry is an embroidery. The pictures and words are sewn onto a backing fabric.

    I showed the children a couple of portions of the Bayeux Tapestry in this introduction, and showed them how it tells a story with both pictures and words. I explained that we were going to be doing the same.

    The books I used for this quick intro were:
    "Picture That: Knights and Castles" by Alex Martin (this is a great book that makes many wonderful connections between art and history for children using colorful illustrations, engaging text and a "zoom-in" feature that highlights details that children don't want to miss. There is a brief section about the Bayeux Tapestry).

    "Medieval Projects You Can Do," by Marsha Graves (this book has many wonderful projects including cooking and costumes that definitely engage and inspire children while making Medieval times more real to them).

    The project is worked in fabric markers on fabric squares and has a short story with illustrations. We then attached the fabric squares to a large fabric banner and added braided cord and/or embroidered trim to "fancy it up."

    Part One:


    After my very brief explanation of the Bayeux Tapestry, I gave the children homework. They need to write a story for their own tapestries. These were the guidelines:

    1. The child should have a personal story from his/her life (it's better if it is personal and true since it will be more special). However, the child can use a poem or story s/he has written, or even something written by someone else if the child is stressing about it. Ideas could be: a family vacation, acquiring a pet, something s/he is proud of such as winning a sports trophy or some kind of award, etc.

    2. The story should be written out by the child in the exact way that it is going to appear on their tapestry. I'd like all of the thinking, rewriting & scribbling to be done at home so they can copy and illustrate in class.

    3. The story should have a couple of parts to it--or be able to be broken down into about three illustrations. We don't need a novel, but we need enough to work with! Two sentences is probably not going to be enough. DO NOT WORRY ABOUT THE PICTURES! The students can sketch out pictures if they want, but focus on the story.

    An example:
    Our Awesome Vacation
    Last year my family was tired of all of the snow so my mom and dad took us to Coco Key water park. We went on a long drive and watched a movie in the car. When we got to the big building, mom and dad said we were staying overnight and we were excited! For two days I played with my family at the water park. I loved going on the lazy river with my mom. We had pizza and soda too. I would love to go back there every year.
    Related Posts Plugin for WordPress, Blogger...