Showing posts with label kindergarden. Show all posts

Friday, June 20, 2014

Nature Walk Scavenger Hunt and Sketches

Are you heading outdoors with a bunch of kiddos to look around? How about a Nature Scavenger Hunt? A couple of years ago, I worked for the Nature Center in town, Peabody Mill Environmental Center, and they sent me off to a Kindergarten to do a class visit. I thought an outdoor exploration of the playground, discussion about plants and their parts, and a sensory nature walk/scavenger hunt would be great! I met with multiple classes that day and we had a blast!

This is a great project and can be adapted for an outing with a bunch of scouts,
a camp experience, an art classroom, general classroom, homeschooling field trip, etc.

Prepping For The Lesson:
This is a nice lesson that requires very little prep--although you may want to buzz around the playground before the kiddos join you, so you have an idea of what is out there that you might want to point out to them.

Also, you'll need to print out the scavenger hunt form--I used one from The Bird Feed NYC--they have a bunch of them there (and some other neat stuff too!). We would all be using the same form and filling it out as a class (each class got their own). I glued the scavenger hunt form to a large piece of construction paper, so I would have room to draw my diagram of a flower and its parts. I also wrote some good scientific words on the poster such as: look, listen, touch, smell, observe, identify, dissect, and collect (apparently I misspelled dissect the first time around!).

I also brought a bunch of star stickers, a sharpie for me, some pencils and sticky notes, too.

Starting Off:
I met the classes in the art room and told them that we'd be heading outside to do some exploring. We talked about using out senses to experience the world around them. However, we would not be using our sense of taste! No licking the trees! I then went over the rules for outside behavior and how we'd be working together to complete the scavenger hunt form.

Moving Outside:
We went out and sat down. We experienced the playground by using our senses and we discussed what we heard, saw, felt, and smelled. We checked off as many things from the scavenger hunt form that we could while sitting there--it was quite a bit!

Then I let the children move around and I pointed out a few things that I thought would interest them, such as a little mushroom I found, etc. We stopped and looked at a dandelion and we discussed the parts of a flower and I drew them on the poster and labeled the parts. They loved this part and they really enjoyed dissecting the dandelions and seeing up close the parts of the flower!

Wrapping It Up:
We took a couple of minutes to see if we could find anything else on the list, then I brought them over to the picnic tables and gave them each a pencil and a sticky note and invited them to draw a picture of something they saw, heard, touched, or smelled today on the walk. I them glued their sketches all around the edges of the poster and gave the finished piece to their teacher to display in the classroom.

In the future, I could make the poster a bit better, I think, but I really liked how this easy lesson came together and I loved the sketches the children drew--it was great to see what they took from their time outside.

Enjoy!


Wednesday, April 10, 2013

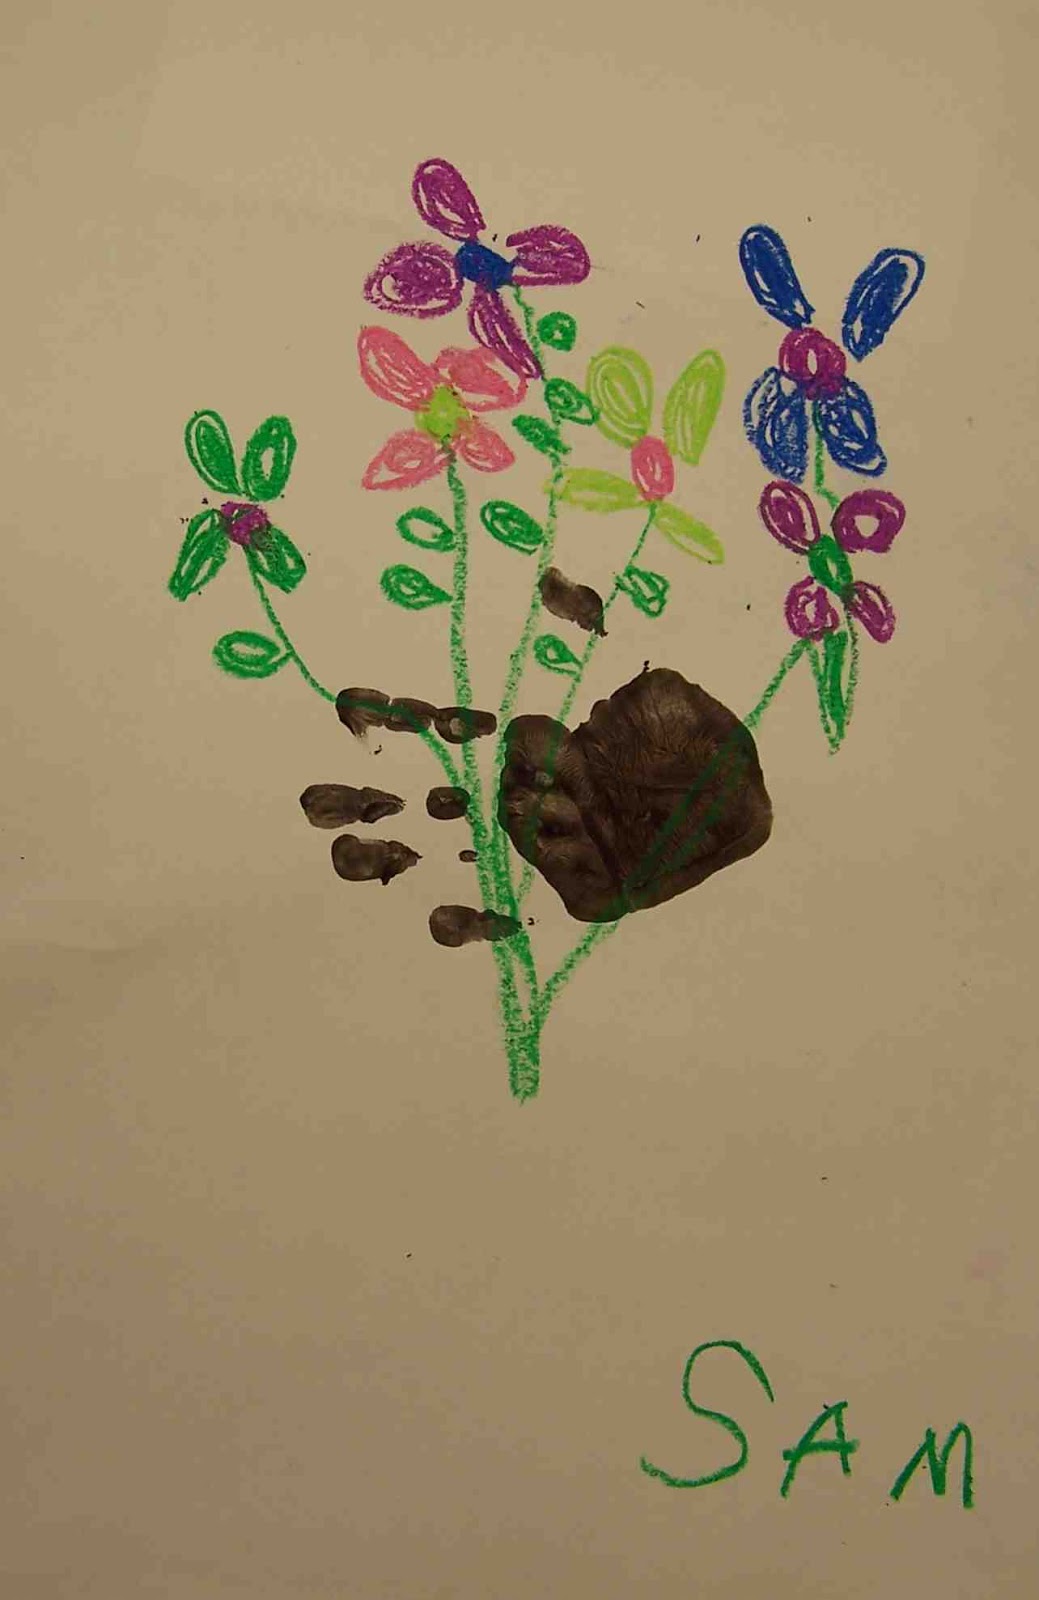
Kinder Picasso "Hand With Bouquet"

I've been visiting the Kinders at a local school (Clark Elementary in Amherst, NH) once a month doing an art enrichment program. I usually tie in a book or music or fine art (and sometimes all three) to make the experience a rich and multi-layered one. I have absolutely LOVED working with the children--Kinders are so cool. They are up for anything and so smart!


We've done some fall- and winter-themed art, but Spring is here! So I thought we'd create a piece that celebrates warm weather, flowers and color! I'm not a huge Picasso fan, but when I saw the piece "Hand With Bouquet" I immediately thought the children would love it. I experimented a bit with using cut paper and paper muffin liners to make a daffodil bouquet (which came out fine), but then I saw this version on the blog "Splish, Splash, Splatter." Rebecca uses the child's hand print as the hand holding the bouquet--WOW! Now, I'm a mom and anything that has a handprint in it instantly gets a place in my heart (and on the wall). It was a no-brainer--this was gonna happen!

But, I have to say, I was a bit worried about handprints and Kinders and only having a half hour per session...but it went great! We have a small sink in the art room, so I brought in two plastic bins, filled them with water, and had the children wash their hands in those. This allowed all 18 kids (or so) to wash their hands in about 5-7 minutes. I had a grown-up helper at the bins keeping an eye on things-I'm sure that helped!

I am so thrilled with the results and so were the kiddos! This lesson was fun and inexpensive and has a great "WOW" factor. It would be lovely for Mother's Day, too. I particularly enjoyed painting my own hand and then giving each student a high five before they printed their hand on the paper (that allowed me to check that they had covered their entire hand in paint and make sure they placed their hand properly on the page). I think the children thought I was silly-but it was so fun!

Here's how we did these colorful pieces:

Kinder Picasso "Hand With Bouquet"

Supplies Needed:

  • One 12" x 18" piece of white construction paper
  • Paintbrush
  • Paper plate for palette
  • Black tempera
  • Oil pastels/cray pas (assorted colors, but you'll definitely need green)
Directions:

1. Paint your palm, thumb and fingers with the paintbrush and black tempera paint. Make sure you get a nice coat on your hand and go all the way to the tips of your fingers. Press your hand onto the white paper, leaving a handprint. The handprint should be perpendicular to the page. Now you can wash your hand.

2. Look at the picture of Picasso's "Hand With Bouquet." How does he make the flowers? What shapes does he use? Turn your paper so the thumb is up. Check out the examples to see what I mean. This gives a more realistic idea of the hand "holding" the flowers.
Our inspiration:
"Hand With Bouquet" by Pablo Picasso
I instructed the children to use the craypas to draw a large circle for the center of their flower and then color it in. Then add petals going around the center. Use whatever colors you want, but make 4-5 flowers on the area of the paper above the hand.

3. Then add the stems. They should go from each flower, to the hand, and out the other side. Add a couple of leaves to make your bouquet look realistic.

4. Don't forget to sign your work like Picasso, using a craypas.

Welcome spring!


Wednesday, February 20, 2013

Process vs. Product Igloos

I recently have been reading about Process vs. Product in art education. I have long been against cookie-cutter type art and assembly-line creation. So, while I understood the concept of Process vs. Product, I decided to test out a couple of my lessons with the following criteria:

• Little or no finished teacher example (so no copying my work)
• Options for students to customize their work in their own way
• Templates available but not relied upon


So I returned to Clark School in Amherst, NH to teach my Igloo Landscapes With Northern Lights project (original post here), this time to the morning Kinders. In my prep work, I cut out MANY extra yellow squares and rectangles so that children could add as many windows and doors as they wanted. Last time, I suggested one window for each igloo and some students weren't happy with that.

Once there, I welcomed the children with fiddle music softly playing on the CD player and kept it playing throughout the lesson. My presentation of the project was pretty much the same, and I did show them an example of the finished project, but when they moved to the work areas, it was not in plain view (just like last time). The children knew that I was asking them to fill up the sky with lines that looked like the Northern Lights (but they decided which colors and how many lines of color to use), then I showed them the elements of the collage table and we discussed what they could use them for:

• White paper strips (snow covered ground)
• Paper plates cut in half (they could trace if they needed help making a semi-circle igloo shape)
• White squares (snow blocks)
• Yellow squares and rectangles (doors, windows, stars, moons)

Then I let the children begin. As I moved around, I made suggestions on the process ("Make sure to use your helper hand to hold that steady" or, "what is your next step?"). I just made sure that the students understood the WAY to use the tools and materials, but I never said where a piece had to go within their work or that they HAD to add a door or a moon--I was giving them options and letting them decide.

How'd it work? Great! I had discussed the idea of Product vs. Process with one of the Kindergarden teachers beforehand and she assured me that this project, as I had done it last month, was full of "process," so I was already feeling pretty good about it. Being mindful about "Process" this time, I learned the following things:

1. Kinders are pretty capable people. Show them techniques and they'll take off running! They can make all sorts of great choices about using techniques, tools, composition, etc.

2. Always cut more bits than you need--sometimes a student will want more than one window or door or moon. That's cool. I'm not making kits to sell, I'm offering supplies up for creativity.

3. Templates aren't always needed. These Kinders were more than capable of making a semi-circle without tracing a plate. And they did it with glue--and not too much glue, I might add. Bravo!

4. When children make creative choices about their artwork, they are taking ownership of the piece--and will even be able to tell you stories about their work. I bet you many of these children can tell you all about their landscapes and who lives in the igloo and what's going on in that colorful sky. This is probably not the case if they are cutting and pasting with strict guidelines--this active vs. passive involvement in the creative process is exactly what I am striving for. We aren't just creating pretty art--we're learning something here!

So, enjoy these igloos and enjoy the process!


Friday, February 24, 2012

Homemade Stamps for Printmaking

Here's a great way for you to explore stamping and printmaking. And, it's inexpensive, fast and fun!


This past fall, at the NH Art Educators Association Conference, I went to a printmaking talk given by Liam Sullivan from the NH Institute of Art. One of the ideas he had for younger students was to make a bunch of stamps using wine corks as the handle. He suggested using bottle caps and such and gave us all sorts of interesting ideas for making stamps. Well, I asked around and someone gave me a big bucket of wine corks and then I started collecting bottle caps, caps from glue sticks, foam shapes, buttons, etc. Once I had a sizable stash, I heated up the glue gun and glued my "findings" to the wine corks.

We used some of the stamps to make Modern-dayAdinkra Cloths, but we also did this simple project that I got from Liam's slideshow. The children had fun digging through the box of stamps I brought in trying out all of the different ones and were very impressed with their finished pieces. This project not only showcases printmaking, but is great for explaining patternline, and repetition.

Stamping Sampler (Or "Stampler")

Supplies Needed:
  • Stamps (see above description)
  • Tempera paint, assorted colors
  • One 8 1/2" x 11" piece of yellow paper
  • One 9" x 12" piece of construction paper for backing/matte
  • Pencil
  • Newspapers
  • Glue stick
Directions:

1. Make the stamps according to the description above. Some good ideas for stamps are shapes cut from craft foam, milk jug caps, glue stick caps, and wooden shapes (I even cut a few NERF bullets crosswise and made some interesting stamps).

The possibilities for homemade stamps are endless!

2. Draw a line on your paper going from one side to the opposite side. The line can be horizontal, vertical, diagonal, wavy, curved, zigzag, etc. 

3. Select a stamp, dip it into the paint and stamp it repeatedly along the line you drew.

4. Choose another stamp and another color and stamp another row of stamps parallel to your first line of stamps. Continue until the entire page is filled with rows and rows of multi-colored stamps!
A work in progress. This piece uses a large sheet of construction paper (12" x 18").

5. Mount your finished paper onto a coordinating color of construction paper using a glue stick.

ENJOY!
Some examples from my home school class.

Saturday, January 21, 2012

Mini Craft (Popsicle) Stick Snowman

Snowman's Valentine
by Leland B. Jacobs

I have a jolly snowman,
The best I've ever had.
I'm giving him a valentine
that ought to make him glad.
For though he's very handsome
and sound in every part,
I noticed only yesterday
he hasn't any heart.
So quickly with my scissors
and paper red and fine
I made a fancy little heart;
my snowman's valentine!


Left: Back of piece
Middle: Front of snowman, partway through project.
Right: Completed snowman project
This is a nice little craft that uses supplies you may already have on hand. I sent this craft in for my son's 2nd grade class to do at their Holiday Party, but it is a cute craft to do on a snowy day or decorate your snowman with a heart, attach the above poem, and give it out for St. Valentine's Day!

Popsicle Stick Snowman

Supplies Needed:

  • Four craft/popsicle sticks
  • Glue (I like using a glue gun, but tacky glue is probably better for little ones)
  • White tempera or acrylic paint
  • Markers (we used black and orange)
  • Felt scraps, assorted colors. You'll need a 3.5" x 4.5" rectangle for a hat and a 9" x 1" rectangle for a scarf
  • One to two 6" pieces of yarn
  • Sticky-backed felt shapes or paper to make a heart, optional
Directions:

1. Line up three of the popsicle sticks next to each other with their long sides touching. Cut the remaining popsicle stick into 1" sections. Glue two of the small sections onto the back of the larger popsicle sticks for support, using tacky glue or hot glue. This is your snowman's body. Let dry.

2. Flip the popsicles sticks over and paint the front of the snowman white. Let dry.

3. Fold one of the long edges of the 3.5" x 4.5" rectangle to make a hat brim. Using the photo as a guide, attach the hat to the snowman (you'll need to glue it to the front of the snowman and the back). Then, use a piece of yarn to gather the hat and give it some shape. Knot the yarn and trim excess. If you are making the snowman an ornament, make a loop with the second piece of yarn and attach it to the back of the piece.

4. Using the markers, draw features on your snowman such as eyes, carrot nose, mouth and buttons.

5. Cut 1/2" long slits for fringe at either end of the piece of felt you will be using for a scarf. Tie the scarf around the snowman and secure with a dot of glue. 

6. Add a paper heart if you are sticking with the poem above.

You're done! Enjoy your little snowman!

Saturday, January 14, 2012

Easy Paper Lanterns

Here's an easy way to decorate for your Chinese New Year Celebration! These paper lanterns take two sheets of paper, some cutting and stapling and you're done! Make a few to hang around your dining room for January 23rd, Chinese New Year 2012! 


Supplies Needed:

  • 1 9" x 12" sheet construction paper, yellow
  • 1 9" x 12" sheet construction paper, red (red is the color of joy)
  • 1 1" strip of paper for handle, any color
  • Ruler
  • Scissors
  • Pencil
  • Stapler
Directions:

1. Beginning with a short side of the yellow paper, roll up the paper to make a tube that is roughly 3" in diameter. Secure with a couple of staples (or you could use glue stick or tape).

2. Fold the red piece of paper in half lengthwise (like a hot dog bun). Use the ruler to draw a 1" line along the long edge that is not the folded edge. Use the scissors to make a series of cuts from the folded edge stopping at the pencil line you made. These cuts should be spaced about 1/2" apart. Make sure that you begin the cuts at the folded end and stop at your line that is 1" from the opposite edge.

3. Unfold the red piece of paper. Wrap the red piece of paper around the yellow tube about 1" down from the top. Secure the red paper to the tube using a couple of staples. Do the same by wrapping and securing the red paper about 1" up from the bottom of the yellow tube. That will make the red paper bow out and create the effect of a lantern with glowing yellow light within.

4. Secure a 1" paper strip to the top of the lantern. 

You are done! These look pretty hanging from the ceiling or lined up along the center of the table.


Thursday, September 22, 2011

Leaves are "FALL"-ing Picture

In honor of the first day of Fall which is tomorrow, I have this super craft. I saw it on display at a local library and had to try it at home with my preschooler who is four. It was a bit challenging for him, so I worked with him to do the tissue paper "puffs" so he didn't get too frustrated with them. My 9 yo was saying he just had to make one as well!

This project is a good way to explore a few different kinds of media and practice fine motor control. It also uses many items you may have on hand. I liked spending time with my little one and we had a wonderful discussion about fall and leaves. ENJOY!

Supplies Needed:

  • 8 1/2x11" piece of white card stock
  • pencil and eraser
  • scissors
  • black marker
  • crayons, colored pencils or markers to color in the tree trunks
  • tissue paper, various colors, cut into 1" squares
  • Elmer's glue in a little tray
  • zip-top plastic baggie
  • tape
  • hole punch
  • various paper scraps in leaf colors
Directions:
1. Fold the card stock about 4" up from the bottom. On the larger portion of the cardstock, draw two trees in a way that creates a frame. You can keep it simple. Make sure the area that is in the center of the trees (that you will be cutting away) is smaller than your zip-top bag, so that the edges of the baggie don't show. 

2. Once you have the drawing the way you want, outline the trees, trucks, roots, ground, etc. with a black marker, if desired.

3. Using the scissors, cut away the center portion of the drawing. 

4. Talk about the color of bark and grass. Have your child look outside for inspiration. My son noticed that bark is kind of gray sometimes, so he colored his tree trunks grey. Have your child color those in (a side note: I don't ever say something HAS to be a certain color. We may look at something in nature & talk about the colors we see, but the artist gets to choose what color s/he wants).

5. Pour a bit of Elmer's glue (white school glue) in a tray. Take a square of tissue paper and cover the end of a pencil eraser with it. Dip the tissue-covered end of the pencil into the glue and then touch it to the paper in the leaf section. Pull the pencil away and the tissue "puff" will be left behind. Continue doing this until the entire leaf section is full of puffs.
Working on his tissue paper "leaves," he says "Mom, I'm excited about this picture!"

6. Now, to make the falling leaves: use a hole punch to punch different colors of paper. Gather all of the little dots you've punched out and add them to the zip-top bag. Seal the baggie and attach the baggie to the back of your frame with clear tape. We folded the bottom portion of the card stock around and stapled the layers together at the edges.

Once the piece is dry, your child can shake the picture and show the autumn leaves falling to the ground! ENJOY!

Saturday, July 16, 2011

Memory Pillow and Artist Talk

I visited my son's first grade classroom a few weeks ago and gave a talk about being an artist. It was so much fun talking with the children about ways to make art as well as the different careers an artist can have. We then did a project where the children made memory pillows. It was a wonderful way for them to remember the school year and all of the friends they made this year!

The Memory Pillow--what a masterpiece!

What is an Artist?

In preparation for this project I looked in the dictionary to see what being an artist meant. It said that an artist is someone who creates art. Well, that didn't seem like a very good explanation!

We discussed different kinds of art/ways of making art and we came up with this list:

Drawing
Painting
Photography
Sculpture
Fabric Arts (like knitting embroidery, quilting)
Computer Arts (like web design)
Mosaics
Cartooning/Animation (like cartoons on TV & movies as well as in newspapers and in books)

(I'm sure this list isn't complete! I also added that people can be artists if they create music, dance, perform in the theater and write).

Many works of art like paintings and drawings are found in museums and in galleries, but art is all around us every day. We discussed different art careers that are out there such as:

Architect: If you like to draw houses and create buildings with Legos then maybe you could be an architect!

Illustrator/Cartoonist: I told the children they were already illustrators since they all published books for the school's writing festival! If you like to draw pictures to go along with stories you could be an illustrator!

Sculptor/Potter: Do you like to work in clay? Do you like to make sculptures or bowls and cups? Maybe this job is for you!

Graphic Designer: Do you like to make books with words and pictures? Do you like to look at cool websites? Those are made by graphic designers!

Actor/Actress/Dancer: If you love to perform and put on shows--this is for you!

Art Teacher: If you love to talk about art and share different projects with children, then this job is for you! This is what I do and I love it! :-)

Memory Pillow:

This is a wonderful project for a teacher gift, a class project, a birthday party and more! After our talk we worked on this craft.

Supplies Needed:

1 square of white 100% cotton fabric (ours was about 12 x 12")
1 square of printed fabric for backing that is the same size as the front piece (ours was 12 x 12")
Gold acrylic paint
1 4"x 8" piece of craft foam
Scissors
Paintbrush
Paper plate for palette
Newspapers or other work surface covering
Fabric markers (I use Crayola brand)
Sewing machine
Pins
Needle and matching thread
Pillow stuffing

Directions:

1. Wash the fabric to remove sizing, dry and cut to size.

2. Cover your work area with newspaper. Cut a frame shape from the foam. Put some gold paint onto the palette and, using a brush, apply a thick coat of paint to the foam. Stamp the foam shape onto the center of the white square. Let dry.
Choose a metallic gold paint for a little sparkle. The children asked,  "Is this REAL gold?"

3. Trace around the edge of the gold frame with a black fabric marker, if desired, to make the frame's edges a little more crisp and interesting. You don't have to be neat about it--it looks more interesting if the edges are off a bit (I completed up to this part at home so all the children had to do was draw with markers).

4. Using fabric markers, draw a picture inside the frame. If you are doing this with a group, you may want to have the artist sign inside the frame as well.
A dragon being stopped by a super hero

A horse and rider in a woodland scene. Love those woodland critters!

5. Now's the time to have everyone sign each other's pillows. Do not sign inside someone's frame or on their picture. Leave about 1/2" border all around the edge of the white square for a seam allowance.


6. Once the marker work is done, pin the white square to the backing material with the right sides facing each other. Sew around the pillow, leaving a 3-4" opening on one side.
Older children can use the sewing machine with adult supervision, to sew their pillows on their own. My 9-year-old was able to sew his pillow.

7. When done, turn the pillow right side out and gently stuff with pillow stuffing.

8. Pin the opening of the pillow closed, thread a needle with matching thread and sew the opening closed.


Ta-da! A masterpiece (and a memory) has been created! Enjoy!!
Related Posts Plugin for WordPress, Blogger...