Showing posts with label magic. Show all posts

Wednesday, August 14, 2013

Survey Says: CLAY!

I'm going to be returning to my teaching schedule soon and wanted to poll my previous after school students to see what they wanted to see more of in the coming year and the media that won was: CLAY!

This is probably no surprise to some of you, but this means I am going to make a serious effort to include some awesome clay projects with this year's classes! This does take a bit of planning since I don't have a kiln--this means air dry clay it is. I have some plans for Model Magic, Crayola Air Dry Clay, and plans to test a couple of new (to me) air dry clays on the market. Any suggestions?

Another downfall: drying space. Since I'm "art on a cart" I don't have space to store the items safely where I teach while they dry. That means I pack all the clay items up, load them in the car and bring them home to dry until the next class. This stresses me out! I worry that one of my kids will get into them or the dog will knock them over. I'm come up with some good ways to transport and store clay creations in progress, but it will be nice when I don't have to worry about moving them.

So, without further ado, I repost this lovely "Forever Sandcastle" post I did awhile back. The lesson is from Family Fun magazine and is really fun for the children to make. Make one yourself and enjoy those summertime memories all year long!

Whip up a batch of air dry sand clay
to make a forever sandcastle of your own!

Monday, March 4, 2013

Lung Project Done

Many of you read about my experience watching my son make a 3D plaster cast of his body for a science project on the respiratory system...well, the project is done (and he got an A+!). This was a great project from a mom point-of-view: the supplies were cheap, it allowed for TONS of creativity on my son's part, and he could pretty much handle the whole thing himself--oh, and it didn't chew up a entire weekend! He worked on it one Saturday morning (taking breaks to go sledding and visit with company). And he was super-proud of it! That's my kind of project!

So here are the finished picts. Hopefully it inspires you to try something new!


The details of the project (in case you were wondering):

The plaster cast was made using three packages of plaster tape bought at Michael's. The strips were about 4" wide and 8' long--we cut them to size (some 4" strips, some 8" strips and some 12" strips), dipped them in warm water, and then applied them to my son's body (make sure you coat the model's body with petroleum jelly before putting the strips on).

The dried cast was painted with leftover house paint my son found in our garage (I am worried I needed that paint, but c'est la vie!).

The red stuff (used for the nasal cavity, mouth, trachea, and bronchi) is model magic--I think he used one standard size package.

The lungs are sponges that he used scissors to cut into lung shapes.

The bronchioles are made from some leftover moss we had that he sprayed with red and blue spray paint (which he also found in the garage).

The whole thing is mounted on foam core (from the Dollar Store) that was covered in leftover colored paper. He also went crazy using the hot glue gun on this project.

Thursday, November 15, 2012

Magical Fauve Landscapes

Every year I teach my students about color theory and the color wheel. This year, we're focusing on Modern Art, so I thought a perfect color-theory tie in would be learning about the Fauves. The Fauves (or Wild Beasts) are a bunch of radical artists that created some bright and beautiful pieces of artwork that didn't quite match up with the colors of reality.


I know these landscapes are pretty basic, but read the post to find out why...

I have always loved the work of the Fauves! When I was in college, I used to take this great book called "Fauve Landscape," by Judi Freeman out of my school library. The paintings just made me happy and after I renewed the book at least three times, I decided I needed to own it! I pulled the book off the shelf for this project, and it was full of inspiration for the kiddos.

I began my lesson by having the children fill in a basic color wheel. My standard 6-color color wheel worksheet allows the children to learn about primary, secondary, complementary, warm and cool colors. There was a bit of grumbling about doing the worksheet (some of my students had done this before), but understanding the color wheel is really important for this project to be a success.

Then we looked at examples of works by the Fauves (and artists that are sometimes classified as Fauvists). We had a discussion about the paintings (the colors that were used and how they make us feel, why the artists might have chosen to use the colors they did, etc.).

Then we moved on to the main project. This project was one I saved pre-Pinterest. It is from the book "Art is Fundamental," by Eileen Prince and I always thought my students would enjoy it. In short, students create a simple landscape scene using complementary colors for the objects in the scene. Prince suggests doing the lesson as a draw-along, so that's why all of our pictures look alike. This is a great project because it only needs one piece of paper, a pencil and markers. Having the color wheel on hand really helps them get the idea of complementary colors. By the end of the lesson, they were pros!

Once they are done coloring their scene with nice, solid color, students stare at the completed image for about 30 seconds and then quickly look at the white surface. If done correctly, they will see an afterimage of the scene with the colors appearing properly. It took some of the students a couple of tries to see the afterimage, but most of them were able to see it.

This project didn't impress some of my students as much as I thought it would, but I think I'll keep it in the curriculum because it is a great lesson on color theory and some really cool artists. I also think it is a great lesson to teach children about creating art "in your own way."

The white space on the lower portion is the "white field"
the children look at to see the afterimage.

Nice, solid colors are key to this project.

This project is like a "art vocab ninja"!
The children don't even realize they are learning so much
about color, landscapes, and Modern art.


Saturday, September 1, 2012

Clay and Paper Butterflies

Do you know some students who are studying butterflies? This is a great project for children in Kindergarten and elementary school. You can work in so many great concepts with this project: parts of an insect, symmetry, pattern, and more.


I started by having my students cut out the wings and design them and then I walked them through the making of the butterfly body. We finished up by adding the details such as antennae and legs. I really enjoyed this project because it taught science and art concepts, but it also because it allowed the students some self expression; a win/win in my book!

Clay Butterfly With Paper Wings

Supplies Needed:

  • One 6" x 9" piece of construction paper for the wings (light color)
  • Pencil with eraser
  • Scissors
  • Assorted markers
  • Model Magic by Crayola (about the size of a chicken egg), whatever color you want
  • 3 pipe cleaners (chenille stems), whatever color you want

Directions:

1. Fold the construction paper in half the short way (hamburger or taco fold).

2. Arrange the construction paper so the fold is on the left. Draw a capital letter "B" on the paper extending it so the top and bottom of the "B" touch the top and bottom of the paper.

3. Cut out the "B" shape, but don't cut the middle line (in between the upper and bottom bumps). Write your name on the paper and open it up so your name is face down. These are your butterfly wings.

4. Decorate the wings with whatever designs you would like: big dots, little dots, lines, etc. I showed a couple of butterfly books to the children before they started drawing. I asked them to make their designs symmetrical, or the same on both wings.

5. I then gave each child a ball of Model Magic the size of a chicken egg. I had them pull off a piece and roll it into a 3/4-1" ball. This is the butterfly's head. Place this ball of dough at the top of your butterfly's wings and press down slightly.

6. Divide the remainder of the dough in half (two equal parts). Form he first into a ball. This is the thorax for your butterfly. Place this ball of dough below your butterfly's head on the wings and press down slightly.

7. Roll the remainder of the dough into a hot dog shape about 3" long or so. This is the abdomen of your butterfly. Place this ball of dough below your butterfly's thorax on the wings and press down slightly.

8. Use scissors to cut each pipe cleaner into three equal sections. Poke 2 pipe cleaner pieces into the butterfly's head as his antennae. Wrap another pipe cleaner piece into a coil and poke it into the head for the butterfly's proboscis.

9. Poke the remaining 6 pipe cleaner pieces into the butterfly's thorax (3 on one side, 3 on the other). These are the butterfly's legs.

You're done! Enjoy your colorful butterfly!

Monday, March 28, 2011

More References: Optical Illusions

Sometimes things just work out great! I love the fact that my children are absorbing all of the "stuff" I'm doing with my art class. While they refuse to actually sit down and try the projects I'm teaching (I think that might be a control thing on their part), they are inspired to use the materials and are very interested in the research I do for each project. As evidenced by my oldest son's library books last week: both about Optical Illusions (FYI: I taught a class on optical illusions just a couple of weeks ago). Both of my older boys have been fascinated by these books, as am I. I'm putting them in my notes for next year...

"Amazing Optical Illusions," by Illusionworks

"You Won't Believe Your Eyes!" by Catherine O'Neil, National Geographic Society

Both of them were awesome! The are full of traditional optical illusions as well as examples of modern-day illusions (newspaper printing, 3D graphics, illusions in nature) all in full color.  There is even a section in "You Won't Believe Your Eyes!" that discusses art techniques where illusion is used (trompe l'oeil, and Pointillism). Wonderful!

And one of the followers of this blog (Hi Scott!) mentioned another kind of optical illusion I hadn't thought of:  Lenticular printing and 3D techniques
 
Say what?!?! At first, I was puzzled--I was sure I didn't know what this was! But then I checked out the definition above and realized that I has seen this before. OK, remember those little novelty stickers from when you were a kid that had a picture of a person or something on it and if you tipped it to the side the guy winked or something like that? They seemed to be made from plastic and have little ridges on them? I used to love these as a kid and my children just received bookmarks that have this technique on them (think: a swimming, biting shark!!). This type of printing is mainly used in novelties (like in Cracker Jack boxes, bookmarks, on Valentine cards, etc.). These pieces can have a series of images that create a little animated movie (sometimes lasting about 1 second) that almost seems 3D (but without the glasses).

What a great way to blend science and art! Thanks, Scott, for making that connection!

Wednesday, March 9, 2011

Op Art: Magic Pictures

This project is a fun one for children! It can be used for a variety of themes and once the child understands how to do the project, s/he can create countless combinations! This idea is based on a project that I first did in middle school or high school. It explores optical illusions and has a nice "wow" factor for the children.
Magic Picture: A great lesson in Optical Illusion!


Class talk:

I began by defining the term "optical illusion." Optical meaning "eyes" or "sight" and illusions are "something that appears to exist, but does not." Magic tricks are a great example of optical illusions. I had a couple of magic books on hand to illustrate this point. I explained that one could read a book on magic and learn how to make something disappear. A child isn't learning "magic," but how to fool the viewer's eye. Optical illusions are like magic for your eyes.

I then showed a few examples of optical illusions from the Childcraft: The How and Why Library, Volume 12, "Look and Learn," by Worldbook (c. 1988). I found it helpful to have a ruler on hand since some of the children had never seen these particular illusions and wanted to measure the lines to verify they were the same length, etc.

Some other examples of everyday optical illusions that also appear in the Childcraft Book were camouflage and movie pictures (animation). I was able to "show" the children examples of those from the same book.

I also brought in a book from my own library entitled, "Masterpieces in 3-D: MC Escher and the Art of Illusion," by Catherine Gleason. This book has 40 images by Escher with built in spectacles so that viewers can see the works in 3-D. It also has brief descriptions of each of the pieces. While the 3-D element of the book is great, many standard examples of Escher's images will work for illustrating the concept of optical illusion.

So, in this class, we decided to create two pictures and put them together in a special way to create an optical illusion. While not technically a medieval-themed project, I explained that we could use medieval-inspired imagery such as a knights, castles, princesses, or shields. We thought that if we created optical illusions like this back in medieval times, people would have thought our art was truly magical!

(NOTE: Once a child learns this technique, s/he can use it to explore many different ideas such as opposites, seasons, transformations, etc. The pictures should be very different for the illusion to be dramatic and should fill the space).

Supplies Needed:

• Templates (while not necessary, I found it easier to have these templates on hand), One copy of all three for each child:
  • Template One: Image Page (this has two 4"x8 1/2" rectangles printed on an 8 1/2"x11" piece of white paper. Each rectangle should have guides to help the child divide the drawing into four 1" segments. On one rectangle, label the sections 1, 2, 3 & 4, on the other rectangle, label the sections A, B, C & D. See image below.)
  • Templete Two: Accordian Page (this is a 8 1/2"x9" rectangle with fold lines spaced every 1" across vertically and 1/2" tabs at either end. See image below.)
  • Template Three: Backing Page (this has a 7"x8 1/2" rectangle printed in the center of an 8 1/2"x11" piece of white paper. See image below.)
Template 1: Image Page
Template 2: Accordian Fold Page
Template 3: Backing Page

(Supplies, cont'd.)

• Construction paper for frame
• Stapler
• Pencils/erasers
• Black marker
• Crayons
• Ruler
• Scissors
• Glue stick

Directions:

1. Using pencil, draw two very different pictures on the Image Page, one in each rectangle. The rectangles should be held vertically. Make to fill up the space in each box and use images that are nice and big--little details will get lost in this kind of project.

Step 1: Draw two pictures

2. Once the the images are planned out, outline the pencil drawings with marker and color in with crayon.
Step 2: Color pictures in
3. When the two images are done, use a ruler and pencil to divide each drawing into four 1" strips from top to bottom. Leave the "1,2,3,4" and "A, B, C, D" marks on each strip for now to help with placement. Take your time and do a nice, neat job--it will help the optical illusion work better if you do a neat job.
Step 3: Cut pictures into 1" strips
4. Cut away the excess portion of the Accordian Page and fold the rectangle on the fold lines like you are folding a paper fan. Fold the 1/2" tabs at the edges so that they lay flat on the table (you'll be stapling them to another piece of paper later).
Step 4: Prepare Accordian Fold Page

5. Following the letter and numbers written on the Accordian Page, glue the strips of the two pictures you created onto the Accordian Page with a glue stick. Take your time and do a nice, neat job. Once you are done gluing all of the strips to the Accordian Page and you are sure the illusion is works, you can cut off the excess portions of the image strips (the parts labeled with the letters and numbers).
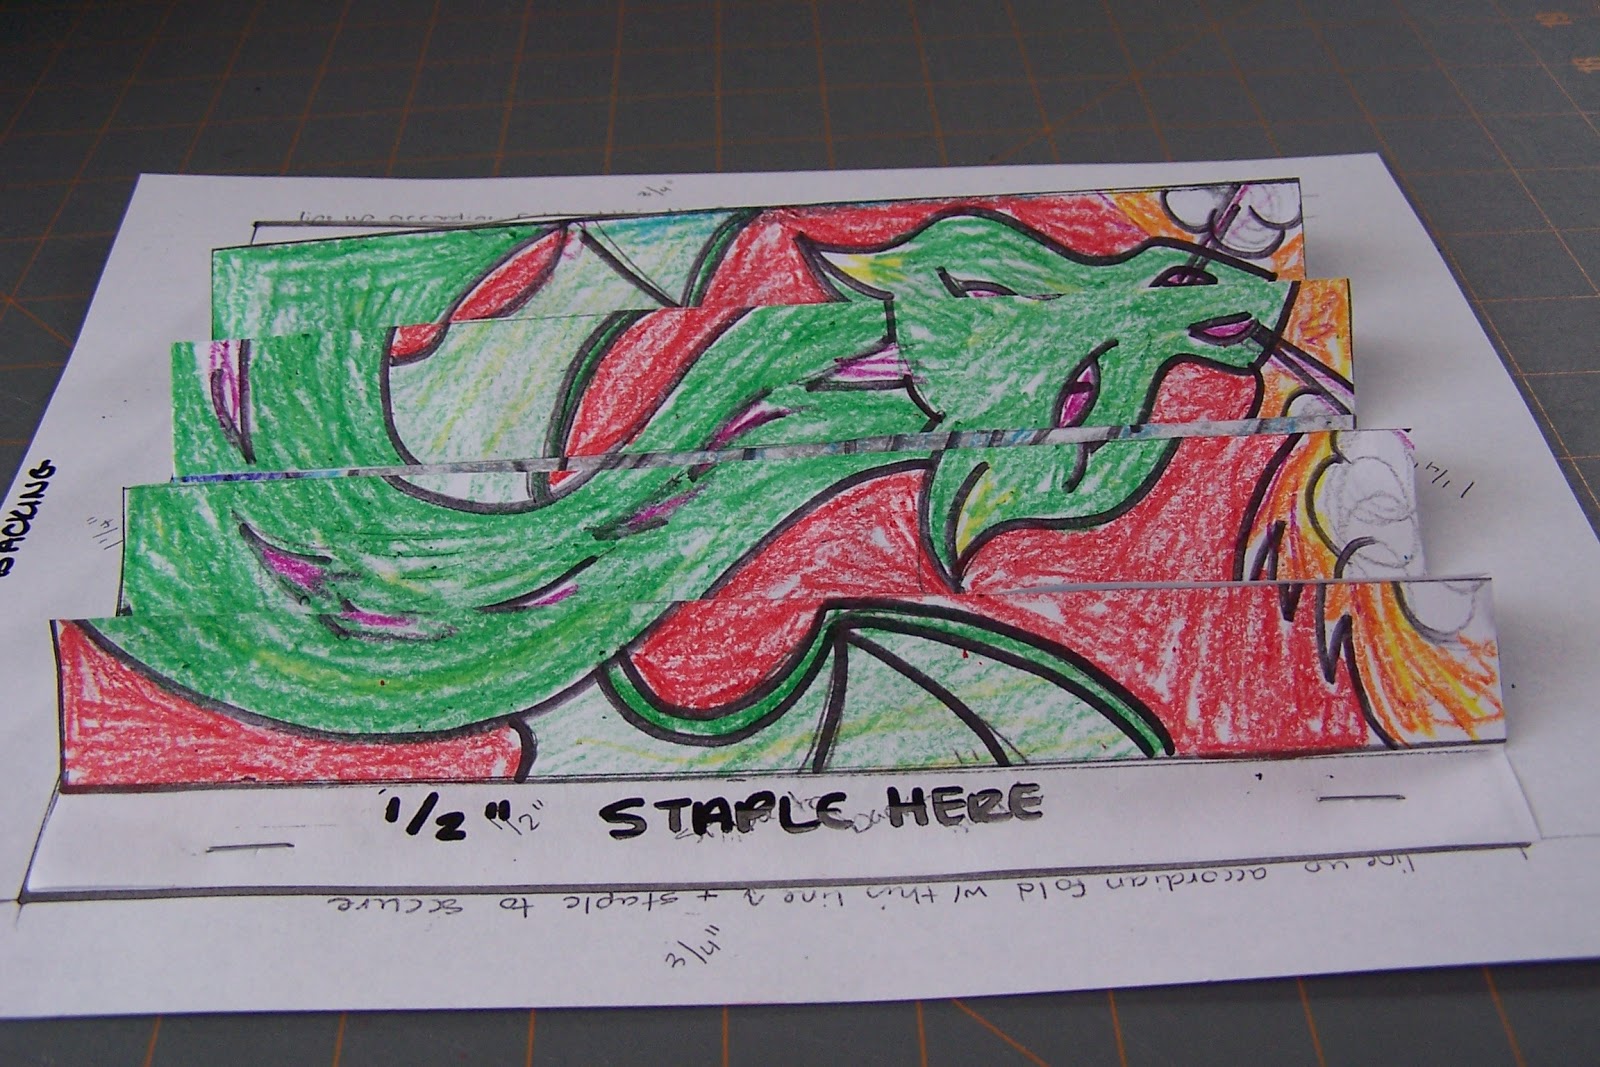
Step 5: Glue strips onto Accordian Page in alternating order
When done, it looks kind of confusing!


6. Staple the Accordian Page onto the Backing Page. Staple through the 1/2" tabs on the left and right side of your project. This will hold your project in the way that you need for the illusion to work.
Step 6: Staple project to Backing Page


7. Test your illusion out! Tilt your drawing one way and then the other--does your illusion work?
From the left: Fire-breathing Dragon!
From the right: A brave knight!


Is it not working? Try these tips:
• Refold the accordian page so that it looks like the one in the photos, if the folds are going the wrong way, the illusion won't work.
• Did you glue the pieces on in the wrong order? Or upside down? That happened to some of the kids in my class. You could try to peel off the strip that is positioned incorrectly, but glue sticks hold pretty strongly--you may need to cut the strips and reposition them onto another Accordian Page.

8. Once your optical illusion is done, you can create a frame for you Magic Picture. Fold a piece of construction paper in half lengthwise. Draw a 3"x8 1/2" square on the fold. Cut away the rectangle with scissors. Open up your frame. It should be the proper size for your Magic Picture. Glue it to the backing page with a glue stick. You can decorate it with crayons and markers if you'd like.
Step 8: Create a frame

Amaze your friends and family with your Magic Picture!
Related Posts Plugin for WordPress, Blogger...