Showing posts with label kid. Show all posts

Wednesday, March 13, 2013

Easy Art Activities For A Snow Day Or Any Day (Part 1)

I had originally wanted to call this post "Artsy Ways To Survive (Yet Another Snow Day) With Children" but it seemed a bit desperate-sounding...

We just came off of our Winter Break and then this past Friday the kids had a snow day. I'm a homebody (as are many of my kids) so when we have days off we hang around the house. But I'm trying to discourage the amount of screen time they have and I found out that yelling, "Go Play!" over and over at them doesn't usually work to encourage them to find something to do...so in this series of posts, I'll share some tips for days at home with kiddos, be it a snow day, a lazy weekend or a school break.

1. ENCOURAGE CREATIVITY (Also known as "Set Yourself Up For Success")

All of my children are creative, but in different ways. One of them MUST do art every day. I used to keep all of my personal art supplies, my classroom art supplies and my children's art supplies together in my office. Problem? Well, I was constantly running back and forth grabbing supplies for my children, they were always getting into my classroom supplies and using things I had set aside for an upcoming class, and after a creative binge, the cabinets looked like a tornado went through...so I finally figured it out. If I want my kids to be creative, they need access to supplies and they need to be able to put them away themselves. I want this to be 100% access all the time. So, where do they work? The dining room. Where are their art supplies? The dining room.

Our house is small and this set-up isn't going to earn us a spot in Better Homes & Gardens, but this works right now for us. I suggest setting up a temporary art center in a corner of your home and trying it out and making adjustments before buying fancy organization "stuff." See how your children work and do what works for your family.

Here's a tour of our ART CENTER:

LEFT DOOR: Restickable hooks hold regular scissors ad decorative scissors, the red thing is a apron.
TOP SHELF: Elmer's glue, glue sticks and tape such as masking, electrical, duct, and clear tape,
there's a bin for watercolors with brushes, watercolor paper and a water cup, old yogurt bins hold colored pencils and markers.
BOTTOM SHELF: a bin of assorted punches, Twistables, a sketchbook for each child, and a slot filled
construction paper, a bin of crayons with a crayon sharpener.
RIGHT DOOR: rulers hanging on restickable hooks
My kids usually prefer to work at our dining room table, but we're
trying out this table-turned-desk. There is a roll of IKEA paper on there
(which they actually never use)
This ain't pretty, but it is a repurposed bookcase with a place
for "How-to" books o drawing and origami and coloring books,  along with
bins for clay, recycling and interesting bits for sculptures, etc.
along with our scrap paper bins organized by color
(I know that seems a bit weird, but it actually works well so you
can find the paper color you need fast).

Other things that are not shown here but are available to them, on an as-needed (mom-involved) basis:

Tempera paints
Acrylic Paints
Hot glue gun and glue sticks
Higher quality watercolors and paper
Higher quality paint brushes
Craft stuff such as beads, pipe cleaners, craft sticks

I keep the above items high up on a shelf in another room. Every once in a while I take a handfull of crafty supplies and leave them in their art center as an invitation to create, but I wouldn't leave the whole box of craft stick or pom poms out--they'd be gone in a day (or more accurately strewn all over the house)...if they decide they need 100 craft sticks I can always bring the bin out and they can use however many they need.

I must say that I've tried MANY versions of an art center with my kids over the years and usually I have to pack most of it away once I have a new baby and they start walking (and putting the art supplies in their mouths), but at this moment, we are out of the baby phase so I can keep this stuff available all the time.

The addition of an art center to our home has increased creativity for all and I see the children choosing to "do art" more often and it is a cinch to clean up (for both the children and me) because everything has a place.

So, take the plunge and create an art center for your home today!

Monday, February 13, 2012

Last Minute Valentine: "I Love U"

This is a nice project to teach positive and negative space and symmetry and makes a cute last-minute Valentine for the wall or as a bookmark. It is super-inexpensive and pretty darn easy. Make one of these for your Valentine today!


Positive/Negative "I Love U" Valentine

Supplies Needed For The Wall Art:

  • Piece of black construction paper (9" x 12") in black
  • Pieces of red and pink construction paper (the red sections are 3" tall and the pink sections are 2 1/4" tall)
  • Pencil
  • Glue stick
  • Scissors
Supplies Needed For The Bookmark: 
  • Piece of white posterboard (2" x 5") in white
  • Pieces of red and pink construction paper (1" square)
  • Pencil
  • Glue stick
  • Scissors
  • Clear packing tape (2" wide)
  • Hole punch
  • 8" of ribbon
Directions:

1. Decide on the order of your colored paper pieces.

2. For the first section, the heart, draw a half a heart shape onto the first piece of colored paper. Cut it out. Glue the outside of the heart shape onto the backing of your piece (either the posterboard if you are making a bookmark or the black construction paper if you are making a larger piece). Line up the cut edge the square with the center of your backing paper.

3. Glue the corresponding half heart shape along the center line, "flipped out" from the square it came from. Hmmm....sounds confusing, but look at the picture for a guide.

4. Continue down the column, cutting out half an uppercase "I" another half heart and half an uppercase "U." Finish with another heart, if desired.

5. If you are making the wall art, you are done! If you are making a bookmark, put a strip of clear of packing tape over your design to protect it. Punch a hole in the top edge of the bookmark and add a ribbon, if desired.

Sealed with a kiss! ENJOY!

Friday, February 10, 2012

Modern-Day Adinkra Cloth

Last time I taught a lesson on African textiles I did the traditional woven paper Kente cloth. This time I wanted the children to explore a type of stamped textile that comes from Ghana: Adinkra. "Adinkra" means "goodbye" and his beautiful fabric was traditionally part of funeral preparations.


To make Adinkra cloth, long strips of cloth are pegged to the ground, then an artisan uses ink and a broad-toothed comb to divide the cloth into sections. Each section is then printed with stamps carved from the calabash gourd. These symbols are sacred and many of the symbols are inspired by nature or from important parables. Many have been used for generations, but some are new such as the Mercedes-Benz emblem, which appears on some cloths and seems to symbolize wealth. The ink used to make Adinkra cloth comes from boiling the bark of the Badee plant.

When the strips of cloth have been stamped and are dry, they are joined with decorative embroidery. I have tried lacing the sections together with yarn, but it was very frustrating for the children. I was recently looking through the book, "Kid Made Modern," by Todd Oldham and he made a screen of little circles joined by paper clips--that's when I knew I had found a way to link the sections of our Adinkra cloths. I found 1000 colored paper clips on sale at Staples for $3--what a bargain!

Modern-Day Adinkra Cloths

Supplies Needed:

  • 4 5" squares of white poster board
  • 6" piece of corrugated cardboard
  • Bits of craft foam for stamps
  • A few wine corks
  • Hot glue gun and glue sticks
  • Tempera paint, assorted colors (we used green, red, blue, yellow, brown and black)
  • Paper plate for palette
  • A pushpin
  • 9 paper clips, assorted colors
Directions:

1. Make your stamps. I made a few of four common symbols: heart which means love, paddle (looks like a plus sign) which means strength, drum (looks kind of like an uppercase letter "I") which means rhythm, and a crescent moon which means patience. I cut the symbols out of craft foam and hot glued them to wine corks. These are pretty permanent, but you could just cut them from a new kitchen sponge.

2. Put some black paint on the palette and dip the 6" end of the corrugated cardboard into the paint. Use the cardboard to make borders on your 5" squares of poster board.

3. Put some colored paint onto your palette and use the stamps you made to fill the center of the squares with symbols. You can probably get about three rows of three symbols in each square. Check out the photos for inspiration. Stamp all of your squares. Let dry.

4. Decide on the order you want to have your squares in. Use the pushpin to create three holes on the bottom and top edge of each of your squares. The holes should be about 1/4" from the edge and be evenly spaced.

5. Insert paper clips into the holes on the bottom edges of the squares. Rotate through the hole two times. Connect all the squares together (this takes a bit of fiddling, but it is easier than it sounds!)

Detail view of the paper clips joining the squares. 
A few examples of Adinkra cloth from my home school class.

Monday, February 6, 2012

Wild Valentine Puppets

Yet another craft idea for your Valentine's Day card-giving needs OR for a classroom project: "Wild About You" Puppets! 
Research shows that 9 out of 10 people people prefer to be bitten
 with pom pom teeth vs. real dinosaur teeth.
I recently was killing time between my sons' basketball games and needed to keep my 4-year-old occupied. I dug into my totebag, folded a scrap piece of paper and "ta-da!" instant puppet. It sure kept him busy, but then I had two teams of boys crowded around me wanting them! Here's a version fancied up a bit for giving:

Easy Paper Puppets

Supplies Needed:

  • Colored piece of paper (your choice) for the puppet head
  • Scrap pieces of paper, optional
  • Embellishments such as googly eyes, pom poms, etc.
  • Tacky glue and glue stick
Directions:

1. Fold the piece of paper you are using for the puppet in thirds lengthwise. Secure the top flap with glue stick. You now have a sort of flat tube. This will make it easier for little hands to know where to put their fingers in the finished puppet.

2. Fold the tube in half and then fold each of the ends back to make an "M" shape. This is the puppet's head.
A detail of the "M" shape that you are creating.

3. Use tacky glue to attach embellishments such as googly eyes and pom pom teeth. If you would like to make features out of paper, the glue stick should work fine to attach them. 

4. Write your message such as: "I'm WILD About You!" or "You're DINO-mite!" on a strip of pink or red paper and glue it in the mouth like a tongue.

5. You can write the "To:" and "From:" info on the underside of the puppet, if desired.

This shows one of the puppets with its mouth opened wide
so you can see how the entire piece is decorated.

ENJOY your WILD puppet!

Friday, February 3, 2012

St. Valentine's Day Craft: Pom Pom Critters

One of my sons loves stuffed animals and any funky little critters with googly eyes! One year we made a ton of these to give away to his classmates. They are fast and easy to make (and easy to love)!

The Usual Suspects...
Pom Pom Critters

Supplies Needed:
  • Small piece of felt for base (feet). I use a stiff piece of felt for the base.
  • Large pom pom (for body), ours were about 2" in diameter
  • 2 googly eyes (or one if you are making a cyclops!)
  • Cardstock for mouth (an index card works great)
  • Markers
  • Scissors
  • Embellishments such as hearts, antennas (mine are flower stamens sold in the cake decorating aisle at the craft store), bows made from bits of ribbon, etc.
  • Tacky glue
  • Tape
  • Construction paper for the card, optional
Directions:

1. Cut out a heart shape large enough so that it sticks out from under your pom pom like little feet.

2. Use tacky glue to glue the pom pom to the heart-shaped base.

3. Add eyes and embellishments. Have fun and be silly! My son knew what he wanted to do and I just let him go!

4. Use tape to secure your critter to a rectangle of construction paper. Write a silly message such as "I'm Wild For You" or "I've got my EYE on you Valentine!" (if you are doing the cyclops) and the To/From Information. ENJOY!

Thursday, August 25, 2011

Artist Trading Cards

Ahhhh...the internet. I need to set limits because there are just WAY too many good sites out there with WAY too many great art ideas and I get lost in a world of links! But, on the bright side, I get so many wonderful ideas and learn so much! One thing I see that intrigued me is something called Artist Trading Cards (or ATCs).
Some of the ATCs made by my boys (the "Make More Art" one is by me).

Artist Trading Cards are awesome! Started in 1997 by an artist in Munich, they are a great way for artists to showcase their style or ideas, but they aren't just for professional artists! Anyone can create ATCs--children, teens, or grown-ups! There are very few rules for ATCs: 1. They must be 2 1/2" x 3 1/2" and, 2. You cannot sell them--they must be given away or traded. This is a wonderful way for children (and grown-ups) to learn new art techniques and express themselves! It is also a wonderful way to spend time together as a family--grab some art supplies and sit down and let your creativity go!

For Me: Personally, I am embracing the ATC idea! I'm an artist but I am also a mother of four and an art teacher trying to grow my business--I don't get to do huge masterpieces right now. I'm OK with it, but sometimes I get an art idea and need to explore that. ATCs are just right for me!

For my children: I am also encouraging my children to do ATCs. My children love to collect and trade things, but I seriously WILL NOT pay lots of money for cheap trading cards whose sole purpose in life is to get children to spend money (oops, getting off the soapbox now...). Anyhow, ATCs allow children to create & explore and gives them something they are excited to trade and are actually connected to. Learning and fun--I'm all in!

Supplies Needed:

ATCs are easy and require no special supplies, unless you want to try different techniques. Here are some supplies to begin with:

  • Posterboard cut to 2 1/2" x 3 1/2" to use as "blanks"
  • Glue sticks
  • Scissors
  • Pencil and eraser
  • Markers, colored pencils, crayons, etc.
  • Stickers
  • Stamping materials
  • Neat papers (I have a scrap paper bin I brought out and I save neat papers from junk mail, etc).
  • Old magazines
  • Paint (tempura or watercolor) & paintbrushes
  • Old photos
  • Needle & embroidery thread
  • The list is truly endless!
Instructions:

1. Cut a whole bunch of blanks from posterboard. You'll need about 8 or so per person to get started. Once you get going--it is hard to stop!

2. Start creating! Think about the different ways you can create:

Drawing
Painting
Collage
Stamping
Ripped paper
Sewing (by hand or machine)

There is no right or wrong way to do these. Relax and have fun. Send me pictures of your ATCs--I'd love to see your creations! ENJOY!

Need more inspiration? Here are a couple of links to check out:
This month's Family Fun Magazine
A great mini tutorial on ATCs from http://www.cedarseed.com/ 

My disclaimer: While I do look at all references before sharing, I cannot look at every page of every reference. Please check out these references before sharing with your children, to verify that the content and images are appropriate for your child's age level and the content is acceptable for your family.


Monday, May 16, 2011

Springtime Still life

Whew! It's been a busy couple of weeks for me! I've been applying for a teaching job for next year and finishing up my current art class with the home school cooperative. In just a couple of days the co-op will have its Grand Finale and the children from my art class will showcase their artwork! I can't wait! I am so proud of them!


I thought that I'd put a project on here from last year's art class that is perfect for celebrating Spring and Mother's Day: Spring Still life pictures featuring forsythia blossoms. This project can be done by a variety of ages, although little ones might need some grown-up help. This project is from the book, "Kids Art Works," by Sandi Henry--an awesome book. Enjoy!

Just one example of a beautiful forsythia still life!

Background Info:
When I teach this class, I start by having a beautiful arrangement of forsythia blossoms in a vase available in the classroom for the children to look at and touch. I have the children notice how a forsythia blossom is constructed and how it looks up close and far way.

I also like to have a couple of postcards or pictures of still lifes from art history for us to look at and discuss what makes a still life--a type of painting that has as its subject inanimate objects such as fruit, flowers, dishes or food.

Materials Needed:

• 1 9x12" sheet of construction paper either white or light blue for background
• Scissors
• Pencil and eraser
• Glue stick
• Markers, brown for stems and other colors to decorate vase
• Small piece of construction paper for vase (maybe 4x6")
• Yellow tempura paint
• Paper Plate for palette
• Kitchen sponge cut to about 1" long by 1/4" wide

Directions:

1. Cut the vase out of the smaller piece of the construction paper (you can do this by folding the paper and cutting through 2 layers of the paper--good introduction to symmetry). Glue the vase to the along the bottom edge of the larger piece of construction paper so that you have lots of space above the vase for your blossoms.

2. Using the brown marker, draw some stems from your vase into the space above.

3. Place some yellow tempura paint on the tray. Dip your sponge piece into the paint and stamp it gently onto the paper along the stems, creating the forsythia blossoms.

4. If you'd like, use the markers to decorate the vase with designs such as lines, dots, etc.

Voila! A spring still life to brighten up a rainy spring day!

Friday, April 22, 2011

Last Minute Bunny Basket & Filler Ideas

No art class for me this week--the cooperative is closed for Holy Week (Easter is this Sunday). I thought this would be a great time to write about some of my favorite artsy gifts to help out with filling those Easter baskets! Come on--one cannot live on chocolate alone!

My theory on Easter baskets and the like is to buy consumables that can be eaten (Peeps candy), used up (a suncatcher kit) or added to what we have (markers) with little impact. With four children, I have WAY too much stuff! While I'm sure you already have a list of candy for those Easter baskets, here's a list of some other stuff to make your children's Easter baskets shine!
  • Basic art supplies (crayons, markers, watercolor paints, glue sticks, glitter glue)
  • A new sketchbook (spiral bound)
  • Mini art kits (make your own picture frame, a suncatcher kit, paint your own pottery, a scratchboard kit, etc.)
  • Origami paper
  • A disposable camera and scrapbook kit or supplies
  • Beads and cord to make a necklace, bracelets, etc.
  • Dover art books--Dover makes a series of mini-books that have mazes, paper dolls, sticker books and more--these are so fun and there is one for every interest! (Buy these online or at book stores).
  • Klutz makes a line of books that foster creativity and come with the supplies needed to create the projects in the books. They have doodle books, window art, pom pom creations and so many more! These books are more pricey (about $15-$20 each), but for older children, one of these books and a couple of candies might be the Easter gift.
  • Yarn and crochet hooks or knitting needles
  • A bucket of air dry clay or play-doh (or you can make your own)
  • Stickers
  • A mini notebook, ruler, and mechanical pencils (for the future draftsperson!)
  • Pipecleaners and googly eyes to make critters
  • A big pack of construction paper
  • New scissors--either straight edge or with decorate edging
  • Sidewalk chalk for outside doodling
Have fun with the "basket" as well--it doesn't have to be traditional! You can use a pail, an art caddy or plastic tote with handle (see the post about art supplies to have on hand). A canvas totebag is also a great "basket" and the child can decorate it as a project as well. One of my girlfriends said that she saw premade baskets made from an upside down sunhat. You can often find plain colors of these and paired with a set of fabric markers, you have an easy project your child will love!

The bunny basket idea below, is a wonderful preschooler craft (or for anyone who is young at heart!). This is not original, it is just the version I improvised with my four-year-old the other day. Excuse the photos--it was difficult to take nice photos while doing the project with a four-year-old! He's very proud of it though--he shows it to everyone who walks though the door!


Spring Bunny Basket

Supplies Needed:
  • A one gallon milk jug, washed and dried
  • A sharpie or other marking pen
  • Scissors
  • 2 Googly eyes (about 3/4"-1" diameter)
  • Glue dots, tacky glue or a hot glue gun and glue sticks
  • 3 pom poms (about 3/4"-1" diameter), 1 pink and 2 white
  • 3 pipe cleaners (any color)
  • Scrap cardstock, white
  • Pencil and eraser
  • Crayons
  • Stapler
Directions:

1. You'll want to start by making a hole at the top of the bunny basket for all of those Easter treats! We left the handle of the milk jug on so that my preschooler could carry it around for an Easter egg hunt. Use the photo below as a reference. A grown-up should use scissors to carefully cut the milk jug.
The cutting line is marked with Sharpie.

2. We then used glue dots to glue on the googly eyes. I like to let the children glue them on because I love the cute expressions that are created when the kids glue the eyes on askew! So cute!

3. I then cut a set of teeth out for the bunny and had my son glue those on using glue dots.

4. I then cut a small slit (about 1/2" long) on either side of the teeth and we threaded all three pipe cleaners through the slits to create whiskers.
The pipecleaners are just fed all at once through two slits--one on either side of the bunny teeth.

5. Using the glue gun (a parent's job), I attached the pom poms to finish the bunny's face.
Awwww....look at that cute bunny face!

6. I then cut two ears out of cardstock and drew an inner ear shape inside of them. My son got busy coloring them in, and then we attached them to the back of the bunny basket with a stapler (he helped me and thought that was the best part of the entire project!).
Not perfect, but what do you expect with a 4yo breathing down my neck!

Rainbow colored ears!

This basket could be done up much more fancy then we did it. You could add a bow tie for a boy bunny and flowers and bows for a girl bunny. Don't worry if you don't have the exact supplies that we used here--using what you have on hand is a great way to teach children how to reduce, reuse and recycle. Enjoy this simple craft with your child!

And, when it's time to help the Easter bunny fill your child's Easter basket--have fun! Helping your child to "spring" into creativity can be easy!

Have a wonderful and joyous Easter! Welcome Spring!

Wednesday, April 13, 2011

Gargoyles in Clay

Last week, with my art class, I thought it would be fun for the children to create gargoyles from clay (carving seems too messy and frustrating). I brought in a variety of pictures of gargoyles for them to look at. We were all surprised to see that gargoyles didn't have to be scary. Modern gargoyles can even be kind of cute, or look like a real animal or person (not a "horrible, unreal creature of the imagination"), and some even tell a story.
Sea turtle gargoyle. This has a gutter on its back. Note the baby turtle hitching a ride!


Background: 

What makes a gargoyle? Well, gargoyles are carved grotesques with a spout used to divert water away from the side of a building. The water usually exits through the mouth, but sometimes there is a gutter on top of the gargoyle instead. If the figure doesn't divert the water, it is not technically a gargoyle, but more of a "chimera."

Gargoyles have been used for thousands of years and in a variety of cultures. The word gargoyle means different things in different languages. The most common being: "throat" or "gargle" and the Dutch call them waterspuwer which means "water spitter" or "water vomiter." Pretty cool visual, eh?

I brought some pictures of gargoyles for the children to see. I also brought in the book, "American Gargoyles: Spirits in Stone," by Darlene Trew Crist. This book has many wonderful, clear images of a variety of old and new gargoyles along with the stories behind them. With this book, I was able to show the children a bird's eye view of a gargoyles and show them the mortar between the building stones (water erodes this mortar--hence the need for the drainage spouts). There were examples of scary gargoyles and friendly-looking gargoyles as well as an image of the gargoyles at work--one with water spewing from its mouth. Since the children in my art class are very interested in turtles, I showed them a picture of the "Weeping Sea Turtle (p.71)" and we discussed how gargoyles can tell a story.

I also borrowed a couple of other books from the library about gargoyles, but left them at home since they weren't completely appropriate for the children to be viewing.

"Holy Terrors: Gargoyles on Medieval Buildings," by Janetta Rebold Benton is also a stellar resource on gargoyles. This book also contains many clear pictures of a variety of gargoyles along with interesting text and an extensive bibliography, but some of the images contained nudity. Since I couldn't leave this book out for the children to peruse, I just left it at home.

"The Gargoyle Book: 572 Examples From Gothic Architecture," by Lester Burbank Bridaham was also left at home due to some nudity, but is an interesting resource of black and white images of gargoyles, Chimeres, Heads, and Woodwork that may be inspiring to the older student. The text is brief, so this is primarily a visual resource.

When doing the research for this project I read about a modern-day gargoyle that I had to check out: Darth Vader on the Washington National Cathedral. I went to the site, searched, and lo and behold. there he was! The piece was designed by Christopher Rader as part of a contest. The piece (not actually a gargoyle since it doesn't direct water) was sculpted by Jay Hall Carpenter, carved by Patrick J. Plunkett, and placed high upon the northwest tower of the Cathedral. I had to show the kids that one!

Before I handed out the materials for the project, I suggested that the children think not only about what creature they were going to create, but think about what type of building it would be on and if it their gargoyle or grotesque would visually be telling a story.

Supplies Needed:
  • Paper mat to work on
  • Hunk of clay (I used Crayola air dry clay in gray-I used two 5lb. buckets for my 12 art students and my demo)
  • Tools such as a plastic knife, toothpicks, a plastic drinking straw and a roller
  • Meat trays for transporting the finished pieces home
  • Paper towels and water for cleanup
  • Books on gargoyles and reference books on animals, dinosaurs, etc.
Directions:

After discussing gargoyles (their function, the different designs, etc.), give each child a hunk of clay about the size of a softball. The clay should be kneaded a bit before starting to work. Have the child create a sculpture of an animal or person (real or imaginary). If it is to be a true gargoyle it should have a hole through its mouth (some of the children in my art class just made the mouth open and some made more of a tunnel going through the clay. I think it depends on the the child's wishes and their ability in working with the clay).

Thin pieces will break off when dry, so the child should be encouraged to make pieces that are at least 1/8" thick (but 1/4" thick is even better). Don't forget to add texture and detail to the piece such as scales, hair, etc.

Is your gargoyle telling a story? What elements can the artist include to help us to "see" the story? In my example, I included the turtle's eggs, a baby turtle, some seaweed and the water, so that viewers could see the life cycle of a turtle and its habitat.

Have fun with this! Gargoyles don't have to be scary! Although....scary gargoyles are cool too!
The sea turtle gargoyle from above. One side has the eggs and seaweed, the other has a baby turtle. The wavy things on either side of the shell are ocean waves (looks nice and makes the sculpture less breakable).

Tuesday, April 5, 2011

Fostering Creativity: Supplies to Have on Hand

I'm in love with art supplies. I consider walking up and down every aisle of an office supply store, craft store or fabric store "quality time." At the beginning of the school year, when department stores have bins and bins of pencils, crayons, etc.--I get giddy! But, ahem, I guess that is not the norm.
This is the art bin we use at home. My oldest three children share it and it stays on the art table all the time.

Throughout my years of being a mom I have encountered many a parent who says, "Oh we do not have (fill in some basic art supply) in our house--it's too messy." I first encountered this when my first son was about three and one of my mom friends said her toddler was driving her crazy (she had a new baby and was short on sleep and patience). I suggested bringing out the crayons and letting the toddler go to town. My friend told me she had never let her two-year-old use more than one crayon at a time. Why? Because it was too messy and she might "get into trouble."

Was this an isolated incident? I guess not. I'm often told by parents and children that they don't have watercolors, colored pencils, etc. at home. I've found that with my children, just having a space with art supplies available gets them thinking creatively. In fact, we just came off of a very prolific watercolor weekend in which my three older children must have created 20 pictures!

Here are some thoughts about fostering creativity by simply having art supplies available to children:

1. What is age-appropriate for your child and household? If you have a two-year-old and a baby crawling around, then maybe the art supplies stay in a bin and come out when mom is prepared to sit with the child who is creating (maybe when baby is taking a nap?). If you keep the "approved" art supplies for your child in a bin, you can bring it out quickly and put it away quickly. Don't put all of your art supplies in this bin--only put the things that the child could use easily at one time (you don't have to out every coloring book, every sheet of stickers, the pom poms, glue and glitter all in there--you will be creating a cleaning nightmare and become frustrated). Have the basic supplies in the bin and have a cabinet or shelf out of sight for the other, special supplies.

2. Be prepared for mess. Young children do not use art supplies like grown-ups do. Some art supplies don't make a huge mess (like crayons and colored pencils--always buy washable!!). If you teach your children the rules about art supplies and remind them over and over that "crayons are for paper," someday you'll be able to trust them to use the supplies without making a mess. I have a child-size table that is well-loved and is called the art table. I still tell them not to draw on the art table, but if paint gets on it and stains the finish (as even so-called washable art supplies do), at least I don't have to worry about my dining room table. The art table is located in our kitchen where spills can be wiped up easily and bits swept up right away (if you let your kids do artwork on carpet, you are asking for trouble).

Since we have a crawling baby, I occasionally drag the art table a few feet to an area behind a baby gate. It's sort of an inconvenient place for mom to get around if I'm running upstairs, but it allows my four-year-old to play with dough without me having to worry that my baby is eating most of it!

3. Be prepared for waste. Well, no matter what the age of your child, they are going to "waste" art supplies. By this I mean going through endless amounts of paper just scribbling randomly or cutting it into little tiny bits over and over and over again....While this may seem wasteful to us as grown-ups, it has great value for children to do these things over and over. It is really forming connections in their brains and teaching them fine and gross motor skills. OK, so not every piece is worthy of being framed and being hung in a museum, but the process does have value to the child in terms of social, emotional and cognitive growth.

That being said, you need to know when to speak up and encourage using the supplies fully ("we use both sides of the paper") and when to let them go on a crayon or glue bender. This is also why I don't suggest putting all of your art supplies in  one basket, so to speak. If you set 5 bottles of glue in front of many children, they will use 5 bottles of glue! So, either bring out the glue when necessary, or leave a half-used bottle in the bin (and keep an eye out for glue dripping in your floors!).

There truly is a fine line here. You don't want your child purposely breaking crayons and refusing to use a piece of paper that has literally a dot-sized crayon mark on it, but think of the pressure on a little child to have to create a refrigerator-worthy masterpiece on every piece of paper! Or know that if s/he makes a mistake when experimenting that mom or dad is going to flip! Art supplies can be inexpensive, and they are meant to be used!

Bin Full of Art Supplies:

Remember, these bins are for most-used art supplies that are safe for your child to use on his/her own while you are nearby.

  • The bin itself. I show a variety of bin in the pictures, find something that works for your family and doesn't have too many areas for supplies to get lost. It should have a handle for a parent or child to carry and be easy for a child to put away his/her supplies.
  • A sketchbook. I like spiral bound sketchbooks because they lay flat. One for each child labeled with his/her name.
  • Crayons. I like Crayola brand. You can keep them in the box (hard to put away) or dump them in a yogurt cup for a more "grab and go" experience. A 24 count box is great.
  • Markers. I like washable Crayola brand. A package of 10 chunky ones is very versatile, but as children get older they may prefer the fine tip. If you have older children, you could put a Sharpie in their bin.
  • Colored pencils. Crayola is good for a start, but older children might like a gift of Studio brand or Prismacolor brand colored pencils in a case.
  • Glue. I throw a couple of glue sticks in the bin when I'm feeling adventurous. Older children could use a glue stick and a bottle of Elmer's school glue (also called PVA glue). Skip this with very young children.
  • Scissors. Very young children can use scissors under supervision. Add in a pair of age appropriate scissors. As your children get older, you can buy scissors that create decorative edges on paper.
  • Regular pencils. Also called Number 2 pencils, these are a must for any child's art bin. Very young children will need to be supervised with them and you'll have to inspect the parts of the pencils to make sure they are OK for your little one to be around (toddlers like to chew on the pencils and erasers), but gradually, you can include a pencil sharpener in their bin. I also keep those rubber pencil toppers on hand to prolong the life of pencils whose erasers have been worn down by overzealous artists. These are not appropriate for children under three though due to choking hazzard.
  • Rulers. A standard 12 inch ruler is great. I have flexible ones because they hurt less when your brother smacks you with one and they don't break when the children practice their muscle man moves.
  • Watercolor Paint. I like Crayola for the very young and messy, but I prefer Prang for the older children. I don't usually keep these in the art bins since my kids make WAY too much of a mess with them and I like to monitor their usage, but if you have older children and they are neat, go for it!
This is a smaller bin and might be good for 1-2 children. This bin still holds plenty of art supplies!

This bin is easy to carry and can be stacked. This is a nice option if you need a few of bins spanning a variety of ages. Make sure to label the outside with the name of each child (or a picture of the child if they cannot read).
    Enjoy the finished art bins! Create, create, create! Or as Ms. Frizzle from "The Magic School Bus" series of books says,  "Take chances, make mistakes, get messy!"

    Thursday, March 24, 2011

    Technique: Watercolors

    Everyone has used watercolors--it is usually the first paint that parents introduce to their children because it is inexpensive and so easy to clean up. Children are often content to mix and experiment on their own and churn out hundreds of watercolor paintings!

    But if your little artist is looking for something new to try, check out the following tutorial for eight different ways to use watercolors. All of them are pretty basic, but can be combined to add textures and interest to a plain old painting!

    An example of wax resist

    Supplies Needed (for each painter):
    • 1 piece of watercolor paper (I used 9"x12" Strathmore cold press watercolor paper from a pad)
    • 1 piece of heavy cardboard or foamcore board slightly larger than your watercolor paper
    • Masking tape
    • Pencil and eraser
    • 1 tray watercolors (I use Prang brand watercolors with my students--the colors are better quality than the dollar store/kid brands, 2 children can share a tray if necessary)
    • Water cup with water
    • Watercolor brush (The one that comes with the Prang set is fine, but don't use one from a cheap set, they are made of nylon and the results will be poor).
    • Ruler
    • Sharpie or other permanent marker
    • A drinking straw
    • Paper towels
    • Plastic wrap
    • Table salt in a cup or shaker
    • Crayons (I like Crayola brand)
    • Colored Pencils (Crayola brand or other good quality)
     Basic Rules:

    Read through the instructions BEFORE you start.
    Gather all supplies BEFORE you start.
    Be respectful & gentle. Good quality art supplies cost money, but they will last a long time if you treat them well.

    I then give a quick talk about using the supplies properly. I show the children how to make paint by gently dipping their brushes and putting a small amount of water into the tray. I say, "we aren't making mashed potatoes or scrubbing a pot!" We have to be gentle with the brushes.

    I also remind them what a paint tray looks like after a 2-year-old is done painting: all messy and black.  Between color changes, artists need to gently wash their paintbrushes in water (if it gets really dirty--get some fresh water!) and dab them on a paper towel.

    OK, let's go!

    Directions:

    1. Begin by taping your watercolor paper onto the stiff cardboard. This will prevent your paper from curling and buckling. Use long strips to tape around all four edges, about 1/4" border.

    2. With the ruler and pencil, divide your watercolor paper into eight sections. I like to leave a little space between the eight boxes because if you are working on one square and your wet paintbrush touches another wet square, the paint will bleed together.

    DID YOU KNOW? You can lightly sketch on watercolor paper using a pencil and once the watercolor paint is dry you can erase without harming the painting! Just draw lightly and use a good quality eraser to gently remove the pencil lines once the paint is completely dry.

    Eight rectangles separated by a little space so they don't bleed into one another while we work (no need to be too precise here, since this is just for practice).

    DRY BRUSH:
    In the first square, we'll be practicing dry brush technique. The paper should be dry. Wet your brush and take a bit of the water and put it in the watercolor tray so that it softens up the dried color and makes some paint for you to use. Rinse your brush and dab it off gently. Now you can dip your cleaned and dried brush in the paint tray and brush it on the dry paper. See how the color is concentrated? Notice how the bristles of the brush can sometimes be seen? If you want to use this brushstroke on top of a base layer of paint, you need to wait until the base layer is completely dry.


    WET ON WET:
    In the second square, we're going to have some fun! In this square you can use plain water on your brush and wet the whole square. While the square is wet, add some wet splotches of color. You can use one color if you'd like, but it is fun to add additional colors and watch them blend on their own. This is wonderful for making oceans and sunsets--they almost look like tie-dyed shirts or the fur of an animal! You can try dripping a drop of plain water onto the wet on wet painting you've created-notice how the plain water pushes aside the colors? Try dabbing a bit up with your paper towel--this removes the color. This way of removing some of the paint with a towel is great for making clouds (or if you make a mistake and you paint something too dark!).

    Combining techniques: for this cloud-like painting, I painted the background using the wet on wet technique and dabbed the painting with my paper towel to remove some of the color making a cloud-like shape. Once dry, I used the dry brush technique to paint in rain (you could also use colored pencils for the rain lines).


    INK & WATERCOLOR:
    This is my favorite! In the third box, use your pencil to sketch a simple drawing. Then go over your pencil lines with a permanent marker. Now it looks like a cartoon or a coloring book page! Use watercolor to fill in the drawing. But watch out! If you touch an area with your paintbrush that is still wet, your sections could bleed into one another and that might not be what you want. When you are filling in the areas of a piece done this way, you can take breaks to let each section dry before you paint the ones next to it.


    COLORED PENCIL & WATERCOLOR:
    OK, also one of my favorites! In this box, you'll want to do a simple shape with watercolor: I chose to make a leaf shape. Once that is dry, add details and texture with colored pencils. I use this technique all the time in my own work. In my example, I painted two leaves and then finished one so that you could see what the colored pencil does. I also added the background in colored pencil. This technique also takes some patience. You must let the paint dry thoroughly before you do the pencil or it will scrape the paint and damage the paper.

    The leaf on the right is what I started with. The leaf on the left shows the addition of pencil lines.

    WAX RESIST:
    In this square, you can make magic! Using crayons, draw some simple shapes in this square. You should use firm pressure, but don't push so hard you break the crayon! Experiment with different colors of crayon: white, blue, red, etc. Once you've finished your shapes, paint a nice wet, watercolor wash in the square-even over the crayon marks! The paint won't stick to the crayon marks! This is wonderful for stars and bubbles and all sorts of great pictures! Experiment with different colors of crayon as well as different colors and values of paint. What happens with a light color of paint? What about a dark color?


    SALT:
    Fill the entire square with paint just like you did with the wet on wet square. While it is still wet, sprinkle the paint with table salt. Don't touch! You'll need to leave this overnight until it is completely dry. This makes little sparkles or stars in the paint. It's a great technique to use when painting water or sky. When it's dry, the salt just brushes off.


    PLASTIC WRAP:
    Fill the entire square with paint just like you did with the wet on wet square. While it is still wet, place a piece of plastic wrap on the square, crumpling it slightly and pressing it gently into the paint. Don't touch! You'll need to leave this overnight until it is completely dry. This makes little sections of color in the paint. The texture of this is interesting and could be used for rocks or in when painting water. Once dry, the plastic wrap peels off and you can throw it away or wash it and reuse it for another painting.


    BLOW PAINTING:
    This one is fun! Get your paint brush very wet with paint and touch the tip of the brush very gently to the dry paper. There should be a rounded drop of paint on the paper. If not, use more water. Once you get a rounded drop on the paper, gently blow through a drinking straw to move the drop around. It's fun to try to control where the paint will go! In one book I have, the artists use this technique to make trees. They look like craggly apple trees! When you are blowing through the straw, take your time and don't blow too hard. Take a break so you don't get dizzy!


    To illustrate these techniques, I first did this project at home then did the project along with the students. It seemed to help the children to understand what we were doing if I said, "next we'll be doing this square." Then I showed them how to do it.

    While they were practicing a technique, we would talk about what we could use that technique for (such as, "this would make a good rock wall" or "that would look really nice if you were making a starry night sky").

    I had the following book on hand: "The Usborne Book of Art Skills" is a wonderful resource for older students (maybe middle school age) and showcases a variety of techniques. I was able to point out many of the things we were practicing. It was helpful for the children to actually see these techniques in use.

    This lesson took the entire hour with my class, so the children and I have decided to have a second watercolor class where we will use these techniques to create underwater creatures in their habitats (maybe like the Loch Ness Monster?). They are all very excited about it--I think I need to run out and get more watercolor paper!

    Wednesday, March 9, 2011

    Op Art: Magic Pictures

    This project is a fun one for children! It can be used for a variety of themes and once the child understands how to do the project, s/he can create countless combinations! This idea is based on a project that I first did in middle school or high school. It explores optical illusions and has a nice "wow" factor for the children.
    Magic Picture: A great lesson in Optical Illusion!


    Class talk:

    I began by defining the term "optical illusion." Optical meaning "eyes" or "sight" and illusions are "something that appears to exist, but does not." Magic tricks are a great example of optical illusions. I had a couple of magic books on hand to illustrate this point. I explained that one could read a book on magic and learn how to make something disappear. A child isn't learning "magic," but how to fool the viewer's eye. Optical illusions are like magic for your eyes.

    I then showed a few examples of optical illusions from the Childcraft: The How and Why Library, Volume 12, "Look and Learn," by Worldbook (c. 1988). I found it helpful to have a ruler on hand since some of the children had never seen these particular illusions and wanted to measure the lines to verify they were the same length, etc.

    Some other examples of everyday optical illusions that also appear in the Childcraft Book were camouflage and movie pictures (animation). I was able to "show" the children examples of those from the same book.

    I also brought in a book from my own library entitled, "Masterpieces in 3-D: MC Escher and the Art of Illusion," by Catherine Gleason. This book has 40 images by Escher with built in spectacles so that viewers can see the works in 3-D. It also has brief descriptions of each of the pieces. While the 3-D element of the book is great, many standard examples of Escher's images will work for illustrating the concept of optical illusion.

    So, in this class, we decided to create two pictures and put them together in a special way to create an optical illusion. While not technically a medieval-themed project, I explained that we could use medieval-inspired imagery such as a knights, castles, princesses, or shields. We thought that if we created optical illusions like this back in medieval times, people would have thought our art was truly magical!

    (NOTE: Once a child learns this technique, s/he can use it to explore many different ideas such as opposites, seasons, transformations, etc. The pictures should be very different for the illusion to be dramatic and should fill the space).

    Supplies Needed:

    • Templates (while not necessary, I found it easier to have these templates on hand), One copy of all three for each child:
    • Template One: Image Page (this has two 4"x8 1/2" rectangles printed on an 8 1/2"x11" piece of white paper. Each rectangle should have guides to help the child divide the drawing into four 1" segments. On one rectangle, label the sections 1, 2, 3 & 4, on the other rectangle, label the sections A, B, C & D. See image below.)
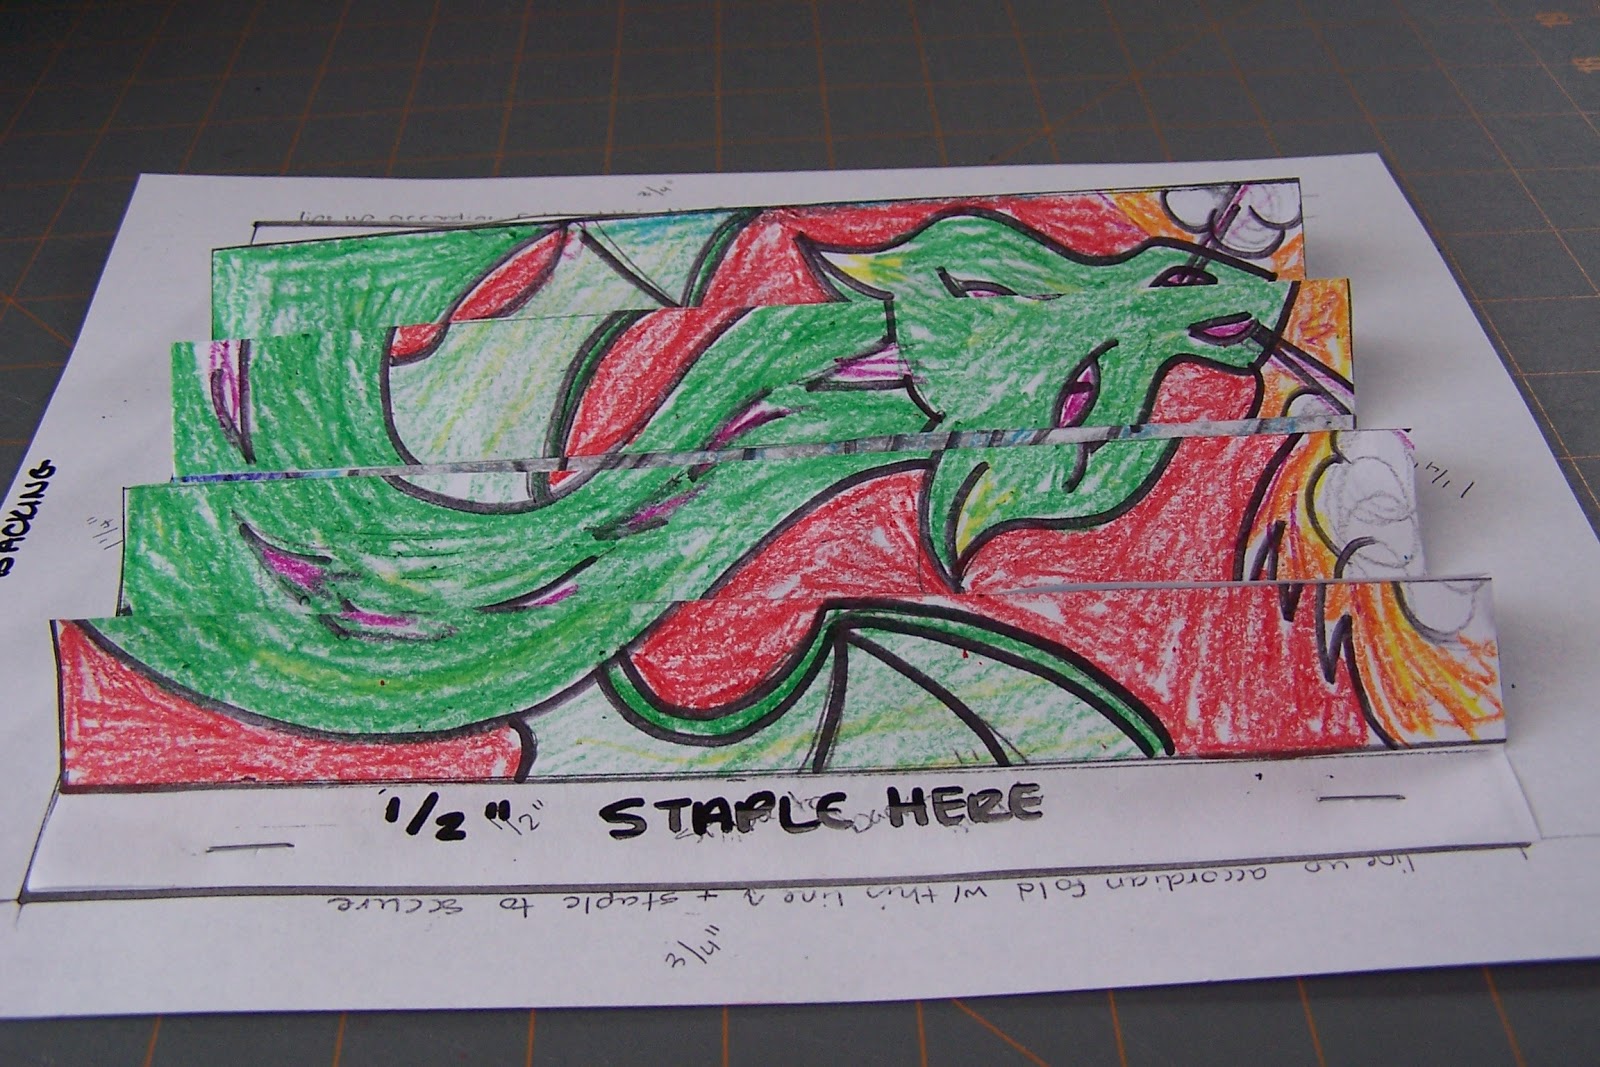
    • Templete Two: Accordian Page (this is a 8 1/2"x9" rectangle with fold lines spaced every 1" across vertically and 1/2" tabs at either end. See image below.)
    • Template Three: Backing Page (this has a 7"x8 1/2" rectangle printed in the center of an 8 1/2"x11" piece of white paper. See image below.)
    Template 1: Image Page
    Template 2: Accordian Fold Page
    Template 3: Backing Page

    (Supplies, cont'd.)

    • Construction paper for frame
    • Stapler
    • Pencils/erasers
    • Black marker
    • Crayons
    • Ruler
    • Scissors
    • Glue stick

    Directions:

    1. Using pencil, draw two very different pictures on the Image Page, one in each rectangle. The rectangles should be held vertically. Make to fill up the space in each box and use images that are nice and big--little details will get lost in this kind of project.

    Step 1: Draw two pictures

    2. Once the the images are planned out, outline the pencil drawings with marker and color in with crayon.
    Step 2: Color pictures in
    3. When the two images are done, use a ruler and pencil to divide each drawing into four 1" strips from top to bottom. Leave the "1,2,3,4" and "A, B, C, D" marks on each strip for now to help with placement. Take your time and do a nice, neat job--it will help the optical illusion work better if you do a neat job.
    Step 3: Cut pictures into 1" strips
    4. Cut away the excess portion of the Accordian Page and fold the rectangle on the fold lines like you are folding a paper fan. Fold the 1/2" tabs at the edges so that they lay flat on the table (you'll be stapling them to another piece of paper later).
    Step 4: Prepare Accordian Fold Page

    5. Following the letter and numbers written on the Accordian Page, glue the strips of the two pictures you created onto the Accordian Page with a glue stick. Take your time and do a nice, neat job. Once you are done gluing all of the strips to the Accordian Page and you are sure the illusion is works, you can cut off the excess portions of the image strips (the parts labeled with the letters and numbers).
    Step 5: Glue strips onto Accordian Page in alternating order
    When done, it looks kind of confusing!


    6. Staple the Accordian Page onto the Backing Page. Staple through the 1/2" tabs on the left and right side of your project. This will hold your project in the way that you need for the illusion to work.
    Step 6: Staple project to Backing Page


    7. Test your illusion out! Tilt your drawing one way and then the other--does your illusion work?
    From the left: Fire-breathing Dragon!
    From the right: A brave knight!


    Is it not working? Try these tips:
    • Refold the accordian page so that it looks like the one in the photos, if the folds are going the wrong way, the illusion won't work.
    • Did you glue the pieces on in the wrong order? Or upside down? That happened to some of the kids in my class. You could try to peel off the strip that is positioned incorrectly, but glue sticks hold pretty strongly--you may need to cut the strips and reposition them onto another Accordian Page.

    8. Once your optical illusion is done, you can create a frame for you Magic Picture. Fold a piece of construction paper in half lengthwise. Draw a 3"x8 1/2" square on the fold. Cut away the rectangle with scissors. Open up your frame. It should be the proper size for your Magic Picture. Glue it to the backing page with a glue stick. You can decorate it with crayons and markers if you'd like.
    Step 8: Create a frame

    Amaze your friends and family with your Magic Picture!
    Related Posts Plugin for WordPress, Blogger...