Showing posts with label fauve. Show all posts

Saturday, August 29, 2015

Grade 6 Oil Pastel Fauve Landscapes

Well, I fell in love with these great oil pastels I found in art room of the middle school I was working at. They are chunky and water soluble--Um, hello!?! Water soluble OIL pastels? I do not understand the mysteries of the world, but I must say, my students and I used the bejeebies out of these last semester! 


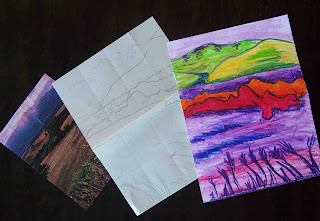
This shows the stages of the project: Image selection, simplified sketch
and completed Fauve Landscape.

One great project the 6th graders worked on was Fauve landscapes. I have posted a Fauve Landscape project before which was more technical and science-oriented since it involved afterimages and such (check it out here--it makes a grew STEAM project). But this time, I went with a simpler version that still allowed the students to learn about the Fauves and color theory. These came out beautiful and made a wonderful display, but I didn't get a picture of them all together (I know, I can't believe it). Trust me, they are awesome and beautiful. :-)

Here's how it worked:
Students looked through the magazines in the classroom for three landscapes they liked that they thought would work to simplify--these oil pastels don't do detail well. The students met with me and we discussed their choices and they selected one to take to final. They could then simplify the landscape on newsprint using a grid format (or freehand it if they preferred).

Once they were done their draft, I had them transfer the image to a poster-weight paper. I thought that would hold up well. However, you could probably use white drawing paper. Students were encouraged to use at least two colors in each section of their drawing using blending. We had talked about color theory, warm/cool colors and atmospheric perspective so they could make great color choices. Once all of the sections of their landscape were complete, they could use a dark-colored pastel to outlines the sections (similar the some of the Fauve artists).

When done, the finished pieces were glued to a black mat (black paper cut 2" larger than the work). This really made the colors seem so bright and also made the pieces look more finished. Matting work just makes it seem more special.

Ta-da! Beautiful Fauve Landscapes! ENJOY!

Thursday, November 15, 2012

Magical Fauve Landscapes

Every year I teach my students about color theory and the color wheel. This year, we're focusing on Modern Art, so I thought a perfect color-theory tie in would be learning about the Fauves. The Fauves (or Wild Beasts) are a bunch of radical artists that created some bright and beautiful pieces of artwork that didn't quite match up with the colors of reality.


I know these landscapes are pretty basic, but read the post to find out why...

I have always loved the work of the Fauves! When I was in college, I used to take this great book called "Fauve Landscape," by Judi Freeman out of my school library. The paintings just made me happy and after I renewed the book at least three times, I decided I needed to own it! I pulled the book off the shelf for this project, and it was full of inspiration for the kiddos.

I began my lesson by having the children fill in a basic color wheel. My standard 6-color color wheel worksheet allows the children to learn about primary, secondary, complementary, warm and cool colors. There was a bit of grumbling about doing the worksheet (some of my students had done this before), but understanding the color wheel is really important for this project to be a success.

Then we looked at examples of works by the Fauves (and artists that are sometimes classified as Fauvists). We had a discussion about the paintings (the colors that were used and how they make us feel, why the artists might have chosen to use the colors they did, etc.).

Then we moved on to the main project. This project was one I saved pre-Pinterest. It is from the book "Art is Fundamental," by Eileen Prince and I always thought my students would enjoy it. In short, students create a simple landscape scene using complementary colors for the objects in the scene. Prince suggests doing the lesson as a draw-along, so that's why all of our pictures look alike. This is a great project because it only needs one piece of paper, a pencil and markers. Having the color wheel on hand really helps them get the idea of complementary colors. By the end of the lesson, they were pros!

Once they are done coloring their scene with nice, solid color, students stare at the completed image for about 30 seconds and then quickly look at the white surface. If done correctly, they will see an afterimage of the scene with the colors appearing properly. It took some of the students a couple of tries to see the afterimage, but most of them were able to see it.

This project didn't impress some of my students as much as I thought it would, but I think I'll keep it in the curriculum because it is a great lesson on color theory and some really cool artists. I also think it is a great lesson to teach children about creating art "in your own way."

The white space on the lower portion is the "white field"
the children look at to see the afterimage.

Nice, solid colors are key to this project.

This project is like a "art vocab ninja"!
The children don't even realize they are learning so much
about color, landscapes, and Modern art.


Related Posts Plugin for WordPress, Blogger...