Showing posts with label projects. Show all posts

Tuesday, November 18, 2014

Scenes from Jewelry-Making Artist's Workshop

Last Thursday I had the pleasure of hanging out and creating jewelry with a few lovely students at Amherst Middle School. We learned some basics of jewelry design and construction and students were able to go home with duct tape earrings, beaded earrings, a glass bead bracelet, and a shrink art necklace. While they were creating, they were learning how to use jewelry-making tools and jewelry findings.


While these pieces are easy to make, they form the foundation of basic jewelry-making skills students can use to make a number of fabulous pieces! Hopefully they are inspired to create some lovely pieces at home!

And here's the link to the tutorial we used as inspiration for our duct tape earrings--I'm now sporting a pair of rainbow tie-dyed feather earrings my son made me! :-) *LOVE*

Thursday, November 13, 2014

Love printmaking? Try these lessons!

I've rediscovered printmaking over the last month or so. I love printmaking because it is easy and can be done on the cheap. Well, sort of. The process is always so fun for the students and the results are magical--I love to watch them "ooh" and "aah" over their prints!

Well, here's a round-up of some past printmaking lessons from my site that may have you rocking and rolling with your students!

Matching Mittens with Found Object "Snow" Prints

USING FOAM TRAYS:
Reduction Prints (Using Styrofoam trays and found objects)
Andy Warhol Self Portraits (Using Styrofoam trays and a pencil to "carve" an image)
Reduction Print Selfie (Using Styrofoam tray and gradually removing portions of it between inkings)

USING CRAFT FOAM:
Haunted Houses (Using sticky-backed foam shapes)
Fall Banner (Using foam shapes to make stamps--can be changed for any theme or season)

FOUND OBJECTS AS STAMPS:
Create Your Own Stamps (Using found objects and wine corks to make your own stamps)
Matching Mittens and Snowflakes (Cut paper mittens with found object "snow")
Focal Point Fruit Prints (Using an apple or pear to print--exploring focal point too).
Leaf Prints (This is mine, it's from Deep Space Sparkle, but it is my go-to early finisher activity in the fall).
Modern Day Adinkra Cloth (Using stamped symbols on sections of card stock that are joined together into one "cloth")
Spring Forsythia Still Life (Using pieces of sponge to make a lovely arrangement of forsythia blossoms)
Not-So-Scary Dancing Skeletons (Uses doggy bone treats for unique stamps)

USING YOUR HANDS:
Andy Warhol Hand Prints (Seriously one of my most popular posts, but not mine--from Artolazzi--so easy!).

And one of my all-time popular posts--
Quick Andy Warhol Hand Prints

Wednesday, March 20, 2013

Easy Art Activities For A Snow Day Or Any Day (Part 3)

This Part 3 in a multi-part series. Here are the previous posts you may have missed:
------------

So your children have moved beyond experimenting with art supplies and you need some ideas to engage them? No problem! My solution? Collect, save and access art ideas as needed.

3. Gradually Gather and *Actually Use* Easy Art Ideas

Before Pinterest, I was a ripper. If I saw a cool art or craft idea in a magazine...RIP!...it was torn out and filed away. But that takes up space (which I don't have) and if you are a piler (like me) I'd have to sort through MOUNDS of ideas to find the one I was looking for. If you are a filer, it would be easier, but who has time to file!?

So I love Pinterest. It allows me to pin ideas and categorize them (quasi-filing) and access them later. I rarely rip stuff out anymore (which is helping the clutter a bit).

The point is--gather ideas as you go. If you see something that you think your child may like to do in the future--grab it and file it so you can easily access it in the future. Think easy projects with supplies you are likely to have on hand. Then, on snow days or lazy days at home when you hear the "I'm bored!!" posse coming for you, whip out the ideas and look through them with your child. I often browse my "Art Ideas" board with my five-year-old in the mornings when he needs to create but can't think of something. Sometimes just looking at a picture of a project is enough and he'll run off to the art center and create-a-way. Sometimes I need to get involved and gather some special materials not in the Art Center and walk him through getting started.

We've done a TON of projects this way! It's great because we are actually doing the things I pin (my Pinterest surfing is not in vain!) and he's practicing his cutting, gluing, collage, and painting while being truly engaged since he's the one choosing the projects.

So here are a couple of pin-worthy projects for you to keep in mind for the next day off:

Aluminum Foil Quilt Squares
These are easy and addicting and all of my children were able to do them (even the 2 1/2 year old with a but of help). We mounted a few of them on mat board to protect them and make them easier to display. I found the instructions here at Piikea Street.


Chalk Shapes
This project kept my little ones busy for a while the other day. Cut a shape from cardboard (we used cereal box cardboard), put a little roll of masking tape on the underside to keep it still on your paper and then place it on a dark piece of paper. Trace around it with colored chalk or pastels, then *before you remove the cardboard shape,* gently wipe with tissue to smudge the chalk a bit. Ta-da! Beautiful!


Other Projects to Check Out:

LOVE these Magic Carpets from mnartgal.blogspot.com--they use materials you have on hand and who wouldn't want to make a magic carpet and go to a far off land! Where will YOU go?


And check out these Paper Sculptures from Sharpie Woman! Awesome! My five-year-old made a ton of these last week and even the two-year-old tried her hand at them. They are fun on a shelf or hung on the wall ad are a great way to use up all of those paper scraps you've been saving in your Art Center!

Other ideas to get you started? 

  • Use masking tape to "write" your name on cardboard or poster board, paint over the whole thing and then remove the tape for a great sign for your room!
  • Try your hand at printmaking using Legos or other found objects around your home (ask mom first!!).
  • Make Magic wands or fairy wands or search the web for "Notan" for some paper-cutting fun! I have an easy version of this here with my "Positively Cute I Love You Project."
  • Get out the clay and make dinosaur fossils or press found objects like sea shells into the dough
  • Make a snow sculpture outside or bring a bin full of snow inside and make a snow sculpture in your house! Or make a snow fort inside for your Playmobil guys or Matchbox cars!
  • And of course, you can always search the Create Art With Me site for more inspiration! (Hint hint!)

What are some of your go-to projects for easy fun? Anything you've done that engage your kids for awhile. I'd love to hear about them!

Monday, January 21, 2013

Valentine's Day Projects (Repost)

Looking for a couple easy projects for St. Valentine's Day? Well, here ya go! These previous posts have been popular and deserve a second go. Some are good for making and giving en masse, and some are for your special sweetie. Either way, enjoy making something for someone you care about!
Positively Cute "I Love You"

This is a nice project to teach positive and negative space and symmetry and makes a cute last-minute Valentine for the wall or as a bookmark. It is super-inexpensive and pretty darn easy. Make one of these for your Valentine today!


Positive/Negative "I Love U" Valentine

Supplies Needed For The Wall Art:

  • Piece of black construction paper (9" x 12") in black
  • Pieces of red and pink construction paper (the red sections are 3" tall and the pink sections are 2 1/4" tall)
  • Pencil
  • Glue stick
  • Scissors
Supplies Needed For The Bookmark: 
  • Piece of white posterboard (2" x 5") in white
  • Pieces of red and pink construction paper (1" square)
  • Pencil
  • Glue stick
  • Scissors
  • Clear packing tape (2" wide)
  • Hole punch
  • 8" of ribbon
Directions:

1. Decide on the order of your colored paper pieces.

2. For the first section, the heart, draw a half a heart shape onto the first piece of colored paper. Cut it out. Glue the outside of the heart shape onto the backing of your piece (either the posterboard if you are making a bookmark or the black construction paper if you are making a larger piece). Line up the cut edge the square with the center of your backing paper.

3. Glue the corresponding half heart shape along the center line, "flipped out" from the square it came from. Hmmm....sounds confusing, but look at the picture for a guide.

4. Continue down the column, cutting out half an uppercase "I" another half heart and half an uppercase "U." Finish with another heart, if desired.

5. If you are making the wall art, you are done! If you are making a bookmark, put a strip of clear of packing tape over your design to protect it. Punch a hole in the top edge of the bookmark and add a ribbon, if desired.

Sealed with a kiss! ENJOY!

Thursday, December 6, 2012

Pinterest Party 2012!

My friends are too busy to get together over the holidays. They work, they have children, they have large families with lots of commitments. Me too, but sometimes going without seeing or talking to my friends for two months, or so, is too long! Friends are what help me get through all of that everyday stuff and offer me a bit of comic relief--and I certainly need that when I'm up to my eyeballs in "to do's" and tinsel!
Look at this LOOT!
I mean, look at all of these presents I was able to make...
I could have had a cookie swap, but I didn't want the stale cookies or calories. I could have had a gift swap, but that didn't seem right either. So, I had a Pinterest Party. Here's how it worked:

How It Works:
I invited 7 of my crafty friends. I asked that they choose an easy, gift-worthy craft from Pinterest, make a sample of it and bring the supplies needed to make 7 more. Making a sample beforehand let us know what we'd be making and allows the person to work all of the kinks out beforehand. I asked that they only spend $20-$25 total for all of the supplies necessary to make their craft. Then, the plan was for us to all get together, eat, drink and craft and go home with one of seven different crafty gifts.

I also asked that they bring a snack, drink or dessert from Pinterest to share.

What I Did To Prepare:
Along with making my own craft, I made sure I had a few tables on hand for us to craft on (instead of my one little dining room table). It's great to have some basic supplies like a hot glue gun, scissors, glue sticks, extra ribbon in various sizes and colors (I just grabbed my ribbon bin) and tape. Having a cleaning spray, paper towels and dustpan and broom easily accessible will also help when you need to tidy between projects.

I think next year I will have a gift bag station for wrapping the gifts and a dedicated place for people to put their gifts as they finish them (maybe a large gift bag or grocery bag with handles).

I also set up a group board on Pinterest and invited all of my guests to pin their craft and food item so that, after the party, we'd have access to the directions and recipes, if needed. Our Board is here.

The Projects:
Wow! I was so thrilled at the diversity of the projects! Here's what we made:

  • Alcohol Ink Coasters (set of 4)
  • Birdseed Wreaths
  • Mason Jar Soy Candles
  • Terrariums in a Glass Ornament
  • Desktop Dry Erase Board
  • No-Sew Lanyards
  • Washer Necklaces

We took turns having the person who brought a specific project lead the rest of us through it in a mini tutorial. We learned so much about so many different types of crafts and we were able to try things that we might otherwise have never done.
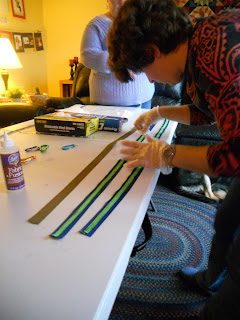
Working on the No-Sew Lanyards
The Food:
YUM! Too many good things and WAY too much food! But I enjoyed working my way through the buffet! I had coffee and tea on hand as well as juice spritzers. One of my good friends brought eggnog from a local dairy. These are some of the recipes from Pinterest that were there (Check out the Pin Board for the links/recipes):

  • Pumpkin Whoopie Pies
  • Candy Cane Dip With Apples & Oreos for dipping
  • Asian Slaw With Ginger-Peanut Dressing
  • Buffalo Chicken Enchilada Roll-ups
  • Goat Cheese Stuffed Bacon Wrapped Dates
  • Seven Layer Bars
  • Hummus & Salsa with veggies and chips, etc.
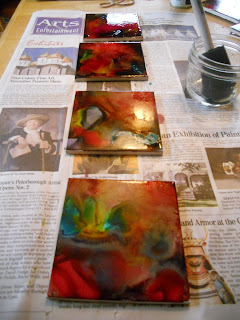
Some of the coasters drying--these really brighten up
after they are sprayed with the sealant.
Some Thoughts:
If you think you'd enjoy a Pinny Party, do it! It was fun and it's great to come away with lots of little gifts for giving. It does take some advance planning since you have to give your guests time to come up with an idea, try it at home, and shop for the supplies to create enough for your guests.

We had allowed three hours for the party (from 1:00-4:00 on a Sunday afternoon). That really wasn't enough time. Have your guests think of how they can prep some of their supplies ahead of time to save time and try to keep each project to about 1/2 hour. Limiting the guest list to 4-6 can help with time, but who wants to limit the guest list too much! Maybe if the party is held a bit earlier in the year (mid-November?) and there are two evenings of crafting (3-4 projects and evening) then that would allow for more time and more fun. But I wouldn't try to hold a party with two sessions in December--much too crazy!

But I LOVE the projects we made and I'm worried I won't be able to part with them! I'm so thrilled I was able to spend time with my friends and have some crafting therapy! I may not be entirely ready to face the holidays, but when things get stressful, I'll try to remember the good time I had with my friends this weekend.
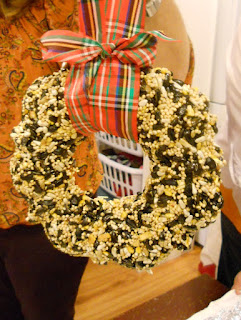
And a present for our feathered friends, too!

Related Posts Plugin for WordPress, Blogger...