Showing posts with label foam. Show all posts

Wednesday, May 25, 2016

Foam Reduction Shoe Prints With Grade 5

Before I got all caught up graduatin' and getting an art teacherin' job, I posted a WHOLE BUNCH about the long-term art sub gig I had at Fairgrounds Elementary School in Nashua. If you didn't see the posts, I did a series of them by grade level (Kinder and grades 1-4). I also taught grade 5 while I was there and did some fabulous projects with them. I thought that I'd break those projects out into individual posts, though, since they require a bit more detail to explain, etc. Here goes...

Sassy boots! This print was done on white paper.
First printing: red ink, second print: black ink.
The yellow you see is a piece of paper I matted the print on,
the red is the mat board.
The first day I met the fifth graders, I decided to do a simple winter-themed foam printmaking project with them to catch their attention and size 'em up. I had them create snowman images on foam and them print with one color (white) onto their choice of background paper--you can see this post here.
This print was done on white paper.
First printing: blue ink, second print: black ink.
The yellow you see is a piece of paper I matted the print on,
the red is the mat board.
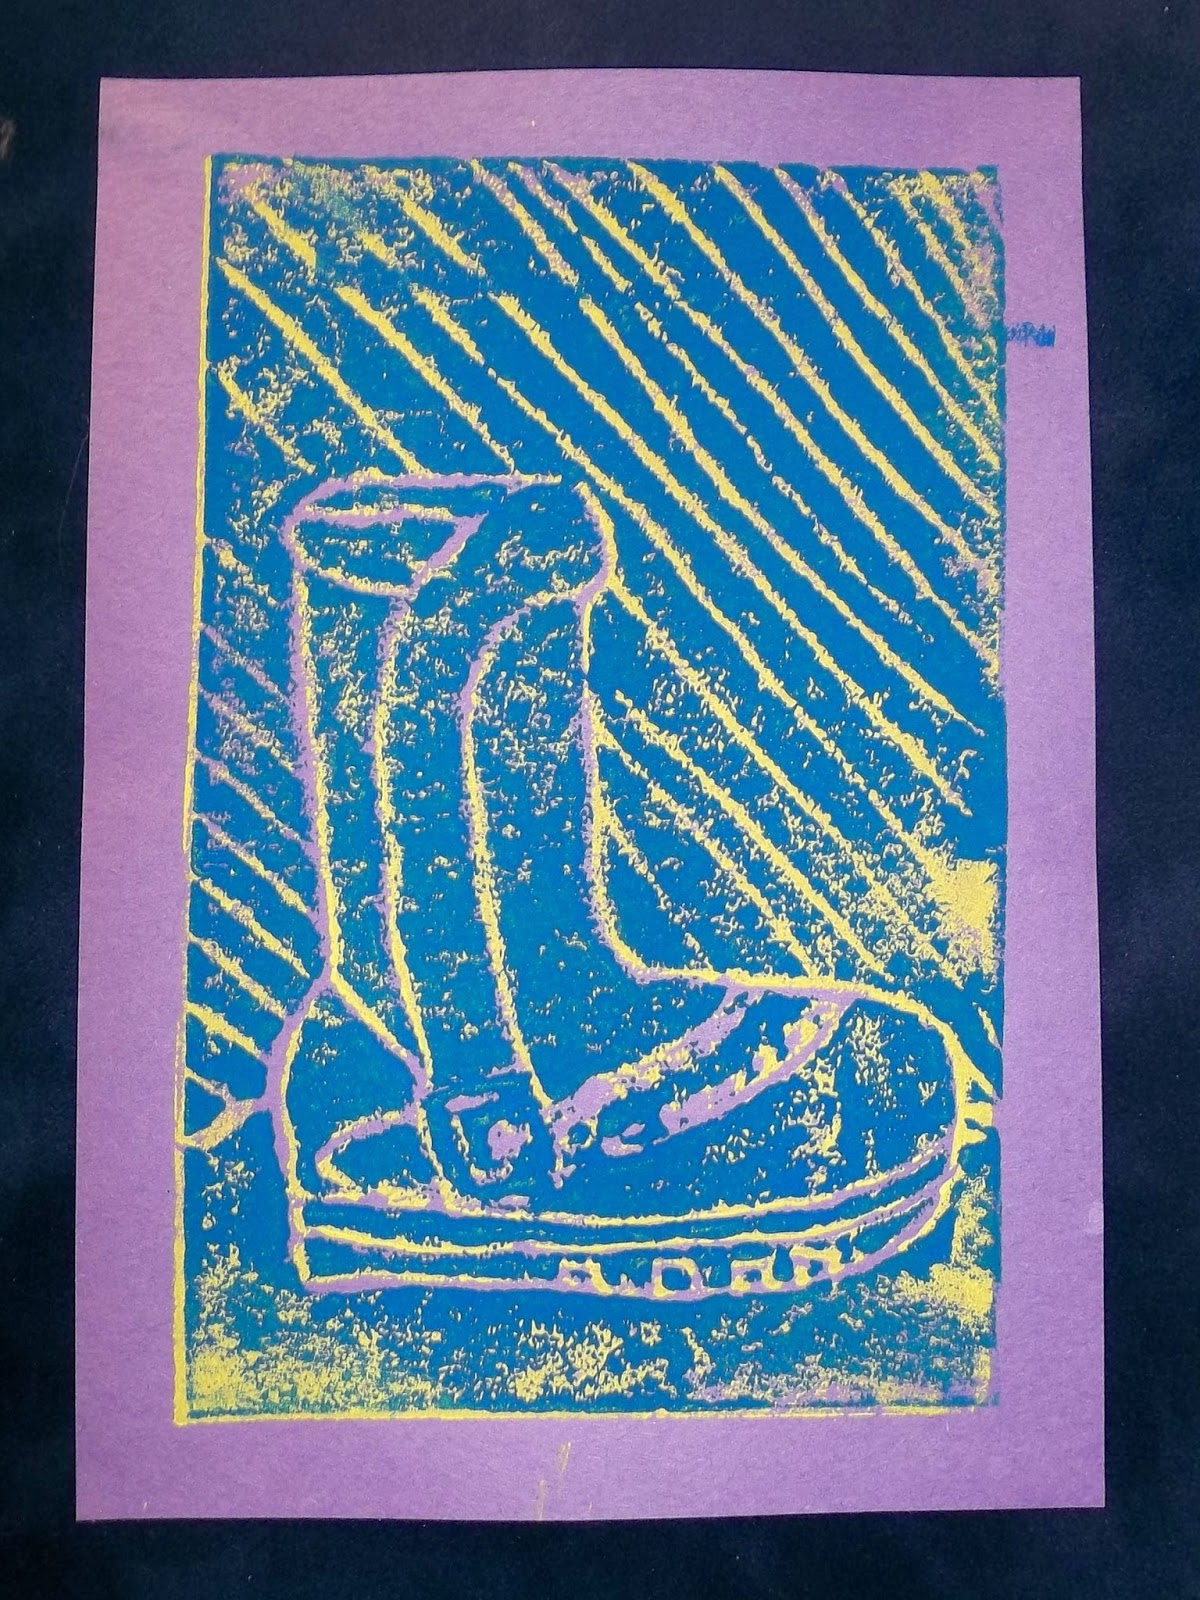
It went so well, that I thought I would continue on with printmaking and do a 2-color printmaking project inspired by the “Killer Heels” exhibit currently at the Currier Museum of Art (actually, I don't think this is currently on exhibit anymore, but it WAS at the time).

This print was done on purple paper.
First printing: yellow ink, second print: blue ink.
The navy blue is the mat board.
Students created their own printing plate by using pencil to “carve” a picture of their shoe into a foam “plate.” Students then used brayers to apply ink to their plates and print 1 print. Week two, students added a ground line and background, chose a contrasting color of ink and reprinted their designs. These prints were mounted on mat board and displayed at the Currier Museum of Art during the New Hampshire Art Educator’s Association Annual Members Reception in March. 

All prints were mounted onto mat board to look fancy.
I think added little paper hinges to groups of three to four
and ribbon ties so that the pieces could be displayed accordion-style
or create triangular displays such as this
(I didn't know how they were going to be used exactly).

WOW! What place of honor--the buffet table,
right where everyone can see these fabulous prints--
although I think people were too busy looking at the awesome food
they were piling on their plates--YUM!

The final week, students worked as a class to create an assessment rubric that contained the important vocabulary words from the Shoe Reduction Print project. They also determined four attributes that should be found in their finished work. Now, having students create their own rubric was something I had only done with high school, but I really wanted the students to be able to see the value in their work and begin to see that assessment isn't something we teachers pull out of thin air. Was walking the students through the rubric creation difficult. Not really. Was it work to keep them focused? Yep. Did it take a lot of time? Nope--we had it done in about 15 minutes. Was it worth it (really)? You bet. They did a great job and I think it lent credibility to me, the art process and what they do in the art room. Creating rubrics with your students is also a great way to review vocabulary and objectives! Win/win! ENJOY!!

Here's the rubric the grade 5 students created.
Normally, I would type up my rubrics to look all fancy,
but I wanted the students to see that this was the one we
created as a class. Pretty good for a first try.
Detail of the top of the rubric--the vocab section.
They needed to think of three vocab words from the lesson
and decide as a class what a good definition would be. 
Detail of the bottom of the rubric--they needed to come up with
four objectives of the assignment. This was fun walking them through
being objective instead of saying "it looks cool!" I put #5 on there. :-)


Sunday, March 6, 2016

One day printmaking project: Winter Prints

I used this as an attention-getting 1-day project with the fifth graders at a school I am temporarily working at--I thought they would appreciate a hands-on project as we got to know each other the first day. 

Yeah, I know, first day printmaking-I'm a little crazy...


We used foam trays from the supermarket as their printmaking plate and they "carved" the plate with a pencil to make a relief. I didn't have them sketch their ideas out first--just grab a pencil and go (I know, super-risky, but it worked)! I had originally intended to have them create just snowmen, but a few branched out and did other winter-themed artwork (snowflakes, hot cups of cocoa, gingerbread houses and more). I'm fine with giving them creative choices and they were able to make a print (white ink on black paper) by the end of the class. Everyone seemed to enjoy themselves and they loved their prints!

P.S. I know that foam plates are not eco-friendly, but I had them already and I wanted to show the students they could create art with supplies they could find in their homes. Next week I'm going to show them how they can use washable markers to hand color a foam plate and make a monoprint like I described in this post.

Saturday, January 9, 2016

You Gotta Try It! Super-Easy Monoprint Foam Plate Printmaking

I love printmaking and can't believe that I didn't take printmaking in college (my art program was so full--I barely had any electives). I'm a self-taught printmaker, and since I don't have a printmaking press, and I have four kiddos around, I like to find easy ways to create prints that they can do too. This here project is definitely one you have to try--either by yourself, with your children, or in the classroom. It is that fun and easy and uses supplies you already have on hand...

Look at this beautiful print created by my five-year-old! Love it!
And this one was done by me showing a more abstract possibility...
perhaps exploring line.
According to DCimPRINT, what we are doing here is a monoprint (versus a monotype--different thing--read more about this here). With a monoprint, a plate is incised, color applied, and a print is made. They say:

"Monoprints are the outcome of matrices that have permanent features, and can be considered variations on a theme.  The theme is the result of permanent features of the plate (such as a silkscreen template or etched lines). Variations on the theme are made when the plate is inked differently prior to each print. Possibilities for variance are infinite, and include monoprints of different color, ink density, or even size, but certain permanent features on the plate will always carry on 
from one print to another." --DCimPRINT

Because the plate is colored by hand before each print, prints can vary greatly; that is truly the fun of this project...check it out...

Supplies needed:
  • Foam tray from the supermarket (I use the green ones from veggies--not meat). These can be purchased in bulk from some nice supermarkets for pennies a piece.
  • Scissors
  • Crayola washable markers (I didn't use the ultra washable ones--just the ones you see in the photo)
  • A dull pencil
  • A sponge and a bit of water
  • White paper (I used some cheap-o paper I had, you should use drawing paper that can handle ink--DO NOT use construction paper, it won't hold up to the water).

Directions:
  1. Remove the rims from the edges of the foam tray using scissors. Our finished piece of foam was roughly 3 1/2" x 8," but you can use any size for this).
  2. Use a dull pencil to draw a design into the foam plate. A simple activity would be to draw different types of lines (straight, curved, zig zag, etc.), but you could draw a recognizable image. The dots you see on our designs were done by poking the plate with the dull pencil.
  3. Use the markers to apply color to the plate between the lines you created. Cover the entire plate with color. Older children can experiment with layering colors within sections.
  4. Prepare your paper: Cut the paper to size (a little larger than your plate). Use a slightly wet sponge to dampen your paper. You don't want the paper too wet, so you'll have to play around with this a bit. 
  5. Place the dampened paper onto the hand-colored plate and press gently, using your hand to smooth the paper onto the plate. I also use the damp sponge to smooth the paper onto the plate--don't scrub the paper or it will shift (and create a blurry image) or the paper will tear.
  6. Remove the paper and let dry.
At this time, you can recolor the plate to make another print. Try changing your colors this time or swapping plates with a friend and coloring their plate. You can keep the print as is (a nice work of art on its own) or use your print to create a card or bookmark (like we did).

Have fun with this easy and fun printmaking project!

Thinking of warm weather and our favorite pastime... 
And a minion card for a friend
(this one was colored by my five-year-old).
And the finished prints can be folded in half, glued and laminated
to make bookmarks. These were some of the ones we created.
The tassels are "Loops and Threads Craft Thread"
which is a bit thicker than embroidery floss.

And here's a close-up of one of the finished bookmarks.
This would be a fun project for a month when your school
celebrates reading.

Thursday, December 31, 2015

6th Grade Radial Symmetry with Foam "Plates"

I love printmaking--especially with easy supplies that are on hand--and this project was perfect for my 6th grade students! We used foam trays from the supermarket as our "plates." The students carved them with dull pencils. 

The project is easy to do and the results are pretty fantastic (lots and "ooh's" and "ahh's" from the students!). Every student was required to create one composition on watercolor paper that had four prints on it. Students who finished quickly and/or who were motivated, could continue on to make a 16-print composition. Either way, they came out beautiful!

The same 3 1/2" printing plate was rotated and repeatedly printed four times
onto the same paper to create a radial print (drawing guide lines lightly in pencil helps to keep things straight).

Objective: Students will create a relief printing plate from foam and use printmaking ink to create a print that has a verity of lines and demonstrates radial symmetry.

Standards of Achievement: Drawing, Painting, Printmaking, Carving

Subject Integration: Math

Vocab: radial, linear, symmetry, line, quadrants, print, printmaking, plate, relief, pressure, ink, brayer, construction lines, repetition, relief, styrofoam, transfer

Duration: 4 class (45 minutes each)

Additional references:
This lesson is based on a lesson from Art With Mrs. Nguyen (formally Ms. Graham). She did this project with 4th grade students, but I felt it was just right for my 6th graders as well. I also showed the students the video on Buddhist sand art Mrs. Nguyen suggests on her site, as well as some images of Spanish tiles and Islamic art.

Definitely a keeper! Enjoy!

The completed bulletin board display.  We had our final debrief in from of this display
and added the vocabulary words you see as part of the debrief.

This student created their design a little differently, but it works.

Neatly done!

Look at that detail--from a foam printing plate--AMAZING!

Lovely!

This design is a little off, but created a nice spiral effect.
The success rate on this project was very high for all students.

Here you can see how the 16 mini prints can be combined into
a larger composition. This student wanted to use four different inks
in their work (I hadn't thought of that!). The students are so creative!

This design is great too. Doing the 16 print compositions definitely require
more fortitude from the students, but are truly stunning when done.

Thursday, November 13, 2014

Love printmaking? Try these lessons!

I've rediscovered printmaking over the last month or so. I love printmaking because it is easy and can be done on the cheap. Well, sort of. The process is always so fun for the students and the results are magical--I love to watch them "ooh" and "aah" over their prints!

Well, here's a round-up of some past printmaking lessons from my site that may have you rocking and rolling with your students!

Matching Mittens with Found Object "Snow" Prints

USING FOAM TRAYS:
Reduction Prints (Using Styrofoam trays and found objects)
Andy Warhol Self Portraits (Using Styrofoam trays and a pencil to "carve" an image)
Reduction Print Selfie (Using Styrofoam tray and gradually removing portions of it between inkings)

USING CRAFT FOAM:
Haunted Houses (Using sticky-backed foam shapes)
Fall Banner (Using foam shapes to make stamps--can be changed for any theme or season)

FOUND OBJECTS AS STAMPS:
Create Your Own Stamps (Using found objects and wine corks to make your own stamps)
Matching Mittens and Snowflakes (Cut paper mittens with found object "snow")
Focal Point Fruit Prints (Using an apple or pear to print--exploring focal point too).
Leaf Prints (This is mine, it's from Deep Space Sparkle, but it is my go-to early finisher activity in the fall).
Modern Day Adinkra Cloth (Using stamped symbols on sections of card stock that are joined together into one "cloth")
Spring Forsythia Still Life (Using pieces of sponge to make a lovely arrangement of forsythia blossoms)
Not-So-Scary Dancing Skeletons (Uses doggy bone treats for unique stamps)

USING YOUR HANDS:
Andy Warhol Hand Prints (Seriously one of my most popular posts, but not mine--from Artolazzi--so easy!).

And one of my all-time popular posts--
Quick Andy Warhol Hand Prints

Friday, November 7, 2014

After School Printmaking Workshop

Yesterday I had fun experimenting with printmaking techniques with some 9- to 12-year-olds. It always amazes me how much fun students have with printmaking. I love it too!


We only had an hour and a half, so we began by doing a reductive print by slowly destroying a foam plate using tools that are easy to find around the house and studio: plastic knives, popsicle sticks, skewers, pen caps, etc. Students were asked to make two types of marks on their plate, print it, return and make more marks on their same plate, print it AGAIN on top of the first print, and then repeat one more time. We could have spent the entire class doing this one project, since some students needed time to "see" how things would turn out. Overall, they were pretty impressed by the beautiful layers that were created in their pieces.

When they were done that, I showed them how to use a plexiglass plate and add shapes and letters using sticky-back foam to make a relief plate. The students really went crazy with this idea and some created three plates in a short period of time. Most created their names or initials but some created trees, hearts, dragons and more.

Supplies we used for the workshop:

  • Foam veggie trays (don't use meat trays)
  • Found tools (mentioned above and hole punches, decorative scissors, etc--pretty much anything that will marks foam in a neat way)
  • Speedball printmaking inks (water soluble in red, blue, yellow, white, gold)
  • Speedball soft rubber brayer (roller)
  • Sticky-backed craft foam
  • Plexiglass scraps (do not use shatter-resistant)
Have a great day!

Tuesday, October 28, 2014

Printmaking with Shapes: Spooky Haunted Houses

Cue the scary music! It's time to get spooky! In my after school class we talked about silhouettes and nighttime and fall. Although we don't usually walk around outside at night--we may be doing that soon if we Trick-or-Treat at Halloween. Halloween can be lots of things: scary, exciting, spooky, cold, dark, and tingly (I love that one!). I had the idea to create a spooky neighborhood and I asked the students to help me by creating their own Spooky Houses.


We had tried another way of making printmaking plates the week before, but the students were struggling a bit and I knew the final results might be "eh" instead of "WOW!" The class is made up of first- through fourth-graders and since they were all struggling with the media, I realized I chosen the wrong way to go about this project! So I rethought the project over the week and this is what I came up with...

We used sticky back foam shapes to create the "silhouette" or outline of our houses that we could then print onto different colors of paper. That's the cool thing about printmaking--you make one plate and you can re-ink it and print it multiple times! Below are the directions for the project. We did it during one after school class period, but I would do this over three regular art classes (to also include a basic writing component--more on that later). Anyway, this will get you started:

On the left: Printing plate example
Middle: The print
Right: The haunted house print embellished with details.

Spooky Printmaking Nighttime Houses

Supplies Needed For the Printing Plates:

  • Sticky-back Foam Shapes (I bought larger sheets and cut my own shapes from them--squares, triangles, long, skinny strips, rectangles, etc.). 
  • Mat board or foam core cut into rectangles for the printing plate (ours are 5 1/2" x 7" because that's what I had).
  • Scissors
  • Pencils
Directions to make the Printing Plates:
  1. Arrange the foam shapes onto the plate to create the silhouette or outside shape of a spooky house. I had the students arrange the pieces first, then when they liked what they had created, they could peel the paper off the back of their shapes and attach them to their plates.
  2. Add elements to the background: bats, ghosts, etc. Attach those to the plate as well. Younger kids may need help cutting out complex shapes such as bats.


Supplies Needed For the Prints:
  • Your completed printing plate (from above)
  • Newspaper for covering surfaces
  • Solid colored papers (We used orange, 2 shades of purple, and lime green cut to 5 1/2" x 8 1/2" rectangles)
  • Washable printmaking ink in black
  • A soft rubber roller
  • A piece of plastic-coated butcher paper (maybe 14"x 17" or so)
  • Masking tape or painter's tape
Directions to make Prints:
  1. Before you begin, set up your work area by taping the butcher paper (plastic-side up) to the work surface on all four sides with tape. This will be the area you'll use for the ink and roller. Squirt a bit of ink on this area and use the roller to spread it around and load the roller. Also, place newspapers on the rest of your work surface.
  2. Ink up the plate, and place a sheet of paper on top of it, rub and press gently & remove. Ta da! A print. Move it to a drying area (that has been covered with newspaper) and let dry.
  3. Repeat to create more prints. I had the students make three to take home and one for me.
  4. Let the prints dry before moving on to the next step.


Supplies to Embellish and Complete the Spooky Houses:
  • Glue sticks and Elmer's glue
  • Large sheets of black construction paper (12 x 18"), 1 per student
  • Scraps of yellow, orange and red paper for windows and moons
  • Scissors and pencils
  • Sharpies (thin and thick)
  • Googly eyes (optional)
  • Halloween stickers (optional)
Directions to Embellish and Complete the Spooky Houses:
  1. Have students glue three of their prints to the black construction paper sheet using a glue stick.
  2. Have students draw and cut out windows and moons, etc. from the yellow scraps of paper. They can trace their pencil lines with Sharpie, if they like. My students also used Sharpies to add cracks to their windows, spiders, and scary phrases to the doors like "Keep Out!" and such.
  3. Glue the windows, doors, and moons, to the prints using glue sticks.
  4. Add goggly eyes to any critters on their prints, if desired: ghosts, cats, bats. Use Elmer's glue for that.
  5. Embellish with stickers, if desired.
Close up of my trial print.

And now you are ready for a Spooky Fall Night! ENJOY!

Tuesday, September 17, 2013

Colonial Leather Jugs and Mugs With Printable PDF

When I was with my family at Plimoth Plantation, I saw a craftsman making these neat jugs and mugs entirely from leather. I didn't actually see any of the people at Plimoth Plantation using these, but the leathersmith said that he was relatively new there and starting to supply the Colonists with these.


In the background you can see one of the mugs that haven't been dyed.
The mug in the foreground still needs the inside finished.

Here's the bottom view of the colonial leather mug.
See how there are two rows of neat stitches--this is all done by hand!
He had them in various stages of completion, they are cut from leather, sewn by hand, colored using a variety of dyes, the insides are then coated with a pitchy substance and they are ready-to-go! This was an interesting project and I thought my students (and my children) would like a variation of this.

The leathersmith suggested I check out Tandy Leather for kits for my students, and there sure are a bunch of kits on their site, though I didn't see a kit for making a leather mug. I'm just not sure that we are ready for real leather just yet.

So, I thought of an easy, inexpensive alternative that will get my students to understand the idea of crafting this product, along with the cutting, punching and sewing, that the real process has, but without the expense of buying leather and fancy tools. They can even use this project afterwards! You know they'll be excited about that!


So, here it goes:

Colonial Faux Leather Mug

Supplies Needed:
  • 1 9" x 12" piece of brown craft foam
  • 1 9 oz paper cup (I bought mine from Walmart as a pack of 10 for $.78)
  • Template pdf (hopefully this template uploads well below!) *needs to be printed on 9"x12" paper, so download the file and have printed on larger paper and trimmed-sorry for the waste! 
  • Pencil or pen
  • Scissors
  • Masking tape, optional
  • Small hole punch (mine is 1/8")
  • Hot glue gun, optional
  • Braiding cord or any thin, strong cord you can sew with
  • Metal needle in which you can tread the cord through
Directions:

1. Print out the template on 9" x 12" paper (sorry, that is the size paper that matches the craft foam sheet). And that's the size that works with these standard size paper cups.

2. Cut out the cup body and the bottom circle from the paper. Punch holes in the paper template using the hole punch wherever you see a little circle.

3. Place your prepared template onto the craft foam, I hold it in place with a couple rolls of masking tape. Use your pencil or pen to trace around the outside of the template. Before you remove your template, make sure you trace around the inside of the mug's handle.

4. Use scissors to cut the cup body and the bottom circle from craft foam. Cut out the inner shape of the handle and discard. These pieces would have been cut from thick, tanned leather in Colonial times.

5. Use the hole punch to punch holes into the craft foam, using your paper template as a guide. Hold the template and the craft foam together and punch through both layers. The leathersmith would have used a tool that looks like a multi-pronged wheel with a handle and roll it along the leather to make little pin pricks nice and even along with path he wanted to sew. Then he would take a sharp metal awl and poke through the leather, making a hole every place he wanted to stitch.

6. This is where I do something that is not-so-Colonial, but helpful for little sewers (you can skip this step, if you'd like). Fold the cup body in half, and line up the handles. Use a couple dabs of hot glue to hold the two layers of the handle together, making sure that you aren't getting hot glue in any of your sewing holes. Make sure you only tack near the sewing holes--don't glue to cup totally together! This will hold the cup body together for you to begin sewing, so you don't have to manage holding the pieces and sewing stitches at the same time. Older kiddos won't need this step, probably.

7. Take a length of cording and knot it at one end. Hide the knot inside the two layers of craft foam and begin sewing the two layers of the handle together. Sew around the handle and down the side of the mug (it will look like an uppercase letter "D"). Leathersmiths would use strong string they imported from England and other parts of Europe to sew the pieces of the mugs together by hand. I'm not sure of the stitch they used, but I used a running stitch.

8. Position the bottom of the mug and, using the photos as a reference, begin sewing around the bottom edge of the mug. Make these bottom stitches snug, but don't pull too hard or you will pull the cording right through the craft foam.

The bottom view of my mug.
9. When you are done, knot your thread and hide the knot inside the mug, if you can. You can secure the knot with a little hot glue, if you'd like. I know, not very Colonial, but bear with me! Colonial leathersmiths would now dye the outside of the leather mugs. The dyes are made by putting metal shavings in vinegar. Once that has oxidized overnight, the dye is painted on. The mug continues to patina as it is used. 

10. Slip a paper cup into your craft foam mug. With this design, the rim of the paper cup is visible. I did this because I wasn't sure that children should be putting their mouths on the craft foam, with this design, the child's lip touches the paper cup. Obviously, this mug should NOT be used for hot liquids, this project is for fun. Colonial leathersmiths would now pour a thick, tarry substance inside the mugs to make them watertight, thankfully, we are using a paper cup that should be watertight already!

Enjoy your handmade faux leather mug!

Friday, April 5, 2013

Kindergarten 2D Shape Robots

I saw this fantastic art project on Teach Preschool and knew I just  HAD to do it with my son's Kindergarten class! So this past Tuesday I was able to go in and spend a robot-themed afternoon with them. We had so much fun! Here are the robots they made using 2D shapes:


Deborah at Teach Preschool is totally great! I wish she lived near me so I could send my little ones off to her! Every day she sends out posts that are full of great learning ideas for the Preschool set. I've found that my Kinder guy also enjoys some of the activities from her site.

So check out her original post for the Shape Robots here.

Here are some of my notes on the lesson:

  • This project is great for Preschool and Kinder-aged kiddos. Both boys and girls enjoyed creating their robots.
  • This project tied in nicely with what my son was learning at this time: 2D versus 3D shapes and had a bunch of different shapes for them to use, identify and talk about while they were working.
  • This project has some very interesting kinetic-learning opportunities. The shapes are secured by poking bits of pipe cleaner through the shapes and into the foam. The kids loved doing that and really enjoyed that the legs and arms could move once they were secured with the pipe cleaner "bolts."
  • The featured book, "The Robot Book," by Heather Brown was a bit hard to find locally since it currently out of print but it is being rereleased in June. I ordered it from Amazon and it has become a favorite in our house. It talks about the parts of a robot, but it is ultimately what's inside the robot (it's heart) that counts. You could get along without the book, I guess. But I was glad to have it. It is a board book with moving parts which tied in perfectly to our robots. 
  • I was able to buy the craft foam sheets for the shapes at Michael's and just spent a few minutes cutting random shapes out of the foam: big rectangles, little rectangles, squares, half circles, and triangles. I also had peel and stick hearts and stars available, too. Maybe having circles would be nice, but I didn't have any and I wasn't going to cut them!
  • I bought the 1/2" thick styrofoam sheets at the dollar store in the floral section. They were 12" square and I was able to get three 5" x 7" rectangles from them and then I used the scraps to piece together another one (so I got four 5" x 7" styrofoam pieces from one 12" x 12" styrofoam piece). I hot glued the styrofoam rectangles to an 8 x 10" piece of mat board.
  • The only thing we used glue for were the googly eyes.
  • I encouraged the children to add details (button, switches, patterns, lines) with a Sharpie. They were more than happy to do so!
  • I worked with about 6 children at a time and at the other "stations" or centers they could play with gears (like Deborah suggested) or play Robot Bingo which I picked up at the dollar store (score!!).
It was a great day and I had a lovely afternoon with the children! They were all so proud of their robots and had a great time exploring shape and line and form. Thank you to Mrs. Greany for having me visit and to Deborah at Teach Preschool for the super-awesome lesson!

Wednesday, March 6, 2013

Printmaking: Warhol Self Portraits

For my last after school Modern Art class I wanted my students to explore the work of Andy Warhol. Last time we studied Warhol, we did the Handy Andy prints (which are a popular one on my blog and with my students). This time, I wanted to have them try printmaking so they could explore the Pop Art  repetitive printed images of Warhol's. With this project we are using foam trays to make a printmaking plate similar to a linocut or woodcut, but without the sharp tools.


This student loves to create Manga-inspired art.
I love this piece because it shows her interests and
is definitely a POP art piece--Warhol would be impressed!

This was a great first "real" printmaking project and the results are always so bright and fun. Some children really embrace this technique and I had one student complete TWO projects with the class time since she was having some much fun. I also did the project one-on-one with my Kindergardener and he loved it too. Clean-up is great since I used water-soluble printmaking ink (although I would love to try something in the future that is more permanent so that the kids could add color with watercolors afterwards...).

This might be a bit of an expense to buy the roller (brayer) if you are doing this project at home, but once you have the supplies on had you ca make a bunch of great prints for gifts, stationary, etc. Give it a try!

Faux Linocut Warhol Self Portraits

Supplies Needed:
Adjust the dimensions of your supplies based on the size of the foam trays you are using...

  • A few 4" x 5 1/2" pieces of white paper for drawing your design 
  • Pencils and erasers
  • Foam trays or styrofoam plates
  • Masking tape
  • Hot glue gun and glue sticks
  • A scrap piece of cardboard or mat board slightly larger than your foam printing "plate"
  • Water soluble printmaking ink
  • Brayer (I use the Speedball 4" soft rubber brayer)
  • A few 5" x 7" pieces of colored paper (smooth paper with bright colors work well)
  • Glue stick
  • Large piece of construction paper to mount the finished prints on
Directions:

1. Use the pencil to draw a simple self portrait on the white piece of paper. Make it unique--just like you, but don't get too detailed. 

2. Place the drawing onto the foam tray and tape down. Trace the lines of your drawing with a dull pencil. Press down enough to leave an impression in the foam tray, but not hard enough to poke all the way through the foam or shred the paper drawing. This takes some practice...using the pencil at a slight angle helps. Once you've traced the drawing, remove the drawing and go over the lines you made in the foam tray to make them a bit deeper.

3. Mount your finished foam printing plate to the cardboard using hot glue.

4. Squeeze some printmaking ink onto a spare foam plate or foam tray. Use your brayer (roller) to move the ink around, coating the roller with ink. You don't need it gooping with ink--a nice even coating works best. Roll the inked brayer over your foam printing plate. Lay a piece of colored paper o top of the inked printing plate and press gently with your fingertips. I had the children use one hand to hold the paper still while the other rubbed the image. Remove the paper to see the transferred image. 

5. Repeat as may times as you wish. I had the children make at least four copies of the image ad the they mounted them onto a larger piece of construction paper once the prints were dry.

Enjoy!


This guy is super-cute, too! 

Love the freckles!

And this piece is super-sweet! It makes me smile!


Related Posts Plugin for WordPress, Blogger...