Showing posts with label currier museum of art. Show all posts

Thursday, October 27, 2016

NH Art Educator's Fall Conference 2016!!

The New Hampshire Art Educators Association's (NHAEA) Fall Conference is one that I look forward to every year--"Clear the calendar! My Conference is coming up!!!" I love to connect with old friends, meet new friends, enjoy a lunch that is made for me and that I don't have to clean up after (hey, I do have four kids!), and get my artsy-ness on!! I purposely sign up for hands-on art making workshop choices. While I love me some lecture on art education theory, I don't get to make art as much as I would like, and art school was a-ways back in time, so any chance I have to create and learn new things I can take back to my classroom, I am game!

Interacting with the art at the Currier Museum...

This year's conference was fabulous and inspiring! It was held at the New Hampshire Institute of Art (NHIA) in Manchester, NH. Keynote speaker NH Artist/Illustrator/Author Marty Kelly spoke about his artistic process and how his multiple "failures" have been useful to his creative process. He urged us as educators to create a "culture of failure" in our classrooms where it is OK to make mistakes and take chances (leading students to further growth, risk-taking, exploration). He suggests that failure is part of the learning process and is essential to learning and growth. He encouraged us to change our attitude about failure as well as our students' attitudes about it as well. He explained that if we are afraid to fail we will be afraid to imagine, innovate, explore, and try. Having a classroom culture where failure is accepted and seen as an opportunity for discussion and growth also allows students to begin to accept advice and criticism and use what is right for them. He says that failure is a "pit stop along the road to success." 
Keynote Speaker: Author and Illustrator Marty Kelly
Photo courtesy: NHAEA website (www.NHAEA.org).
This is particularly useful to me as much of what we do in the middle school art room is moving away from product-focused, cookie cutter art to process-focused, student-centered work where the students are encouraged to problem-solve, explore and make the piece their own. This is a tough transition for some and some students struggle when they do not have a teacher-model to "copy" and are asked to try and explore and adapt. I've often have students come up and ask, "Is this an A? Am I done?" The first couple of times this happened I was floored, now I counter with: "I don't know, are you done? Take a look at the project objectives and talk to one of the other students in class to see if they have suggestions for further improvement (or to see if your piece is "saying" what you want it to say)." To me, this part of the creative process is a gradual release as the students' confidence and skill-level increases, ultimately preparing them for the independence and self motivation that high school will require. 

Session 1: Reinterpreting With Recylables. I went on a mini field trip to the Currier Museum of Art and saw the Mount Washington show that just opened. Mount Washington is the highest mountain in New Hampshire and is known throughout the world for its crazy weather. We went downstairs to classroom and Linn Krikorian taught us how we can use the art and artifacts within the Currier's collection as well as from life and other disciplines and have students reimagine them using recycled materials. Resources were shared for places to get interesting recyclables and for using this idea across the curriculum. Then Megan McIntyre discussed how art can be used to facilitate other ideas across the curriculum such as Science, Math, etc. This is particularly pertinent to me in my art room as I strive to develop lessons that are individualized and cross-curricular in nature. This lesson idea (and its spin-off ideas) will be helpful to me as I encourage the students to observe and reinterpret art and artifacts in class but make them their own. 

My take on a Robert Indiana from the Currier's collection.

Session 2: Structures to Sculpture (Bookmaking) This was a wonderful hands-on session led by Erin Sweeney, professor at NHIA (and her student helper Karen) taught us about a number of book-making techniques and led an open discussion amongst the creative educators present as to how we are currently using these structures within our classrooms and how we could potentially use them even more. Connections to other courses were discussed as well as connections to STEM/STEAM. While the pieces we made weren't complete (just the "bones" of the books and not fully developed within), the examples took the 2D linear idea of "book" and transformed it into 3D sculptural forms (easily!!) that could be used in our teaching in a number of ways (assessment, reflection, student mini portfolios, the documentation of a unit or the transformation of an idea, etc.). This was a VERY relevant workshop in that it allows a student to move from 2D to 3D in a seamless and accessible way while allowing them to reflect on a process or subject matter and use the 3D model-making techniques that we strive to teach them in class. This will definitely be applied to my future 7th and 8th grade classes next trimester! 


Busily working at the Structures To Sculpture Session led by Erin Sweeney.
Photo courtesy: NHAEA website (www.NHAEA.org).
After our sessions, we met back in the mail hall for closing remarks, a raffle (nope, didn't win anything this year), and a wine a cheese reception sponsored by NHIA. I went away physically tired, but rejuvenated and with so many great ideas that I can bring back to my students!

And here are some other images from the Currier workshop--the art of my classmates. ENJOY!


Wednesday, May 25, 2016

Foam Reduction Shoe Prints With Grade 5

Before I got all caught up graduatin' and getting an art teacherin' job, I posted a WHOLE BUNCH about the long-term art sub gig I had at Fairgrounds Elementary School in Nashua. If you didn't see the posts, I did a series of them by grade level (Kinder and grades 1-4). I also taught grade 5 while I was there and did some fabulous projects with them. I thought that I'd break those projects out into individual posts, though, since they require a bit more detail to explain, etc. Here goes...

Sassy boots! This print was done on white paper.
First printing: red ink, second print: black ink.
The yellow you see is a piece of paper I matted the print on,
the red is the mat board.
The first day I met the fifth graders, I decided to do a simple winter-themed foam printmaking project with them to catch their attention and size 'em up. I had them create snowman images on foam and them print with one color (white) onto their choice of background paper--you can see this post here.
This print was done on white paper.
First printing: blue ink, second print: black ink.
The yellow you see is a piece of paper I matted the print on,
the red is the mat board.
It went so well, that I thought I would continue on with printmaking and do a 2-color printmaking project inspired by the “Killer Heels” exhibit currently at the Currier Museum of Art (actually, I don't think this is currently on exhibit anymore, but it WAS at the time).

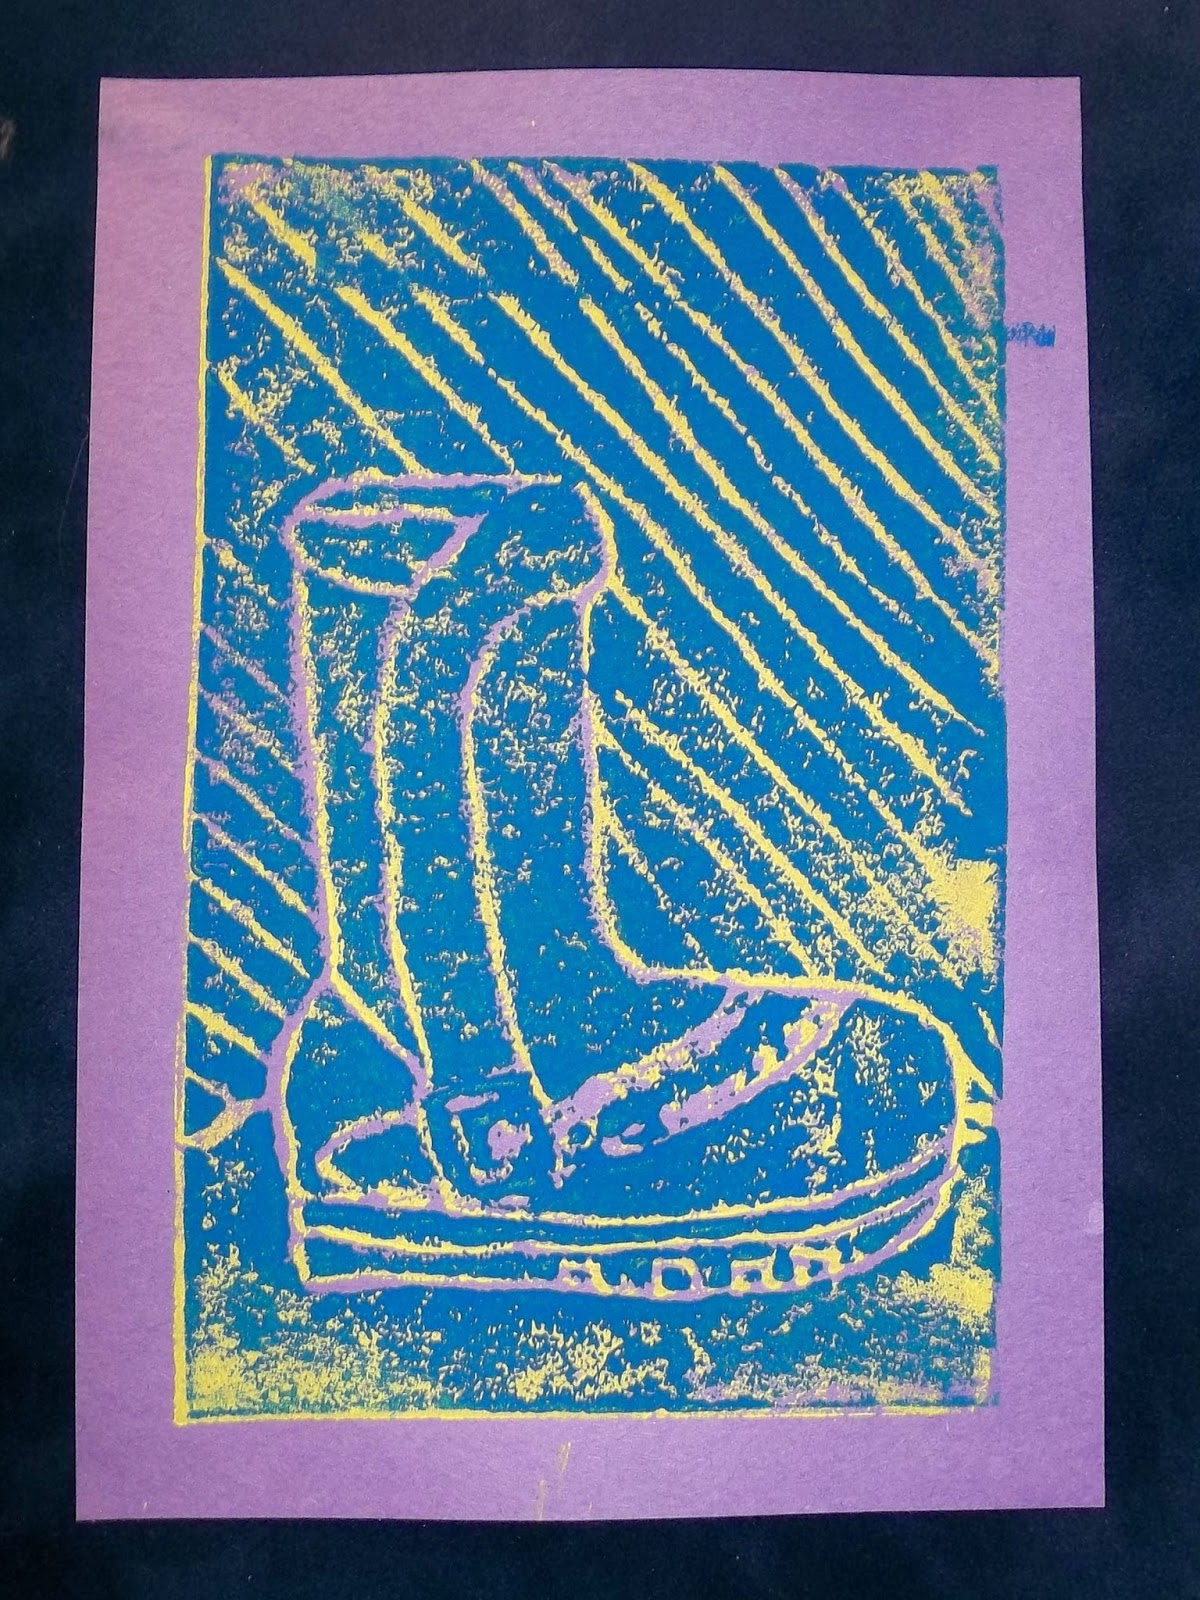
This print was done on purple paper.
First printing: yellow ink, second print: blue ink.
The navy blue is the mat board.
Students created their own printing plate by using pencil to “carve” a picture of their shoe into a foam “plate.” Students then used brayers to apply ink to their plates and print 1 print. Week two, students added a ground line and background, chose a contrasting color of ink and reprinted their designs. These prints were mounted on mat board and displayed at the Currier Museum of Art during the New Hampshire Art Educator’s Association Annual Members Reception in March. 

All prints were mounted onto mat board to look fancy.
I think added little paper hinges to groups of three to four
and ribbon ties so that the pieces could be displayed accordion-style
or create triangular displays such as this
(I didn't know how they were going to be used exactly).

WOW! What place of honor--the buffet table,
right where everyone can see these fabulous prints--
although I think people were too busy looking at the awesome food
they were piling on their plates--YUM!

The final week, students worked as a class to create an assessment rubric that contained the important vocabulary words from the Shoe Reduction Print project. They also determined four attributes that should be found in their finished work. Now, having students create their own rubric was something I had only done with high school, but I really wanted the students to be able to see the value in their work and begin to see that assessment isn't something we teachers pull out of thin air. Was walking the students through the rubric creation difficult. Not really. Was it work to keep them focused? Yep. Did it take a lot of time? Nope--we had it done in about 15 minutes. Was it worth it (really)? You bet. They did a great job and I think it lent credibility to me, the art process and what they do in the art room. Creating rubrics with your students is also a great way to review vocabulary and objectives! Win/win! ENJOY!!

Here's the rubric the grade 5 students created.
Normally, I would type up my rubrics to look all fancy,
but I wanted the students to see that this was the one we
created as a class. Pretty good for a first try.
Detail of the top of the rubric--the vocab section.
They needed to think of three vocab words from the lesson
and decide as a class what a good definition would be. 
Detail of the bottom of the rubric--they needed to come up with
four objectives of the assignment. This was fun walking them through
being objective instead of saying "it looks cool!" I put #5 on there. :-)


Sunday, March 13, 2016

Get your shoe fix at KILLER HEELS!

If you are near Manchester, New Hampshire, stop in at the Currier Museum of Art and get your shoe fix at their latest special exhibit: Killer Heels-The Art of the High-Heeled Shoe. I went this past week and it was FABULOUS!! Some of the shoes are pretty tame (not many, though!) and some are confusing (I still can't figure out how one would even put on one particular shoe in the show). Many I want to own and a few just made my jaw drop (spikes? animal hooves? pointe shoes with a 7" heel? YIPES!!).
Image top: Christian Louboutin, “Printz,” Spring/Summer 2013. Courtesy of Christian Louboutin. Photo: Jay Zukerkorn.

The only thing that could have made it better was if I could have tried some of them on--or if they were giving away boxes of shoes to take home! You know, a girl can dream!

Seriously, if you have a chance to see this show, please do. It is fun and so versatile to an art teacher's repertoire! I have a bunch of future art ideas in store for my kiddos.

Enjoy!
Related Posts Plugin for WordPress, Blogger...