Showing posts with label 2012. Show all posts

Tuesday, January 1, 2013

Top 10 Posts of 2012: Create Art With Me!

When I look back on the projects I've done with my students in 2012, I'm very happy. I don't post every project I do with my students, I just can't right now. But I do try to post enough to strengthen the link between home and school for my students. We've all been there, as parents, when we ask our child what  s/he did in school today, only to receive a one syllable reply. My blog tries to keep the lines of communication open between me, my students, the parents, and the administrators with which I work.

Upon looking back at my posts from 2012, here are the Top 10 Viewed Posts from my blog. Some of them surprised me (Love Bird in Oil Pastels) and some just beg to be done (Modern Day Adinkra Cloth). I hope you'll take a minute to view these projects and try out something new in 2013!

10. Modern Day Adinkra Cloth (231 Page Views)


9.  Love Bird in Oil Pastels (242 Page Views)


8. Only One You (264 Page Views)


7. One Point Perspective Landscape (273 Page Views)


6. Zaire (Congo) Masks (315 Page Views)


5. Claus Oldenburg Food Sculptures (399 Page Views)


3. Paper Plate Dream Catchers (697 Page Views)


2. Andy Warhol Hands (953 Page Views)


And tied for first place, each with 1778 Page Views:


Thank you to everyone who stopped by my humble blog in 2012 and checked out what I've been up to with my Art Explorers. Thank you to the families who allow me to spend time with their precious little ones making a mess and having fun. And thank you to my students for their creativeness and energy--I have the best group of kids who are always up for anything. You make me want to be the best teacher possible.

Have a wonderful New Year!!

Thursday, December 6, 2012

Pinterest Party 2012!

My friends are too busy to get together over the holidays. They work, they have children, they have large families with lots of commitments. Me too, but sometimes going without seeing or talking to my friends for two months, or so, is too long! Friends are what help me get through all of that everyday stuff and offer me a bit of comic relief--and I certainly need that when I'm up to my eyeballs in "to do's" and tinsel!
Look at this LOOT!
I mean, look at all of these presents I was able to make...
I could have had a cookie swap, but I didn't want the stale cookies or calories. I could have had a gift swap, but that didn't seem right either. So, I had a Pinterest Party. Here's how it worked:

How It Works:
I invited 7 of my crafty friends. I asked that they choose an easy, gift-worthy craft from Pinterest, make a sample of it and bring the supplies needed to make 7 more. Making a sample beforehand let us know what we'd be making and allows the person to work all of the kinks out beforehand. I asked that they only spend $20-$25 total for all of the supplies necessary to make their craft. Then, the plan was for us to all get together, eat, drink and craft and go home with one of seven different crafty gifts.

I also asked that they bring a snack, drink or dessert from Pinterest to share.

What I Did To Prepare:
Along with making my own craft, I made sure I had a few tables on hand for us to craft on (instead of my one little dining room table). It's great to have some basic supplies like a hot glue gun, scissors, glue sticks, extra ribbon in various sizes and colors (I just grabbed my ribbon bin) and tape. Having a cleaning spray, paper towels and dustpan and broom easily accessible will also help when you need to tidy between projects.

I think next year I will have a gift bag station for wrapping the gifts and a dedicated place for people to put their gifts as they finish them (maybe a large gift bag or grocery bag with handles).

I also set up a group board on Pinterest and invited all of my guests to pin their craft and food item so that, after the party, we'd have access to the directions and recipes, if needed. Our Board is here.

The Projects:
Wow! I was so thrilled at the diversity of the projects! Here's what we made:

  • Alcohol Ink Coasters (set of 4)
  • Birdseed Wreaths
  • Mason Jar Soy Candles
  • Terrariums in a Glass Ornament
  • Desktop Dry Erase Board
  • No-Sew Lanyards
  • Washer Necklaces

We took turns having the person who brought a specific project lead the rest of us through it in a mini tutorial. We learned so much about so many different types of crafts and we were able to try things that we might otherwise have never done.
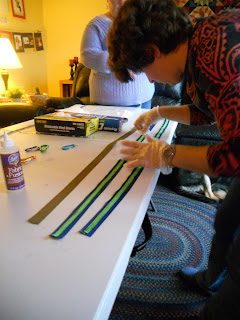
Working on the No-Sew Lanyards
The Food:
YUM! Too many good things and WAY too much food! But I enjoyed working my way through the buffet! I had coffee and tea on hand as well as juice spritzers. One of my good friends brought eggnog from a local dairy. These are some of the recipes from Pinterest that were there (Check out the Pin Board for the links/recipes):

  • Pumpkin Whoopie Pies
  • Candy Cane Dip With Apples & Oreos for dipping
  • Asian Slaw With Ginger-Peanut Dressing
  • Buffalo Chicken Enchilada Roll-ups
  • Goat Cheese Stuffed Bacon Wrapped Dates
  • Seven Layer Bars
  • Hummus & Salsa with veggies and chips, etc.
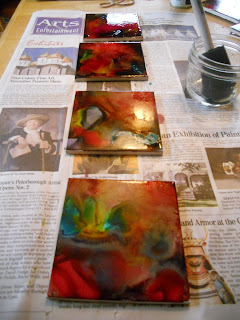
Some of the coasters drying--these really brighten up
after they are sprayed with the sealant.
Some Thoughts:
If you think you'd enjoy a Pinny Party, do it! It was fun and it's great to come away with lots of little gifts for giving. It does take some advance planning since you have to give your guests time to come up with an idea, try it at home, and shop for the supplies to create enough for your guests.

We had allowed three hours for the party (from 1:00-4:00 on a Sunday afternoon). That really wasn't enough time. Have your guests think of how they can prep some of their supplies ahead of time to save time and try to keep each project to about 1/2 hour. Limiting the guest list to 4-6 can help with time, but who wants to limit the guest list too much! Maybe if the party is held a bit earlier in the year (mid-November?) and there are two evenings of crafting (3-4 projects and evening) then that would allow for more time and more fun. But I wouldn't try to hold a party with two sessions in December--much too crazy!

But I LOVE the projects we made and I'm worried I won't be able to part with them! I'm so thrilled I was able to spend time with my friends and have some crafting therapy! I may not be entirely ready to face the holidays, but when things get stressful, I'll try to remember the good time I had with my friends this weekend.
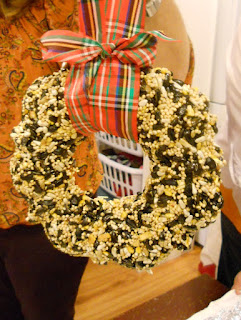
And a present for our feathered friends, too!

Sunday, November 11, 2012

Amherst PTA Online Auction Has Begun!

YAY! The day is here! The Amherst PTA's Online Auction has begun. This is a wonderful fundraiser for our local schools and there are so many wonderful things to kick-start your Holiday Shopping. Click here to enter the auction site and browse. The auction ends promptly November 17th at 11:00pm ET.


There are categories such as:

  • Fun At School (lunch with principals and teachers, etc.)
  • We Love Sports (karate lessons, etc)
  • Eat, Drink and Be Merry (Wine, GC at Restaurants)
  • Pamper Yourself (Gift baskets, jewelry, etc.)
  • Let's Go Shopping! (More GC's, etc.)
  • More Great Stuff (Classes and items for yourself and for giving)


I donated two things to the auction: the first is the Kandinsky-inspired canvas with the learning quote "You Learn Something EVERY Day IF You Pay Attention." This is perfect for home or classroom! We can all use a reminder to pay attention, right? NOTE: If someone outside of driving distance to Amherst, NH (say, over 30 miles--but still in the continental U.S.) is the winning bidder of this piece, I'll pay to ship it to you.

The other thing I donated is full tuition for my "Gifts From The Art" Class held in Amherst at Wilkin's Elementary School in December 2012. This is a fun 2-day class where children can create art-inspired gifts for their family and friends for the holidays. It really is a blast and the children create all sorts of amazing pieces. This one you'll have to be in Amherst to attend. Right now, this class is open to 2nd-4th graders. Here's the post about last year's class.

Both of my items are in the "More Great Stuff" category.

OK, so there's my commercial--get bidding!

Saturday, November 3, 2012

2012 PTA Auction Item: Colorful Learning Quote

Our local PTA is great! They provide so many wonderful enrichment programs at my childrens' schools. Since I have three children in school, I feel it is my duty to help the PTA with their fundraising efforts. The online auction allows me to help in a way that is easy for me. Last year, I went into my oldest son's classroom and helped them create a piece as a group to donate. They learned about mosaics and math and created a beautiful piece that raised $50 for the PTA.

This year, I asked some children to help me create a piece inspired by Kandinsky (one of my favorite artists) which I combined with a learning quote to create a unique and colorful piece that should appeal to a wide audience.


Ta da! Here's this year's piece I created
for the Amherst (NH) PTA's Annual Online Auction.
Now to get it to the auction coordinator so she can get it online...
Here's how we created the piece:

First off, I took inspiration from Kathy Barbro at Art Projects For Kids. It was in her blog that I first saw the technique of having children use Sharpies on dry wax paper and then adhering it to canvas. What an awesome idea and I'm so glad she posted it. Really, once you try this technique, you'll be hooked! I bought my dry wax paper at a food service supply store in our town. It came in sheets and it used to wrap sandwiches--it is less waxy than regular wax paper and is thicker than tracing paper.

Kandinsky Inspired PTA Piece

Supplies Needed:
  • Dry wax paper
  • Pencils
  • Sharpies in various colors
  • Scissors and ruler or paper cutter
  • Pre-primed and pre-stretched canvas (or you can use a canvas board), mine is 20" x 24"
  • Mod Podge and paint brush (I used matte Mod Podge while working & the Glossy for the final coat)
  • Acrylic paints (I used black, blue and white)
  • Quote printed out to size needed
Directions:

1. Figure out what size squares you want for your border and how many you need. I needed 18 four inch squares for my border. Cut squares of dry wax paper slightly larger than you need (I cut them to be 4 1/2" so little fingerprints on the edges could be trimmed away for a neater look. You can skip this step and make your squares actual size if you want to--it would save some time later).

2. Use the pencil to draw a circle in the center of the dry wax paper square. Then draw concentric circles radiating from that. The circles don't have to be perfect, it actually looks better if they are imperfect.

3. Use the Sharpies to color in the concentric circles. You can color in the circles entirely with one color, or split a circle and do the left side one color and the right side another color (check out Kandinsky's work and the photos of this project for inspiration). Fill in your entire square with rings of color. 

4. Once all of the squares are done, trim them to the size you need. I trimmed mine to be 4" square.

5. Use a ruler and pencil to measure and lightly draw guidelines to place your border squares. I did a 4" border all around the canvas with little tick marks every four inches so I could make sure I was lining everything up properly as I went.

6. Use Mod Podge to attach the squares to the canvas around the border. I suggest laying out all of your squares first to make sure you like the arrangement before you start gluing. Paint the Mod Podge onto the canvas, lay the dry wax paper square onto the glue and then paint a coat of Mod Podge on top of the square, gently easing the wrinkles and bubbles out. Let dry.

7. At this point, I painted the inner area of the piece. I used white acrylic paint and a touch of blue to create a painterly sky feel. I kept the color choice light since I knew I would be adding words over this area. Feel free to use the color(s) of your choice here.

8. I then painted black acrylic paint on the side edges of the canvas that had not been covered by the dry wax squares border. This makes the piece look more finished and makes it ready to hang--no frame needed! The buyer of this piece will appreciate that. I allowed the black to cover the sides of the canvas and come over the face of the painting a little bit. If you are using a canvas board, you could skip this step, if you wanted.

9. Once the center area is dry, you can add a little inner border of black paint, as I did. Use a thin brush (I used a soft, flat brush that was about 3/16" wide). Let dry.

10. Tape some dry wax paper over the printout of your quote. Trace the letters and fill them in using Sharpie. Cut out the words you traced on the dry wax paper close to the words (I kept all the words on a line together). Adhere the words to the canvas using Mod Podge. Let dry.

11. Once the entire canvas is dry, go over the entire piece with a thin coat of glossy Mod Podge, if desired. This will provide a nice sheen to the piece, sealing everything onto the canvas. Let dry and enjoy!

P.S. If anyone knows who Ray Lablond is, let me know, I tried to look him up online and couldn't find the man that matches the quote. ENJOY!
Related Posts Plugin for WordPress, Blogger...