Showing posts with label necklace. Show all posts

Tuesday, November 18, 2014

Scenes from Jewelry-Making Artist's Workshop

Last Thursday I had the pleasure of hanging out and creating jewelry with a few lovely students at Amherst Middle School. We learned some basics of jewelry design and construction and students were able to go home with duct tape earrings, beaded earrings, a glass bead bracelet, and a shrink art necklace. While they were creating, they were learning how to use jewelry-making tools and jewelry findings.


While these pieces are easy to make, they form the foundation of basic jewelry-making skills students can use to make a number of fabulous pieces! Hopefully they are inspired to create some lovely pieces at home!

And here's the link to the tutorial we used as inspiration for our duct tape earrings--I'm now sporting a pair of rainbow tie-dyed feather earrings my son made me! :-) *LOVE*

Monday, April 15, 2013

Walk Like An Egyptian Costumes

I just finished up week 4 of Egyptian Art with my after school kiddos. We created some great projects during our time together, and this was the final project: 3D funerary masks that you can wear as a costume.

The idea for making these came from the book, "The Ancient Egypt Pack: A Three-Dimensional Celebration of Egyptian Mythology, Culture, Art, Life and the Afterlife," by Christos Kondeatis & Sara Maitland. I picked this little gem up at a used bookstore for a couple of bucks and it was just perfect for my Egyptian Art class because it has all sorts of little pop ups and fold-outs that echoed the projects we were doing in class. One of the pieces that comes with the book is a 3D model of the famous gold Tutankhamun funeral mask that you can put together. My copy of the book did not come with the directions on how to put the mask's 25 pieces together, but I thought the children would love to create their own 3D models of the masks. Then, as I was doing research for my class, I saw a few sites that offered printable and wearable versions of King Tut's headdress, mask and the necklace/chest plate.

With a bit of downloading and printing, I was able to provide the children with printables they could color in their down time. I printed the pieces at home on white card stock and had the children use watercolors to add color to the pieces. For the gold, I had them use metallic gold acrylic. Colored pencils would also work, but would be super-tedious I think. During our last class, we assembled the pieces into wearables and they had fun posing in their unique creations.

This project could be done in many ways, if you have a bit more time or you wanted the children to have more creative input besides just coloring, you could make templates using the outlines of these pieces and have the children add their own details. The children had fun wearing the masks, as you can see below...I think it was a neat project to do and I will probably do it again (or some variation) next year.

Here are the sites you can find the printable elements of the Egyptian costumes. Thank you so much for the creators of these pieces! Give them some love and use their pieces in the way they intended (for free use with the kids in your life!). Enjoy!

Printable King Tut Headdress
First Palette has a great printable headdress. You can either print out version to color or one that it already colored and ready-to-go. They also have lots of other great Egyptian projects (along with lots of other great project ideas).

Printable Mask and Necklace
Alpha Mom has an adorable mask (complete with beard) along with a very elaborate-looking necklace. These projects are easy to print out and assemble. Very cool!


Thursday, December 6, 2012

Pinterest Party 2012!

My friends are too busy to get together over the holidays. They work, they have children, they have large families with lots of commitments. Me too, but sometimes going without seeing or talking to my friends for two months, or so, is too long! Friends are what help me get through all of that everyday stuff and offer me a bit of comic relief--and I certainly need that when I'm up to my eyeballs in "to do's" and tinsel!
Look at this LOOT!
I mean, look at all of these presents I was able to make...
I could have had a cookie swap, but I didn't want the stale cookies or calories. I could have had a gift swap, but that didn't seem right either. So, I had a Pinterest Party. Here's how it worked:

How It Works:
I invited 7 of my crafty friends. I asked that they choose an easy, gift-worthy craft from Pinterest, make a sample of it and bring the supplies needed to make 7 more. Making a sample beforehand let us know what we'd be making and allows the person to work all of the kinks out beforehand. I asked that they only spend $20-$25 total for all of the supplies necessary to make their craft. Then, the plan was for us to all get together, eat, drink and craft and go home with one of seven different crafty gifts.

I also asked that they bring a snack, drink or dessert from Pinterest to share.

What I Did To Prepare:
Along with making my own craft, I made sure I had a few tables on hand for us to craft on (instead of my one little dining room table). It's great to have some basic supplies like a hot glue gun, scissors, glue sticks, extra ribbon in various sizes and colors (I just grabbed my ribbon bin) and tape. Having a cleaning spray, paper towels and dustpan and broom easily accessible will also help when you need to tidy between projects.

I think next year I will have a gift bag station for wrapping the gifts and a dedicated place for people to put their gifts as they finish them (maybe a large gift bag or grocery bag with handles).

I also set up a group board on Pinterest and invited all of my guests to pin their craft and food item so that, after the party, we'd have access to the directions and recipes, if needed. Our Board is here.

The Projects:
Wow! I was so thrilled at the diversity of the projects! Here's what we made:

  • Alcohol Ink Coasters (set of 4)
  • Birdseed Wreaths
  • Mason Jar Soy Candles
  • Terrariums in a Glass Ornament
  • Desktop Dry Erase Board
  • No-Sew Lanyards
  • Washer Necklaces

We took turns having the person who brought a specific project lead the rest of us through it in a mini tutorial. We learned so much about so many different types of crafts and we were able to try things that we might otherwise have never done.
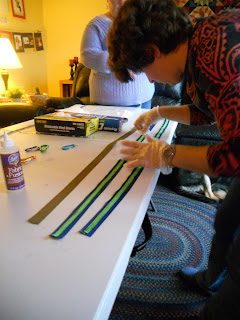
Working on the No-Sew Lanyards
The Food:
YUM! Too many good things and WAY too much food! But I enjoyed working my way through the buffet! I had coffee and tea on hand as well as juice spritzers. One of my good friends brought eggnog from a local dairy. These are some of the recipes from Pinterest that were there (Check out the Pin Board for the links/recipes):

  • Pumpkin Whoopie Pies
  • Candy Cane Dip With Apples & Oreos for dipping
  • Asian Slaw With Ginger-Peanut Dressing
  • Buffalo Chicken Enchilada Roll-ups
  • Goat Cheese Stuffed Bacon Wrapped Dates
  • Seven Layer Bars
  • Hummus & Salsa with veggies and chips, etc.
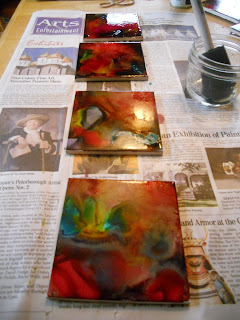
Some of the coasters drying--these really brighten up
after they are sprayed with the sealant.
Some Thoughts:
If you think you'd enjoy a Pinny Party, do it! It was fun and it's great to come away with lots of little gifts for giving. It does take some advance planning since you have to give your guests time to come up with an idea, try it at home, and shop for the supplies to create enough for your guests.

We had allowed three hours for the party (from 1:00-4:00 on a Sunday afternoon). That really wasn't enough time. Have your guests think of how they can prep some of their supplies ahead of time to save time and try to keep each project to about 1/2 hour. Limiting the guest list to 4-6 can help with time, but who wants to limit the guest list too much! Maybe if the party is held a bit earlier in the year (mid-November?) and there are two evenings of crafting (3-4 projects and evening) then that would allow for more time and more fun. But I wouldn't try to hold a party with two sessions in December--much too crazy!

But I LOVE the projects we made and I'm worried I won't be able to part with them! I'm so thrilled I was able to spend time with my friends and have some crafting therapy! I may not be entirely ready to face the holidays, but when things get stressful, I'll try to remember the good time I had with my friends this weekend.
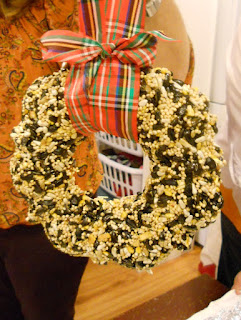
And a present for our feathered friends, too!

Monday, May 21, 2012

Three Recycled Art Projects in Progress

I haven't posted in a few days, but I have been busy. My students have three recycled art projects in the works! All three I've seen floating around on the web, but they are super-cool and my students seem very excited about them (as am I):

Abstract Sculptures (wire and pantyhose)
These are seriously awesome! You can't make just one! I've seen the idea in a couple of spots, but most recently on A Faithful Attempt. The basic idea is to insert a metal coat hanger into a wooden block. Twist and turn it & cover it with a knee-high pantyhose. Twist and turn some more & coat in gesso, then paint. Seriously cool. I'm doing this with one of my private art student (she's thirteen). Right now her sculpture is sitting in gesso. Next class, she'll paint it and we'll sketch it with charcoal from a variety of angles.

The abstract sculpture in gesso
(we used tempera paint mixed with Elmer's glue).


Sole Pendants
Also cool! I saw this on www.dickblick.com and thought my boys would love to make them. Now I'm making them with my Recycled Art class after school. My goal with this class is to get the children looking around and being inspired to create art from everyday object. These pendants get their funky texture from the soles of the students' shoes. How great is that? These were molded last week and this week we'll paint them and string them on a cord to make necklaces.


Some of the pendants in the drying phase.
The texture is made from the soles of our shoes.
Magazine Bowls
Ah...the humble magazine! Great for collage and now used as the structural component for a funky bowl! Once the after school students were done molding their Sole Pendants, I had them start prepping their magazine strips as suggested on the blog Mini Matisse. This week, we'll start coiling the strips into the form that will magically transform turn into the magazine bowl.

My magazine bowl demo with some of the strips cut from
National Geographic Magazines.

WHEW! Lot's going on here! I'm loving the energy and creativity of my students! So what are YOU working on?
Related Posts Plugin for WordPress, Blogger...