Our local PTA is great! They provide so many wonderful enrichment programs at my childrens' schools. Since I have three children in school, I feel it is my duty to help the PTA with their fundraising efforts. The online auction allows me to help in a way that is easy for me. Last year, I went into my oldest son's classroom and helped them create a piece as a group to donate. They learned about mosaics and math and created a beautiful piece that raised $50 for the PTA.
This year, I asked some children to help me create a piece inspired by Kandinsky (one of my favorite artists) which I combined with a learning quote to create a unique and colorful piece that should appeal to a wide audience.
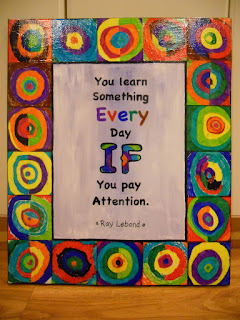 |
Ta da! Here's this year's piece I created
for the Amherst (NH) PTA's Annual Online Auction.
Now to get it to the auction coordinator so she can get it online... |
Here's how we created the piece:
First off, I took inspiration from
Kathy Barbro at Art Projects For Kids. It was in her blog that I first saw the technique of having children use Sharpies on dry wax paper and then adhering it to canvas. What an awesome idea and I'm so glad she posted it. Really, once you try this technique, you'll be hooked! I bought my dry wax paper at a food service supply store in our town. It came in sheets and it used to wrap sandwiches--it is less waxy than regular wax paper and is thicker than tracing paper.
Kandinsky Inspired PTA Piece
Supplies Needed:
- Dry wax paper
- Pencils
- Sharpies in various colors
- Scissors and ruler or paper cutter
- Pre-primed and pre-stretched canvas (or you can use a canvas board), mine is 20" x 24"
- Mod Podge and paint brush (I used matte Mod Podge while working & the Glossy for the final coat)
- Acrylic paints (I used black, blue and white)
- Quote printed out to size needed
Directions:
1. Figure out what size squares you want for your border and how many you need. I needed 18 four inch squares for my border. Cut squares of dry wax paper slightly larger than you need (I cut them to be 4 1/2" so little fingerprints on the edges could be trimmed away for a neater look. You can skip this step and make your squares actual size if you want to--it would save some time later).
2. Use the pencil to draw a circle in the center of the dry wax paper square. Then draw concentric circles radiating from that. The circles don't have to be perfect, it actually looks better if they are imperfect.
3. Use the Sharpies to color in the concentric circles. You can color in the circles entirely with one color, or split a circle and do the left side one color and the right side another color (check out Kandinsky's work and the photos of this project for inspiration). Fill in your entire square with rings of color.
4. Once all of the squares are done, trim them to the size you need. I trimmed mine to be 4" square.
5. Use a ruler and pencil to measure and lightly draw guidelines to place your border squares. I did a 4" border all around the canvas with little tick marks every four inches so I could make sure I was lining everything up properly as I went.
6. Use Mod Podge to attach the squares to the canvas around the border. I suggest laying out all of your squares first to make sure you like the arrangement before you start gluing. Paint the Mod Podge onto the canvas, lay the dry wax paper square onto the glue and then paint a coat of Mod Podge on top of the square, gently easing the wrinkles and bubbles out. Let dry.
7. At this point, I painted the inner area of the piece. I used white acrylic paint and a touch of blue to create a painterly sky feel. I kept the color choice light since I knew I would be adding words over this area. Feel free to use the color(s) of your choice here.
8. I then painted black acrylic paint on the side edges of the canvas that had not been covered by the dry wax squares border. This makes the piece look more finished and makes it ready to hang--no frame needed! The buyer of this piece will appreciate that. I allowed the black to cover the sides of the canvas and come over the face of the painting a little bit. If you are using a canvas board, you could skip this step, if you wanted.
9. Once the center area is dry, you can add a little inner border of black paint, as I did. Use a thin brush (I used a soft, flat brush that was about 3/16" wide). Let dry.
10. Tape some dry wax paper over the printout of your quote. Trace the letters and fill them in using Sharpie. Cut out the words you traced on the dry wax paper close to the words (I kept all the words on a line together). Adhere the words to the canvas using Mod Podge. Let dry.
11. Once the entire canvas is dry, go over the entire piece with a thin coat of glossy Mod Podge, if desired. This will provide a nice sheen to the piece, sealing everything onto the canvas. Let dry and enjoy!
P.S. If anyone knows who Ray Lablond is, let me know, I tried to look him up online and couldn't find the man that matches the quote. ENJOY!


