Showing posts with label PTA. Show all posts

Saturday, April 5, 2014

Silly Seussical Hats at the PTA Fair!

Today I had a fun time at the second annual PTA Family Fun Fair making silly hats! I had a display about the Art of the Play explaining all of the different jobs or roles that people can do in a play (or behind the scenes) if they have an interest in dance, music, theater, building, drawing, painting, or playing an instrument! When putting on a play, there truly is something for everybody!


Yep, that's me in my silly hat--I wore it all day! I even saw a bunch of people
I went to high school with while wearing it! :-)
I had  originally wanted to have children create masks as a tie-in to the play and costume design. However, I didn't want the children to churn out the same masks or have it cost too much. But I wanted them to have fun and come away with something they designed to wear.

I decided to have the children create silly hats instead (or headbands if you want to be super-technical about it!). These are made from 1" and 2" strips of construction paper (12" long) and staples. That's it.

I toyed with the idea of bringing pom poms, pipe cleaners, feathers, hole punches, and peel and stick foam shapes, stickers, glue sticks, and tape. But I didn't. And it was great!

Some old friends stopped by to create and say "Hello!"
I did, however, make a few hats and pass them around for grown-ups who were working the fair to wear. And I was wearing the one in my pict above that demonstrated a few paper tricks (folding, twisting, linking, curling) and that got them going an showed them some options. I also had a poster showing some paper tricks (pretty much the same as above).

And then I crossed my fingers. Was it too simple? Would anyone want to make a silly hat? I did have a couple children look frightened at me when I asked them if they wanted to make one (kind of a deer in the headlights look!). Gradually, however, children (and some grown-ups) began to create and design.

I really suggest this easy, wonderful project if you have a little time and some paper strips (and a whole bunch of staplers!).

And thank you to the grown-ups who were such good sports!
This hat seriously went beyond anything I could have dreamed!

Some other projects that are like this, appear on these fabulous blogs, so check 'em out!

Seussical Landscapes from Mrs. Knight's Smartest Artists:
http://dolvinartknight.blogspot.com/2014/03/making-art-in-media-center.html

Cut Paper-Collage Hats from Art For Small Hands
http://www.artforsmallhands.com/2010/08/cut-paper-collage-hats.html

ENJOY!

Wednesday, March 12, 2014

Integrating the Arts: Art, Science & The Persistence of Vision

Monday night I had the pleasure of volunteering at Amherst PTA's Math & Science Night at Wilkin's Elementary School in Amherst, NH. The Math & Science night is a free non-commercial event where families can come together and enjoy playing with math and science concepts. There were all sorts of good things there: games, voting & graphing, fishing for fractions, using microscopes, learning about sound waves and more--all in a fun & relaxed setting.


I asked if I could come and set up a table where art and science were used together. Combining science and art is probably one of the most fun things to do (I often tell my husband that if this art teacher thing doesn't work out I am becoming an earth science teacher. To which he replies with raised eyebrows!).

Anyhow, I needed to create a project that would entice children to stop at my table, stay a couple minutes, have a high success rate, and be cheap (hey, I'm paying for this and I didn't know if I was going to have 100 or 300 kids at this event!). So, I chose a basic animation "machine" called the Thaumatrope. Here's my original post here with the "how to."I used plastic drinking straws instead of skewers because they were safer.


Here are some of the examples of Thaumatropes I brought to the event.
Compare the two images to see the front and the back of each...


Here are some photos from the event...
My display explaining lenticular animation & optical illusions (top portion)
and animation and the persistence of vision (bottom portion).
The work area before the kids arrived. I had all the supplies they needed
in each tray and directions in case I wasn't able to get to the right away.
These Thaumatropes cost about 2 cents each to make (not including the colored pencils).
And just to prove I actually had children visit me, here's a photo of a few
girls working at my table. This was at the end of the night. At one point it was
standing room only at my table! Visitors ended up making 100 Thaumatropes that night!

How it went:

Great! I tried to think of some great hook to get children to stop and do my project—I was worried it would seem like too much work. So I would say—“Hey, do you want to make a magic picture?—It only takes a minute!” and then I’d show them a couple of examples. My favorite was one that I created that has an image of a top hat on one side. I showed this to the children and said “I can make a rabbit come out of this hat—want to see?” And then, when I spun it, the rabbit (image from the other side) appears. It was really fun seeing the look of awe on some of the kids’ faces when they saw the two images come together!

The Lesson:
Because I had about 30 seconds per child to explain the concept, I tried to be pretty descriptive when showing them the examples. I’d say the following:
  • See how there is one picture on this side and one on the other side?
  • When you draw your two pictures, they will come together when you spin your thaumatrope—so think about that when you draw—use pencil first so we can try it out.
  • Don’t worry if it doesn’t work at first—this is tricky! I made mistakes too (I had one of my mistakes on hand to show them)—if you make a mistake, you can erase, or make another one—I have more!
I had all sorts of creative Thaumatropes made: a cheetah leaping into a tree, a sugar glider leaping from a tree, a Star Wars light saber battle, all sorts of sports balls going into goals, hoops, nets, etc., kittens lounging in cat beds or eating food, and so much more! Students of all ages were successful with this craft—K-4th, I’d say. 

I noticed the older they were, the more complicated they tried to make their animations and therefore the more thought needed to go into them (and then they sometimes needed to make some adjustments). But I tried to work with the students so that everyone went away with a successful Thaumatrope.

Friday, March 7, 2014

My SEUSS-ical Bulletin Board


Here's a bulletin board I created for the PTA at the local Middle School. It's my first bulletin board ever (given my art-on-a-cart status), and I'm pleased. I tried to choose Dr. Seuss quotes that would inspire middle school students and catch their eye. Hopefully it works and we drum up some interest in the PTA play coming in April and the cake decorating competition the PTA will be having--so fun!

Thursday, May 9, 2013

Mother's Day Flowerpot Ideas

I was asked to create a painted flowerpot idea or two for our PTA to use as a fundraising kid activity at last weekend's 1st Annual PTA World's Fair. The idea for this event was to have a fun-filled day where families could come and browse different vendors, taste foods from around the world, play carnival games, do crafts, jump in a bounce house, etc.


Ladybugs were VERY popular...

I was set up in the Japanese garden area of the gym. One vendor had let the PTA borrow all sorts of trees and flowers and they were arranged all around my work area-beautiful! In keeping with the Japanese theme, I brought some sheets of origami paper and the instructions to fold a few simple pieces such as a helmet, a dog, a butterfly, etc. Since I was busy overseeing the flowerpot painting, the origami  didn't attract as much interest as I had hoped. I have some ideas about that for next year, though...

On to the flowerpots...these ideas aren't mine, they are ideas I've seen here and there multiple times or are things I've received as a mom myself. But they fit the bill for the craft request: something for mom, a painted flowerpot, easy for whatever age group showed up (this was the first year of the event and we had no idea who was going to show), and cheap (the children "paid" four tickets, roughly $2.00 to do the craft and it is supposed to be a fundraiser for the PTA). Each pot included an herb or flower plant that was donated by a local organic farm.

The supplies needed are:

  • 4" flower pots with your choice of herb or flower
  • Acrylic craft paints (we used red, orange, yellow, green, white and brown)
  • Foam brushes if the children wanted to paint the rim of the pots
  • Sharpies for details, optional
  • Fingers for fingerprints! That's what makes them so easy--no brushes to clean up!

So, here are the (poorly taken) photos of my examples, complete with my cheapo fake plant from IKEA sticking out of it. SIGH. But you get the idea...


This example is great for little ones since they are the only ones
who could fit their handprints on the little pots! I had a couple people do this version...
When the children were done, they could choose one of these
poems on a skewer to stick in their finished pot.
These bring tears to my eyes--so sweet!

The children ran with these ideas and we ended up selling about 30 of them. There are going to be many happy mothers in southern NH this Mother's Day!


Sunday, November 11, 2012

Amherst PTA Online Auction Has Begun!

YAY! The day is here! The Amherst PTA's Online Auction has begun. This is a wonderful fundraiser for our local schools and there are so many wonderful things to kick-start your Holiday Shopping. Click here to enter the auction site and browse. The auction ends promptly November 17th at 11:00pm ET.


There are categories such as:

  • Fun At School (lunch with principals and teachers, etc.)
  • We Love Sports (karate lessons, etc)
  • Eat, Drink and Be Merry (Wine, GC at Restaurants)
  • Pamper Yourself (Gift baskets, jewelry, etc.)
  • Let's Go Shopping! (More GC's, etc.)
  • More Great Stuff (Classes and items for yourself and for giving)


I donated two things to the auction: the first is the Kandinsky-inspired canvas with the learning quote "You Learn Something EVERY Day IF You Pay Attention." This is perfect for home or classroom! We can all use a reminder to pay attention, right? NOTE: If someone outside of driving distance to Amherst, NH (say, over 30 miles--but still in the continental U.S.) is the winning bidder of this piece, I'll pay to ship it to you.

The other thing I donated is full tuition for my "Gifts From The Art" Class held in Amherst at Wilkin's Elementary School in December 2012. This is a fun 2-day class where children can create art-inspired gifts for their family and friends for the holidays. It really is a blast and the children create all sorts of amazing pieces. This one you'll have to be in Amherst to attend. Right now, this class is open to 2nd-4th graders. Here's the post about last year's class.

Both of my items are in the "More Great Stuff" category.

OK, so there's my commercial--get bidding!

Saturday, November 3, 2012

2012 PTA Auction Item: Colorful Learning Quote

Our local PTA is great! They provide so many wonderful enrichment programs at my childrens' schools. Since I have three children in school, I feel it is my duty to help the PTA with their fundraising efforts. The online auction allows me to help in a way that is easy for me. Last year, I went into my oldest son's classroom and helped them create a piece as a group to donate. They learned about mosaics and math and created a beautiful piece that raised $50 for the PTA.

This year, I asked some children to help me create a piece inspired by Kandinsky (one of my favorite artists) which I combined with a learning quote to create a unique and colorful piece that should appeal to a wide audience.


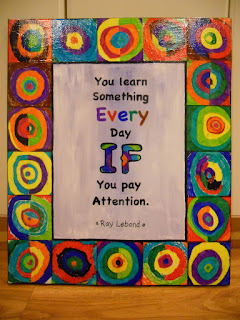
Ta da! Here's this year's piece I created
for the Amherst (NH) PTA's Annual Online Auction.
Now to get it to the auction coordinator so she can get it online...
Here's how we created the piece:

First off, I took inspiration from Kathy Barbro at Art Projects For Kids. It was in her blog that I first saw the technique of having children use Sharpies on dry wax paper and then adhering it to canvas. What an awesome idea and I'm so glad she posted it. Really, once you try this technique, you'll be hooked! I bought my dry wax paper at a food service supply store in our town. It came in sheets and it used to wrap sandwiches--it is less waxy than regular wax paper and is thicker than tracing paper.

Kandinsky Inspired PTA Piece

Supplies Needed:
  • Dry wax paper
  • Pencils
  • Sharpies in various colors
  • Scissors and ruler or paper cutter
  • Pre-primed and pre-stretched canvas (or you can use a canvas board), mine is 20" x 24"
  • Mod Podge and paint brush (I used matte Mod Podge while working & the Glossy for the final coat)
  • Acrylic paints (I used black, blue and white)
  • Quote printed out to size needed
Directions:

1. Figure out what size squares you want for your border and how many you need. I needed 18 four inch squares for my border. Cut squares of dry wax paper slightly larger than you need (I cut them to be 4 1/2" so little fingerprints on the edges could be trimmed away for a neater look. You can skip this step and make your squares actual size if you want to--it would save some time later).

2. Use the pencil to draw a circle in the center of the dry wax paper square. Then draw concentric circles radiating from that. The circles don't have to be perfect, it actually looks better if they are imperfect.

3. Use the Sharpies to color in the concentric circles. You can color in the circles entirely with one color, or split a circle and do the left side one color and the right side another color (check out Kandinsky's work and the photos of this project for inspiration). Fill in your entire square with rings of color. 

4. Once all of the squares are done, trim them to the size you need. I trimmed mine to be 4" square.

5. Use a ruler and pencil to measure and lightly draw guidelines to place your border squares. I did a 4" border all around the canvas with little tick marks every four inches so I could make sure I was lining everything up properly as I went.

6. Use Mod Podge to attach the squares to the canvas around the border. I suggest laying out all of your squares first to make sure you like the arrangement before you start gluing. Paint the Mod Podge onto the canvas, lay the dry wax paper square onto the glue and then paint a coat of Mod Podge on top of the square, gently easing the wrinkles and bubbles out. Let dry.

7. At this point, I painted the inner area of the piece. I used white acrylic paint and a touch of blue to create a painterly sky feel. I kept the color choice light since I knew I would be adding words over this area. Feel free to use the color(s) of your choice here.

8. I then painted black acrylic paint on the side edges of the canvas that had not been covered by the dry wax squares border. This makes the piece look more finished and makes it ready to hang--no frame needed! The buyer of this piece will appreciate that. I allowed the black to cover the sides of the canvas and come over the face of the painting a little bit. If you are using a canvas board, you could skip this step, if you wanted.

9. Once the center area is dry, you can add a little inner border of black paint, as I did. Use a thin brush (I used a soft, flat brush that was about 3/16" wide). Let dry.

10. Tape some dry wax paper over the printout of your quote. Trace the letters and fill them in using Sharpie. Cut out the words you traced on the dry wax paper close to the words (I kept all the words on a line together). Adhere the words to the canvas using Mod Podge. Let dry.

11. Once the entire canvas is dry, go over the entire piece with a thin coat of glossy Mod Podge, if desired. This will provide a nice sheen to the piece, sealing everything onto the canvas. Let dry and enjoy!

P.S. If anyone knows who Ray Lablond is, let me know, I tried to look him up online and couldn't find the man that matches the quote. ENJOY!

Sunday, October 9, 2011

Snowman & Bird Mosaic for PTA Auction

I am so thrilled with this craft! This past Friday, I went into my oldest son's fourth grade class to help the students create a piece to be auctioned off by the Amherst PTA this fall in their online fundraiser. Since the auction will be ending November 22nd or so, we couldn't create anything that had a Halloween theme. I chose an image that would be great to display through the winter: a Snowman and Bird (this image came from a magazine, it was intended to be a pillow).


The image was divided into 24 sections and each child was responsible for one section, or 100 tiles! It sounds like a lot, but it really wasn't all that bad once we divided it up! The children were amazed that the image was made from over 2400 little paper tiles! This was a great way for the students to recharge after a long week of standardized testing and learn something new! The lesson has a bit of math thrown in and next week the students will be learning about maps, so working with the grids was a nice tie-in.

The tiles are scrap booking paper and the final piece was mounted on canvas and framed so it is ready-to-hang. I think that will make the piece more marketable-it certainly looks good to me!

Here are some pictures documenting the process. I will be posting a tutorial for a similar project as soon as I can. Thank you so much to Mrs. Nagy for letting me come in and do this craft with her students and thank you to all of the boys and girls who worked so hard on this piece. It truly came out fantastic! ENJOY!
This board shows the entire piece on the grid, how the sections are divided and the steps to create the piece.
Each student was given a 10x10 block section of the piece. Students then copied the diagram with 1/4" squares cut from scrap booking paper.


The finished colors were much more vibrant than the original diagram.

This picture shows the piece in progress. Each section is attached to the canvas using Modge Podge. It's fun to see the image magically come together!

Related Posts Plugin for WordPress, Blogger...