Showing posts with label name. Show all posts

Thursday, June 13, 2013

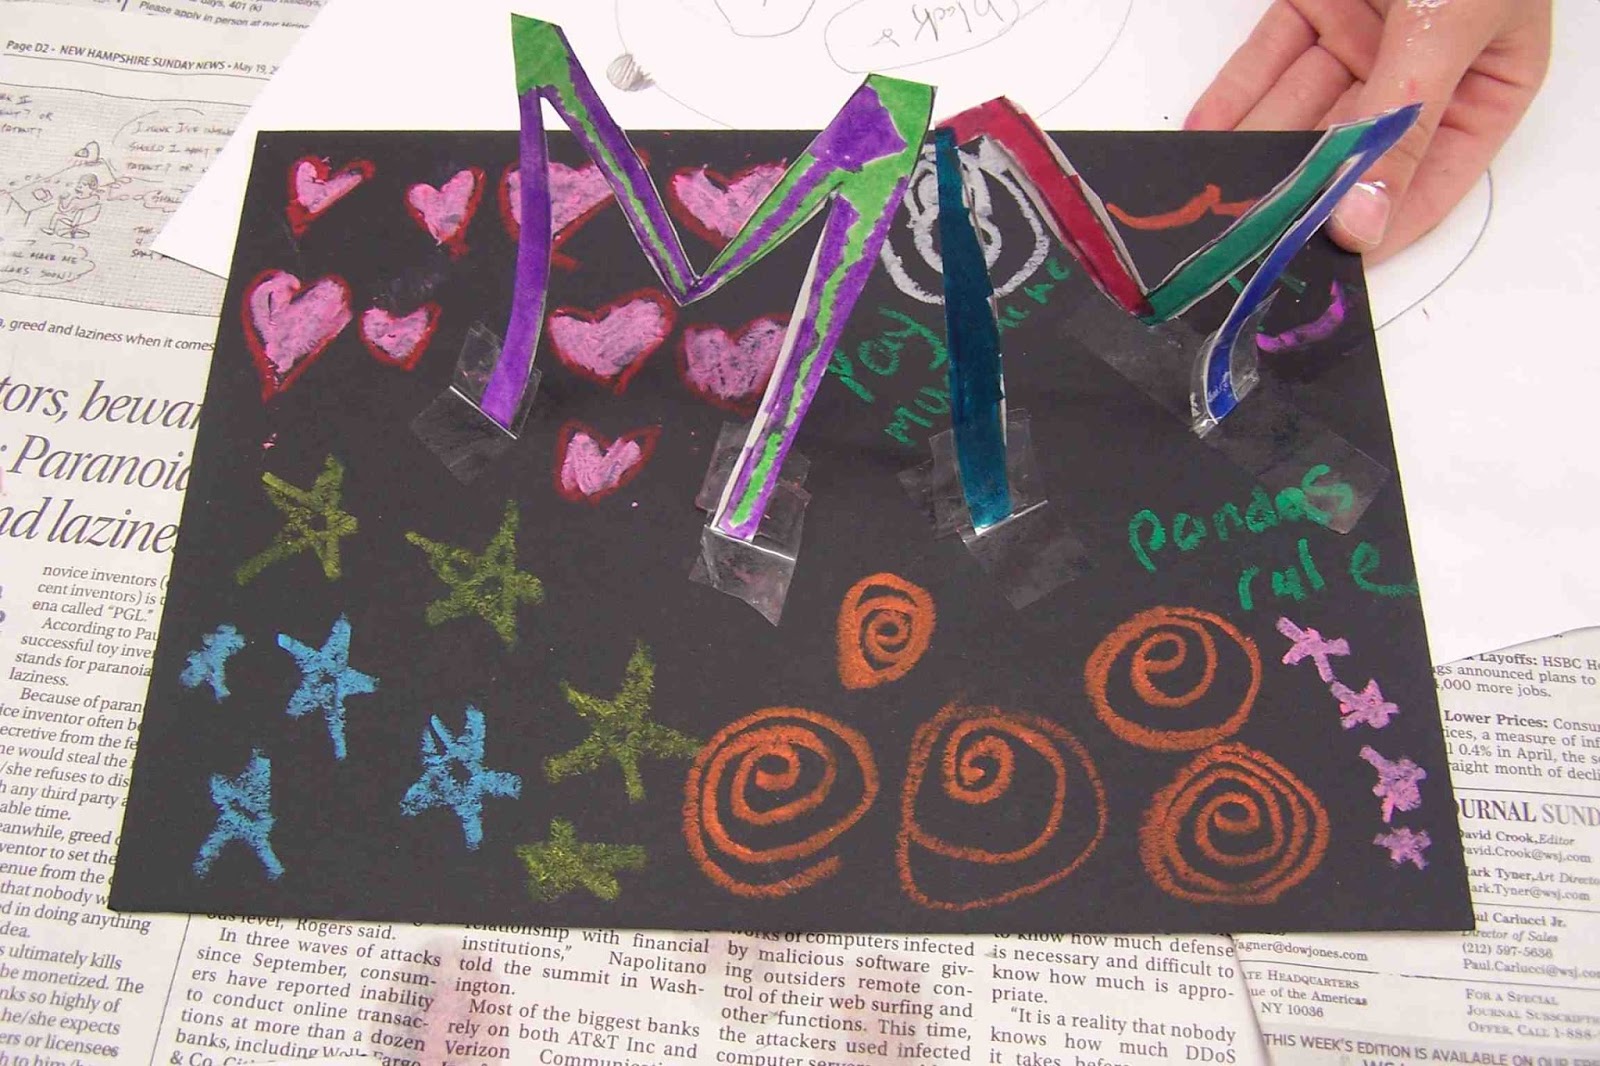
Easy Paper Name Sculpture For DAD

Yep, Father's Day is right around the corner, but don't fret if you haven't made Dear Old Dad a present yet...here's a fun and easy sculpture you can make for him that will look nice on his desk or toolbox (that's how the dads in our family roll). 


This project is based on one I saw on pinterest that had no destination or info--it was pretty much a picture on the internet. I've tried to do it justice, so here's my version. My early finisher students did this one day after painting some other sculptures. I'd say this project takes less than a half an hour to do if you choose an easy word like "dad."I'd love to have my students create multi-leveled sculptures with their entire names (more letters = a more exciting sculpture), but that's for another time!

Paper Name Sculpture For DAD

Supplies Needed:
  • 3" x 5" index cards, white on both sides (one for each letter of the name you choose)
  • Pencil
  • Scissors
  • Markers
  • Clear Tape
  • Mat Board, we used black
  • Oil Pastels
Directions:

1. Draw nice, thick letters onto the index cards making them as big as you can (touching all edges of the index card, if possible). Cut out your letters with scissors.

2. Decorate both sides of each letter with markers. Use at least two colors on each side of every letter. Try using different patterns and colors for each letter--have fun!

3. Use clear tape to attach the letters to the mat board so they stand up. Make your letters touch and lean against one another, if you'd like. The more letters you have, the more elaborate your sculpture will be. You can even make your sculpture go up vertically if you have enough letters. Think of building this sculpture like you would build a house of cards with a deck of playing cards, but you can hold the letters together with clear tape (bonus!).

4. Once all of your letters are taped where you'd like them, use the oil pastels or craypas to write a message on the base such as "I Love You!" or "Dad Rocks!" The decorate the rest of the base with the oil pastels with swirls, lines, and patterns.

Now you have a colorful sculpture for Dad! Enjoy!


Some students made sculptures with their initials instead.

And this student made a sculpture for his dog, Lulu!

Friday, May 10, 2013

Graffiti Names...ooh, Edgy!

Here in southern NH we aren't exactly urban or edgy. Our town is more "quaint" and "quiet" and is best known for its Colonial feel. Graffiti can be seen here and there, but it is looked upon as vandalism. Probably for a couple of reasons: 1. It appears in inappropriate places such as on street signs and, 2. For the most part, it isn't very good...Sorry!

I am not crazy about the swear words or anatomy lessons that sometimes appear on the underpasses. It's always lovely to have your emerging reader sounding out four letter words he has seen as you make the trip to Grandma's house! That's not the kind of graffiti I'm talking about. I'm talking about the artform in which artists use spray paint to create images and lettering in a colorful, concise way in a public setting. This is a type of artwork I cannot do (at least in spray paint), but I highly admire. The colors are out-of-this world! The way the artists combine text and image is amazing and creative. So, I needed to do this with my kiddos and see what they could come up with.

This student is in 3rd grade.
I did this project with students in 2nd-4th grade and then again with 5th-8th graders and both groups of students took to the project easily. I love the creative results and would highly recommend this project! A site that I found VERY helpful when planning the project was www.graffitidiplomacy.com--lots of visuals and handouts and how-to's. Another great take on this project can be seen at Art Room With a View. Danielle's 7th graders created graffiti tags but then went above and beyond with the backgrounds--you have to go check those out!

Graffiti Names

Supplies Needed:
  • Lettering Sheets (examples of the alphabet in different styles of graffiti--bubble, tag, etc.)
  • White copy paper
  • Pencils with erasers
  • Sharpies (I had fine point and ultra fine on hand)
  • Colored pencils
  • Scissors
  • Glue sticks
  • Print-out of a photo of a brick wall
Directions:

1. Choose a word, nickname, or your name to use for your tag and sketch out a few ideas for your tag. 

2. Choose a font for your tag. Are you going to use bubble letters or a more edgy, linear font? Draw or trace the letters for your tag on the white copy paper.

3. Thicken the letters in your tag, if desired, and then retrace your letters so that they touch one another.

4. Make your letters 3D, if desired.

5. Add "bits" such as shiny highlights on the letters, a crown, hearts, bubbles, or arrows.

6. Add a "forcefield," or two to hold it all together. The forcefield is the cloud around the letters.

7. Ink pencil lines with Sharpie. Erase any extra pencil lines.

8. Add color with colored pencils. Colors can be bright, you can use complementary color combinations for "pop," the letters should be different than the forcefield for readability, use effects such as gradients, textures, patterns, etc. 

9. Cut out the finished tag. Glue to the printout of the brick wall with a glue stick. Re-outline the tag with Sharpie, if necessary.

Have fun with this artform and make it yours! Don't worry if your first try isn't exactly perfect--just try again! Try using your tag as your homescreen on your phone or iPod or putting it in a tee-shirt. So cool!

This student is in 5th grade. 
This student is in 5th grade.
This student is in 2nd grade.

This student is in 7th grade.
This student is in 5th grade.
This student is in 3rd grade.

This student is in 2nd grade.

This student is in 2nd grade.
This student is in 5th grade.

Wednesday, September 14, 2011

Illuminated Names

This is a wonderful project for students to get to know each other. I saw this in the book, "Medieval Projects Your Can Do," by Martha Graves. This is a great resource for parents and educators and it is full of lovely, simple little projects.
This shows the various stages on the project all at once.


I have the children introduce themselves and give a couple of brief bits of information about themselves (favorite sports, colors, animals, etc). Then we talk about how they can incorporate those ideas into a fancy letter of their names. Simple and fun and everyone leaves with a piece they are proud of and is uniquely theirs!

Supplies Needed:

  • Large index card (5x7" or so) without lines on it
  • Pencil and eraser
  • Ruler with inches
  • Reference books with illuminated letters or calligraphy (optional, but nice)
  • Fine tip markers (we used sharpie brand in black and other colors)
  • Colored pencils, optional (when we wanted to add a hint of color)
  • Gold paint pen or gold acrylic paint with a fine brush
Directions:

1. With the pencil and ruler, lightly make horizontal guidelines every 1" on the index card.

2. Check out the reference books for inspiration and lightly draw the initial, or first letter of your name onto the index card. It should be large about 3" tall (mine touched both the top guideline and the bottom guideline on my index card). See below for the reference books I had on hand.

3. You can letter the rest of your name now, if you'd like. I made my letters about 1" tall and used a plain text I found in a book.

4. Add details to your initial. This is where all of the things that make you YOU come in! The girl I am making this for loves art and is seven. She also has a grandmother who does a lot with protecting sea turtles (and this little girl is interested in that), so I put a sea turtle and a seascape in there as well.

5. Use a marker to fill in the piece. I used black first and then colored in parts with other colored markers. I wasn't crazy about how dark the marker colors were getting, so I used colored pencils for the elements that I wanted to be secondary. When I was done the marker work I used an eraser to remove my guidelines and THEN I did the colored pencil work.

6. When it is done, use a gold paint pen to add some pizazz to the piece. This is part of what makes this art so "illuminating" because the gold makes it appear to be shining with light and color.

Here are some of my students' pieces, below. ENJOY!

The students could choose their first or last name.

This student traced over the pencil guidelines with gold with beautiful results!

Lovely lettering!

References for this class:

Tuesday, July 26, 2011

Fun With Heiroglyphics: Name Cartouche

Ahhh, Summer. Weeks and weeks of heat that eventually force children to play inside. This is the week that it is officially "too hot" for the boys to play outside for very long. 
Ancient Egyptian Hieroglyphs used to make personalized name plaques.

The other day I had 6 children running around inside & outside during the afternoon (my four and two friends). I pushed the ice water & juice boxes. I handed out freeze pops, but eventually they came inside to cool down and recharge. They weren't super-crazy about the toys on hand, so I whipped up a bunch of salt dough and brought out my newest find: a book and stamp kit from the Metropolitan Museum of Art written by Catharine Roehrig. The title of the kit: "Fun With Hieroglyphs."

I found this great little kit at a discount store near me and snapped it up even though I won't be covering that time period with my art class again for a couple of years. The kit has 24 rubber stamps, an ink pad and a full-color book explaining TONS about the development of writing in ancient Egypt. The pictures are engaging, the text easy-to-read and understand. Roehrig gradually introduces readers to the "rules" of using hieroglyphs and gives many examples, easy-to-use charts and games so that readers can become familiar with the symbols. It's a wonderful resource, and would be a great gift for a child who is maybe 7-12 years old.

I am not a huge fan of stamping (ink and my boys don't mix all that well just yet), but I thought they could use the stamps in dough to make a more permanent decoration for their rooms.

If you do not have this kit, you can still have fun with hierogylphs--see if your local library can get this book on loan for you or if you can get another book about hieroglyphs to use. Roehrig explains that the the system of writing used by ancient Egyptians used 24 symbols, so any resource that would show those 24 symbols along with their meanings (sounds) would allow you to do a project like this.

You can draw or stamp the symbols of your name on paper (maybe make notecards or a bookmark). Or, if tracking down a source of hieroglyphs is just too much work for the summer, whip up a batch of salt dough and make something else that strikes your fancy! ENJOY!

Clay Name Cartouche

Supplies Needed:
  • 1 batch of salt dough (Make about 6 cartouche plaques, each 2" x 6" or so), recipe to follow
  • Foil or parchment paper for work surface
  • Toothpick or skewer to make a hole to hang the piece by
  • Hieroglyph stamps
  • Rolling pin
  • Watercolor, tempera, or acrylic paints
  • Water & water bowl
  • Paint brushes
  • Paper towels
  • Newspaper to protect your work surface
  • Acrylic spray varnish, optional
Directions:

1. Mix up a batch of salt dough right before you are going to do the project. Here's the recipe I use:

Salt dough

2 cups flour
1 cup salt
1 cup (or so) of water

Mix the flour and salt together and gradually add the water until a soft dough forms. Knead the dough for 7-10 minutes. If the dough is too wet or sticky, add more flour. If the dough is too dry, sprinkle it with a few drops of water. Keep excess dough covered with plastic wrap until ready to use.

2. Chose the symbols you will need for your name. The Egyptians based their writing on the sounds of a word, so you may have to make some adjustments to the spelling of your name. For example, the name "SUSAN" sounds like "SOOZIN" and so we'd be looking for hieroglyphs that captured those sounds.

3. Cover your workspace with foil or parchment. It is easier to work directly on foil then to try to remove your clay piece from table to cookie sheet once it is done. Take a portion of the dough and roll it into a log shape. Gradually flatten it, using the rolling pin, so that a flattened oblong shape is created. I chose that shape because it is the shape of a cartouche--a symbol that shows readers that a group of hieroglyphs should be read together. Make sure all of your hieroglyphs will fit on the dough piece you have created. If not, simply create a larger plaque using more dough.

4. Stamp your hieroglyphs into the dough. I stamped my symbols in a column, but you can arrange your hieroglyphs horizontally or vertically within the cartouche shape or fit them together so that they look nice (Egyptians took great care in the arrangement of the hieroglyphs within a cartouche).

Adding the clay border around the hieroglyphs.
5. Once all of the hieroglyphs in your name are stamped into the clay, you can create the border of the cartouche. That is an oval around the hieroglyphs that looks a little like a rope. Take a bit of clay and roll it into a long rope. Gently lay it onto the plague as a frame or border around the hieroglyphs. Take a shorter piece and place it onto your plaque horizontally, using the photos as a reference. I then took the side of a toothpick and pressed lines into the dough to make the little lines that appeared in the cartouche pictures I was using as a reference.
Ready to go in the oven.

6. If you'd like to hang the cartouche, use the toothpick to gently make a hole at the top of the piece.

7. Bake the piece in the oven at 325 degrees for 30 minutes per 1/4" of thickness. The dough should be light browned when done. Allow the baked plaque to cool slightly, remove the foil, if necessary, and let cool completely on a wire rack.

8. Once the piece is completely cooled, gather your supplies for painting. I used liquid acrylics in bottles. They are inexpensive and easy to work with. However, while they are water soluable while wet and will wash off your skin, they will stain clothes and wood. Cover your work surface with paper and wear an apron or old clothes. Younger children may want to use tempera paints or watercolors.


9. Using images of wall paintings from Egyptian times, paint your cartouche. Egyptian wall paintings usually have bright, natural colors and the images don't have much detail (they are stylized). Let the paint dry thoroughly. Once dry, you can spray the plaque with acrylic varnish to protect the paint, but it is not necessary.


10. When your cartouche is done, thread a ribbon through the hole to hang the piece or hang it directly on a nail in your room. Now everyone will now whose room it is by the ancient hieroglyphs in your own personal cartouche! Enjoy!

Related Posts Plugin for WordPress, Blogger...