Friday, January 24, 2014

The Heart Needs ART!

I just got home from a wonderful conference at Plymouth State University on Integrating the Arts. So awesome! I met a ton of great educators. You'll be hearing more about my findings from the conference soon since I'm taking a related course for Grad credit. Now I need to come up with a project that integrates the arts with other subjects in the curriculum...now, if you're like me, I can't teach a lesson without tripping over a dozen standards! So hopefully this integrated arts project will be fun to create!

One thing we did to wrap up the conference was that we each created a "quilt square" from a variety of media that represented something we learned at the conference. Here's mine:


It's a positive/negative space Notan that is meant to show how the arts are related and connected to one another (theater, visual arts, music & dance) and the top triangle represents one of my loves: New Hampshire! It's supposed to depict the mountains of NH--hey, I only had about 15 minutes or so! Maybe I could go as far as to say the top triangle represents the NH Common Core Standards!?! See how the Common Core standards are connected to the Arts? Man, I'm good!

But really, this image is based on something one presenter said: "New Hampshire has a long-standing tradition of a love for the arts!" And another presenter said "The Heart Needs ART!"

I'm happy to be a part such a great profession!

FYI: the quilt squares made by the conference-goers were complied into a larger paper quilt that was displayed at the performing arts center at PSU. What a great idea, huh? Having everyone create a bit of art to get them thinking about what they learned during the day. It was great to see how different all of the squares were.

So make your heart happy--and do some ART!

The 2014 AIC Reflection Quilt

Positive-ly ME Collage

I'm currently taking a course at Plymouth State University on teaching art to high school students. It's been so awesome! One thing we've need to do was create a curriculum for an Intro to Art course (also called Visual Studies or Art 1). 

Here's an art idea that could be used for a variety of age levels to teach about Positive and Negative Space. It's my spin on a positive/negative space lesson I saw online. With my lesson, students think of a pose, an object, or a symbol that best represent them, sketches it as a silhouette, and fills in the negative space around the silhouette with images and text from magazines or personal photos that are unique to them (i.e. that tell the viewer who they are). It was fun to do and pretty quick. Here's my example:


I originally saw this project on TeacherPayTeachers, designed by Melissa Woodland. She designed it as a negative space social issue collage. What a great idea! I purchased her lesson and it is nicely thought out with great resources and skill-building activities included. Her lesson focuses on the art or Kara Walker, a contemporary silhouette artist who uses silhouettes to address social issues of race, slavery, and sexuality. Melissa Woodland's lesson has students watch a PBS video on Woodland and has a wonderful handout for students about the film. Woodland also includes a rubric for the lesson and three clear images of finished products to get you and your students started. This would be a wonderful project to link with history class and get students checking out the resources that the library offers (to collect newspaper and magazine articles as well as images related to their social issue).

On a personal note, I felt that Walker's art was a bit too edgy for me to be introducing to students, so I substituted local (to me) contemporary silhouette artist Randal Thurston. He is using silhouettes in his work and his work is thought-provoking and technically exquisite. He doesn't have images on his website, but you can google his images and contact him for more info about his work (I did and he sent me TONS of images of his work as well as info about the collections--wonderful!).

Another fabulous resource for silhouettes to get your students thinking can be found online at Art Inspired with a lesson written by Tricia Fuglestad, an art teacher at Dryden Elementary School is Illinois. She has her students create silhouettes of their bodies in front of a green screen and create posters reminiscent of iPad ads from awhile back. She links her lesson to the viral iRaq posters that appeared online and in Los Angeles. Seriously cool (and it links art with technology!).

So many possibilities! I hope you try this with your students--and if you do, email me some picts and I'll post them here. ENJOY!

Wednesday, January 22, 2014

Another Artsy Conference Coming Up...Even for the non-artsy!

If you are looking for a scenic drive up to Plymouth, NH this Friday as well as some professional time, try this Conference...


The Integrated Arts Conference is going to be held this Friday in Plymouth, NH at the Plymouth State University campus. The sessions look intriguing and I can't wait to check them out! 

Here's the schedule for the conference:

And while you are there, check out Oliver! at the Silver Center (the conference is centered around this classic play).

And as for places to eat...Thai Smile on Main Street is a great choice! YUM!

See you there!


Monday, January 13, 2014

Dollar Store Animation Class: Thaumatropes

So you'd like to create a series of animation classes for your students, but don't have much $$? No problem! I taught a 3 week series of animation classes for middle school students this fall that was full of information and inspiration, and didn't cost too much.


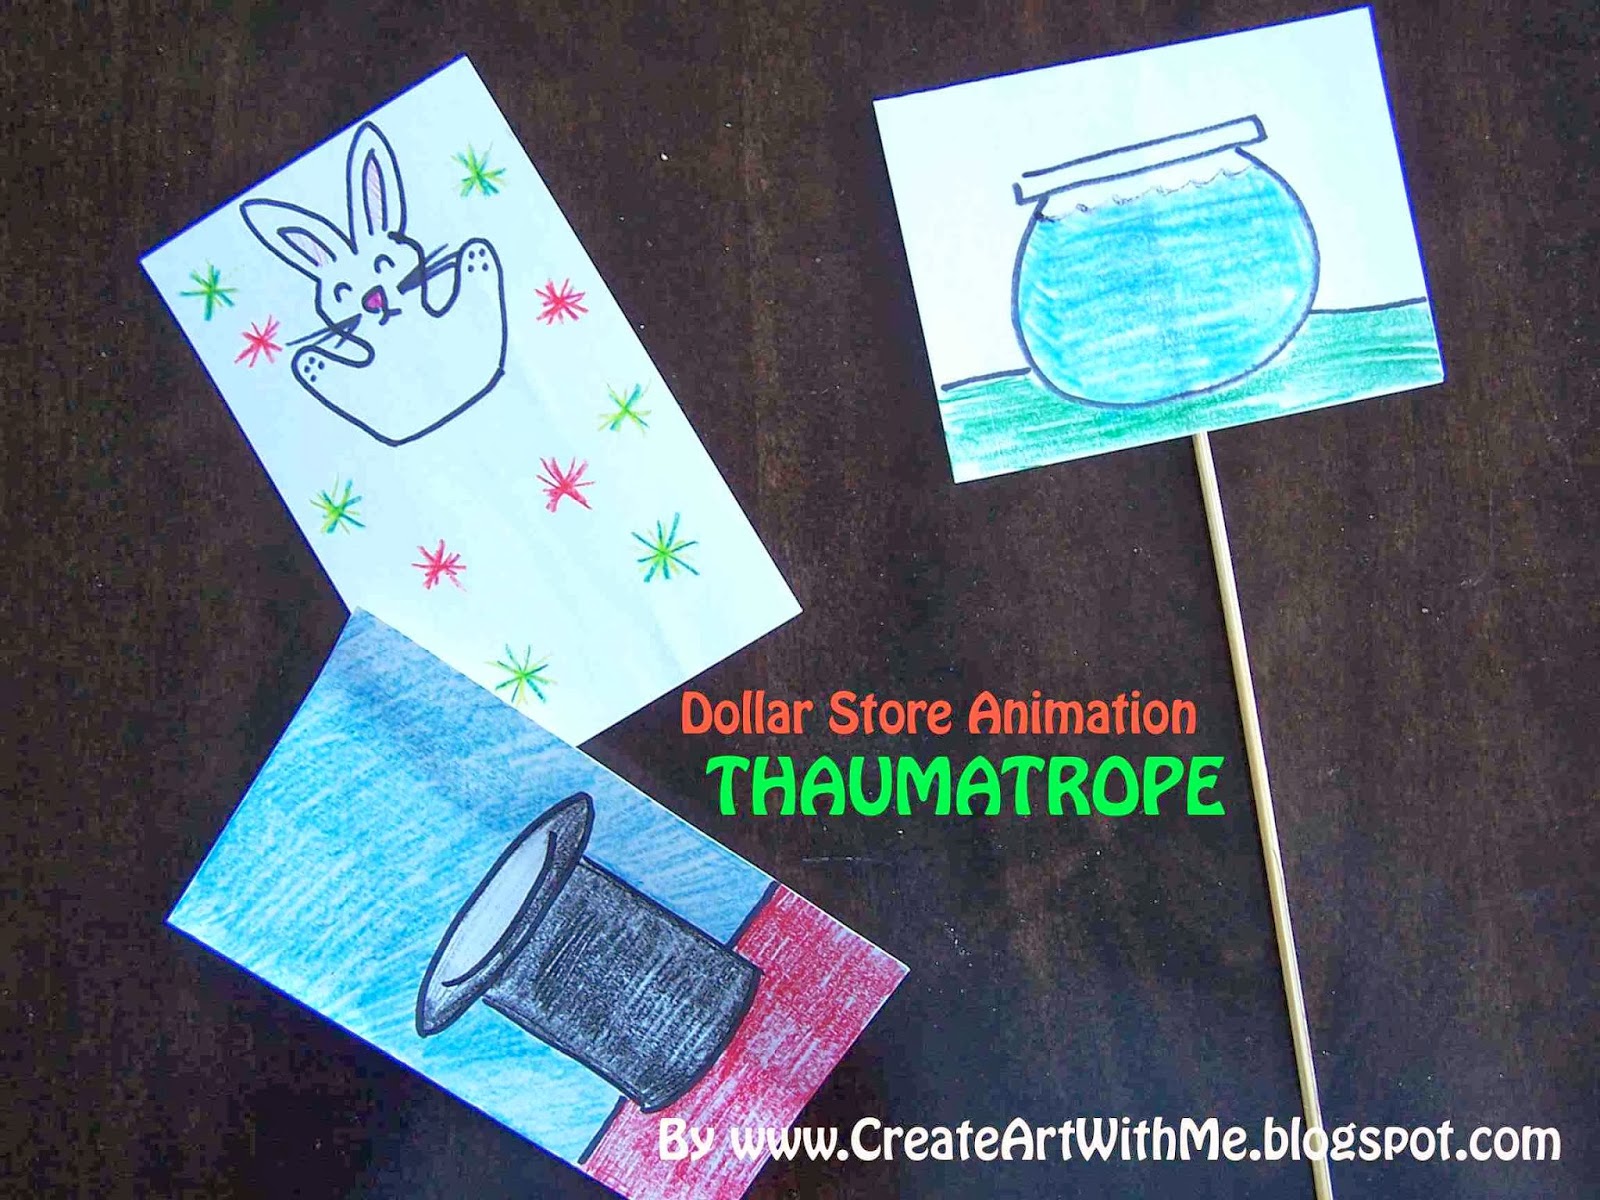
On the left: a magical bunny who pops out of a magician's hat (both sides seen here).
On the right: The goldfish in the fishbowl (only one side shown).

The course was called: Animation, The Old-Fashoined Way--I wanted to start off showing students that they can create little movies from everyday items. I was able to show them all sorts of animation "machines" from the history of animation. We saw still and moving examples of each "machine" and then created our own.

I told the students that this course is mainly a workshop--lots of experimenting going on here! This was a bit different from my other art classes where they may come away with artwork for the fridge--many of the examples they made in animation class are meant to be held, spun, flipped, etc. and since I'm not telling them exactly what to animate (that wouldn't be fun!), they were going to learn-as-they-went, so they may make mistakes.

Class one, we watched a great video by MIT about the history of animation. This video has examples of many of the old-fashioned animation "machines" we were going to be creating!

http://video.mit.edu/watch/history-of-animation-3391/

First, we started off with the Thaumatrope--the easiest animation machine of all (I think).

What is a Thaumatrope?
The Thaumatrope is a great & quick way to illustrate to students the main magic about animation: persistence of vision. Students create two drawings and glue them back-to-back. As they spin the "machine" in their hands, both drawings will seem to appear at the same time.

History of the Thaumatrope:
The Thaumatrope is a simple toy that was used in the Victorian era (about 1824). Traditional examples use a string to spin the cards, but my example below uses a skewer, because I think that works better.

Examples of a Thaumatrope to check out:
The most common example of the Thaumatrope you'll see on the Internet is the goldfish in a fishbowl. I'm sure you can do better than that! But check these out for inspiration:


Make Your Own Thaumatrope!

Supplies Needed:
  • One 4"x6" white index card
  • Clear tape
  • Pencil with eraser
  • Glue Stick
  • One wooden skewer (I've also used plastic drinking straws)
  • Markers
  • Colored pencils and/or crayons
Directions:

1. Fold the index card in half widthwise (hamburger or taco fold).

2. Lightly sketch 2 images (one on each side of the index card) using the pencil. Make sure that your drawings line up when you flip back and forth between them: I had students fold the index card and then hold the card up to the light in a sunny window so they could see both pencil drawings through the paper. Make adjustments as necessary.

3. Outline the finished pencil lines with marker and color the drawings with colored pencil to make them nice and bold. Animations work best if you do your best coloring.

4. Tape the skewer to the center of the inside of the folded index card. Glue the inside of the index card with glue stick and fold the card closed over the skewer to secure (refer to the photos in this post).

5. Roll the stick of the Thaumatrope back and forth in your hands and enjoy!

----------------------

Other posts in the "Dollar Store Animation Class" Series:

• Thaumatrope (you're here!)

• Phenakistoscope

• Zoetrope
• Flip books
• Stop Motion (Part 1)
• Stop Motion (Part 2)
Related Posts Plugin for WordPress, Blogger...