Showing posts with label plymouth. Show all posts

Monday, November 10, 2014

African Cloth Speaks--Now at the Silver Center in Plymouth, NH

I had the pleasure of attending the opening for a lovely show located at the Silver Center in Plymouth, NH called "African Cloth Speaks." I have long admired the beautiful and symbolic ceremonial cloth the people of Africa weave, print, and/or embroider and this was the perfect show to see all types of cloth from many different countries from Africa.


A close-up of Kente cloth
(image courtesy of Plymouth State University).
About the Show:
"Throughout the continent of Africa, people use cloth to speak for them. Whether the fabric represents religious affiliation, age, class status, ethnic membership, or political association, what one wears is one’s identity. Woven or dyed, imported or locally produced, wrapped, tied, or tailored—all clothing speaks clearly in the many African languages. Demonstrating ancient traditions or contemporary fads, African peoples use cloth to celebrate the vibrancy of life’s rituals from birth to death. Co-curated by Philip Peek, professor emeritus of anthropology at Drew University, and Anthropology of Religion, Ritual, and Myth students." (From www.plymouth.edu)

I was so thrilled to see real examples of Adinkra cloth and  Kente cloth since I have taught those lessons to my students in the past. For a modern take on Adinkra cloth (a great lesson on printmaking and symbolism), click here: Modern Day Adinkra Cloth. 

Project Idea:
This would be a lovely lesson to have each student create a symbol that has meaning for them, create a square, and then link them together as a class (or you could do this for your family). Children could them write about the symbol they created and what it means to them. What a wonderful group project this would make!

This close-up shows how each printed square of Adinkra fabric
is linked together using paper clips (a modern twist), traditionally,
they'd be sewn together using bright embroidery thread. 

"African Cloth Speaks" runs from November 5th-December 12th, 2014 at the Silver Center For the Performing Arts at Plymouth State University in Plymouth, NH. For more info, visit: www.plymouth.edu.

Friday, January 24, 2014

The Heart Needs ART!

I just got home from a wonderful conference at Plymouth State University on Integrating the Arts. So awesome! I met a ton of great educators. You'll be hearing more about my findings from the conference soon since I'm taking a related course for Grad credit. Now I need to come up with a project that integrates the arts with other subjects in the curriculum...now, if you're like me, I can't teach a lesson without tripping over a dozen standards! So hopefully this integrated arts project will be fun to create!

One thing we did to wrap up the conference was that we each created a "quilt square" from a variety of media that represented something we learned at the conference. Here's mine:


It's a positive/negative space Notan that is meant to show how the arts are related and connected to one another (theater, visual arts, music & dance) and the top triangle represents one of my loves: New Hampshire! It's supposed to depict the mountains of NH--hey, I only had about 15 minutes or so! Maybe I could go as far as to say the top triangle represents the NH Common Core Standards!?! See how the Common Core standards are connected to the Arts? Man, I'm good!

But really, this image is based on something one presenter said: "New Hampshire has a long-standing tradition of a love for the arts!" And another presenter said "The Heart Needs ART!"

I'm happy to be a part such a great profession!

FYI: the quilt squares made by the conference-goers were complied into a larger paper quilt that was displayed at the performing arts center at PSU. What a great idea, huh? Having everyone create a bit of art to get them thinking about what they learned during the day. It was great to see how different all of the squares were.

So make your heart happy--and do some ART!

The 2014 AIC Reflection Quilt

Wednesday, January 22, 2014

Another Artsy Conference Coming Up...Even for the non-artsy!

If you are looking for a scenic drive up to Plymouth, NH this Friday as well as some professional time, try this Conference...


The Integrated Arts Conference is going to be held this Friday in Plymouth, NH at the Plymouth State University campus. The sessions look intriguing and I can't wait to check them out! 

Here's the schedule for the conference:

And while you are there, check out Oliver! at the Silver Center (the conference is centered around this classic play).

And as for places to eat...Thai Smile on Main Street is a great choice! YUM!

See you there!


Tuesday, September 17, 2013

Colonial Leather Jugs and Mugs With Printable PDF

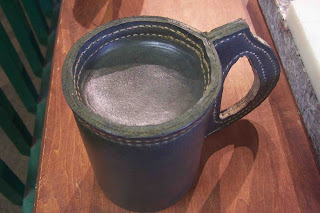
When I was with my family at Plimoth Plantation, I saw a craftsman making these neat jugs and mugs entirely from leather. I didn't actually see any of the people at Plimoth Plantation using these, but the leathersmith said that he was relatively new there and starting to supply the Colonists with these.


In the background you can see one of the mugs that haven't been dyed.
The mug in the foreground still needs the inside finished.

Here's the bottom view of the colonial leather mug.
See how there are two rows of neat stitches--this is all done by hand!
He had them in various stages of completion, they are cut from leather, sewn by hand, colored using a variety of dyes, the insides are then coated with a pitchy substance and they are ready-to-go! This was an interesting project and I thought my students (and my children) would like a variation of this.

The leathersmith suggested I check out Tandy Leather for kits for my students, and there sure are a bunch of kits on their site, though I didn't see a kit for making a leather mug. I'm just not sure that we are ready for real leather just yet.

So, I thought of an easy, inexpensive alternative that will get my students to understand the idea of crafting this product, along with the cutting, punching and sewing, that the real process has, but without the expense of buying leather and fancy tools. They can even use this project afterwards! You know they'll be excited about that!


So, here it goes:

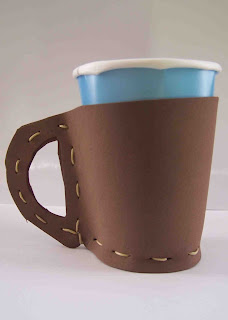
Colonial Faux Leather Mug

Supplies Needed:
  • 1 9" x 12" piece of brown craft foam
  • 1 9 oz paper cup (I bought mine from Walmart as a pack of 10 for $.78)
  • Template pdf (hopefully this template uploads well below!) *needs to be printed on 9"x12" paper, so download the file and have printed on larger paper and trimmed-sorry for the waste! 
  • Pencil or pen
  • Scissors
  • Masking tape, optional
  • Small hole punch (mine is 1/8")
  • Hot glue gun, optional
  • Braiding cord or any thin, strong cord you can sew with
  • Metal needle in which you can tread the cord through
Directions:

1. Print out the template on 9" x 12" paper (sorry, that is the size paper that matches the craft foam sheet). And that's the size that works with these standard size paper cups.

2. Cut out the cup body and the bottom circle from the paper. Punch holes in the paper template using the hole punch wherever you see a little circle.

3. Place your prepared template onto the craft foam, I hold it in place with a couple rolls of masking tape. Use your pencil or pen to trace around the outside of the template. Before you remove your template, make sure you trace around the inside of the mug's handle.

4. Use scissors to cut the cup body and the bottom circle from craft foam. Cut out the inner shape of the handle and discard. These pieces would have been cut from thick, tanned leather in Colonial times.

5. Use the hole punch to punch holes into the craft foam, using your paper template as a guide. Hold the template and the craft foam together and punch through both layers. The leathersmith would have used a tool that looks like a multi-pronged wheel with a handle and roll it along the leather to make little pin pricks nice and even along with path he wanted to sew. Then he would take a sharp metal awl and poke through the leather, making a hole every place he wanted to stitch.

6. This is where I do something that is not-so-Colonial, but helpful for little sewers (you can skip this step, if you'd like). Fold the cup body in half, and line up the handles. Use a couple dabs of hot glue to hold the two layers of the handle together, making sure that you aren't getting hot glue in any of your sewing holes. Make sure you only tack near the sewing holes--don't glue to cup totally together! This will hold the cup body together for you to begin sewing, so you don't have to manage holding the pieces and sewing stitches at the same time. Older kiddos won't need this step, probably.

7. Take a length of cording and knot it at one end. Hide the knot inside the two layers of craft foam and begin sewing the two layers of the handle together. Sew around the handle and down the side of the mug (it will look like an uppercase letter "D"). Leathersmiths would use strong string they imported from England and other parts of Europe to sew the pieces of the mugs together by hand. I'm not sure of the stitch they used, but I used a running stitch.

8. Position the bottom of the mug and, using the photos as a reference, begin sewing around the bottom edge of the mug. Make these bottom stitches snug, but don't pull too hard or you will pull the cording right through the craft foam.

The bottom view of my mug.
9. When you are done, knot your thread and hide the knot inside the mug, if you can. You can secure the knot with a little hot glue, if you'd like. I know, not very Colonial, but bear with me! Colonial leathersmiths would now dye the outside of the leather mugs. The dyes are made by putting metal shavings in vinegar. Once that has oxidized overnight, the dye is painted on. The mug continues to patina as it is used. 

10. Slip a paper cup into your craft foam mug. With this design, the rim of the paper cup is visible. I did this because I wasn't sure that children should be putting their mouths on the craft foam, with this design, the child's lip touches the paper cup. Obviously, this mug should NOT be used for hot liquids, this project is for fun. Colonial leathersmiths would now pour a thick, tarry substance inside the mugs to make them watertight, thankfully, we are using a paper cup that should be watertight already!

Enjoy your handmade faux leather mug!

Saturday, September 7, 2013

Plimoth Plantation and Wampum Belts

This past weekend my family and I took our final camping trip of the season. We camped in Plymouth, Massachusetts so we could explore Plimoth Plantation, a living history museum. There are a few different sections to the place:
A view from the fort at the top of the hill.
One section of Plimoth Plantation has a recreation of the first settlement of the pilgrims with people dressed up and acting like pilgrims. It's pretty neat and the children enjoyed watching woman working in the kitchen and got a tour of a surgeon's garden where he pointed out all sorts of plants and their medicinal properties. My husband and I thought there could have been more work happening. We wanted to see people baking bread and making clapboards for siding, mending fences, etc. But my children liked chasing the chickens and looking at the goats and talking with the people.

Another area of the museum is a craftsman's area. This was not part of the reenactment area. Here there are modern craftspeople working creating all of the neat things the pilgrims are using in the settlement: pottery, leather cups and jugs, and wooden chairs and chests. There were two craftsmen there that day, one was making leathercrafts and was very talkative, knowlegable and helpful. The second, the potter, was there but wasn't working at that time. There was also an area for a person who might have been doing Native beadwork, but that person wasn't there. So, while that area could have been interesting, it wasn't as active as it could have been.

Another section of the museum was the Wampanoag settlement. This area was a reenactment of a Native settlement from the time of the pilgrims and, while there were real people dressed as Native Americans doing things here, they do not act like they are from the 1600's--they are themselves as Native representatives. I have to say, they were super-talkative and super-knowlegable and I loved this area most of all. We saw a lady making dinner for her children (her children were actually there running around and playing with other worker's chidren). She was roasting corn over the fire and making a stew that all of the children were going to eat when it was done. She had a baby on her hip and, as he started to get fussy, she laid a fur on the ground and he took a nap.

There was another lady making woven mats for the homes on site. Beside her were a number of toys that Native children may have played with: a canoe, a couple of dolls, and a game made of bones that is like the "ball and cock" game that we played as kids.

Here are the mats inside the longhouse. This is the winter house.

There was also a man creating a canoe by burning the wood center out of a log. We got some serious time looking at that! My boys were fascinated!


And finally, there was a lady in the longhouse talking about pretty much anything you'd like to know: what Natives would eat, who lived in the long houses, what they wore, how they repelled bugs, how they prepared their food...the list went on and on. We sat in that longhouse for while just listening to her talk about all sorts of stuff. This area of the museum felt real and comfortable to me. I think I could have spent all day there. My oldest (a 6th grader) whispered to me:  "When I grow up, I want to be a Native American and work here."

Now, the Wampanoag people are from the Massachusetts area and I've mentioned them before on my blog. One of the artforms they are known for are their Wampum beads that are made into Wampum belts and other items. See my post about a cool art/math/social studies project you can do on this theme here.

While I was in the gift shop at Plimoth Plantation, I noticed all sorts of jewelry made from Wampum--the shell of the quahog clam. But alas, real wampum is too expensive for this art teacher (even as a tax write-off...What? It's for a lesson!). But I was able to get a real quahog shell for $2--and that price is just right!
The humble quahog shell...


Enjoy this repost of the Wampum Belt project!

Wampum Designs


Wampum are beads made from the quahog shell and strung on string in intricate patterns of purple and white (although some sources say that red and black beads were used sometimes too). Quahog's are endangered today and, I guess, artisans can only get one or two truly purple beads per shell, so one wampum bead costs around $5--way too pricey to use for large belt designs. The beadwork we did today had 72 beads per child so each child would have used $360 worth of beads for their project. The children loved hearing that!

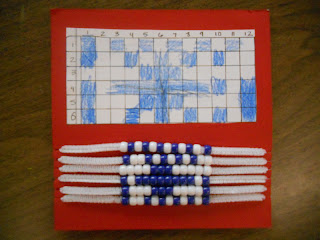
We used plain old pony beads I bought from Michael's for our designs. I had been looking for a way for students to easily realize their own bead designs without sewing or doing crazy things with string (my students are in 2nd-4th grade) and I finally found a solution on the blog Mrs. Erb's Art Page. Mrs. Erb uses pipe cleaners (chenille stems) to hold the beads in each row. Perfect! I had the children fit them onto matte board that had been donated to me. This allowed a nice way to display their original designs along with the finished wampums. They came out great and didn't take long at all.

Beaded Wampum

Supplies Needed:
  • Worksheet for practicing designs
  • Crayons in purple (and red and black if you want to use those)
  • Six chenille stems-white
  • Purple and white pony beads (ours were more royal blue)
  • Matte board (ours were red and about 8" square)
  • Clear tape (I used packing tape because it's stickier than regular tape)
  • Scissors
  • Glue stick
Directions:

1. I passed out the worksheets and instructed the children to create a couple different designs using geometrics shapes and using pattern. My worksheet had two 6x12 grids so the children could try out a couple of designs before beginning to bead. We looked at real wampum for inspiration. Word of advice: only put out the crayon colors that correspond to the colors of beads you will be using. If you are only using purple beads, only put out purple crayons for them to diagram with. Trust me.

2. Once they had a couple of designs down on paper, they could bring them to me and we'd discuss which one they wanted to do. 

3. Our designs were 6 rows of beads, each with 12 beads per row. My directions will reflect that. I had them start off with the first pipe cleaner (which represents the first row) and follow their diagram to place 12 beads on it. After that, they worked down the rows, using their diagram as a guide. I cautioned them to keep their rows in order so they didn't get mixed up. If you are doing this with a group you could have them label the chenille stems with a piece of tape or prepare the matte board (as in step 4, below) and have them transfer each row, as it is finished, to the matte board.

4. Once all of the rows were completed, I had them affix them to matte board, again using their diagram as a guide. The way I did it was to cut 1/4" slits on the right and left side of a piece of matte board. Since we have 6 rows, I cut 6 slits in each side of the board (one for each row). The children then slipped the chenille stem in the slits (pulling tight) and we wrapped the ends around the back and secured them with the packing tape to the back side of the matte board. I thought this looked tidy, although there was space enough for the children to do a much larger design (maybe they could repeat their design twice next time...).

5. I then had the children cut out the diagram they had used to create their wampum and affix it above the beadwork on the matte board using glue stick.


Related Posts Plugin for WordPress, Blogger...