Thursday, September 26, 2013

Welcome Fall! Birch Tree Project

The leaves are starting to change up here in New England and I love it! I was looking in our local paper this past weekend and they ran a great article about vacationing in Minnesota written by Laurie Hertzel and I just LOVED the beautiful images! Check it out here at the Star Tribune.

This beautiful photo, below, caught my eye especially, since the Birch Tree is the state tree of New Hampshire. 
This photo of birch trees in the Fall taken by Laurie Hertzel at the Star Tribune
inspired this birch tree craft.
This project uses a couple of fun techniques. First, the black lines of the birch bark are made using a hair comb (I saw that on the blog ARTASTIC: Miss Oetkin's Artists), and second, the colorful leaves are sponge painted on the background paper. It's quick, easy, fun, and just a bit messy. I hope you enjoy this craft and this crisp fall weather!


NOTE: I had my son create the birch trees on paper that was being held vertically and then place them on a background that was horizontal--this allows you to have the tree trunks touch the edges of the paper if your child puts them on tilted--some other lessons don't allow for this and there's a gap at the bottom edge of the trees. Sorry, no floating trees here!)

Fall Birch Tree Paint Project

Supplies Needed:
  • 1 8 1/2" x 11" sheet of white card stock
  • 1 8 1/2" x 11" sheet of yellow card stock
  • Tempera paints in black, yellow, orange and red
  • A plastic hair comb
  • A 1" piece of clean sponge
  • An old magazine to use as a palette
  • Newspapers for your work surface
  • Scissors
  • Elmer's glue
Directions:

1. Make the trees: begin by placing the white card stock vertically on your work surface. Put a little of the black tempera paint onto the magazine palette. Dip the teeth of the comb into black paint and scrape it across the surface of the white card stock back and forth horizontally. Make sure you don't use too much paint or you'll get large areas of black on your trees. Also, make sure you go right off the page--you'll be using all of the white paper, so you'll want those little black scratch marks to be all over. Once you are satisfied, set the paper aside to dry.

2. Make the leafy-background: place the yellow piece of card stock on your work surface horizontally. Remove the page of the magazine that had your black paint on it so you have a fresh page. Put a bit of red, orange, and yellow on the palette. Dip your sponge into the paint and dab it all over the yellow piece of card stock. Don't blend the colors too much, or goop on the paint too thick. Check out the photo above to see how the colors blend. When the background is covered to your liking, set it aside to dry.

3. Cut the trees: Take your scissors and cut the white card stock into long, vertical strips (they should be 11" long by about 1/2"-1" wide). These don't need to be perfect, they are your trees, so don't get out a ruler and measure them! Cut strips out of all the white card stock (you may not use all of these trees).

4. Put a line of glue down the back of the birch tree strip and place it onto the horizontal background. The birch trees will extend past the edges of your background, but that is OK, it allows for you to tilt the tree a bit, as in the picture (and real life). Glue as many trees as you would like to your background.

5. Trim the excess bits of the trees that extend beyond the background and discard.

Enjoy this lovely bit of fall!

Thursday, September 19, 2013

Technology in the Art Room: Digital Books


The other day I posted about Books In The Art Room. I've since heard of a couple additional sites that you may want to check out. Trust me, they are worth it!


Here are a few sites that have digital picture books to use in your classroom:
  • www.storylineonline.net (SAG Actors read children's books)
  • www.speakaboos.com (a colorful, interactive site for traditional read-along stories)
  • www.readtomelv.org (Las Vegas celebrities read children's books)
  • www.schooltube.com (like youtube but without the commercials. There are read alouds and picture books as little movies. Search other topics such as "Kandinsky," etc.)
  • www.pbskids.org (I like: www.pbskids.org/lions/stories) hunt around for additional online stories
  • www.nhptv.org/kn (you could get lost in this resource--there's so much!)
  • www.wegivebooks.org (you'll need to register to use this site, but it is pretty neat and there are lots of free popular books you can read online. Their selections do change, though, so make sure the book you want is still available before you present your lesson!)
(Thank you to Program Associate & Technology Guru, Tiffany Dube at Plymouth State University and Selina Smith at Classroom Magic for their help with this list).


Tuesday, September 17, 2013

Colonial Leather Jugs and Mugs With Printable PDF

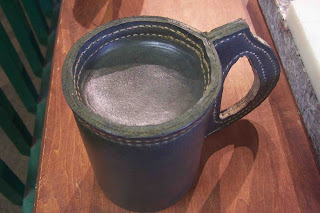
When I was with my family at Plimoth Plantation, I saw a craftsman making these neat jugs and mugs entirely from leather. I didn't actually see any of the people at Plimoth Plantation using these, but the leathersmith said that he was relatively new there and starting to supply the Colonists with these.


In the background you can see one of the mugs that haven't been dyed.
The mug in the foreground still needs the inside finished.

Here's the bottom view of the colonial leather mug.
See how there are two rows of neat stitches--this is all done by hand!
He had them in various stages of completion, they are cut from leather, sewn by hand, colored using a variety of dyes, the insides are then coated with a pitchy substance and they are ready-to-go! This was an interesting project and I thought my students (and my children) would like a variation of this.

The leathersmith suggested I check out Tandy Leather for kits for my students, and there sure are a bunch of kits on their site, though I didn't see a kit for making a leather mug. I'm just not sure that we are ready for real leather just yet.

So, I thought of an easy, inexpensive alternative that will get my students to understand the idea of crafting this product, along with the cutting, punching and sewing, that the real process has, but without the expense of buying leather and fancy tools. They can even use this project afterwards! You know they'll be excited about that!


So, here it goes:

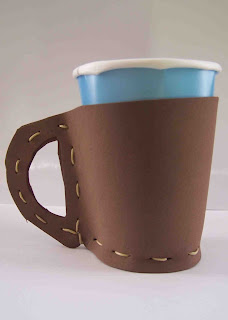
Colonial Faux Leather Mug

Supplies Needed:
  • 1 9" x 12" piece of brown craft foam
  • 1 9 oz paper cup (I bought mine from Walmart as a pack of 10 for $.78)
  • Template pdf (hopefully this template uploads well below!) *needs to be printed on 9"x12" paper, so download the file and have printed on larger paper and trimmed-sorry for the waste! 
  • Pencil or pen
  • Scissors
  • Masking tape, optional
  • Small hole punch (mine is 1/8")
  • Hot glue gun, optional
  • Braiding cord or any thin, strong cord you can sew with
  • Metal needle in which you can tread the cord through
Directions:

1. Print out the template on 9" x 12" paper (sorry, that is the size paper that matches the craft foam sheet). And that's the size that works with these standard size paper cups.

2. Cut out the cup body and the bottom circle from the paper. Punch holes in the paper template using the hole punch wherever you see a little circle.

3. Place your prepared template onto the craft foam, I hold it in place with a couple rolls of masking tape. Use your pencil or pen to trace around the outside of the template. Before you remove your template, make sure you trace around the inside of the mug's handle.

4. Use scissors to cut the cup body and the bottom circle from craft foam. Cut out the inner shape of the handle and discard. These pieces would have been cut from thick, tanned leather in Colonial times.

5. Use the hole punch to punch holes into the craft foam, using your paper template as a guide. Hold the template and the craft foam together and punch through both layers. The leathersmith would have used a tool that looks like a multi-pronged wheel with a handle and roll it along the leather to make little pin pricks nice and even along with path he wanted to sew. Then he would take a sharp metal awl and poke through the leather, making a hole every place he wanted to stitch.

6. This is where I do something that is not-so-Colonial, but helpful for little sewers (you can skip this step, if you'd like). Fold the cup body in half, and line up the handles. Use a couple dabs of hot glue to hold the two layers of the handle together, making sure that you aren't getting hot glue in any of your sewing holes. Make sure you only tack near the sewing holes--don't glue to cup totally together! This will hold the cup body together for you to begin sewing, so you don't have to manage holding the pieces and sewing stitches at the same time. Older kiddos won't need this step, probably.

7. Take a length of cording and knot it at one end. Hide the knot inside the two layers of craft foam and begin sewing the two layers of the handle together. Sew around the handle and down the side of the mug (it will look like an uppercase letter "D"). Leathersmiths would use strong string they imported from England and other parts of Europe to sew the pieces of the mugs together by hand. I'm not sure of the stitch they used, but I used a running stitch.

8. Position the bottom of the mug and, using the photos as a reference, begin sewing around the bottom edge of the mug. Make these bottom stitches snug, but don't pull too hard or you will pull the cording right through the craft foam.

The bottom view of my mug.
9. When you are done, knot your thread and hide the knot inside the mug, if you can. You can secure the knot with a little hot glue, if you'd like. I know, not very Colonial, but bear with me! Colonial leathersmiths would now dye the outside of the leather mugs. The dyes are made by putting metal shavings in vinegar. Once that has oxidized overnight, the dye is painted on. The mug continues to patina as it is used. 

10. Slip a paper cup into your craft foam mug. With this design, the rim of the paper cup is visible. I did this because I wasn't sure that children should be putting their mouths on the craft foam, with this design, the child's lip touches the paper cup. Obviously, this mug should NOT be used for hot liquids, this project is for fun. Colonial leathersmiths would now pour a thick, tarry substance inside the mugs to make them watertight, thankfully, we are using a paper cup that should be watertight already!

Enjoy your handmade faux leather mug!

Saturday, September 14, 2013

There's a BOOK For That!


I got up early this morning to head out to our town library's annual book sale.

Of course, I went right for the children's book, and $20 later, I was on my way home. I spent the morning sipping coffee and dreaming of art lessons as I looked through my new treasures. Because for me, books = inspiration. I have found this true for my students as well. there's no denying how the illustrations and stories of books can get a child's creative juices flowing, activate background knowledge, and really help concepts hit home.


Even as an art teacher, I gather more than just art books. I rarely buy books on technique, but I collect lots and lots of other books. I think of this as job security. Yep, I do. Take a look at my lessons on this blog. My students don't just make a pretty picture to hang above the sofa--art connects to all subjects. So, while I read books to my class to create a rich, multi-sensory learning experience, I am also incorporating math, social studies, science, physical education, music and more into my lessons. When I do this, I inspire and engage my students, and tell everybody, "Art connects to ALL subjects!"

So, what do I look for in a book? Many things, and that is why I have so many books! As I said, I don't have many books on art technique, but if you are a classroom teacher, you may find these helpful. I don't like to own more than I have to, so you may be able to find many "how to" videos and tutorials online.

All of the books I decide to own must have a great story and great visuals (illustrations, photos, etc.). I like books that aren't too wordy and are easy-to-read. Simple picture books I can read word-for-word, but more complex books, I summarize as we look at the pictures. Hey, we need time for art! The pictures should get us talking.

Art/Art Movements/Artists Books
I collect books on artists (such as Van Gogh), art movements (such as Fauvism), and more. I use picture  books as read-alouds (sometimes) and grown-up books for reference (I'll show pictures of the artist's work from a grown-up book). I also grab old, worn-out books and rip out the color plates for my files, laminate them for visuals, use them for posters, etc.).

Book About Time Periods/Cultures
Visuals, visuals, visuals! I like folk tales that are nicely illustrated in a style that we'll be applying in class. I love photo books that depict a child from a certain culture moving throughout a typical day. I also grab any of the DK books about a culture or time period. They have lots of great pictures that inspire my art projects!

Math Books
I collect books about math concepts such as counting, shapes, forms, patterns, matching, etc.

Science Books
I am a sucker for a good science book! I collect all sorts of nature-inspired books about insects, plants, animals, etc. Books about the seasons are great, along with more sophisticated science ideas such as optical illusions.

Music Books
There are many great books about music as it relates to art (colors, rhythms, patterns). Some books are illustrated versions of songs and that is cool. I also have a nice little collection of books on how to make musical instruments.

Language Arts Books
I like stories that inspire and have great images. Sometimes the illustrations connect to specific techniques I want to show the children such as collage, cut paper, linocuts, etc. Or deal with themes I think would make great art lessons such as quilting, family history, colors, feelings and more.

Reference Books
As I said above, I grab any DK book about pretty much any subject for reference. I also have visual dictionaries and Nature Encyclopedias. These are helpful when students want to draw a certain type of animal and they want to draw it accurately. 

Early Finisher Books
I make most of my books available to my students if they finish early. Usually I'll select a few books that pertain to the theme we are dealing with in art (say, Egypt) and leave them as selections for the children to peruse if they finish early. There are some books, however, that I know I may not use for a lesson, but I grab them specifically for the early-finishers. These would be the I Spy and Can You See What I See series of books.

My loot from today's sale! I think there must be at least 10 art lesson ideas
in this pile of books. And notice my new favorite book: "Paddle-to-the-sea."
I found multiple copies of this classic--enough to share with some
teacher friends of mine.

How do I get these books?

I'd be broke if I bought all of these books new. So, a couple tips for acquiring books:
  1. Try it before you buy it. You don't need to have every book! Also, a book that earns rave reviews from one teacher, may leave you flat. Look at the book--will you really use this?
  2. If you can get it used, do it!
  3. Be patient! You aren't going to get every book your first year teaching. These things take time. Get what you can as you go and borrow the rest. Gradually add when you can.


My sources for books:

Borrow (FREE): Borrow from other teachers you know, ask your friends and family to lend from their personal collections, and USE YOUR LIBRARY! 

Seriously, your library is the best! I have a card at my local library which allows me access to their books and the resources from many other libraries in the consortium they belong to. Intra-library loans do take some time, so you need to plan ahead, but you can borrow movies, books, audio books and more. One library near me even lends artwork. 

Also utilize the library at the school you teach at as well as the school you are an alumni of. I can borrow books from my Undergrad library as well as my Graduate school library and the public library in the town I work in. I don't use all of the resources, but I could.

Find it (FREE)! My local transfer station (dump) has a used book area where people can leave books (and keep them out of the landfills). I have found so many resources there--and the return policy is great. When I no longer want the book, I bring it back. Online groups such as freecycle.org are also great--you can join and ask for books (and other resources you need)--who knows, maybe someone out there has something you need that they no longer want.

Go digital (FREE): I'm just starting to use online books, so I know this isn't a huge list. But here are some sites to check out:
(Thank you to Program Associate & Technology Guru, Tiffany Dube at Plymouth State University and Selina Smith at Classroom Magic for their help with this list).

Buy Used ($): Yard sales, book sales, online (craigslist.org, Amazon.com, ebay.com), thrift stores and used book stores such as Goodwill

Buy New (With a Discount)($$): If you shop online, you can get reduced pricing on new books and some places have free shipping if you buy enough. You can go to publishing house sales (get on their mailing lists and they'll let you know when they are having sales). You can go in with a group of teachers and get a group discount. Discount/overstock stores such as Building 19 and Ocean State Job Lot also have new books for a couple dollars each.

How do you get the books you need for your classroom? Do you know source for great children's books to read online? Please share your sources here and help fellow teachers out!


Saturday, September 7, 2013

Plimoth Plantation and Wampum Belts

This past weekend my family and I took our final camping trip of the season. We camped in Plymouth, Massachusetts so we could explore Plimoth Plantation, a living history museum. There are a few different sections to the place:
A view from the fort at the top of the hill.
One section of Plimoth Plantation has a recreation of the first settlement of the pilgrims with people dressed up and acting like pilgrims. It's pretty neat and the children enjoyed watching woman working in the kitchen and got a tour of a surgeon's garden where he pointed out all sorts of plants and their medicinal properties. My husband and I thought there could have been more work happening. We wanted to see people baking bread and making clapboards for siding, mending fences, etc. But my children liked chasing the chickens and looking at the goats and talking with the people.

Another area of the museum is a craftsman's area. This was not part of the reenactment area. Here there are modern craftspeople working creating all of the neat things the pilgrims are using in the settlement: pottery, leather cups and jugs, and wooden chairs and chests. There were two craftsmen there that day, one was making leathercrafts and was very talkative, knowlegable and helpful. The second, the potter, was there but wasn't working at that time. There was also an area for a person who might have been doing Native beadwork, but that person wasn't there. So, while that area could have been interesting, it wasn't as active as it could have been.

Another section of the museum was the Wampanoag settlement. This area was a reenactment of a Native settlement from the time of the pilgrims and, while there were real people dressed as Native Americans doing things here, they do not act like they are from the 1600's--they are themselves as Native representatives. I have to say, they were super-talkative and super-knowlegable and I loved this area most of all. We saw a lady making dinner for her children (her children were actually there running around and playing with other worker's chidren). She was roasting corn over the fire and making a stew that all of the children were going to eat when it was done. She had a baby on her hip and, as he started to get fussy, she laid a fur on the ground and he took a nap.

There was another lady making woven mats for the homes on site. Beside her were a number of toys that Native children may have played with: a canoe, a couple of dolls, and a game made of bones that is like the "ball and cock" game that we played as kids.

Here are the mats inside the longhouse. This is the winter house.

There was also a man creating a canoe by burning the wood center out of a log. We got some serious time looking at that! My boys were fascinated!


And finally, there was a lady in the longhouse talking about pretty much anything you'd like to know: what Natives would eat, who lived in the long houses, what they wore, how they repelled bugs, how they prepared their food...the list went on and on. We sat in that longhouse for while just listening to her talk about all sorts of stuff. This area of the museum felt real and comfortable to me. I think I could have spent all day there. My oldest (a 6th grader) whispered to me:  "When I grow up, I want to be a Native American and work here."

Now, the Wampanoag people are from the Massachusetts area and I've mentioned them before on my blog. One of the artforms they are known for are their Wampum beads that are made into Wampum belts and other items. See my post about a cool art/math/social studies project you can do on this theme here.

While I was in the gift shop at Plimoth Plantation, I noticed all sorts of jewelry made from Wampum--the shell of the quahog clam. But alas, real wampum is too expensive for this art teacher (even as a tax write-off...What? It's for a lesson!). But I was able to get a real quahog shell for $2--and that price is just right!
The humble quahog shell...


Enjoy this repost of the Wampum Belt project!

Wampum Designs


Wampum are beads made from the quahog shell and strung on string in intricate patterns of purple and white (although some sources say that red and black beads were used sometimes too). Quahog's are endangered today and, I guess, artisans can only get one or two truly purple beads per shell, so one wampum bead costs around $5--way too pricey to use for large belt designs. The beadwork we did today had 72 beads per child so each child would have used $360 worth of beads for their project. The children loved hearing that!

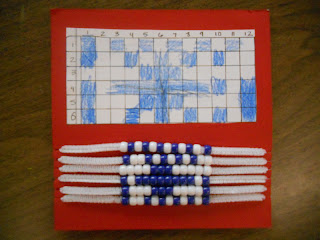
We used plain old pony beads I bought from Michael's for our designs. I had been looking for a way for students to easily realize their own bead designs without sewing or doing crazy things with string (my students are in 2nd-4th grade) and I finally found a solution on the blog Mrs. Erb's Art Page. Mrs. Erb uses pipe cleaners (chenille stems) to hold the beads in each row. Perfect! I had the children fit them onto matte board that had been donated to me. This allowed a nice way to display their original designs along with the finished wampums. They came out great and didn't take long at all.

Beaded Wampum

Supplies Needed:
  • Worksheet for practicing designs
  • Crayons in purple (and red and black if you want to use those)
  • Six chenille stems-white
  • Purple and white pony beads (ours were more royal blue)
  • Matte board (ours were red and about 8" square)
  • Clear tape (I used packing tape because it's stickier than regular tape)
  • Scissors
  • Glue stick
Directions:

1. I passed out the worksheets and instructed the children to create a couple different designs using geometrics shapes and using pattern. My worksheet had two 6x12 grids so the children could try out a couple of designs before beginning to bead. We looked at real wampum for inspiration. Word of advice: only put out the crayon colors that correspond to the colors of beads you will be using. If you are only using purple beads, only put out purple crayons for them to diagram with. Trust me.

2. Once they had a couple of designs down on paper, they could bring them to me and we'd discuss which one they wanted to do. 

3. Our designs were 6 rows of beads, each with 12 beads per row. My directions will reflect that. I had them start off with the first pipe cleaner (which represents the first row) and follow their diagram to place 12 beads on it. After that, they worked down the rows, using their diagram as a guide. I cautioned them to keep their rows in order so they didn't get mixed up. If you are doing this with a group you could have them label the chenille stems with a piece of tape or prepare the matte board (as in step 4, below) and have them transfer each row, as it is finished, to the matte board.

4. Once all of the rows were completed, I had them affix them to matte board, again using their diagram as a guide. The way I did it was to cut 1/4" slits on the right and left side of a piece of matte board. Since we have 6 rows, I cut 6 slits in each side of the board (one for each row). The children then slipped the chenille stem in the slits (pulling tight) and we wrapped the ends around the back and secured them with the packing tape to the back side of the matte board. I thought this looked tidy, although there was space enough for the children to do a much larger design (maybe they could repeat their design twice next time...).

5. I then had the children cut out the diagram they had used to create their wampum and affix it above the beadwork on the matte board using glue stick.


Related Posts Plugin for WordPress, Blogger...